https://github.com/imagekit-developer/strapi-plugin-imagekit
https://github.com/imagekit-developer/strapi-plugin-imagekit
Last synced: 3 months ago
JSON representation
- Host: GitHub
- URL: https://github.com/imagekit-developer/strapi-plugin-imagekit
- Owner: imagekit-developer
- License: mit
- Created: 2025-05-12T15:02:57.000Z (about 1 year ago)
- Default Branch: main
- Last Pushed: 2025-08-19T15:02:56.000Z (10 months ago)
- Last Synced: 2025-10-05T09:05:42.659Z (9 months ago)
- Language: TypeScript
- Size: 497 KB
- Stars: 1
- Watchers: 2
- Forks: 1
- Open Issues: 1
-
Metadata Files:
- Readme: README.md
- Contributing: CONTRIBUTING.md
- License: LICENSE
Awesome Lists containing this project
README
[ ](https://imagekit.io)
# Strapi Plugin for ImageKit.io
[](https://github.com/imagekit-developer/strapi-plugin-imagekit/actions/workflows/ci.yaml)
[](https://www.npmjs.com/package/strapi-plugin-imagekit)
[](https://opensource.org/licenses/MIT)
[](https://twitter.com/ImagekitIo)
A Strapi plugin that provides seamless integration with [ImageKit.io](https://imagekit.io/), enabling you to browse, manage, and deliver optimized media directly from your Strapi admin panel. View the [plugin installation and setup video](https://youtu.be/wpCiQj4JKGU) here.
ImageKit is a complete media storage, optimization, and transformation solution with an image and video CDN. It integrates with your existing infrastructure (AWS S3, web servers, CDN, custom domains) to deliver optimized images in minutes with minimal code changes.
## Table of Contents
1. [Features](#features)
2. [Prerequisites](#prerequisites)
3. [Installation](#installation)
4. [Configuration](#configuration)
- [Configure in Admin UI](#configure-in-admin-ui)
- [Advanced: Programmatic Configuration](#advanced-programmatic-configuration-configpluginsjs)
- [Configure Security Middleware (CSP)](#configure-security-middleware-csp)
5. [Contributing](#contributing)
6. [License](#license)
7. [Support](#support)
## Features
- **Media Library Integration**: Browse and manage your ImageKit media library directly in Strapi
- **Bulk Import**: Import existing ImageKit assets into Strapi with a single click
- **Optimized Delivery**: Serve optimized images and videos through ImageKit
- **Upload**: Upload new files to ImageKit directly from the Strapi media library
- **Signed URLs**: Deliver signed URLs for your media assets
## Prerequisites
Before you begin, you need:
- A Strapi project (v5 or later)
- Node.js and npm/yarn installed
- Administrator access to your Strapi instance
- An [ImageKit account](https://imagekit.io/registration/) (sign up if you don't have one)
You can refer to Strapi's [official documentation](https://docs.strapi.io/cms/quick-start) to understand the prerequisites for running your Strapi instance.
## Installation
To install the ImageKit plugin in your Strapi instance, run one of the following commands from your project's root directory:
```bash
# Using NPM
npm install strapi-plugin-imagekit --save
# Using Yarn (recommended)
yarn add strapi-plugin-imagekit
```
Once installed, you must rebuild your Strapi instance:
```bash
# Using NPM
npm run build
npm run develop
# Using Yarn
yarn build
yarn develop
# OR development mode with auto-reload for admin panel
yarn develop --watch-admin
```
The **ImageKit** plugin will appear in the sidebar and Settings section after the app rebuilds.
| | |
| ----------------------------------------------------------------------------------------------------------------- | ------------------------------------------------------------------------------------------ |
|  |  |
## Configuration
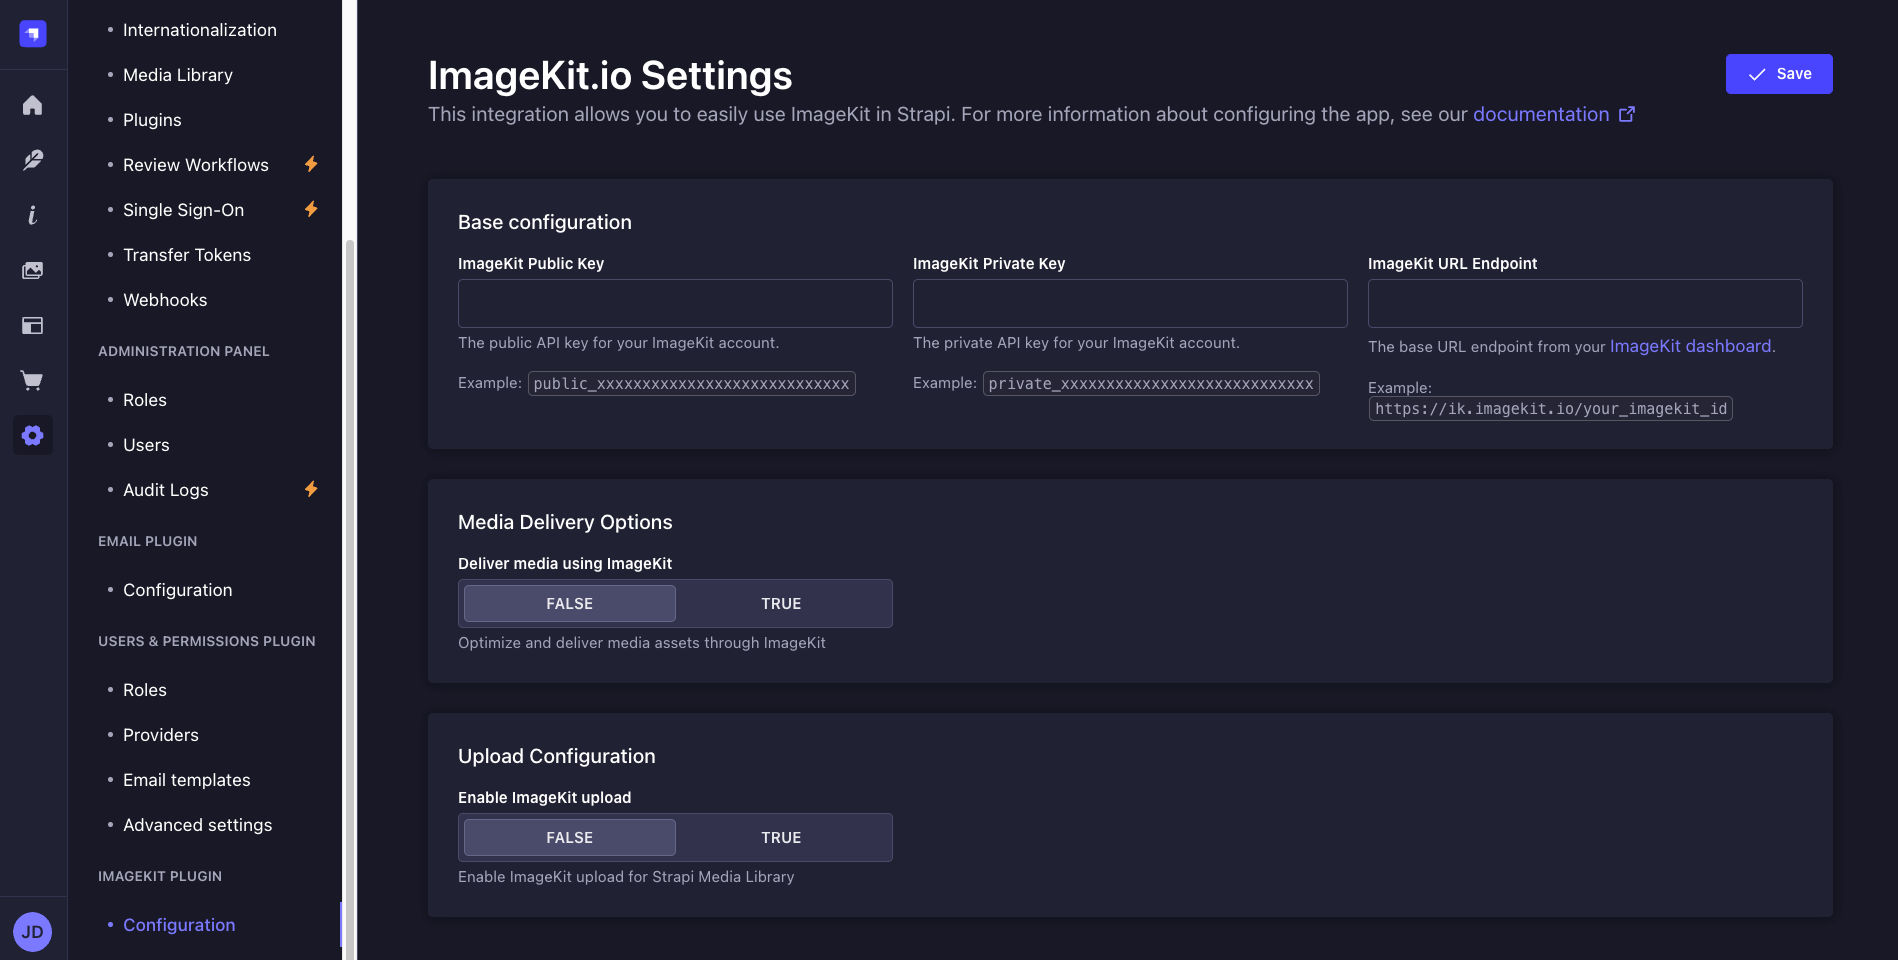
### Configure in Admin UI
You can configure the ImageKit plugin from within the Strapi admin dashboard. Follow these steps:
1. Go to **Settings** in the main sidebar
2. Find the **ImageKit Plugin** section and click on **Configuration**.

You'll see three configuration sections that you should complete in order:
#### 1. Base Configuration
This section contains the essential credentials to connect with your ImageKit account:
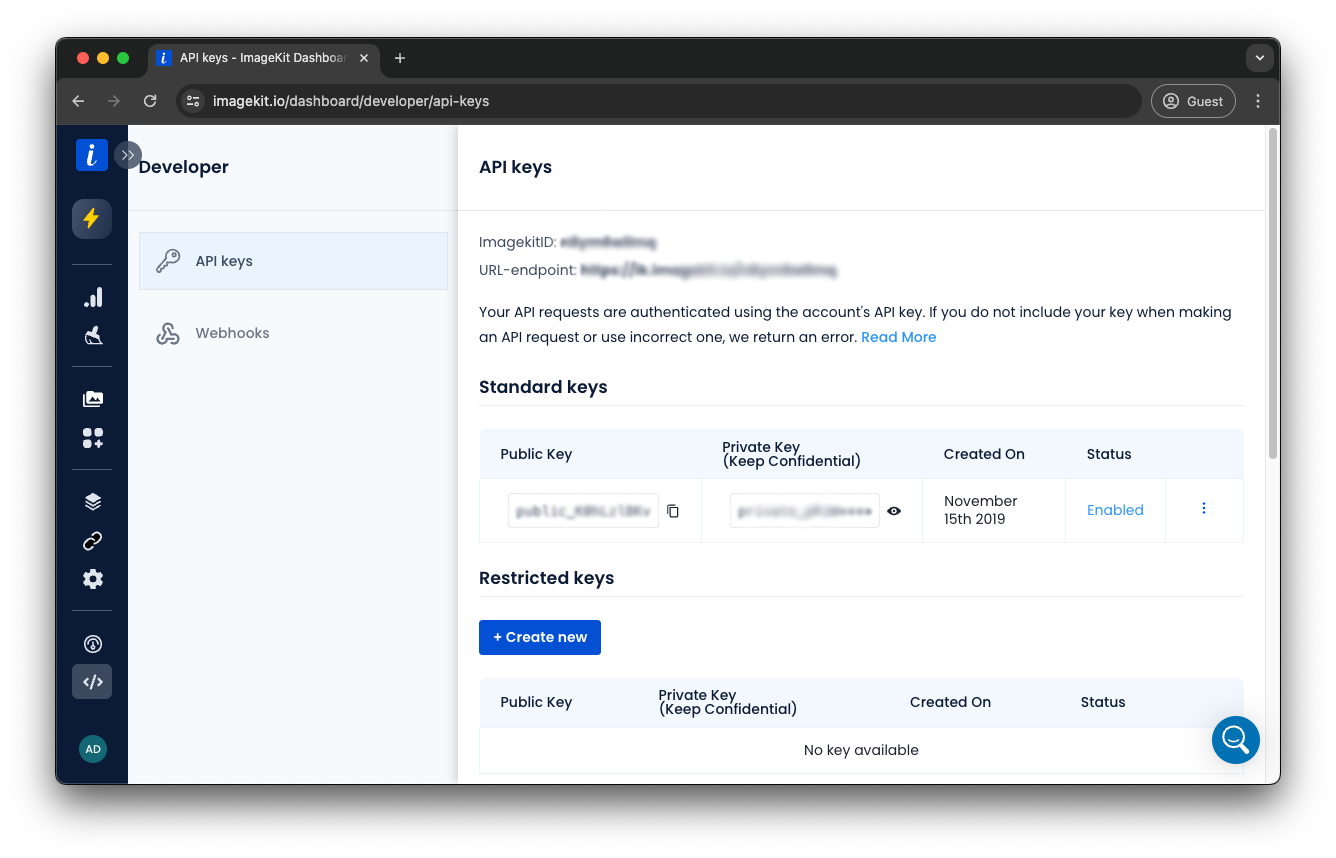
1. **Public Key**: Obtain your public key (prefixed with `public_`) from the [API Keys section](https://imagekit.io/dashboard/developer/api-keys) of your ImageKit dashboard.
2. **Private Key**: Copy your private key (prefixed with `private_`) from the same dashboard page. Note: Keep your private key confidential as it grants full access to your ImageKit account.
3. **URL Endpoint**: Get your endpoint URL (formatted as `https://ik.imagekit.io/your_imagekit_id`) from the same dashboard page.
#### 2. Configure Media Delivery
After adding your credentials, set up how your media will be served:
1. **Configure Web Folder Origin**: Add Strapi as a web folder origin in your ImageKit dashboard (ignore if already done). Follow the [Web Server Integration Documentation](https://imagekit.io/docs/integration/web-server) for detailed steps.
2. **Enable Integration**: Toggle **Enable Plugin** to ON to activate ImageKit integration for media handling. When OFF, Strapi will use the default provider for uploads.
3. **Enable Transformations**: Toggle **Use Transform URLs** to ON to leverage ImageKit's real-time transformations, generating responsive URLs with automatic format detection and image optimization capabilities. When OFF, original images are served without transformations.
4. **Configure Secure Access** (recommended):
- Enable **Use Signed URLs**
- Set an appropriate **Expiry** time (0 for URLs that never expire, or a duration in seconds)
#### 3. Configure Upload Options
Decide how uploads should work:
1. **Enable Uploads**: Toggle this option ON to upload the files uploaded in Strapi to your ImageKit media library. When OFF, files will be uploaded to the default Strapi storage location. Enabling this option does not upload existing files in Strapi to ImageKit.
2. **Set Upload Properties**:
- **Upload Folder**: Specify a base directory path in ImageKit for organizing your uploads (e.g., `/strapi-uploads/`)
- **Tags**: Add comma-separated tags to categorize and filter media assets (e.g., `strapi,media`)
- **Overwrite Tags**: Choose whether to replace existing tags or append new ones
3. **Configure Security & Validation**:
- **File Checks**: Define validation rules for uploads such as size limits or allowed file types. See [Upload API Checks](https://imagekit.io/docs/api-reference/upload-file/upload-file) for available options.
- **Mark as Private**: Toggle ON to restrict public access to uploaded files (requires signed URLs to access)
#### 4. Save Your Configuration
Click the **Save** button in the top-right corner to apply your settings.
> **Note**: Some changes may require restarting your Strapi server to take full effect.
### Advanced: Programmatic Configuration (config/plugins.js)
While the primary way to configure the ImageKit plugin is through the Strapi admin settings page, you can also provide default values in your Strapi project's configuration file. This is particularly useful for setting up initial configurations in development or deployment environments.
Settings defined in `config/plugins.js` serve as default values that are copied to the dashboard on the first run of your Strapi application. After this initial setup, any changes made through the admin UI will be stored in the database and will be used instead of the values in the configuration file.
Follow these steps:
1. Create or update your `config/plugins.js` file with ImageKit configuration:
```js
module.exports = ({ env }) => ({
imagekit: {
enabled: true,
config: {
// Basic Configuration
publicKey: env('IMAGEKIT_PUBLIC_KEY'),
privateKey: env('IMAGEKIT_PRIVATE_KEY'),
urlEndpoint: env('IMAGEKIT_URL_ENDPOINT'),
// Delivery Configuration
enabled: true,
useTransformUrls: true,
useSignedUrls: false,
expiry: 3600, // URL expiry time in seconds when useSignedUrls is true
// Upload Configuration
uploadEnabled: true,
// Upload Options
uploadOptions: {
folder: '/strapi-uploads/',
tags: ['strapi', 'media'],
overwriteTags: false,
checks: '', // Example: '"file.size" <= "5MB"'
isPrivateFile: false,
},
},
},
});
```
2. Add these variables to your `.env` file:
```env
IMAGEKIT_PUBLIC_KEY=your_public_key_here
IMAGEKIT_PRIVATE_KEY=your_private_key_here
IMAGEKIT_URL_ENDPOINT=https://ik.imagekit.io/your_imagekit_id
```
You can, of course, add more environment variables if you choose to configure other optional settings (like `IMAGEKIT_UPLOAD_FOLDER`, `IMAGEKIT_USE_SIGNED_URLS`, etc.) through `env()` calls in your `config/plugins.js`.
3. Restart your Strapi server for changes to take effect:
```bash
yarn develop
```
### Configure Security Middleware (CSP)
To ensure your Strapi application can securely load assets and interact with ImageKit services, you need to update your Content Security Policy (CSP) settings. This is configured in the `strapi::security` middleware.
Modify your `config/middlewares.js` file as follows. This configuration allows your Strapi admin panel and frontend (if applicable) to load images, videos, and potentially embeddable ImageKit frames, while maintaining a secure policy:
```js
// config/middlewares.js
module.exports = [
{
name: 'strapi::security',
config: {
contentSecurityPolicy: {
useDefaults: true,
directives: {
'connect-src': ["'self'", 'https:'],
'img-src': [
"'self'",
'data:',
'blob:',
'ik.imagekit.io', // Add ImageKit domain for images
// Add your custom domain if you use one with ImageKit:
// 'images.yourdomain.com',
],
'media-src': [
"'self'",
'data:',
'blob:',
'ik.imagekit.io', // Add ImageKit domain for videos/audio
// Add your custom domain if you use one:
// 'media.yourdomain.com',
],
'frame-src': [
"'self'",
'data:',
'blob:',
'eml.imagekit.io', // For ImageKit UI components
],
upgradeInsecureRequests: null,
},
},
},
},
// Keep your other middleware entries here
];
```
> **Important**: If you use a custom domain with ImageKit, uncomment and update the relevant lines with your domain.
## Contributing
Contributions are welcome! Please read our [contributing guidelines](CONTRIBUTING.md) before submitting pull requests.
## License
This project is licensed under the MIT License - see the [LICENSE](LICENSE) file for details.
## Support
For support, please contact [ImageKit Support](https://imagekit.io/contact/) or open an issue in the GitHub repository.