https://github.com/ines/juniper
🍇 Edit and execute code snippets in the browser using Jupyter kernels
https://github.com/ines/juniper
binder binderhub ipython javascript-library jupyter jupyter-notebook jupyterlab python widget
Last synced: over 1 year ago
JSON representation
🍇 Edit and execute code snippets in the browser using Jupyter kernels
- Host: GitHub
- URL: https://github.com/ines/juniper
- Owner: ines
- License: mit
- Created: 2018-04-30T18:46:44.000Z (about 8 years ago)
- Default Branch: master
- Last Pushed: 2019-04-10T15:00:46.000Z (over 7 years ago)
- Last Synced: 2025-03-31T06:01:55.764Z (over 1 year ago)
- Topics: binder, binderhub, ipython, javascript-library, jupyter, jupyter-notebook, jupyterlab, python, widget
- Language: JavaScript
- Homepage: https://ines.github.io/juniper/
- Size: 363 KB
- Stars: 223
- Watchers: 9
- Forks: 36
- Open Issues: 9
-
Metadata Files:
- Readme: README.md
- License: LICENSE
Awesome Lists containing this project
README
# Juniper: Edit and execute code snippets in the browser using Jupyter kernels
Juniper is a lightweight JavaScript library for adding interactive, editable
and runnable code snippets to any website. It uses
[JupyterLab](https://github.com/jupyterlab/jupyterlab) components and
[Binder](https://mybinder.org) (or your own self-hosted version of
[BinderHub](https://github.com/jupyterhub/binderhub)) to launch Python, R or
Julia environments based on a GitHub repository and an auto-built
Jupyter-enabled Docker image.
This project was heavily inspired by [Min RK](https://github.com/minrk)'s
[Thebelab](https://github.com/minrk/thebelab) package – thanks for the great
work on this. It was also instrumental in helping me understand how JupyterLab
works under the hood. Also thanks to [Binder](https://mybinder.org) for making
their great service available and allowing such a smooth integration.
[](https://www.npmjs.com/package/juniper-js)
[](https://github.com/ines/juniper)
[](https://unpkg.com/juniper-js)
## Quickstart
To add interactive code widgets to your site, you'll need a GitHub repository
with a `requirements.txt` listing the packages you want to install in the
environment. Using the repository, you can build a Docker image on
[Binder](https://mybinder.org), which will provide the Jupyter kernels.
When a user connects to the code widget, Binder will start up a Docker
container for them.
You'll also need to include [`juniper.min.js`](dist/juniper.min.js), add a
`data-executable` attribute to elements containing code and initialise the
module. See [the list of options](#options) for a full overview of the available
settings.
```html
print('Hello world!')
```
```javascript
new Juniper({
repo: 'username/repo'
})
```
### Setting up the environment
The `requirements.txt` can either live in the repository root, or in a
subdirectory `binder`. It can include PyPi packages with version identifiers, as
well as URLs to installable packages. This lets us install both spaCy *and* the
small English model via [its direct link](https://spacy.io/usage/models#download-pip):
```txt
spacy>=2.0.11,<3.0.0
https://github.com/explosion/spacy-models/releases/download/en_core_web_sm-2.0.0/en_core_web_sm-2.0.0.tar.gz#egg=en_core_web_sm==2.0.0
```
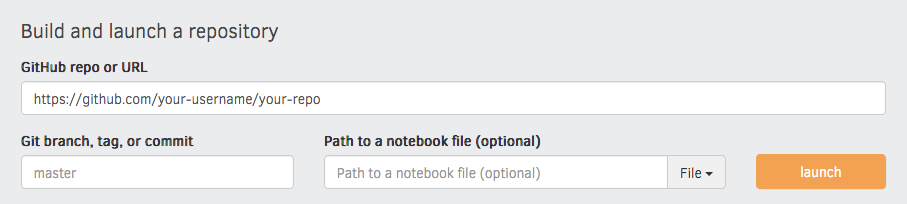
I'd recommend running the very first build via the interface on the
[Binder website](https://mybinder.org), as this gives you a detailed build log
and feedback on whether everything worked as expected. Enter your repository
URL, click "launch" and wait for it to install the dependencies and build the
image.
Depending on the requirements, building the initial Docker image may take a
while. However, once it's built, launching a new container for each session will
be much faster.
I've mostly been using Binder with Python environments, but it should also work
natively with R and Julia projects.For more details and examples, see the
[`binder-examples`](https://github.com/binder-examples) repo or check out the
[`jupyter-repo2docker`](https://github.com/jupyter/repo2docker) project, which
lets you turn git repositories into Jupyter-enabled Docker images.
## Using Juniper with existing markup
Juniper is designed as a simple, drop-in script that you can add to your
existing markup – for example, your blog template or your package's API
documentation.
```diff
Your website
-
+
print('hello world!')
+
+ new Juniper({ repo: 'ines/juniper' })
```
When initialised, `Juniper` will look for elements with the `data-executable` attribute, extract their contents and replace them with an interactive widget. This also means that if your users have JavaScript disabled, they'll still get to see the static code and no information is lost.
### Customising the theme
The editable code widget is powered by [CodeMirror](https://codemirror.net) which offers flexible customisation, and a variety of [syntax themes](https://codemirror.net/demo/theme.html) (also see this [user-curated collection](https://github.com/FarhadG/code-mirror-themes)). Note that Juniper only ships with the `default` theme – so if you want to use a different one, you need to include its stylesheet separately. Make sure the theme name assigned via the setting matches the name used in the stylesheet, e.g. `monokai` and `.cm-s-monokai`.
```diff
Your website
+
```
```diff
new Juniper({
repo: 'ines/juniper',
+ theme: 'monokai'
})
```
You can also change the theme of individual cells using the `data-theme` attribute:
```html
print('Cobalt theme!')
```
## Options
The following options are available when initialising `Juniper`:
| Name | Type | Description | Default |
| --- | --- | --- | --- |
| `repo` | string | Binder repository in the format `user/repo`. | - |
| `branch` | string | Repository branch to use. | `'master'` |
| `url` | string | URL of the binder deployment. | `'https://mybinder.org'` |
| `kernelType` | string | Type of the kernel to start. | `'python3'` |
| `defaultLang` | string | Default language for syntax highlighting. | `'python'` |
| `defaultTheme` | string | Default [CodeMirror](https://codemirror.net) theme. (Don't forget to include the CSS!) | `'default'` |
| `isolateCells` | boolean | Treat each sell as an independent, isolated example. If set to `false`, code from previous cells will be availabe in the current cell, just like in a Jupyer Notebook. | `true` |
| `noAutoInit` | boolean | Don't initialise the cells on load. You then have to call the `renderCell` method manually on each element. | `false` |
| `useStorage` | boolean | Experimental: Use the browser's `localStorage` to save the connection parameters. If the user navigates to a different page, the binder won't have to be requested from scratch. | `true` |
| `storageKey` | string | Key used to save the parameters in the `localStorage`. Change this if you don't want your settings to clash with other sites using Juniper. | `'juniper'` |
| `storageExpire` | number | Time in minutes after which parameters in the local storage expire. Ensures that Juniper reconnects if the connection isn't available anymore. | `60` |
| `useBinder` | boolean | Use [Binder](https://mybinder.org) or another BinderHub deployment to request a kernel. If set to `false`, the `serverSettings` are passed to JupyterLab directly. Use at your own risk. | `true` |
| `serverSettings` | object | Experimental: Use different server settings and connect to request a kernel from a notebook server. Can include a `baseUrl`, a `wsUrl` (websockets) and a `token`. | `{}` |
| `eventName` | string | Name of the custom event dispatched for status updates. | `'juniper'` |
| `msgLoading` | string | Text displayed after successful connection and before the response is ready. | `'Loading...'` |
| `msgError` | string | Text displayed if connecting failed. | `'Connecting failed. Please reload and try again.'` |
| `selector` | string | Element selector for code blocks. | `'[data-executable]'` |
| `classNames` | object | Overwrite the class names for `cell`, `input`, `button` and `output`. | [see here](#customising-the-widget-style) |
## Advanced Usage
### Notebook mode vs. isolated cells
By default, Juniper treats all cells as independent and isolated code examples.
If you're used to working in Jupyter Notebooks, you might prefer splitting your
code into cells like this:
```html
some_variable = 'some value'
print(some_variable)
```
With the default settings, the above example will raise an error because
`some_variable` isn't defined. However, if `isolateCells` is set to `false` in
the Juniper settings, the individual cells will be treated as a concurrent
script, just like a Jupyter Notebook.
```diff
new Juniper({
repo: 'user/repo',
+ isolateCells: false
})
```
### Listening to events
In some cases, you might want to display additional information about the server
status to the user. Juniper dispatches custom events along the way, which you
can catch by adding an event listener for `'juniper'` (or a custom name defined
via the `eventName` option):
```javascript
document.addEventListener('juniper', event => {
if (event.detail.status == 'failed') {
// do something here
}
})
```
The event status is available as `event.detail.status`. The following event
types are dispatched:
| Event | Description |
| --- | --- |
| `building` | Building the [Binder](https://mybinder.org) image. |
| `server-ready` | The Binder server is ready. |
| `ready` | The Binder image and session is ready. |
| `executing` | Executing the user action, i.e. a click on the "run" button. |
| `requesting-kernel` | Requesting a kernel from the Binder image. |
| `failed` | Connecting to the server failed. |
### Customising the widget style
The Juniper widget is kept fairly minimalistic, to make it easier to integrate
and adjust. See [`juniper.css`](src/juniper.css) for the existing styles. The
elements created in place of the original code block look like this:
```html
run
```
You can also change the class names via the `classNames` setting – for example,
like this to implement a BEM-style scheme:
```javascript
new Juniper({
repo: 'user/repo',
classNames: {
cell: 'c-juniper',
input: 'c-juniper__input',
button: 'c-juniper__button',
output: 'c-juniper__output'
}
})
```
The [CodeMirror](https://codemirror.net) widget is also exposed as
`window.CodeMirror`, so you can add plugins and tweak the options.