https://github.com/iskage/cifar10-classification
ResNet18 to address CIFAR-10 Classification CIFAR-10 分类问题 (基于 ResNet18 预训练模型)
https://github.com/iskage/cifar10-classification
cifar10 classification deep-learning nerual-network python pytorch resnet resnet18
Last synced: 3 months ago
JSON representation
ResNet18 to address CIFAR-10 Classification CIFAR-10 分类问题 (基于 ResNet18 预训练模型)
- Host: GitHub
- URL: https://github.com/iskage/cifar10-classification
- Owner: isKage
- Created: 2025-03-01T08:07:04.000Z (3 months ago)
- Default Branch: main
- Last Pushed: 2025-03-01T08:47:15.000Z (3 months ago)
- Last Synced: 2025-03-01T09:26:40.069Z (3 months ago)
- Topics: cifar10, classification, deep-learning, nerual-network, python, pytorch, resnet, resnet18
- Language: Python
- Homepage:
- Size: 375 KB
- Stars: 0
- Watchers: 1
- Forks: 0
- Open Issues: 0
-
Metadata Files:
- Readme: README.md
Awesome Lists containing this project
README
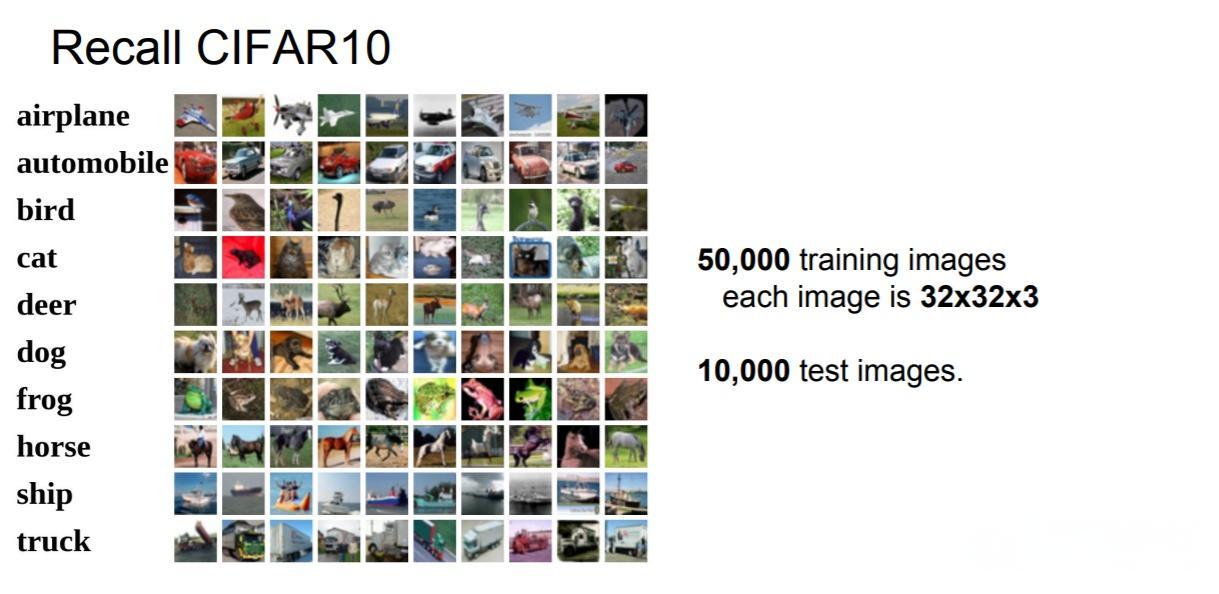
# CIFAR-10 分类问题 (基于 ResNet18 预训练模型)
`PyTorch` `Python` `torch` `nn` `ResNet` `ResNet18` `pre-trained`
针对 CIFAR-10 分类问题,搭建神经网络:`AlexNet`、`GoogLeNet`、`ResNet`、`ResNet18`。最后选择预训练后的 `ResNet18` 进行该问题的训练、验证和测试。包含自定义数据集 `Dataset` 类、自定义训练、验证和测试函数、自定义结果表格函数等。
`kaggle: private score = 0.76750, ranked about 58. (training 10 epochs with GPU)`
`kaggle: private score = 0.68100, ranked about 71. (just training once as using CPU)`
`device: cpu`
**项目目录**
```bash
├── README.md
├── TempData # 取少量图片模拟 CIFAR10 数据集
│ └── competitions
│ └── cifar-10
├── checkpoints # 存放训练完成后的模型参数 model.save() 存放处
├── config.py # 默认的配置文件
├── data # 自定义的数据集 Dataset 类
│ ├── __init__.py
│ └── dataset.py
├── logfile # 记录模型表现 csv 文件的目录
├── logs # 存放 tensorboard 文件
├── main.py # 主程序: 包含 train, test 等主要函数
├── models # 搭建的各种神经网络 `AlexNet`、`GoogLeNet`、`ResNet`、`ResNet18`
│ ├── __init__.py
│ ├── alexnet.py
│ ├── basic.py
│ ├── googlenet.py
│ ├── resnet.py
│ └── resnet18.py
├── requirements.txt # 安装依赖
├── result_example.csv # 少量数据模拟数据集得到的测试结果
└── sampleSubmission.csv # 最后生成的可提交 kaggle 的最终测试结果
```
## 1 下载至本地
在终端运行
```bash
git clone https://github.com/isKage/cifar10-classification.git
```
## 2 安装依赖和数据集
### 2.1 pip 安装依赖
在项目根目录下终端输入
```bash
pip install -r requirements.txt
```
### 2.2 kaggle 下载数据集
教程见 [从 kaggle 下载数据集 (mac & win)](https://zhuanlan.zhihu.com/p/25732245405)。
## 3 本地配置 `config.py`
在 `config.py` 中配置相关参数。例如数据集路径。相关配置均已配置好,但需要自己配置数据集的位置。
在 `_parse()` 方法中,需修改 cifar 数据集的路径。例如我的配置:`cifar-10` 文件夹放在用户目录下的 `AllData/competitions/` 下。
```python
if config.real_or_try == "real":
# 如果数据放在用户目录的 'AllData' 下则
config.root = os.path.join(config.user_root, 'AllData', 'competitions', 'cifar-10') # 【本地设置: 数据目录】
config.res_path = os.path.join(config.working_root, 'sampleSubmission.csv')
else:
# 样本数据尝试
config.root = os.path.join(config.working_root, 'TempData', 'competitions', 'cifar-10')
config.res_path = os.path.join(config.working_root, 'result_example.csv')
```
## 4 训练
> 注意,默认的数据集为模拟数据集,故如果想在完整数据集训练,在指定路径后还需传入参数 `--real_or_try=real`
> ,或者直接在 `config.py` 中
> 修改默认
### 4.1 解压数据集
在第 3 步设置完成数据集下载的路径后,终端输入
```bash
python main.py unzip
```
即可解压数据集。
### 4.2 训练
使用 `fire` 库方便的在终端中进行训练、测试过程。可以在 `config.py` 中输入默认参数。例如:`model`
为选择模型,默认使用 `"ResNet18"` 模型,
会自动进行下载,下载的预训练模型参数保存在 `checkpoints/` 文件夹里。
在终端运行
```bash
python main.py train
```
可以使用 `--<参数名>=参数值` 在终端覆盖默认参数
```bash
python main.py train model=AlexNet # 指定 AlexNet 为模型
python main.py train rea_or_try=real # 使用完整 CIFAR10 数据集,而不是模拟数据集
```
### 4.3 可视化
终端运行
```bash
tensorboard --logdir=./logs # http://localhost:6006/
```
打开浏览器观察训练过程可视化:

## 5 测试
终端运行
```bash
python main.py test
```
即可得到测试后的结果表格 `result_example.csv` 或 `sampleSubmission.csv` (取决与使用的是模拟数据集还是完整的数据集)。
注意,测试完成后终端输入一下指令,对结果表格按照 `id` 进行排序。
```bash
python main.py sort_csv
```
最后可以将 `sampleSubmission.csv` 上传到 kaggle [CIFAR-10 competition](https://www.kaggle.com/competitions/cifar-10) 。

## 6 友链
1. 关注我的知乎账号 [Zhuhu](https://www.zhihu.com/people/--55-97-8-41) 不错过我的笔记更新。
2. 我会在个人博客 [isKage`Blog](https://blog.iskage.online/) 更新相关项目和学习资料。