Ecosyste.ms: Awesome
An open API service indexing awesome lists of open source software.
https://github.com/islishude/shell-proxy
在命令行工具中使用HTTP/SOCK5代理
https://github.com/islishude/shell-proxy
http-proxy proxy shadowsocks
Last synced: about 21 hours ago
JSON representation
在命令行工具中使用HTTP/SOCK5代理
- Host: GitHub
- URL: https://github.com/islishude/shell-proxy
- Owner: islishude
- License: mit
- Created: 2018-01-19T14:15:32.000Z (about 7 years ago)
- Default Branch: master
- Last Pushed: 2022-05-28T01:42:21.000Z (over 2 years ago)
- Last Synced: 2023-03-03T15:18:18.985Z (almost 2 years ago)
- Topics: http-proxy, proxy, shadowsocks
- Language: Shell
- Homepage:
- Size: 24.4 KB
- Stars: 33
- Watchers: 3
- Forks: 6
- Open Issues: 0
-
Metadata Files:
- Readme: README.md
- License: LICENSE
Awesome Lists containing this project
README
# 在命令行工具中使用代理
## Mac 和 Linux
类 Unix 环境下设置代理特别简单,只要在用户家目录下的 `.bashrc` 或 `.bash_profile` (ZSH 对应 `.zshrc` 以及 `.zsh_profile`)设置 `http_proxy` 和 `https_proxy` 环境变量到代理地址即可,如下所示,其中 `$url` 就是代理地址。
```bash
# 代理设置
url=http://127.0.0.1:7890
# 如果代理失效的话直接运行 poff 即可断开 proxy
alias poff='unset http_proxy;unset https_proxy'
# 快捷方式打开
alias pon='export http_proxy=$url; export https_proxy=$url'
```
这里我设置了别名,需要使用代理的时候直接运行 `pon` 即可打开代理,而运行 `poff` 则关闭代理。
或者你可以直接可以设置只要打开 Termial 就使用代理的话去掉 `alias` 命令即可。
```bash
export https_proxy=http://127.0.0.1:7890 http_proxy=http://127.0.0.1:7890
```
这里我使用的是 clashx ,所以这里的 `url` 是 `http://127.0.0.1:7890`。如果你需要自定义端口可以打开 ClashX Dashboard Setting 配置相关端口即可。
在 Linux 下有个比设置 http 和 https 代理有个更简单的,可以直接设置 `export ALL_PROXY=socks5://127.0.0.1:7890` 就行了。
最后测试一下连接,如果出现以下情况即说明设置成功。
```console
$ curl -I https://google.com
HTTP/1.1 200 Connection established
HTTP/2 301
location: https://www.google.com/
content-type: text/html; charset=UTF-8
date: Thu, 28 Feb 2019 03:37:48 GMT
expires: Sat, 30 Mar 2019 03:37:48 GMT
cache-control: public, max-age=2592000
server: gws
content-length: 220
x-xss-protection: 1; mode=block
x-frame-options: SAMEORIGIN
alt-svc: quic=":443"; ma=2592000; v="44,43,39"
```
由于 ClashX 可以对系统内直接配置代理,一般不需要再次在 Terminal 中额外配置。
## 忽略对网段的代理
我们可以对某些网段进行忽略代理设置,比如本地 127.0.0.1 等等。
设置这个也很简单,
```
export NO_PROXY=127.0.0.1,10.96.0.0/12,192.168.99.0/24,192.168.39.0/24
```
## Windows
如果你使用 Windows PowerShell 的话,那么需要使用下面的方式:
```bash
# 查看
set http_proxy
# 设置
set http_proxy=YOUR-PROXY
set https_proxy=YOUR-PROXY
# 删除
set http_proxy=
```
在 Windows 下使用 Git Bash 则配置方式和 Mac/Linux 一致,不过需要注意的需要在 `.bash_profile` 而不是 `.bashrc` 中进行配置。
因为如果你留意的话在每次打开 Git Bash 的时候回一闪而过 login 的字样,而 `.bashrc` 在每次打开命令行工具时就加载,而 `.bash_profile` 仅在用户登录时候加载一次,所以每次打开 GitBash 的行为就是登录用户。
## VSCode
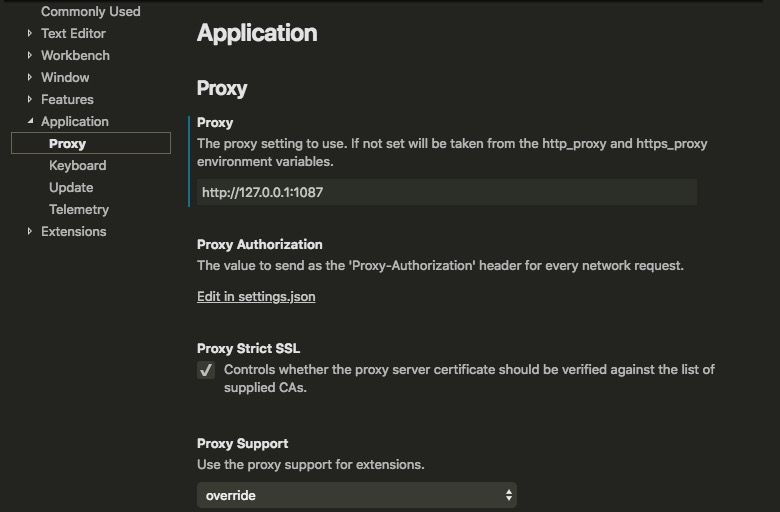
打开设置,选择 Applicaion-Proxy,注意这里保持 `Proxy Strict SSL`,关闭可能导致某些插件不能正常工作。

在 VSCode Windows 下默认使用 PowerShell 或者 CMD 命令工具,当然也可以设置成 GitBash 的。方法很简单,使用快捷键 Ctrl + Shift + p,然后输入 `shell` 选择默认 shell 命令即可。
在这里 vscode 使用正则限制了 proxy url,只能输入 http/https 开头的地址,但是是可以输入并使用 socks5,只需要点击右上角 `{}` 符号切换到 json 配置界面设置 socks5 开头的地址,然后忽略错误就可以了。
## Git
```
# 设置 git 的代理相关设置
git config –global http.proxy http://127.0.0.1:1080
git config –global https.proxy http://127.0.0.1:1080
# 或者使用 sock5
git config --global http.proxy socks5://127.0.0.1:1080
git config --global https.proxy socks5://127.0.0.1:1080
# 取消 git 的代理相关设置
git config –global –unset http.proxy
# 取消 git 的代理相关设置
git config –global –unset https.proxy
```
## 虚拟机
在虚拟机中可以开启 ss 然后设置代理,基本流程和上述一致。但是如果想要连接宿主机的代理服务的话也很简单。首先在宿主机中的 ss 设置允许其它设备访问,然后代理设置成宿主机的 IP 即可。虚拟机的网络设置最好设置成桥接模式,这样主机和虚拟机就会在一个网络段,可以互相直连。
## ClashX
- 项目 https://github.com/yichengchen/clashX
- 规则推荐 https://github.com/Loyalsoldier/clash-rules