https://github.com/izzypt/ecommerce-rest-api
Process of designin, building, documenting and testing a RESTful API
https://github.com/izzypt/ecommerce-rest-api
Last synced: about 1 month ago
JSON representation
Process of designin, building, documenting and testing a RESTful API
- Host: GitHub
- URL: https://github.com/izzypt/ecommerce-rest-api
- Owner: izzypt
- Created: 2023-02-01T00:21:31.000Z (over 3 years ago)
- Default Branch: main
- Last Pushed: 2023-02-01T12:53:32.000Z (over 3 years ago)
- Last Synced: 2025-03-04T15:48:01.522Z (over 1 year ago)
- Language: Python
- Size: 10.7 KB
- Stars: 0
- Watchers: 1
- Forks: 0
- Open Issues: 0
-
Metadata Files:
- Readme: README.md
Awesome Lists containing this project
README
# eCommerce-RESTful-API
The goal of this repo is to go through the real world phases of building a RESTful (eCommerce or any other) API.
## Phases
- Specification
- Design and implement DataBase
- Routers/Viewsets and Serializers
- Testing (end to end && Unit test)
- Documentation
## #1 Specification
An API specification provides a broad understanding of how an API behaves and how the API links with other APIs. It explains how the API functions and the results to expect when using the API.
You can download the specifications file for this project from the link below:
- [Specification-v1.docx](https://github.com/izzypt/eCommerce-RESTful-API/files/10547740/Specification-v1.docx)
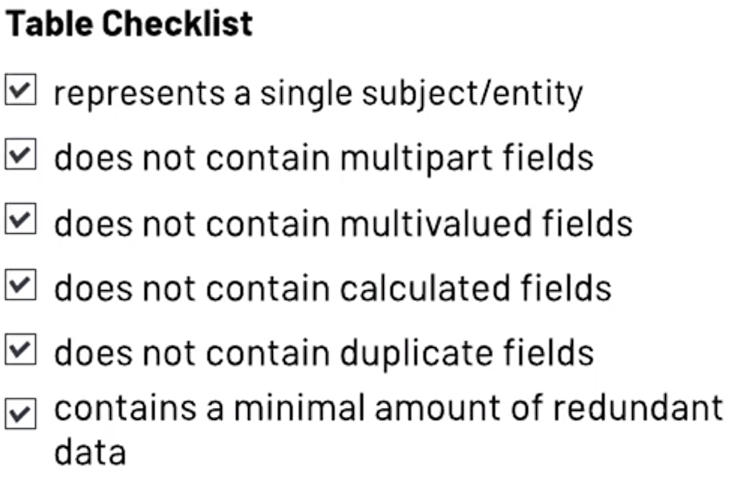
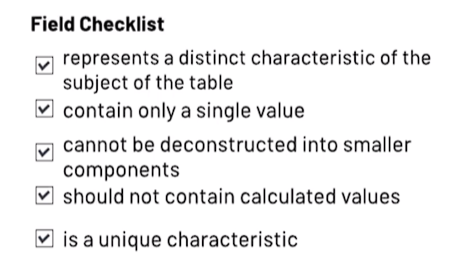
Analyzing the specifications we can extract information to help us design a preliminary table list, a draft of what tables we will need in order for our API to work:
- We can make a list of what entities/subjects we will need ( things we want to store info about)
- What fields those entities will need (what things we want to store about those entities)
### Preliminary Table List
| Product | Product Line | Category |
| ---------------------| ---------------------| ---------------------|
| Product name | Product price | Category Name |
| Product description | Product image |
| Product type | Product SKU |
| | Product color |
| | Product size |
### Identifying MultiValued Field
It's important to try and identify any field which might take more than 1 value and remove it (Multivalued field).
For example, associated to a product we can have multiple images, so one field might not be enoug...
A possible solution is to add a new field for each image , something like this :
| Product Line |
| ---------------------|
| Product price |
| Product image1 |
| Product image2 |
| Product image3 |
| Product image4 |
| Product SKU |
| Product color |
| Product size |
But what if our product only has 1 image (we want to avoid empty cells) or we want to add more than 4 images ?
The best solution is to create a new table for the product image, something like this :
| Product Image |
| ---------------------|
| Image name |
| alternative text |
| Image Location |
So , we actually end up with something like this:
| Product | Product Line | Category | Product Image |
| ---------------------| ---------------------| ---------------------| ---------------------|
| Product name | Product price | Category Name | Image name |
| Product description | Product size | | alternative text |
| Product type | Product SKU | | Image Location |
| | Product color |
| | |
Try to keep those in mind, when designing you tables and field :
### Table and Field Naming Convention
Ultimately, you can do whatever you want in terms of naming tables and fields, but the recommendation is to be consistent across the database and try to make it meaningfull and descriptive.

Since we will be using Python and Django to build our API, if you want to have a deeper understanding of naming convention and code styling convention in Python/Django you can always check the official docs :
- https://peps.python.org/pep-0008/#naming-conventions
### Database table relationships
Last but not least , we need to define the relationship between our tables.
Identifying the connections you’ll need between tables is part of the data modeling and schema design process — that is, the process of figuring out how your data fits together, and how exactly you should configure your tables and their fields.
The relationships between your tables can be:
- One-to-one
- One-to-many
- Many-to-many

If you want to read more about database table relationship, follow this link : https://www.metabase.com/learn/databases/table-relationships
## #2 Setting up Django
I'am not going to cover step by step the entire process of setting up Django (I already have that on other repos), but I want to touch on some key points, those are :
- Configuring multiple file setting (separate development settings from production settings)
- Generating a Secret Key
- Configuring Environment variables
### -> Configuring multiple settings files
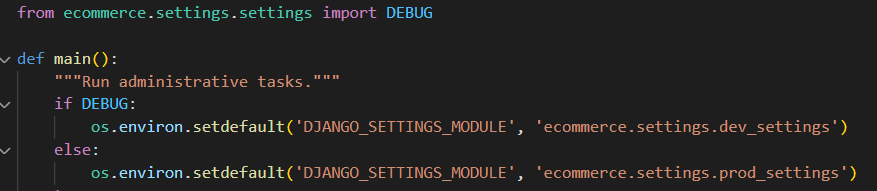
By default, our django project will come with a default "settings.py", which "manage.py" file will set to the default settings as you can see below:

One way to have multiple settings files and use them interchangeably according to our environment (production or development) is the following:
- Inside our main folder create a settings folder.
- Move the "settings.py" to the settings folder.
- Since we changed the locations of our "settings.py" file, we need to let "manage.py" know the new location:

- Now, inside our settings folder, we can create 2 new files: one for the development settings and one for production settings. Let's call them "dev_settings.py" and "prod_settings.py".
- In those 2 new files , we can import the main settings file configurations and change them to our needs.
- Once we have done that, we can then, on our "manage.py" set the logic to change between those to files, depending on if ```DEBUG=TRUE or DEBUG=False```
### -> Generating a Secret Key
- Run
```
python manage.py shell
```
- Inside it, run the following commands:
```
>>> from django.core.management.utils import get_random_secret_key
>>> new_secret_key = get_random_secret_key
>>> new_secret_key
'#r4#$v54nt(k9g*8z-$=v4yexsm2%fevqsz1(+iy(4@^nj^m$5'
```
- Paste the new key into your "settings.py" or your ```.env``` file.
### -> Configuring Env variables
- Create a ```.env``` file in the project.
- pip install python-dotenv
- Load env variables where you need them. Most likely on "settings.py" :
```
from dotenv import load_dotenv
load_dotenv() # take environment variables from .env.
# Code of your application, which uses environment variables (e.g. from `os.environ` or
# `os.getenv`) as if they came from the actual environment.
```
- Import them by acessing the os.environ :
```
import os
SECRET_KEY = os.environ.get("SECRET_KEY")
```
## Testing our API
- We will use pytest
```
pip install pytest
```
- Create a file called "pytest.ini" at the root of our project folder.
- We can customize some pytest behavior using this file.
- This file contains a number of configuration values that are applied to all test runs for that project.
- To get a list of the possible options for the "pytest.ini" config file you can run the command ``` pytest -h ```