https://github.com/izzypt/nodejs-101
Repo for NodeJS basics, like API, authentication , authorization and users.
https://github.com/izzypt/nodejs-101
Last synced: 4 months ago
JSON representation
Repo for NodeJS basics, like API, authentication , authorization and users.
- Host: GitHub
- URL: https://github.com/izzypt/nodejs-101
- Owner: izzypt
- Created: 2023-01-23T14:14:40.000Z (over 3 years ago)
- Default Branch: main
- Last Pushed: 2023-02-02T12:54:20.000Z (over 3 years ago)
- Last Synced: 2025-12-05T05:52:33.736Z (7 months ago)
- Size: 65.4 KB
- Stars: 0
- Watchers: 1
- Forks: 0
- Open Issues: 0
-
Metadata Files:
- Readme: README.md
Awesome Lists containing this project
README
# NodeJS Basics 101 + Project Setup ( under construction)
### What is NodeJS ?
- Is a platform built on google Chrome JavaScript Engine for building fast and scalable network applications.
- You can use it to run JavaScript from outside the browser, like the backend of a website.
### NodeJS features
- Asynchronous and event-driven
- Very fast - being built on Chrome V8 engine.
- Single Threaded
- Highly Scalable
- Used to bnuild web servers
- Perfect for building real time applpications
- Helpful for manipulating files on File System.
### On what type of apps should we use NodeJS?
- I/O bound apps
- Data Streaming apps
- Real-time apps
- JSON Api's based apps
- Single Page apps
### Where not to use it?
It is not advisable to use Node for CPU intensive applications because of the single threaded nature of Node.
### You are going to create an API with Node, but ... what is it ?
An API is an application programming interface, that allows two applications to talk to each other.
Each time , you check the weather on your phone, for example, you're using an API to fetch that information.
### What about a Restful API , is that any different ?
REST stands for Representational State Transfer.
RESTful API's were designed to take advantage of existing protocols, like HTTP protocol.
To build a RESTful API there are some rules we should follow, like :
- Client and Server should be separate from each other and allowed to evolve individually.
- Stateless. Rest API's should be stateless, meaning that, each request to a REST API, can be made indenpendently from one another and each request contains the data to complete itself.
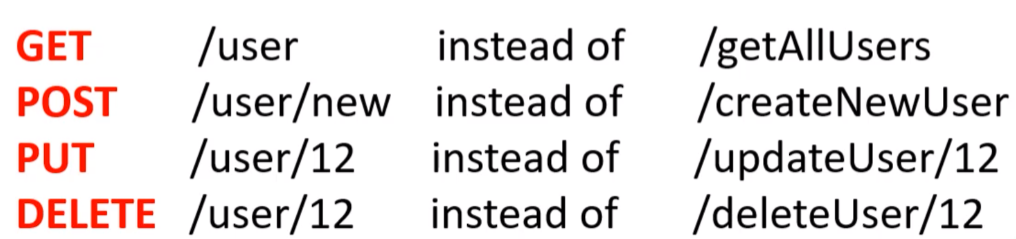
- Use HTTP methods. REST API should use proper http methods, like :
- GET
- PUT
- POST
- DELETE
Example for your URL design:
- The API should send data back in JSON.
### HTTP response status codes
- Informational responses (100 – 199)
- Successful responses (200 – 299)
- Redirection messages (300 – 399)
- Client error responses (400 – 499)
- Server error responses (500 – 599)
#### Information responses
100 Continue
This interim response indicates that the client should continue the request or ignore the response if the request is already finished.
101 Switching Protocols
This code is sent in response to an Upgrade request header from the client and indicates the protocol the server is switching to.
102 Processing (WebDAV)
This code indicates that the server has received and is processing the request, but no response is available yet.
103 Early Hints
This status code is primarily intended to be used with the Link header, letting the user agent start preloading resources while the server prepares a response.
#### Successful responses
200 OK
The request succeeded. The result meaning of "success" depends on the HTTP method:
GET: The resource has been fetched and transmitted in the message body.
HEAD: The representation headers are included in the response without any message body.
PUT or POST: The resource describing the result of the action is transmitted in the message body.
TRACE: The message body contains the request message as received by the server.
201 Created
The request succeeded, and a new resource was created as a result. This is typically the response sent after POST requests, or some PUT requests.
202 Accepted
The request has been received but not yet acted upon. It is noncommittal, since there is no way in HTTP to later send an asynchronous response indicating the outcome of the request. It is intended for cases where another process or server handles the request, or for batch processing.
203 Non-Authoritative Information
This response code means the returned metadata is not exactly the same as is available from the origin server, but is collected from a local or a third-party copy. This is mostly used for mirrors or backups of another resource. Except for that specific case, the 200 OK response is preferred to this status.
204 No Content
There is no content to send for this request, but the headers may be useful. The user agent may update its cached headers for this resource with the new ones.
205 Reset Content
Tells the user agent to reset the document which sent this request.
206 Partial Content
This response code is used when the Range header is sent from the client to request only part of a resource.
207 Multi-Status (WebDAV)
Conveys information about multiple resources, for situations where multiple status codes might be appropriate.
#### Redirection responses
300 Multiple Choices
The request has more than one possible response. The user agent or user should choose one of them. (There is no standardized way of choosing one of the responses, but HTML links to the possibilities are recommended so the user can pick.)
301 Moved Permanently
The URL of the requested resource has been changed permanently. The new URL is given in the response.
302 Found
This response code means that the URI of requested resource has been changed temporarily. Further changes in the URI might be made in the future. Therefore, this same URI should be used by the client in future requests.
303 See Other
The server sent this response to direct the client to get the requested resource at another URI with a GET request.
304 Not Modified
This is used for caching purposes. It tells the client that the response has not been modified, so the client can continue to use the same cached version of the response.
305 Use Proxy Deprecated
Defined in a previous version of the HTTP specification to indicate that a requested response must be accessed by a proxy. It has been deprecated due to security concerns regarding in-band configuration of a proxy.
306 unused
This response code is no longer used; it is just reserved. It was used in a previous version of the HTTP/1.1 specification.
307 Temporary Redirect
The server sends this response to direct the client to get the requested resource at another URI with same method that was used in the prior request. This has the same semantics as the 302 Found HTTP response code, with the exception that the user agent must not change the HTTP method used: if a POST was used in the first request, a POST must be used in the second request.
308 Permanent Redirect
This means that the resource is now permanently located at another URI, specified by the Location: HTTP Response header. This has the same semantics as the 301 Moved Permanently HTTP response code, with the exception that the user agent must not change the HTTP method used: if a POST was used in the first request, a POST must be used in the second request.
#### Clien error responses
400 Bad Request
The server cannot or will not process the request due to something that is perceived to be a client error (e.g., malformed request syntax, invalid request message framing, or deceptive request routing).
401 Unauthorized
Although the HTTP standard specifies "unauthorized", semantically this response means "unauthenticated". That is, the client must authenticate itself to get the requested response.
402 Payment Required Experimental
This response code is reserved for future use. The initial aim for creating this code was using it for digital payment systems, however this status code is used very rarely and no standard convention exists.
403 Forbidden
The client does not have access rights to the content; that is, it is unauthorized, so the server is refusing to give the requested resource. Unlike 401 Unauthorized, the client's identity is known to the server.
404 Not Found
The server cannot find the requested resource. In the browser, this means the URL is not recognized. In an API, this can also mean that the endpoint is valid but the resource itself does not exist. Servers may also send this response instead of 403 Forbidden to hide the existence of a resource from an unauthorized client. This response code is probably the most well known due to its frequent occurrence on the web.
405 Method Not Allowed
The request method is known by the server but is not supported by the target resource. For example, an API may not allow calling DELETE to remove a resource.
406 Not Acceptable
This response is sent when the web server, after performing server-driven content negotiation, doesn't find any content that conforms to the criteria given by the user agent.
407 Proxy Authentication Required
This is similar to 401 Unauthorized but authentication is needed to be done by a proxy.
408 Request Timeout
This response is sent on an idle connection by some servers, even without any previous request by the client. It means that the server would like to shut down this unused connection. This response is used much more since some browsers, like Chrome, Firefox 27+, or IE9, use HTTP pre-connection mechanisms to speed up surfing. Also note that some servers merely shut down the connection without sending this message.
#### Server error responses
500 Internal Server Error
The server has encountered a situation it does not know how to handle.
501 Not Implemented
The request method is not supported by the server and cannot be handled. The only methods that servers are required to support (and therefore that must not return this code) are GET and HEAD.
502 Bad Gateway
This error response means that the server, while working as a gateway to get a response needed to handle the request, got an invalid response.
503 Service Unavailable
The server is not ready to handle the request. Common causes are a server that is down for maintenance or that is overloaded. Note that together with this response, a user-friendly page explaining the problem should be sent. This response should be used for temporary conditions and the Retry-After HTTP header should, if possible, contain the estimated time before the recovery of the service. The webmaster must also take care about the caching-related headers that are sent along with this response, as these temporary condition responses should usually not be cached.
# Project Setup
### On your project folder
1 - Run npm init on your working folder to start.
2 - Configurate your package name, description, entry point, etc...
3 - This will output your package.json file.
### Install required packages
1 - We will use express and dotenv.
2 - Run the following command to install them:
```
npm i express dotenv --save
```
### Create your .env file, to store env variables.
1 - Create file 'config.env'
2 - To start, define the following:
```
PORT = 3000
NODE_ENV = development
```
### Create our main file, app.js
1 - Import express and set which port to listen to for incoming requests...
```
const express = require('express')
const app = express();
const dotenv = require('dotenv');
dotenv.config({path : './config.env'});
app.listen(PORT, () => {
console.log(`Server listening on port ${process.env.PORT} in ${process.env.NODE_ENV} mode.`);
});
```
### Install nodemon as dev dependencie, it will allow you to automatically restart the server, whenever there are changes on your files.
1 - Run the command to install:
```
npm i nodemon --save-dev
```
2 - On your package.json, on the 'scripts' object , add:
```
scripts: {
"start" : "node app.js"
"dev" : "nodemon app"
"prod" : "SET NODE_ENV=production & NODEMON app.js"
}
```
This will allows to run 3 different commands , according to our needs/stage of development:
- npm run start
- npm run dev (to run when in development)
- npm run prod (to run when in production)
### Creating basic route
1 - Let's create a folder called routes.
2 - Inside it , create a file called "jobs.js", it will include some of our routes and the controllers for each one.
```
const express = require('express');
const routes = express.Router();
//Importing jobs controller method
const { getJobs } = require(../controllers/jobsController)
router.route('/jobs').get(getJobs);
module.exports = router;
```
3 - Now import this router in our main file , at src/app.js
```
const jobs = require('./routes/jobs');
app.use('/api/v1', jobs);
```
### Setting up the controllers
We will attach controllers/handlers to our routes. Controllers are responsible for handling incoming requests and returning responses to the client.
1 - Create a controllers folder in the src.
2 - Create a 'jobControllers.js' file
```
exports.getJobs = (req, res, next) => {
res.status(200).json({
sucess: true,
message: 'This route will display all jobs in the future'
});
}
```
### Setting up our DataBase
We have 2 options
- Online Database or
- Local Database
1 - Install MongoDB community Server. Follow this link and the instructions :
https://www.mongodb.com/docs/manual/tutorial/install-mongodb-on-windows/
2 - Install MongoDB Compass for an aditional GUI.
### Connecting API with DB
1- In our '.env' file add a new variable, for the DB address:
```
DB_LOCAL_URI = mongodb://localhost:27017
```
1 - Inside our config folder (src/config), create a 'database.js'.
2 - We will use the mongoose package to create our models and connect to the MongoDB. So if , it is not installed yet, run :
```
npm i mongoose --save
```
```
const mongoose = require('mongoose');
const connectToDB = () => {
mongoose.connect(process.env.DB_LOCAL_URI, {
useNewUrlParser: true,
useUnifiedTopology: true
}).then( con => {
console.log(`Connected to DB with host : ${con.connection.host}`);
});
}
module.exports = connectToDB
```
2 - Now we can the import the connect method we just created into our main file (app.js) and place it AFTER the dotenv.config() statement, since we are using ENV variables we need to make sure we have acess to them :
```
/* src/app.js*/
const connectToDB = require('./config/database')
connectToDB()
```
### Explaining Middlewares
Middleware are functions that have access to the request object (req), the response object (res), and the next middleware function in the application's request-response cycle. These functions are used to modify req and res objects for tasks like parsing request bodies, adding response headers, etc.
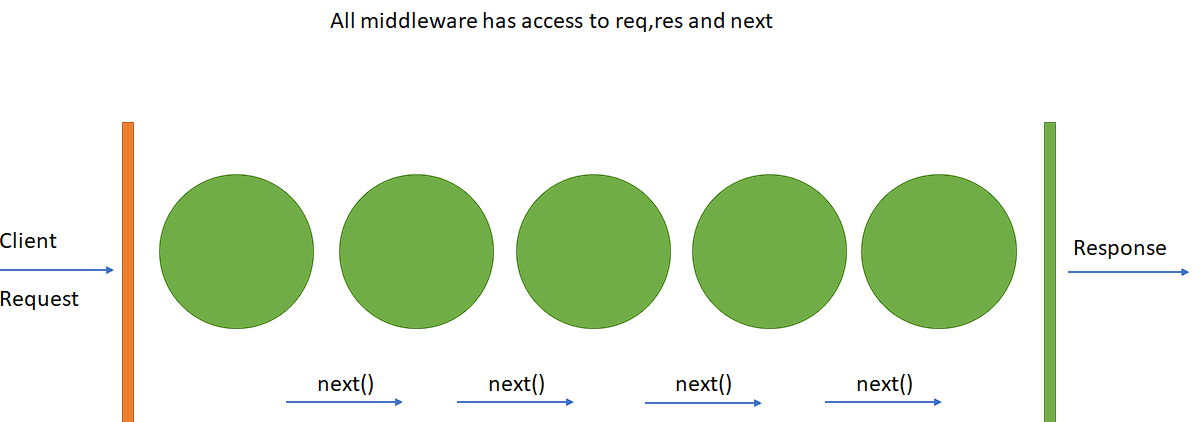
So, a simple EXAMPLE of a middleware would be something like :
```
const middleware = (req, res, next) => {
console.log("Hey , I'll do something to do req or res objects and call the next middleware");
next()
}
app.use(middleware)
```
### Creating Job Model using Mongoose Schema
1 - Create a models folder. (src/models)
2- Create 'jobs.js', it will contain our jobs model.
```
const mongoose = require('mongoose')
const validator = require('validator')
//Validator package will be used to validate data like email, phone number, etc..
//Create the job Schema
const jobSchema = new mongoose.Schema({
title : {
type: String,
required: [true, 'Please enter Job title.'],
trim : true,
maxlength: [100, 'Job title can not exceed 100 characters']
},
slug : String,
description: {
typ: String,
required : [true, 'Please enter job description'],
maxlength: [1000, 'Maximum 1000 characters description.']
}
email : {
type: String,
validate : [validate.isEmail, 'Please add a valid email address']
},
address : {
type: String,
required : [true, 'Please add an address.']
},
company : {
type: String,
required : [true, 'Please add a company name.']
},
industry : {
type: [String],/*Array of strings*/
required : true,
enum : {
values : [
'Business',
'Information Technology',
'Banking',
'Education/Training',
'Telecommunication',
'Others'
],
message : 'Please select current options for industry.'
},
jobType : {
type: String,
required : true,
enum : {
values : [
'Permanent',
'Temporary',
'Internship'
],
message : "Please select correct options for job type"
},
minEducation : {
type: String,
required : true,
enum : {
values : [
'Bachelors',
'Masters',
'Phd'
],
message : 'Please select correct options for Education.'
}
},
positions : {
type : Number,
default : 1,
},
experience : {
type: String,
required : true,
enum : {
values : [
'No Experience',
'1 Year - 2 Years',
'2 Year - 5 Years',
'5 Years +'
],
message : "Select options for experience"
}
},
salary: {
type: Number,
required : [true, 'Please enter expected salary']
},
postingDate : {
type: Date,
default: Date.now
},
applicatsApplied : {
type : [Object],
select : false,
}
}
}
})
//Create the model based on the Schema and export it.
module.exports = mongoose.model('Job', jobSchema)
```