https://github.com/jdlorimer/chinese-support-redux
Anki add-on providing support for Chinese study
https://github.com/jdlorimer/chinese-support-redux
addon anki cantonese chinese flashcards mandarin study-aid
Last synced: 6 months ago
JSON representation
Anki add-on providing support for Chinese study
- Host: GitHub
- URL: https://github.com/jdlorimer/chinese-support-redux
- Owner: jdlorimer
- License: gpl-3.0
- Archived: true
- Created: 2017-10-21T08:18:30.000Z (over 7 years ago)
- Default Branch: master
- Last Pushed: 2023-11-30T22:45:58.000Z (over 1 year ago)
- Last Synced: 2024-10-09T21:03:58.021Z (9 months ago)
- Topics: addon, anki, cantonese, chinese, flashcards, mandarin, study-aid
- Language: Python
- Homepage: https://ankiweb.net/shared/info/1128979221
- Size: 136 MB
- Stars: 101
- Watchers: 13
- Forks: 50
- Open Issues: 97
-
Metadata Files:
- Readme: README.html
- License: LICENSE
Awesome Lists containing this project
- awesome-github-repos - jdlorimer/chinese-support-redux - Anki add-on providing support for Chinese study (Python)
README
Chinese Support Redux is an Anki 2.1-compatible rewrite of the original Chinese Support add-on. It offers a number of features that streamline the process of creating flashcards for learning Chinese. The current focus of development effort is on improving the stability of the add-on and the accuracy of its output. Once the core functionality is sufficiently robust and reliable, additional features will be considered.

Please note that the add-on is still in beta and is sometimes shipped in an unstable state. Please upgrade with each new release and report any issues on GitHub. The automated test suite is a work-in-progress, so I still rely heavily on user reports to supplement my own manual testing.

Important Notes
- If you find that a field is not filling at all, please check config.json for the complete list of valid field names. For those migrating from an older version of the add-on, you will need to rename any definition fields to
English,GermanorFrench, depending on what you want. - If tone colours are not showing, ensure that the styling section of the template contains the following CSS:
.tone1 {color: red;}

.tone2 {color: orange;}

.tone3 {color: green;}

.tone4 {color: blue;}

.tone5 {color: gray;}
Features
- Automatic field filling
- Translation (from built-in dictionary; supports English, German and French)
- Romanisation (supports Pīnyīn (拼音) and Cantonese Jyutping (粵拼))
- Mandarin Audio (fetched from Google or Baidu)
- Traditional (繁體字) and simplified (簡體字) characters
-
Bopomofo (ㄅㄆㄇㄈ), also known as Zhuyin (注音) -
Rubies (small-print transcription placed above characters) - Frequency (from “very basic” to “obscure”) - based on anki-chinese-word-frequency
- Usage Sentence Examples - Chinese/English sentence pairs from Tatoeba
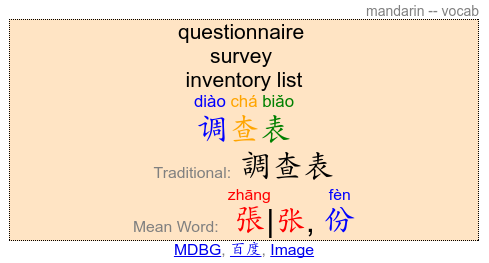
- Tone colours (applied to characters, romanisation and Bopomofo)
- Built-in note types (Basic and Advanced)
Status
The vast majority of features have been successfully ported, and the add-on is in a usable state, albeit with some definite rough edges.
The add-on is still in beta. By this I mean “it works, but I wouldn’t trust it with my children”. Expect occasional issues, and please make a back-up before trying it. I use it myself and haven't experienced data loss, but your mileage may vary.
Please report any issues here on GitHub. Feature requests are also welcome.
If you are new to the Chinese Support add-on, the wiki from the previous version is still relevant (here).
Usage
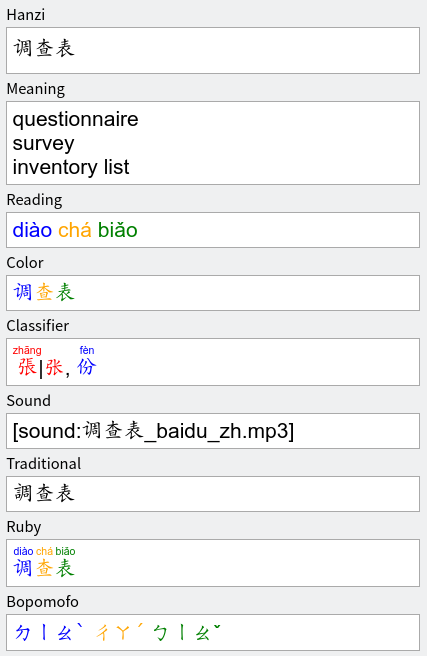
The core feature of the add-on is the automatic field filling. To take advantage of this, you need to have an Anki note type with the appropriate fields (e.g., Hanzi, English, Pinyin, Sound). See config.json for a list of valid field names.
If you don't already have such a note type, the easiest approach is to use one of the built-in models. Two types are installed automatically: Basic and Advanced. The only important difference is that the Advanced model shows more information.
To use the field-filling features:
- Add a new note to Anki (press
a) - Select
Chinese (Basic)orChinese (Advanced)as the note type - Enable Chinese Support Redux for this note type (click
汉字) - Enter a word (e.g., 電話) into the
Hanzifield (sentences will also work) - Press
Tab - The remaining fields should then be populated automatically
Screenshots


Support
If you encounter any issues, the best way to have these addressed is to raise them on GitHub. Feature requests are welcome, with the caveat that all good things take time.
I understand the documentation is sparse. Anyone who wishes to add content to the wiki is more than welcome to.
Development
Testing
For those who wish to run the tests locally, this is fairly straightforward.
Clone the repository:
git clone https://github.com/luoliyan/chinese-support-redux

cd chinese-support-redux
Ideally, set up a virtual environment to isolate the project:
curl https://pyenv.run | bash

pyenv virtualenv 3.6.8 csr

pyenv local csr
Install dependencies and run the tests:
pip install -r requirements.txt

make test
Debugging with PyCharm
(a) Without Anki Source
- Copy the repo root to the Anki add-ons folder. As of version 2.1, this is
%AppData%\Anki2\addons21 - Create a Python 3.8 virtual environment in PyCharm for the add-on folder (make sure you are running 64-bit Python). This can be done with:
pythonimport platformplatform.architecture() - Run the following in the PyCharm console (these could be added to
requirements.txtinstead):pythonimport subprocesssubprocess.check_call(["pip3", "install", "mypy", "anki", "ankirspy", "aqt", "pyqt5", pyqtwebengine"]) - Install the
requirements.txtfor the project venv - Create a file for debugging in PyCharm as:
pythonimport aqtaqt.run() - Start debugging. The first Anki run will pick up the
testsfolder as a plugin and error out. This is expected. - Go to the Tools → Add-ons menu and disable
tests - Enjoy coding!
(b) With Anki Source
- Download and extract Anki source code somewhere on the hard drive.
- Create a folder such as
anki-addon-devon your hard drive and open it on PyCharm as a project. Then, open Anki source code folder as another project within the current project window by choosing Attach. - Under
Preferences → Project → Project Dependencies → anki-addon-dev, check the box to approve the add-on depends on Anki source code. - Under the run configurations beside run and debug buttons, edit the configuration as follows:
- Script Path:
[PATH_TO_ANKI_SOURCE_FOLDER]/anki-2.1.13/runanki - Parameters:
-b [PATH_TO_ANKI_ADDON_PROJECT]/anki-addon-dev - Create your project files and do the development on this path:
anki-addon-dev/addons21/[YOUR_PROJECT_FOLDER] - Happy debugging while developing
Additional Guidance
