https://github.com/jedie/micropython-sonoff-webswitch
MicroPython project to free the Sonoff WiFi Smart Socket from the cloud by run a webserver on the device.
https://github.com/jedie/micropython-sonoff-webswitch
esp8266 micropython micropython-esp8266 python web-application webserver wifi
Last synced: about 1 year ago
JSON representation
MicroPython project to free the Sonoff WiFi Smart Socket from the cloud by run a webserver on the device.
- Host: GitHub
- URL: https://github.com/jedie/micropython-sonoff-webswitch
- Owner: jedie
- License: gpl-3.0
- Created: 2019-11-08T07:23:52.000Z (over 6 years ago)
- Default Branch: master
- Last Pushed: 2022-10-18T19:37:41.000Z (almost 4 years ago)
- Last Synced: 2025-04-07T03:02:31.879Z (over 1 year ago)
- Topics: esp8266, micropython, micropython-esp8266, python, web-application, webserver, wifi
- Language: Python
- Homepage:
- Size: 484 KB
- Stars: 19
- Watchers: 2
- Forks: 7
- Open Issues: 4
-
Metadata Files:
- Readme: README.md
- License: LICENSE
Awesome Lists containing this project
README
# micropython-sonoff-webswitch


MicroPython project to free the Sonoff WiFi Smart Socket from the cloud by run a webserver on the device.
Tested devices:
* Sonoff S20 (Easy to connect. Solder joints prepared.)
* Sonoff S26 (Harder to connect: Solder joints very small.)
## Features
* web interface
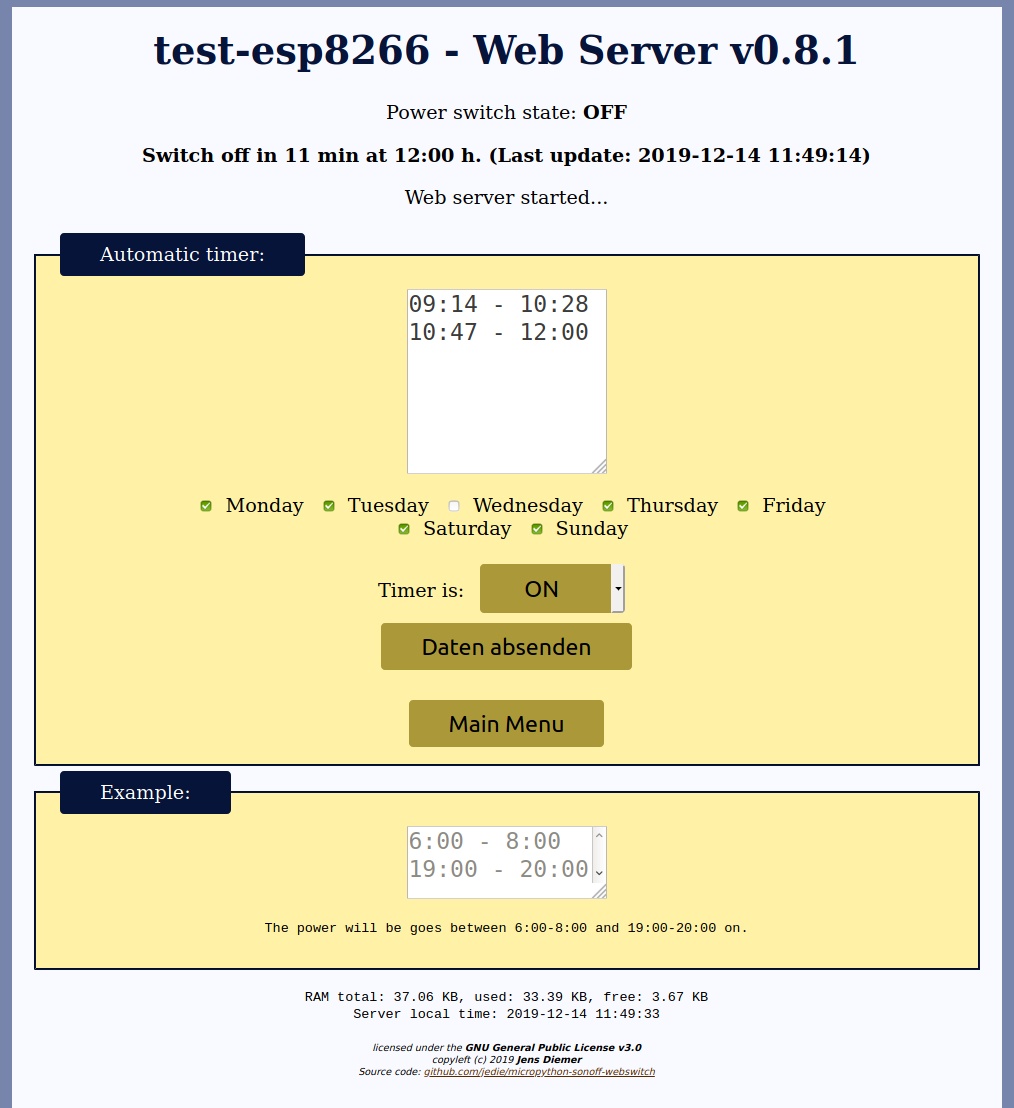
* schedule multiple timers
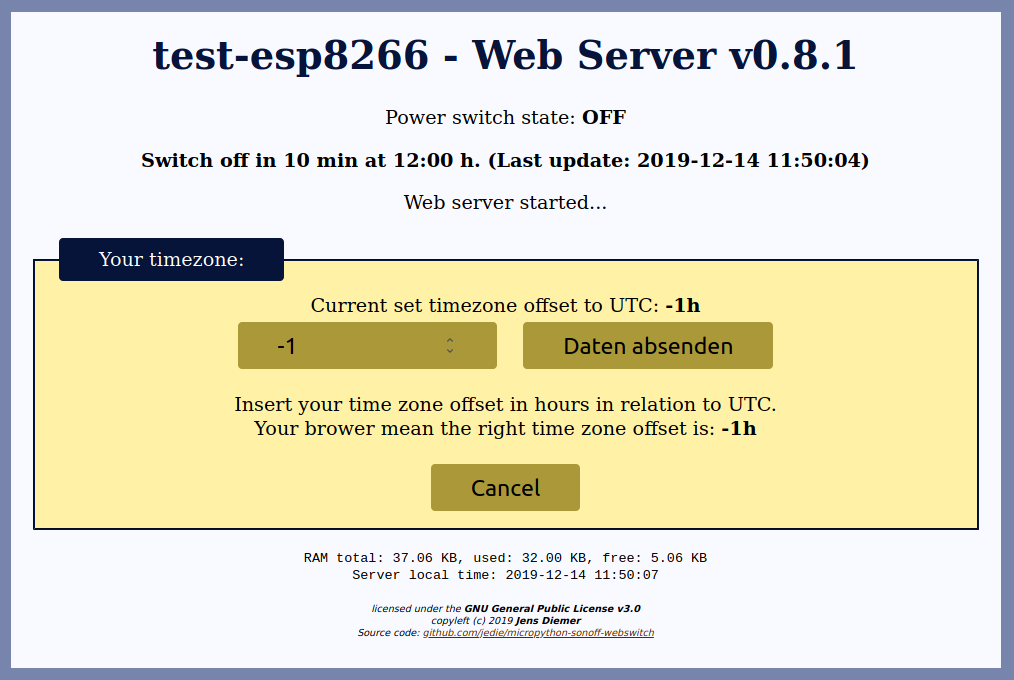
* Handle time zones (set you time zone via web page)
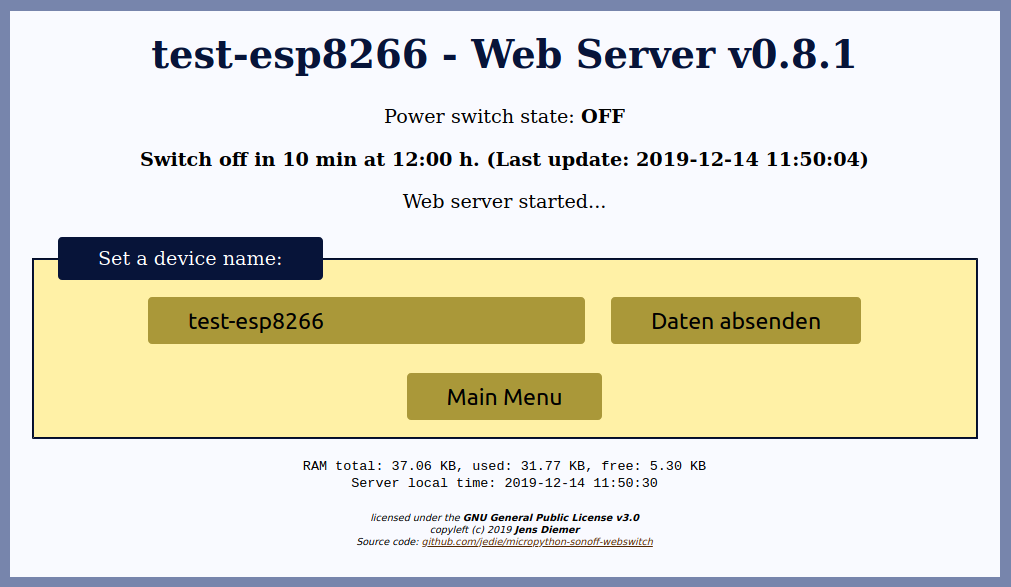
* Display an editable device name (Helpful if you have more than one device ;) )
* The device name will also be used as DHCP hostname
* OTA updates (currently without directory support)
* turn the switch on/off by the web page or the device button
* checkbox for each day of the week where timers are active
* Reset the device by long pressing the button
* supports multiple WIFI credentials
* NTP sync
The device will do this on every boot:
* boot
* connect to your WiFi
* get current time via ntp
* make OTA Update (timeout: 15sec.)
* serve web page
Some notes about the timer functionality:
The Device always tries to turn the power ON/OFF based on the current timer. Even after a power failure.
However, this only works correctly if the current time is set correctly by the RTC.
The current time is automatically retrieved from the Internet via NTP sync. At boot and also repeated after start.
Of course, this can only work if the device is connected to the Internet via WiFi ;)
You can "overwrite" the current timer at any time by pressing the button on the device.
This overwrite will stay until the next timer.
After a power failure the "overwrite" information is deleted and the timer regulates the power again.
## Roadmap
Things that will be implement in the near feature:
* Insert new WiFi settings via web page
* timer toggle flag to reverse: power is switched off during the specified periods
further away:
* different timers for every weekday
* Support directories via OTA Updates
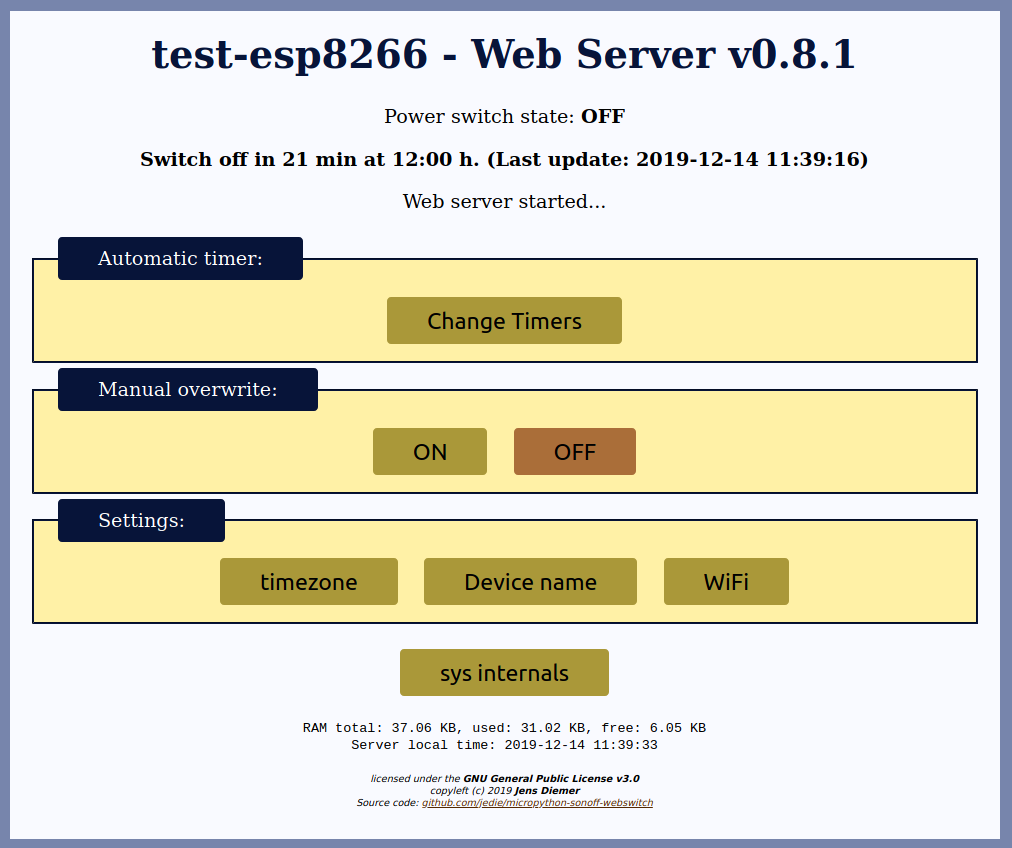
## Screenshot
The Web Page looks like this:
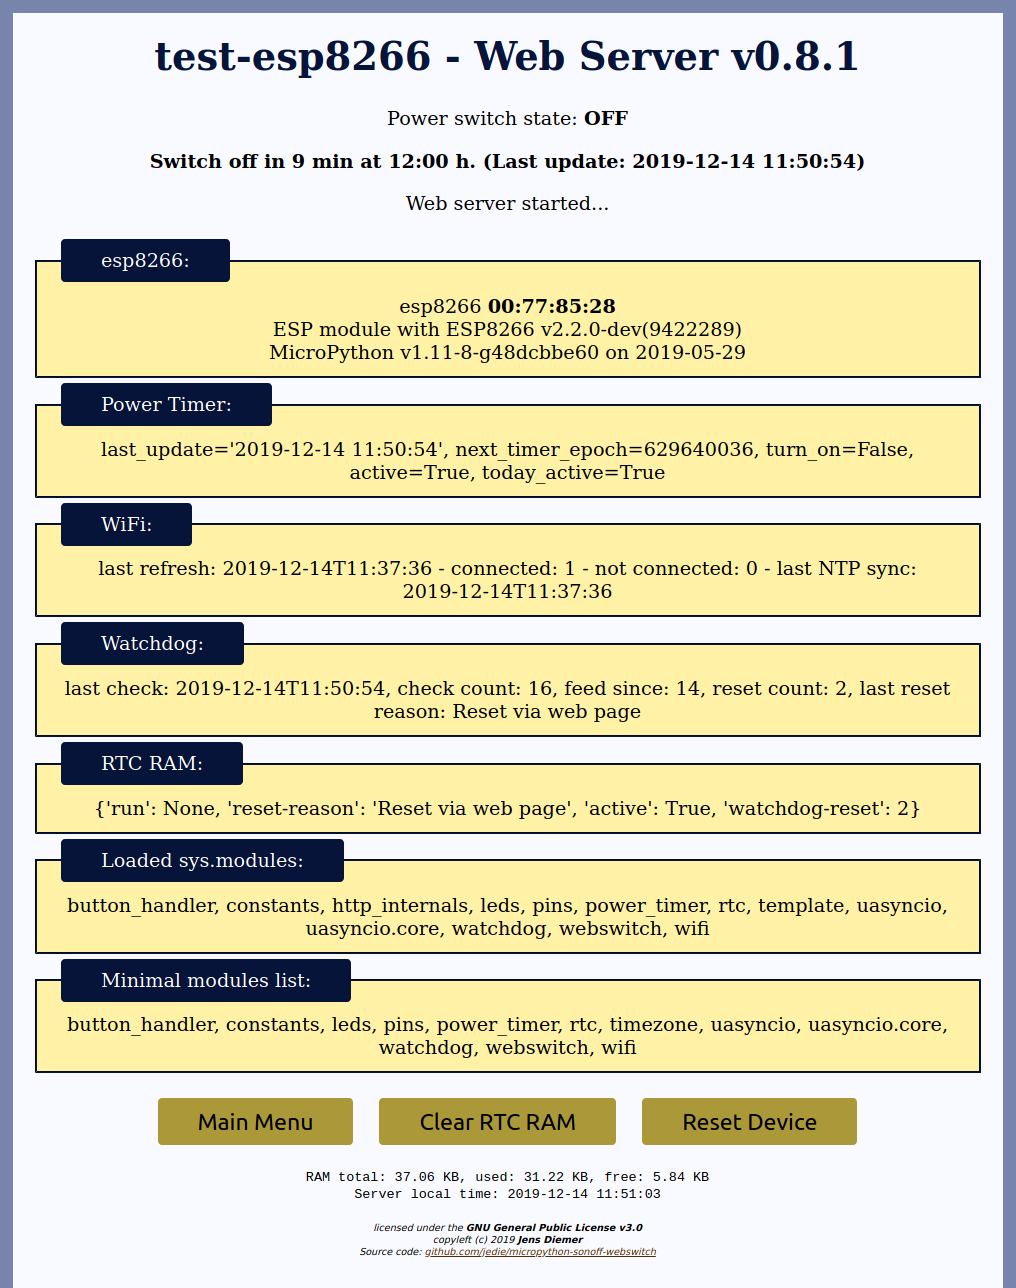
All existing screenshots can be found here:
* [jedie.github.io/blob/master/screenshots/WebSwitch/](https://github.com/jedie/jedie.github.io/blob/master/screenshots/WebSwitch/README.creole)
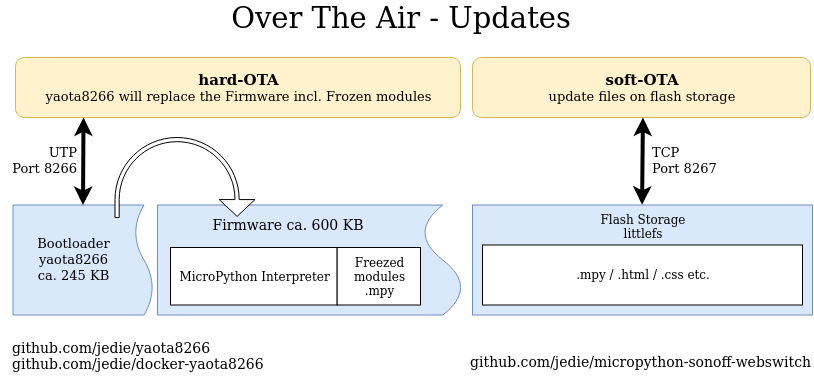
### OTA overview
# setup a device
## prepare the hardware:
* Open the device
* make a connection with a UART-USB converter with 3.3V option and to the `3.3V`, `GND`, `TX` and `RX` pins
* **WARNING:** DO NOT CONNECT DEVICES TO MAINS POWER WHILE THE COVER IS OPEN AND CIRCUIT BOARD IS EXPOSED!!!
Very good information to get started can you found here:
- https://templates.blakadder.com/sonoff_S20.html
- https://github.com/tsaarni/mqtt-micropython-smartsocket
## Overview of installing the software on the device:
* Generate yaota8266 RSA keys, create `config.h` and compile yaota8266 and firmware
* Flash yaota8266 and firmware
* create `_config_wifi.json`
* Connect device to WiFi
* start soft-OTA to put all missing files to the device
## setup project
Clone the sources, and setup virtualenv via `pipenv`:
```bash
~$ git clone https://github.com/jedie/micropython-sonoff-webswitch.git
~$ cd micropython-sonoff-webswitch
~/micropython-sonoff-webswitch$ make update
```
To see all make targets, just call make, e.g.:
```bash
~/micropython-sonoff-webswitch$ make
make targets:
help This help page
docker-pull pull docker images
docker-build pull and build docker images
update update git repositories/submodules, virtualenv, docker images and build local docker image
thonny run Thonny IDE to access the Micropython REPL (Python prompt)
test Run pytest
micropython_shell start a bash shell in docker container "local/micropython:latest"
unix-port-shell start micropython unix port interpreter
build-firmware-combined compiles the micropython non-OTA firmware and store it here: /build/firmware-combined.bin
build-ota-firmware compiles the micropython OTA firmware and store it here: /build/firmware-ota.bin
yaota8266-rsa-keys Pull/build yaota8266 docker images and Generate RSA keys and/or print RSA modulus line for copy&paste into config.h
yaota8266-build Compile ota bootloader and store it here: build/yaota8266.bin
verify Check RSA key, config.h and compiled "yaota8266.bin"
erase-flash call esptool.py erase_flash
flash-firmware-combined Flash build/firmware-combined to location 0x3c000 via esptool.py
flash-yaota8266 Flash build/yaota8266.bin to location 0x0 via esptool.py
flash-ota-firmware Flash build/firmware-ota.bin to location 0x3c000 via esptool.py
hard-ota Start yaota8266 live-ota to hard-OTA Update the firmware file build/firmware-ota.bin.ota
soft-ota Start soft-OTA updates: Compile .py to .mpy and push missing/updated files (*.mpy, *.css, *.html etc.) to the device
miniterm Low level debug device via miniterm.py (from pyserial) to /dev/ttyUSB0
```
## compile own firmware
### docker-yaota8266/yaota8266/config.h
You must create `docker-yaota8266/yaota8266/config.h` and insert your RSA modulus line.
To generate your RSA keys and display the needed line for `config.h` just call:
```bash
~/micropython-sonoff-webswitch$ make yaota8266-rsa-keys
...
Copy&paste this RSA modulus line into your config.h:
----------------------------------------------------------------------------------------------------
#define MODULUS "\xce\x4a\xaf\x65\x0d\x4a\x74\xda\xc1\x30\x59\x80\xcf\xdd\xe8\x2a\x2e\x1d\xf7\xa8\xc9\x6c\xa9\x4a\x2c\xb7\x8a\x5a\x2a\x25\xc0\x2b\x7b\x2f\x58\x4c\xa8\xcb\x82\x07\x06\x08\x7e\xff\x1f\xce\x47\x13\x67\x94\x5f\x9a\xac\x5e\x7d\xcf\x63\xf0\x08\xe9\x51\x98\x95\x01"
----------------------------------------------------------------------------------------------------
```
The generated RSA key files are here:
* `docker-yaota8266/yaota8266/ota-client/priv.key`
* `docker-yaota8266/yaota8266/ota-client/pub.key`
You should backup theses files;
### compile
After you have created your own RSA keys and `config.h`, you can compile `yaota8266.bin` and `firmware-ota.bin`, e.g.:
```bash
~/micropython-sonoff-webswitch$ make yaota8266-build
~/micropython-sonoff-webswitch$ make build-ota-firmware
```
The compiled files are stored here:
* `~/micropython-sonoff-webswitch/build/yaota8266.bin`
* `~/micropython-sonoff-webswitch/build/firmware-ota.bin` <- for flashing
* `~/micropython-sonoff-webswitch/build/firmware-ota.bin.ota` <- used in hard-OTA process
### Deploying the firmware: flash yaota8266 and firmware
ESP8266 needs to be put into Programming Mode before the firmware can be uploaded. To put the ESP8266 into Programming Mode:
* Press and hold the power button before connecting
* Connect device via UART-USB converter
* After about 2 seconds: release the button
Maybe you must give the user the permissions to access the USB Port, e.g.: `sudo usermod -a -G dialout $USER` Otherwise you will get a error message like: `Permission denied: '/dev/ttyUSB0'`
Now `esptool` can be used. But only for *one* operation! After each esptool call, you must disconnect the device from the USB and repeat this procedure!
The first time, the flash memory must be erased, call:
```bash
~/micropython-sonoff-webswitch$ make erase-flash
```
After `erase-flash` and after you have called `make yaota8266-build` and `make build-ota-firmware` you can flash your device:
```bash
# put into Programming Mode and call:
~/micropython-sonoff-webswitch$ make flash-yaota8266
# Again, put into Programming Mode and call:
~/micropython-sonoff-webswitch$ make flash-ota-firmware
```
**Importand**: These flash commands are for the Sonoff device and may **not work** on other ESP8266 devices!
For other devices just use `esptool` directly, e.g.:
```bash
~/micropython-sonoff-webswitch$ pipenv run esptool.py --port /dev/ttyUSB0 write_flash 0 build/yaota8266.bin
~/micropython-sonoff-webswitch$ pipenv run esptool.py --port /dev/ttyUSB0 write_flash 0x3c000 build/firmware-ota.bin
```
**Note:**
The file `firmware-ota.bin` must be flash with `esptool.py` **not** the `firmware-ota.bin.ota` ! This file is ues in hard-OTA update process.
More information about flashing can be found in the official documentation here: http://docs.micropython.org/en/latest/esp8266/tutorial/intro.html
### access the Micropython REPL
Once you have the firmware on the device you can access the Micropython REPL (Python prompt).
There are different ways to do this. I used [thonny](https://github.com/thonny/thonny/) and his [MicroPython support](https://github.com/thonny/thonny/wiki/MicroPython)
`thonny` is installed via pipenv, to start the IDE, just call:
```bash
~/micropython-sonoff-webswitch$ make thonny
```
First steps in thonny:
* Activate ESP8266 mode: `Tools / Options / Interpreter` select: `MicroPython (ESP8266)`
* Activate `files` Tab: `View / Files`
Now you should be able to access the Micropython REPL via `Ctrl-F2`.
You can also start scripts on the device:
* In `This computer` TAB go to: `.../micropython-sonoff-webswitch/helpers`
* Open a file by double-click e.g.: `mpy_information.py` in the editor
* Run the script on the device by `F5`
### copy missing files to the device
After format the flash filesystem as `littlefs2`: copy missing files to the device, using soft-OTA:
* Connect Device to your WiFi network
* start soft-OTA client and server
#### create src/_config_wifi.json
The device needs SSID/passwords to be able to log in to different WLANs. It reads the credentials from the file `_config_wifi.json`. This file must be created. The template is [_config_wifi-example.json](https://github.com/jedie/micropython-sonoff-webswitch/blob/master/_config_wifi-example.json).
Copy and edit [_config_wifi-example.json](https://github.com/jedie/micropython-sonoff-webswitch/blob/master/_config_wifi-example.json) to `src/_config_wifi.json`
All missing files in `src` will be copied to device via soft-OTA.
#### connect device to WiFi
To connect the device on the fist start to your WiFi network, edit and run this:
```python
import time, network
sta_if = network.WLAN(network.STA_IF)
sta_if.active(True)
sta_if.connect('your-ssid', 'Your-WiFi-Password')
while not sta_if.isconnected():
time.sleep(0.5)
print('connected:', sta_if.ifconfig())
```
Just copy&paste this code snippet into Thonny IDE, insert your credentials and run it via `F5`
### run soft-OTA manually
After the device is connected to your WiFi, it can run soft-OTA and copy all missing `src` files.
Start soft-OTA server with:
```bash
~/micropython-sonoff-webswitch$ make soft-ota
```
At the same time, open [.../micropython-sonoff-webswitch/src/ota_client.py](https://github.com/jedie/micropython-sonoff-webswitch/blob/master/src/ota_client.py) in Thonny and start it via `F5`.
Now the soft-OTA should be run:
* The device will be connected
* All missing/new files from `src` will be transfered to the device
Now the device setup is done ;)
### OTA updates
**Note**: There are two kinds of OTA updates:
* 'hard' OTA update via **yaota8266** bootloader that will replace the complete firmware.
* 'soft' OTA updates via pure micropython script that will only upload new files to the flash filesystem.
The 'hard' OTA via **yaota8266** is work-in-progress, see: https://github.com/jedie/micropython-sonoff-webswitch/issues/33
#### 'soft' OTA updates
After the initial setup and when everything is working and the device is connected to your wlan, you can use OTA updates.
The device will run the [/src/ota_client.py](https://github.com/jedie/micropython-sonoff-webswitch/blob/master/src/ota_client.py) on every boot.
The script waits some time for the OTA server and after the timeout the normal web server will be started.
To start the `soft-OTA Server`, do this:
```bash
~/micropython-sonoff-webswitch$ make soft-ota
```
If server runs: reboot device and look to the output of the OTA server.
The OTA update implementation does:
* compare device micropython version with installed `mpy_cross` version (If not match: deny update)
* send only new/changed files
* remove existing `.py` file on the device if `.mpy` file was send
* replace existing files only after correct sha hash verify
## project structure
* `./bdist/` - compiled `.mpy` files (and `.html`, `.css` files) that will be uploaded to the device in `soft-OTA`
* `./build/` - compiled firmware files (`firmware-*.bin` and `yaota8266.bin`) for flashing and `hard-OTA`
* `./docker-yaota8266/` - git submodule https://github.com/jedie/docker-yaota8266 to compile yaota8266.bin via docker
* `./helpers/` - Some device tests/helper scripts for bootstrap and developing
* `./micropython_config/` - Config files used to compile MicroPython Firmware
* `./mpy_tests/` - tests that can be run on micropython device (will be also run by pytest with mocks)
* `./sdist/` - Contains all modules that will be freezes into firmware, created via `utils/make_sdist.py`
* `./soft_ota/` - source code of the OTA server
* `./src/` - device source files
* `./tests/` - some pytest files (run on host with CPython)
* `./utils/` - utils for local run (compile, code lint, sync with mpycntrl)
## Links
### sub project links
* Compile `yaota8266.bin` via docker: https://github.com/jedie/docker-yaota8266
* Compile micropython firmware via docker: https://github.com/jedie/docker-micropython
### Forum links
* OTA updates: https://forum.micropython.org/viewtopic.php?f=2&t=7300
* free RAM: https://forum.micropython.org/viewtopic.php?f=2&t=7345
### misc
* S20 Wifi Smart Socket Schematic: https://www.itead.cc/wiki/S20_Smart_Socket
## history
- *dev* - [compare v0.12.0...master](https://github.com/jedie/micropython-sonoff-webswitch/compare/v0.12.0...master)
- TBC
- v0.12.0 - 2020-02-06 - [compare v0.11.1...v0.12.0](https://github.com/jedie/micropython-sonoff-webswitch/compare/v0.11.1...v0.12.0)
- Refactory reset handling: Reset only after 7h WiFi/NTP lost
- ...