https://github.com/jellydn/ts-inlay-hints
A guide on how to utilize TypeScript inlay hints in VS Code / Neovim with the TypeScript Language Server
https://github.com/jellydn/ts-inlay-hints
inlay-hints neovim typescript vscode
Last synced: about 1 year ago
JSON representation
A guide on how to utilize TypeScript inlay hints in VS Code / Neovim with the TypeScript Language Server
- Host: GitHub
- URL: https://github.com/jellydn/ts-inlay-hints
- Owner: jellydn
- License: mit
- Created: 2023-07-07T15:34:37.000Z (about 3 years ago)
- Default Branch: main
- Last Pushed: 2025-04-12T21:09:48.000Z (about 1 year ago)
- Last Synced: 2025-04-12T22:21:28.469Z (about 1 year ago)
- Topics: inlay-hints, neovim, typescript, vscode
- Language: TypeScript
- Homepage: https://jellydn.github.io/ts-inlay-hints/
- Size: 210 KB
- Stars: 37
- Watchers: 2
- Forks: 1
- Open Issues: 2
-
Metadata Files:
- Readme: README.md
- License: LICENSE
Awesome Lists containing this project
README
Welcome to ts-inlay-hints 👋
A guide on how to utilize TypeScript inlay hints in VS Code / Neovim with the TypeScript Language Server
[](#contributors-)
[![IT Man - Tip #39 - Level Up Your TypeScript: Inlay Hints [Vietnamese]](https://i.ytimg.com/vi/0Y0HrvFQ600/hqdefault.jpg)](https://www.youtube.com/watch?v=0Y0HrvFQ600)
## What is TypeScript inlay hints?
TypeScript inlay hints are inline annotations that appear in your source code while you are coding. They provide additional contextual information about variables, parameters, or function return values. This feature enhances the readability and understanding of your code by providing live insights about your types directly in the code.
Below is a comparison to illustrate how your code looks without and with TypeScript inlay hints:
| Without Inlay Hints | With Inlay Hints |
| -------------------------------------------------------------------------------- | ----------------------------------------------------------------------------- |
| 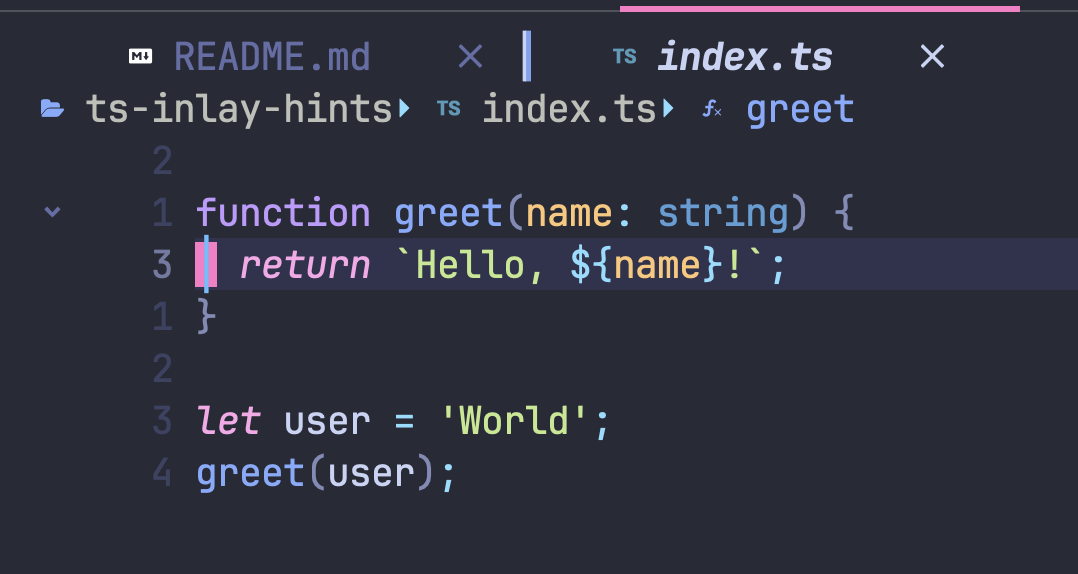 | 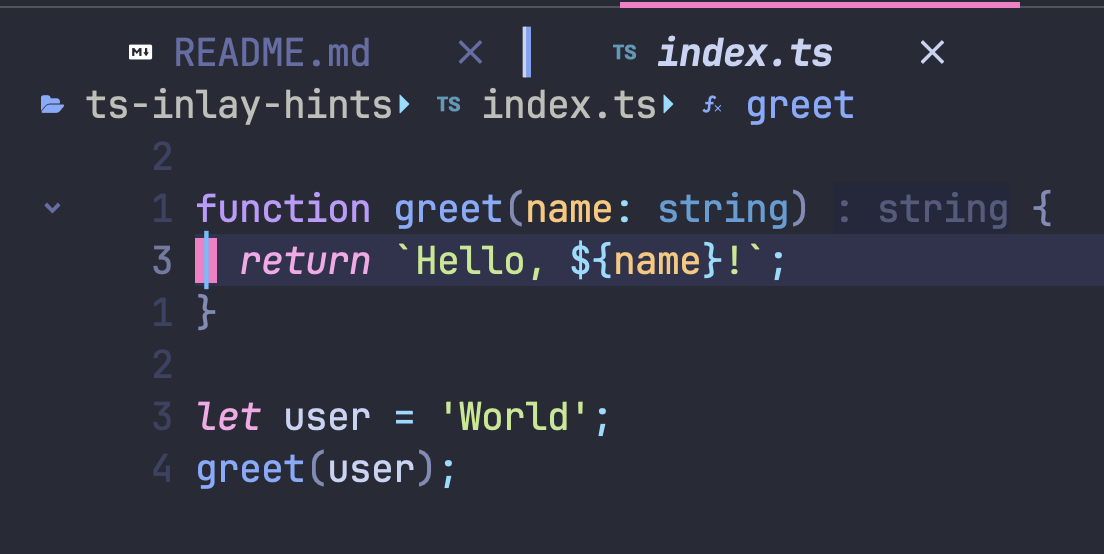 |
Here's the same example, represented as code:
**Without Inlay Hints:**
```ts
function greet(name: string) {
return `Hello, ${name}!`;
}
let user = "World";
greet(user);
```
**With Inlay Hints:**
```ts
function greet(name: string): string {
return `Hello, ${name}!`;
}
let user: string = 'World';
greet(user: string): string;
```
As you can see, the inlay hints provide extra information about the types of the variables and function return values directly in the code, significantly improving readability and understanding.
## How to use
The instructions to set this up are detailed in the following VS Code and Neovim sections.
## VS Code settings
In Visual Studio Code, to enable TypeScript inlay hints, follow these steps:
1. Open settings (File -> Preferences -> Settings or `CMD/Ctrl + ,`).
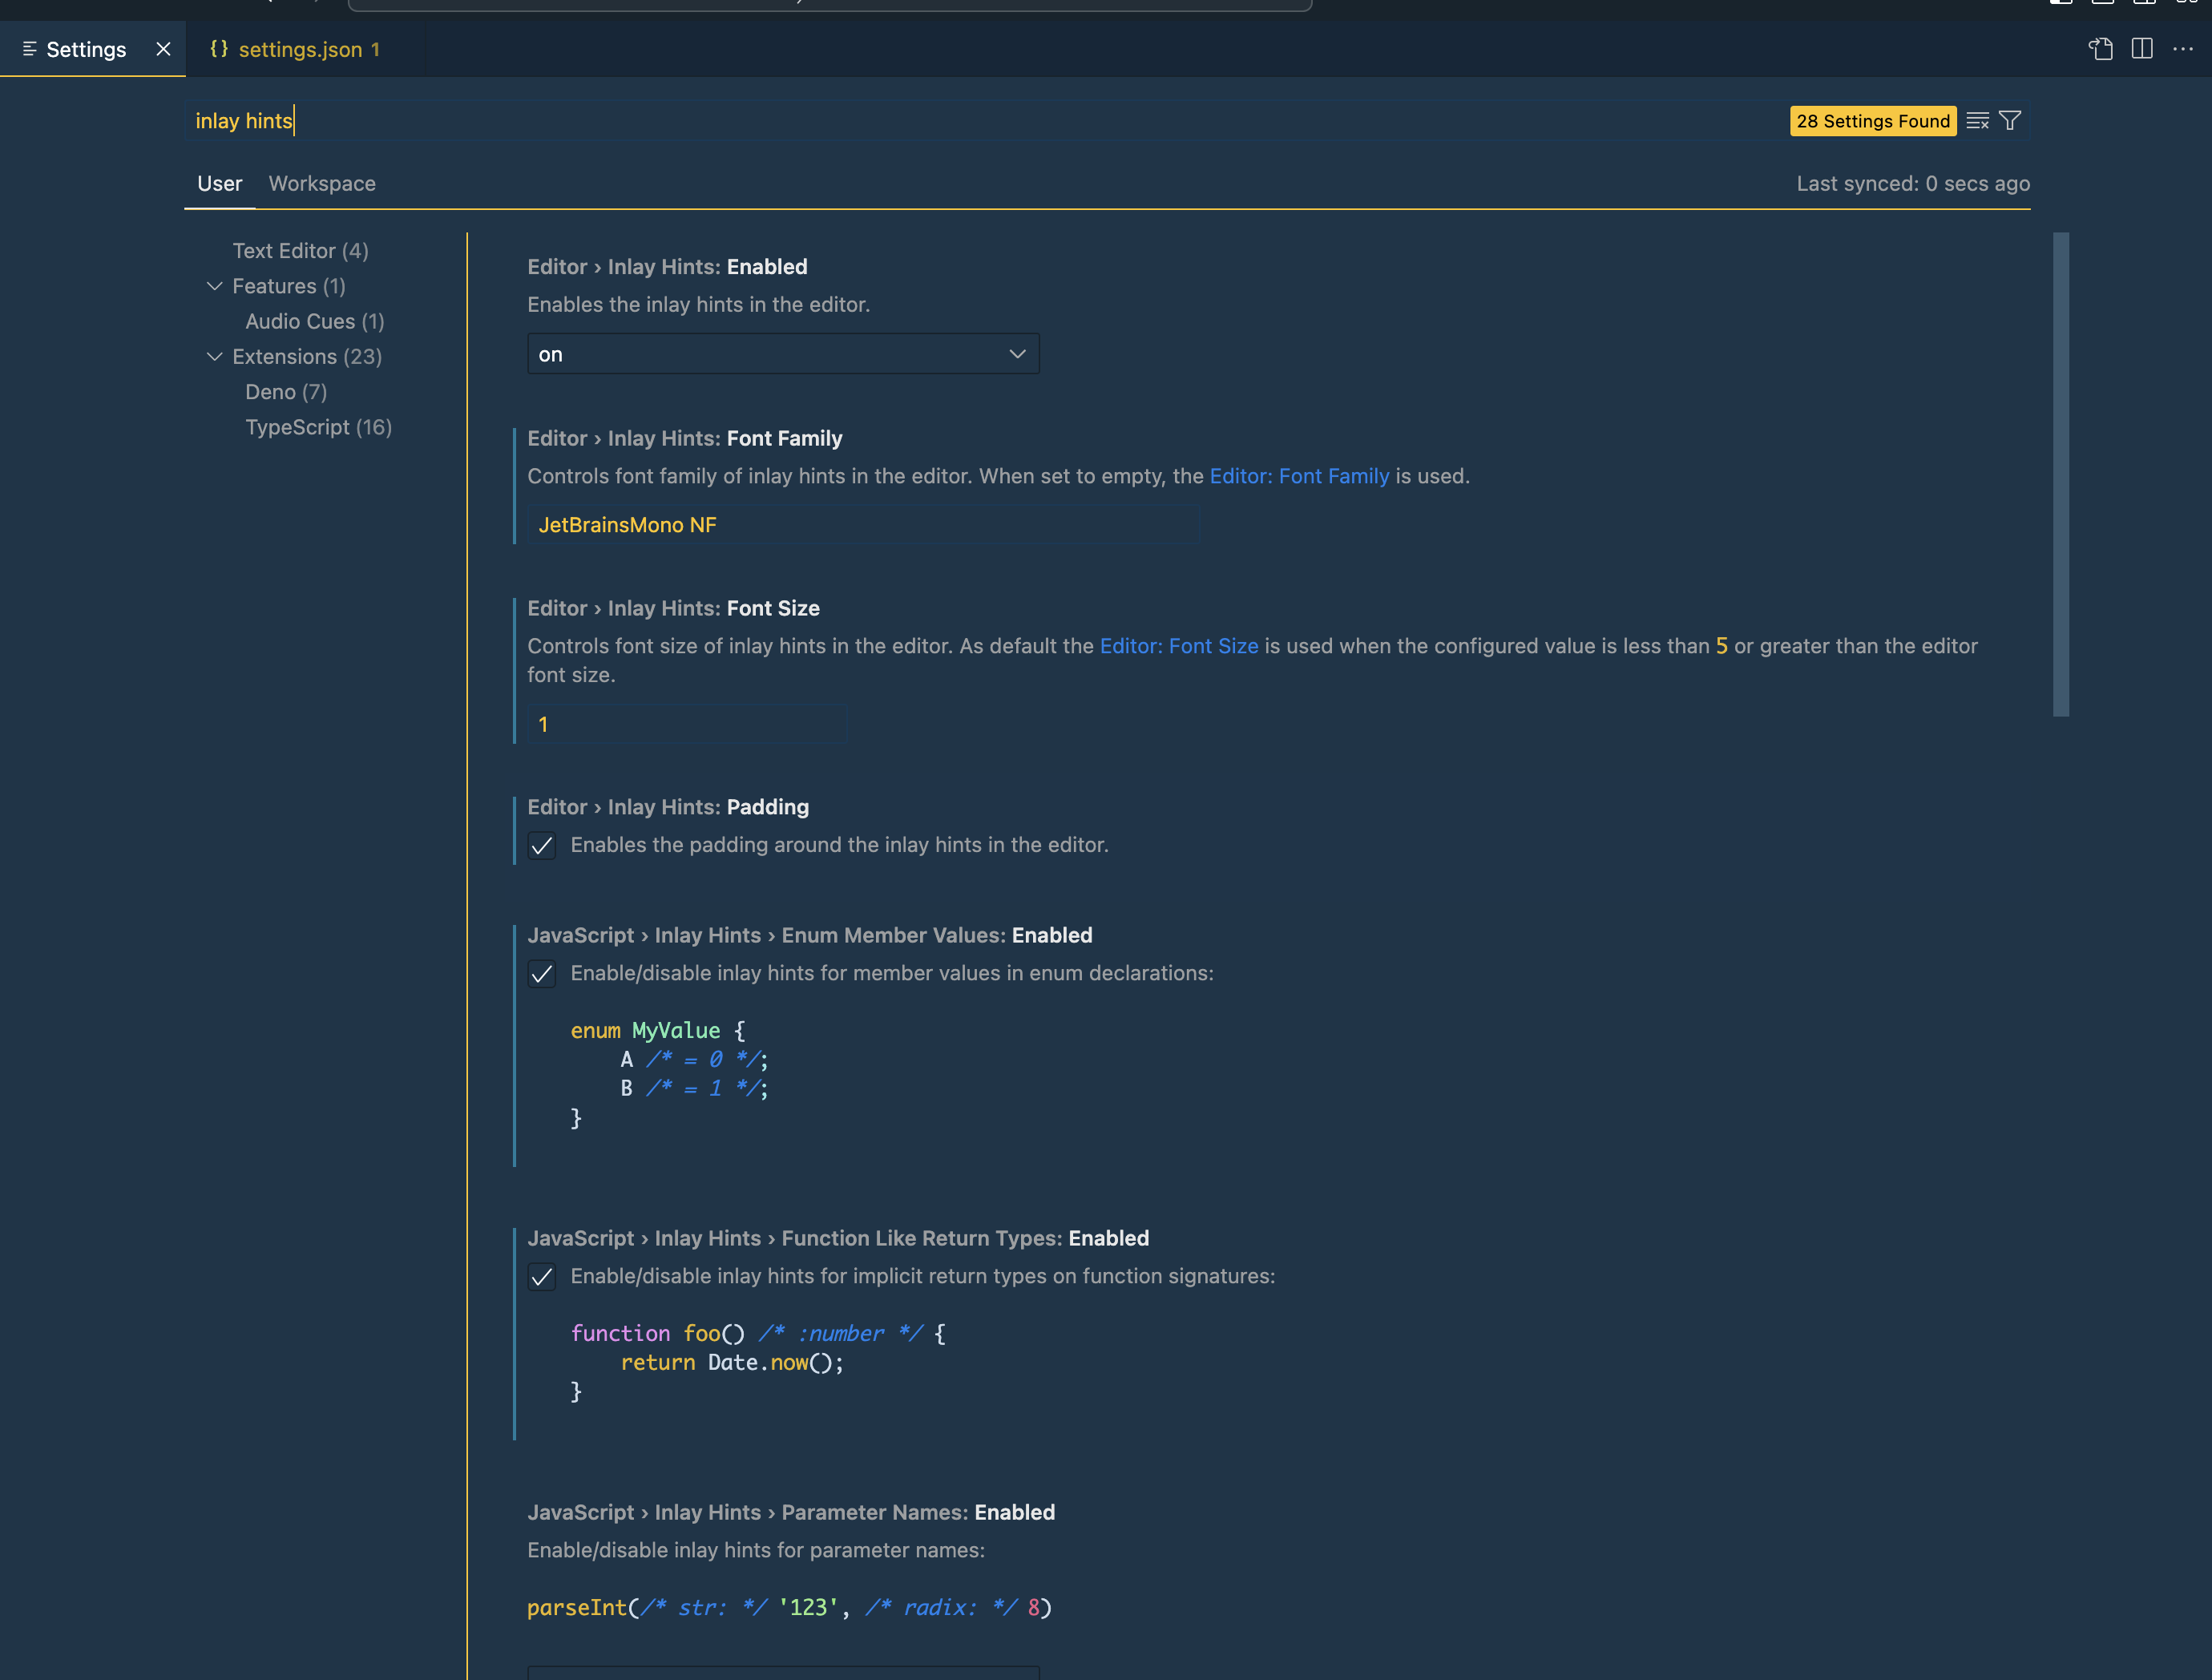
2. Search for "inlay hints" in the search bar.
3. Look for the "Typescript > Inlay Hints" section. There are several options that can be configured here. You can enable or disable each type of hint individually.
4. Reload the VS Code for changes to take effect.
[](https://gyazo.com/eea68c7a1d71827af0b3c659c320ca52)
### My preferred VS Code Settings
Below is a recommended configuration for VS Code when using `inlay-hints`. These settings optimize various aspects of the VS Code environment for JavaScript, TypeScript and Deno development. You can copy and paste these settings into your VS Code settings JSON file.
```json
{
"editor.inlayHints.fontFamily": "JetBrainsMono NF",
"editor.inlayHints.fontSize": 1,
"editor.inlayHints.padding": true,
"javascript.inlayHints.enumMemberValues.enabled": true,
"javascript.inlayHints.functionLikeReturnTypes.enabled": true,
// You can set this to 'all' or 'literals' to enable more hints, default is none
"javascript.inlayHints.parameterNames.enabled": "literals",
"deno.inlayHints.enumMemberValues.enabled": true,
"deno.inlayHints.functionLikeReturnTypes.enabled": true,
"typescript.inlayHints.enumMemberValues.enabled": true,
"typescript.inlayHints.functionLikeReturnTypes.enabled": true,
// You can set this to 'all' or 'literals' to enable more hints, default is none
"typescript.inlayHints.parameterNames.enabled": "literals"
}
```
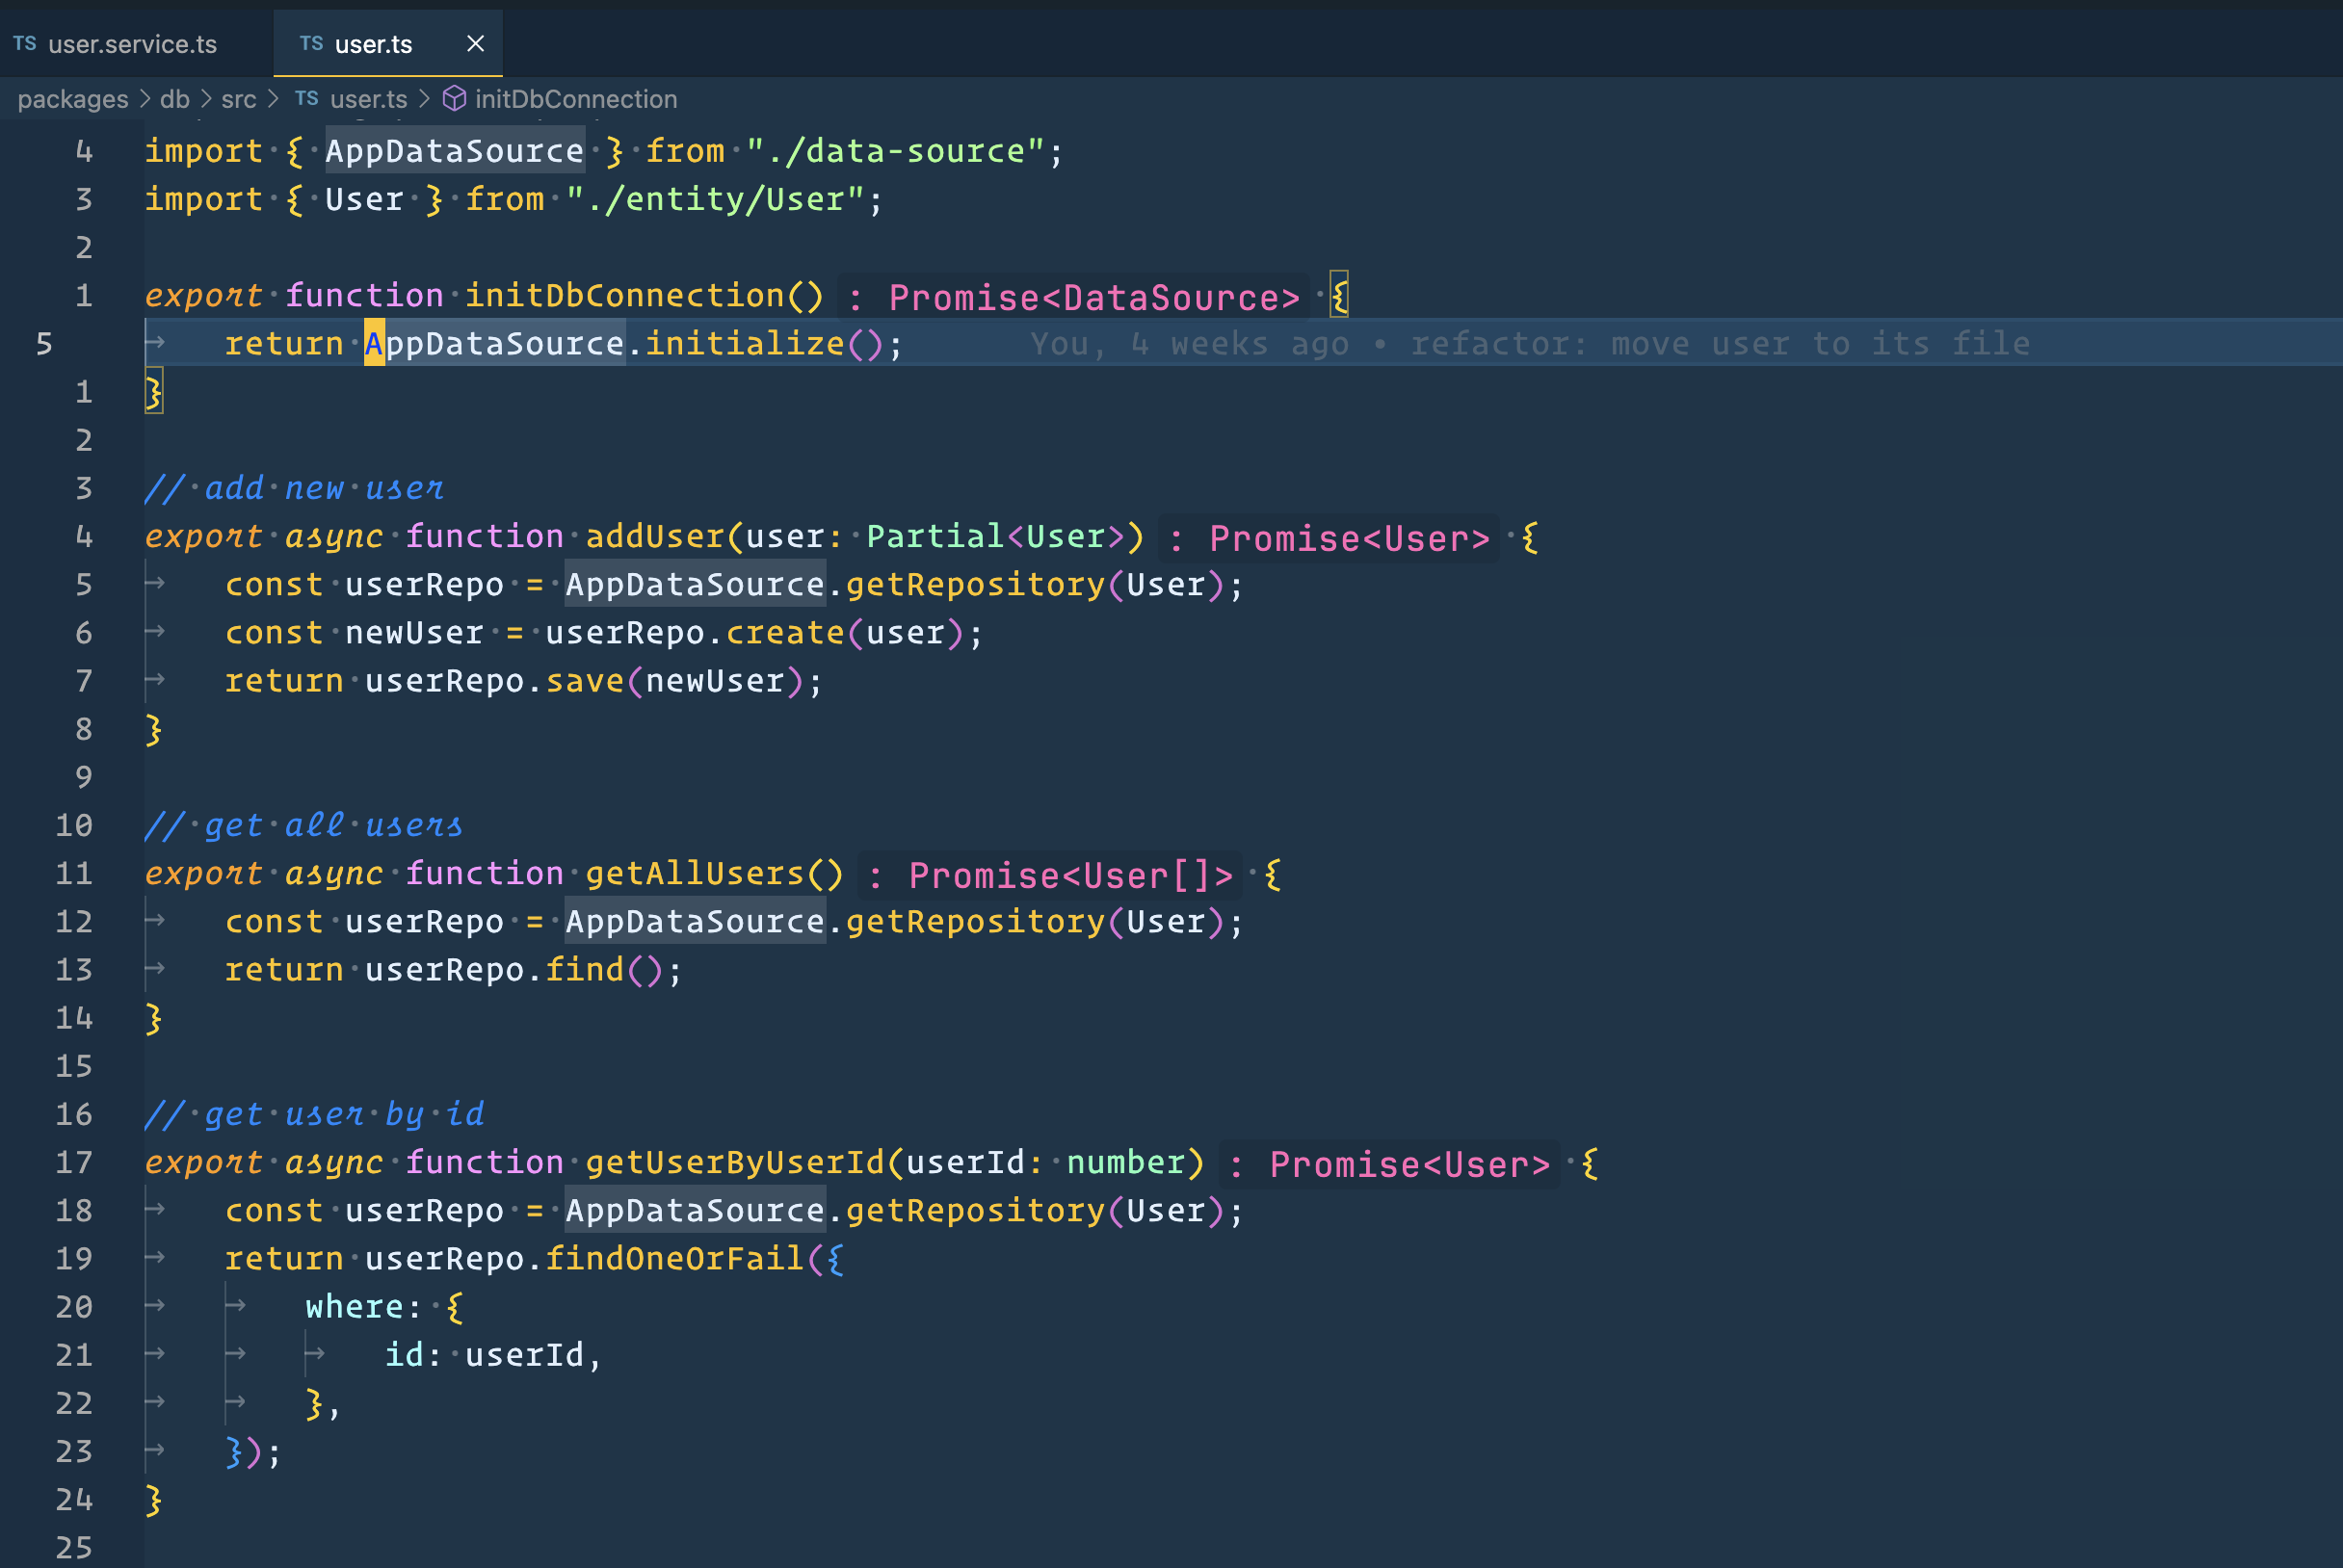
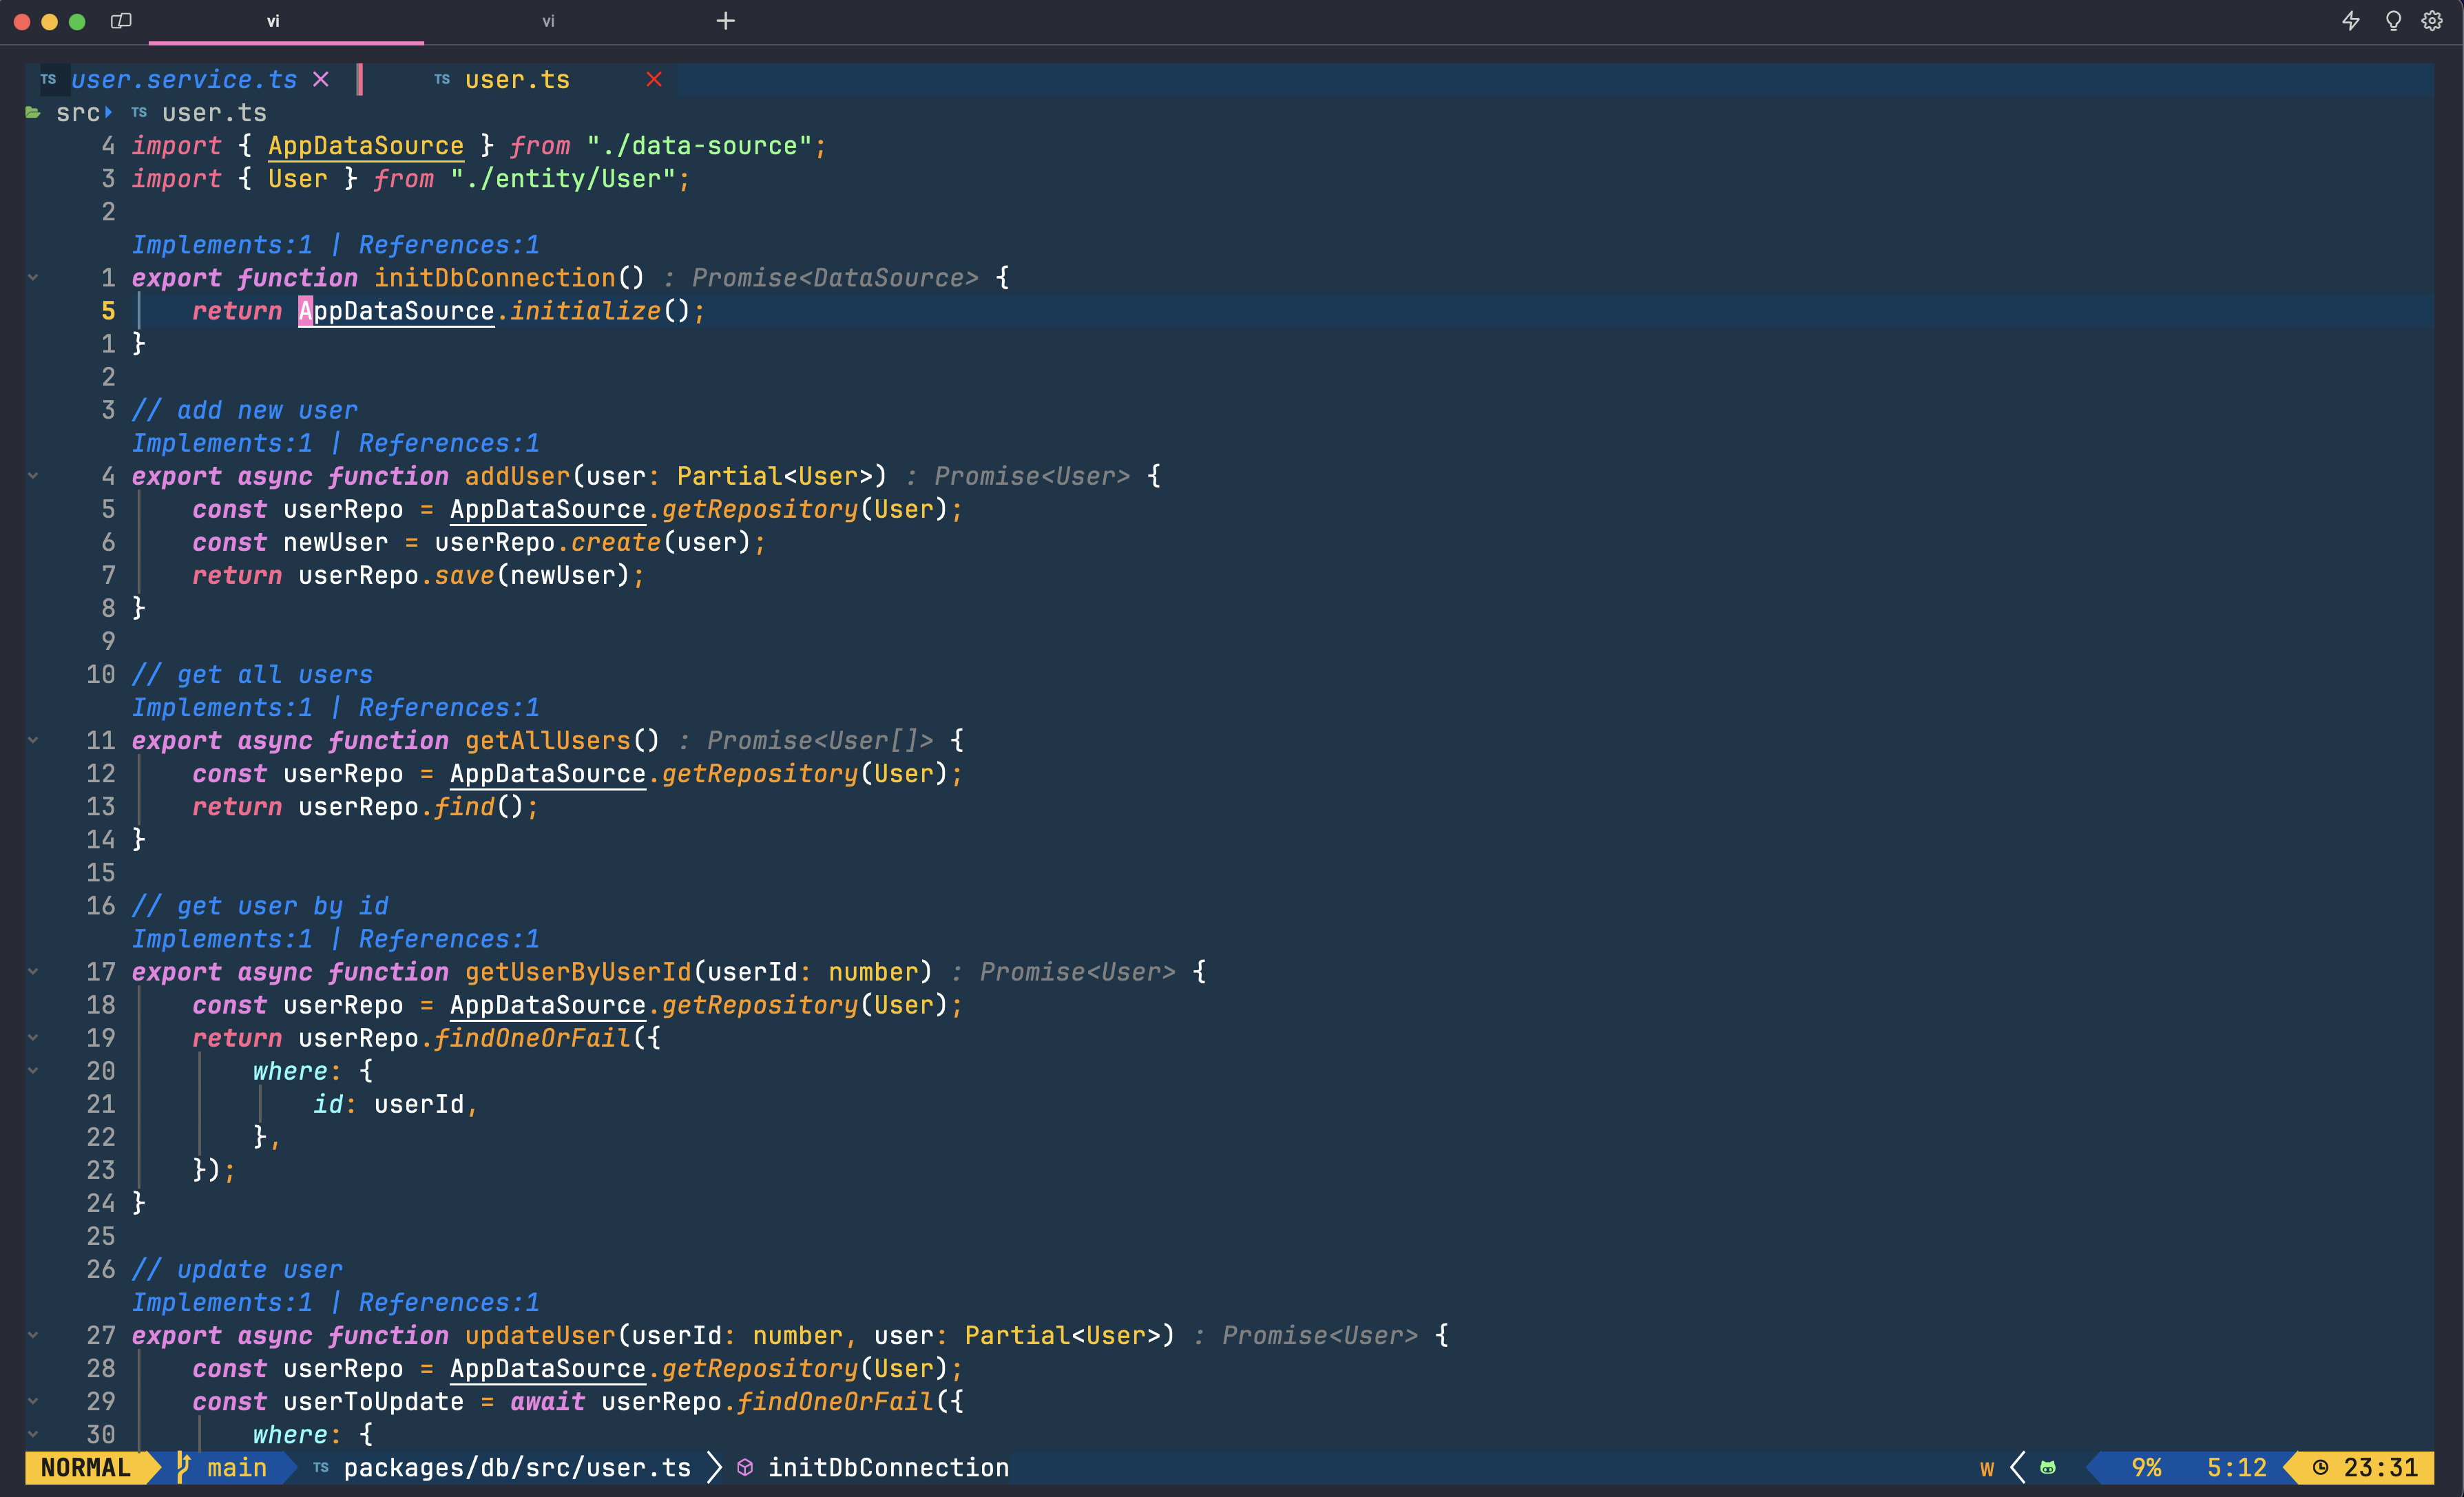
| Setting | Description | Image |
| ------------------------------------------------------------ | ----------------------------------------------------------------------------------------------------------------------------------------------------------------------------------- | ----------------------------------------------------------------------------------------------------------------------------------- |
| `enumMemberValues` | If set to true, this setting enables Inlay Hints for enum member values. | [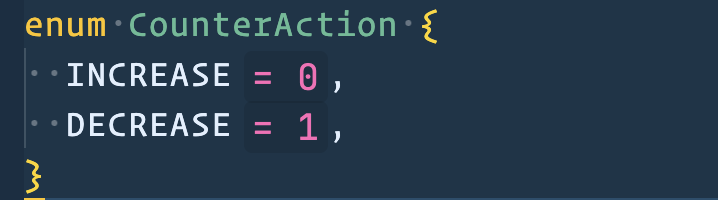](https://gyazo.com/02e301ce25394d6a5a6e70f619174e3e) |
| `functionLikeReturnTypes` | If set to true, this setting enables Inlay Hints for function and method return types. | [](https://gyazo.com/511215a1522c21ceac87822e89df1b83) |
| `parameterNames` | If set to 'all' or 'literals', this setting provides Inlay Hints for variable declarations, default values and destructuring assignments. The default setting is 'none'. | [](https://gyazo.com/635558a6ced872c2efc22c43126b439c) |
[](https://gyazo.com/ecec0eb8d42a2214e1540e098a65b371)
## Neovim settings
For Neovim users, TypeScript inlay hints can be enabled using the nvim-lspconfig and typescript.nvim plugins.
[](https://gyazo.com/95d23014fd5c730fcff0082fc171d214)
### Usage with [LazyVim](https://www.lazyvim.org/)
```lua
-- plugins/lspconfig.lua
return {
"neovim/nvim-lspconfig",
dependencies = { "jose-elias-alvarez/typescript.nvim" },
opts = {
servers = {
tsserver = {
settings = {
typescript = {
inlayHints = {
includeInlayParameterNameHints = "all", -- 'none' | 'literals' | 'all'
includeInlayParameterNameHintsWhenArgumentMatchesName = true,
includeInlayVariableTypeHints = true,
includeInlayFunctionParameterTypeHints = true,
includeInlayVariableTypeHintsWhenTypeMatchesName = true,
includeInlayPropertyDeclarationTypeHints = true,
includeInlayFunctionLikeReturnTypeHints = true,
includeInlayEnumMemberValueHints = true,
},
},
javascript = {
inlayHints = {
includeInlayParameterNameHints = "all", -- 'none' | 'literals' | 'all'
includeInlayParameterNameHintsWhenArgumentMatchesName = true,
includeInlayVariableTypeHints = true,
includeInlayFunctionParameterTypeHints = true,
includeInlayVariableTypeHintsWhenTypeMatchesName = true,
includeInlayPropertyDeclarationTypeHints = true,
includeInlayFunctionLikeReturnTypeHints = true,
includeInlayEnumMemberValueHints = true,
},
},
},
},
},
inlay_hints = {
enabled = true,
},
setup = {
tsserver = function(_, opts)
require("typescript").setup({ server = opts })
return true
end,
},
},
}
```
If you are using the stable version of Neovim, you need to install lsp-inlayhints in your config:
```lua
-- plugins/lsp-inlayhints.lua
-- Disable lsp-inlayhints if that is nightly version, will remove when 0.10.0 is stable
local enabled_inlay_hints = true
if vim.fn.has("nvim-0.10.0") == 1 then
enabled_inlay_hints = true
end
return {
{
"lvimuser/lsp-inlayhints.nvim",
ft = { "javascript", "javascriptreact", "json", "jsonc", "typescript", "typescriptreact", "svelte" },
enabled = enabled_inlay_hints,
opts = {
debug_mode = true,
},
config = function(_, options)
vim.api.nvim_create_augroup("LspAttach_inlayhints", {})
vim.api.nvim_create_autocmd("LspAttach", {
group = "LspAttach_inlayhints",
callback = function(args)
if not (args.data and args.data.client_id) then
return
end
local bufnr = args.buf
local client = vim.lsp.get_client_by_id(args.data.client_id)
require("lsp-inlayhints").on_attach(client, bufnr)
end,
})
require("lsp-inlayhints").setup(options)
vim.api.nvim_set_keymap(
"n",
"uI",
"lua require('lsp-inlayhints').toggle()",
{ noremap = true, silent = true }
)
end,
},
}
```
### My preferred Neovim LSP settings
This is my preferred Neovim configuration for JavaScript, TypeScript and Deno development. You can copy and paste these settings into your Neovim config.
```lua
settings = {
typescript = {
inlayHints = {
-- You can set this to 'all' or 'literals' to enable more hints
includeInlayParameterNameHints = "none", -- 'none' | 'literals' | 'all'
includeInlayParameterNameHintsWhenArgumentMatchesName = false,
includeInlayFunctionParameterTypeHints = false,
includeInlayVariableTypeHints = false,
includeInlayVariableTypeHintsWhenTypeMatchesName = false,
includeInlayPropertyDeclarationTypeHints = false,
includeInlayFunctionLikeReturnTypeHints = true,
includeInlayEnumMemberValueHints = true,
},
},
javascript = {
inlayHints = {
-- You can set this to 'all' or 'literals' to enable more hints
includeInlayParameterNameHints = "none", -- 'none' | 'literals' | 'all'
includeInlayParameterNameHintsWhenArgumentMatchesName = false,
includeInlayVariableTypeHints = false,
includeInlayFunctionParameterTypeHints = false,
includeInlayVariableTypeHintsWhenTypeMatchesName = false,
includeInlayPropertyDeclarationTypeHints = false,
includeInlayFunctionLikeReturnTypeHints = true,
includeInlayEnumMemberValueHints = true,
},
},
},
```
## Resources
Here are some additional resources that you may find helpful when working with TypeScript inlay hints:
### VS Code Extensions
### [VS Code Comment Queries](https://github.com/NWYLZW/vscode-comment-queries/blob/main/README_en-US.md)
This extension enables showing the variable types in your code through annotation syntax and inline prompts.
#### [Total TypeScript VSCode Extension](https://github.com/mattpocock/ts-error-translator)
This extension aims to help you learn TypeScript directly from your IDE. It provides helpful hints on syntax and translates TypeScript's most cryptic errors.
### Neovim Plugins
These plugins can enhance your TypeScript coding experience in Neovim:
#### [lsp-lens.nvim](https://github.com/VidocqH/lsp-lens.nvim)
This plugin displays references and definition info upon functions, similar to JetBrains' IDEA. You can enable/disable specific requests such as definitions, references, and implementations. It also includes declaration in references.
```lua
{
"VidocqH/lsp-lens.nvim",
event = "BufRead",
opts = {
include_declaration = true, -- Reference include declaration
sections = { -- Enable / Disable specific request
definition = false,
references = true,
implementation = false,
},
},
keys = {
{
-- LspLensToggle
"uL",
"LspLensToggle",
desc = "LSP Len Toggle",
},
},
}
```
### [dim.lua](https://github.com/narutoxy/dim.lua)
dim.lua is a Neovim plugin that dims unused variables and functions using LSP and Treesitter. It is dependent on nvim-treesitter and nvim-lspconfig.
```lua
{
"narutoxy/dim.lua",
event = "BufRead",
dependencies = { "nvim-treesitter/nvim-treesitter", "neovim/nvim-lspconfig" },
config = true,
}
```
### [typescript.nvim](https://github.com/jose-elias-alvarez/typescript.nvim#faq)
A minimal typescript-language-server integration plugin to set up the language server via nvim-lspconfig and add commands for convenience.
```lua
return {
"neovim/nvim-lspconfig",
dependencies = {
{
"jose-elias-alvarez/typescript.nvim",
dependencies = {
"davidosomething/format-ts-errors.nvim",
},
},
},
---@class PluginLspOpts
opts = {
---@type lspconfig.options
servers = {
tsserver = {
root_dir = require("lspconfig").util.root_pattern("package.json"),
single_file_support = false,
-- refer https://github.com/jose-elias-alvarez/null-ls.nvim/discussions/274#discussioncomment-1515526
on_attach = function(client)
client.resolved_capabilities.document_formatting = false -- disable formatting in tsserver in favor of null-ls
end,
handlers = {
-- format error code with better error message
["textDocument/publishDiagnostics"] = function(_, result, ctx, config)
if result.diagnostics == nil then
return
end
local idx = 1
while idx <= #result.diagnostics do
local entry = result.diagnostics[idx]
local formatter = require("format-ts-errors")[entry.code]
entry.message = formatter and formatter(entry.message) or entry.message
if entry.code == 80001 then
table.remove(result.diagnostics, idx)
else
idx = idx + 1
end
end
vim.lsp.diagnostic.on_publish_diagnostics(_, result, ctx, config)
end,
},
-- add keymap
keys = {
{ "co", "TypescriptOrganizeImports", desc = "Organize Imports" },
{ "cR", "TypescriptRenameFile", desc = "Rename File" },
},
-- inlay hints
settings = {
typescript = {
inlayHints = {
-- You can set this to 'all' or 'literals' to enable more hints
includeInlayParameterNameHints = "literals", -- 'none' | 'literals' | 'all'
includeInlayParameterNameHintsWhenArgumentMatchesName = false,
includeInlayFunctionParameterTypeHints = false,
includeInlayVariableTypeHints = false,
includeInlayVariableTypeHintsWhenTypeMatchesName = false,
includeInlayPropertyDeclarationTypeHints = false,
includeInlayFunctionLikeReturnTypeHints = true,
includeInlayEnumMemberValueHints = true,
},
},
javascript = {
inlayHints = {
-- You can set this to 'all' or 'literals' to enable more hints
includeInlayParameterNameHints = "literals", -- 'none' | 'literals' | 'all'
includeInlayParameterNameHintsWhenArgumentMatchesName = false,
includeInlayVariableTypeHints = false,
includeInlayFunctionParameterTypeHints = false,
includeInlayVariableTypeHintsWhenTypeMatchesName = false,
includeInlayPropertyDeclarationTypeHints = false,
includeInlayFunctionLikeReturnTypeHints = true,
includeInlayEnumMemberValueHints = true,
},
},
},
},
},
-- Enable this to enable the builtin LSP inlay hints on Neovim >= 0.10.0
inlay_hints = {
enabled = true,
},
format = {
timeout_ms = 10000, -- 10 seconds
},
},
}
```
### [tsc.nvim](https://github.com/dmmulroy/tsc.nvim)
This Neovim plugin provides an asynchronous interface to run project-wide TypeScript type-checking using the TypeScript compiler (tsc).
```lua
return {
{
"dmmulroy/tsc.nvim",
auto_open_qflist = true,
opts = {
auto_close_qflist = false,
enable_progress_notifications = false, -- disable notification
-- support monorepo
flags = {
build = true,
},
},
keys = {
{ "ck", "TSC", desc = "Check TypeScript error" },
},
},
}
```
## Tips
### [Bob](https://github.com/MordechaiHadad/bob) - A Guide for Easy Switching Between Neovim Versions
**Bob** is a versatile, cross-platform Neovim version manager that simplifies the process of switching between different versions of Neovim. It supports a range of commands for version management and comes with several features that offer added convenience.
Here's how you can use it:
- **Selecting a Version**: Use the `bob use` command followed by either a specific version number (in either `vx.x.x` or `x.x.x` format), `nightly`, `stable`, `latest`, or a specific commit hash. For instance, `bob use 0.9.1` or `bob use v0.9.1` will switch to version 0.9.1. The `--no-install` flag can be added to prevent automatic installation of the specified version if it's not already installed.
- **Installing a Version**: The `bob install` command lets you install a specific version of Neovim, including `nightly`, `stable`, `latest`, or a specific version number or commit hash. This command can also be used to update an out-of-date `nightly` version.
- **Uninstalling a Version**: To uninstall a specific version of Neovim, use the `bob uninstall` command followed by the version identifier (`nightly`, `stable`, `latest`, version number, or commit hash).
- **Erasing Changes**: Use the `bob erase` command to undo all changes made by Bob, including Neovim installations, version downloads, and registry modifications.
- **Listing Versions**: To see all installed and currently used versions, use the `bob list` command.
- **Updating Versions**: Use the `bob update` command followed by a version identifier (`nightly`, `stable`, specific version number) or `--all` to update existing versions.
### [getNF](https://github.com/ronniedroid/getnf) - The Convenient Way to Install NerdFonts
**getNF** is an efficient and intuitive way to install [NerdFonts](https://www.nerdfonts.com/). NerdFonts are developer-targeted fonts that come packed with a plethora of glyphs (icons) from popular 'iconic fonts' such as Font Awesome, Devicons, Octicons, and others.
#### Installation
To install getNF, follow these steps:
1. Clone the getNF repository from GitHub:
```
git clone https://github.com/ronniedroid/getnf.git
```
2. Move into the `getnf` directory:
```
cd getnf
```
3. Run the `install.sh` script:
```
./install.sh
```
Now, you're all set to enrich your coding experience with an array of Nerd Fonts. Enjoy!
## Author
👤 **Huynh Duc Dung**
- Website: https://productsway.com/
- Twitter: [@jellydn](https://twitter.com/jellydn)
- Github: [@jellydn](https://github.com/jellydn)
## Show your support
Give a ⭐️ if this project helped you!
[](https://ko-fi.com/dunghd)
[](https://paypal.me/dunghd)
[](https://www.buymeacoffee.com/dunghd)
## Contributors ✨
Thanks goes to these wonderful people ([emoji key](https://allcontributors.org/docs/en/emoji-key)):

Mika Vilpas
📖

Dung Duc Huynh (Kaka)
💻 📖
This project follows the [all-contributors](https://github.com/all-contributors/all-contributors) specification. Contributions of any kind welcome!