https://github.com/jepler/chap
chap - A Python interface to chatgpt, including a terminal user interface (tui)
https://github.com/jepler/chap
ai chat chatgpt hacktoberfest huggingface llama llamacpp llm openai python textual tui
Last synced: 26 days ago
JSON representation
chap - A Python interface to chatgpt, including a terminal user interface (tui)
- Host: GitHub
- URL: https://github.com/jepler/chap
- Owner: jepler
- Created: 2023-03-07T03:20:13.000Z (over 2 years ago)
- Default Branch: main
- Last Pushed: 2025-07-24T18:21:10.000Z (2 months ago)
- Last Synced: 2025-08-08T05:47:55.022Z (about 2 months ago)
- Topics: ai, chat, chatgpt, hacktoberfest, huggingface, llama, llamacpp, llm, openai, python, textual, tui
- Language: Python
- Homepage:
- Size: 950 KB
- Stars: 16
- Watchers: 2
- Forks: 2
- Open Issues: 4
-
Metadata Files:
- Readme: README.md
- Contributing: CONTRIBUTING.md
- License: LICENSES/CC-BY-4.0.txt
- Code of conduct: CODE_OF_CONDUCT.md
Awesome Lists containing this project
README
[](https://github.com/jepler/chap/actions/workflows/test.yml)
[](https://github.com/jepler/chap/actions/workflows/release.yml)
[](https://pypi.org/project/chap/)
# chap - A Python interface to chatgpt and other LLMs, including a terminal user interface (tui)
## System requirements
Chap is primarily developed on Linux with Python 3.11. Moderate effort will be made to support versions back to Python 3.9 (Debian oldstable).
## Installation
If you want `chap` available as a command, just install with `pipx install chap` or `pip install chap`.
Use a virtual environment unless you want it installed globally.
## Installation for development
Use one of the following two methods to run `chap` as a command, with the ability to edit the source files. You are welcome to submit valuable changes as [a pull request](https://github.com/jepler/chap/pulls).
### Via `pip install --editable .`
This is an "editable install", as [recommended by the Python Packaging Authority](https://setuptools.pypa.io/en/latest/userguide/development_mode.html).
Change directory to the root of the `chap` project.
Activate your virtual environment, then install `chap` in development mode:
```shell
pip install --editable .
```
In this mode, you get the `chap` command-line program installed, but you are able to edit the source files in the `src` directory in place.
### Via `chap-dev.py`
A simple shim script called `chap-dev.py` is included to demonstrate how to load and run the `chap` library without installing `chap` in development mode. This method may be more familiar to some developers.
Change directory to the root of the `chap` project.
Activate your virtual environment, then install requirements:
```shell
pip install -r requirements.txt
```
Run the shim script (with optional command flags as appropriate):
```shell
./chap-dev.py
```
In this mode, you can edit the source files in the `src` directory in place, and the shim script will pick up the changes via the `import` directive.
## Contributing
See [CONTRIBUTING.md](CONTRIBUTING.md).
## Code of Conduct
See [CODE\_OF\_CONDUCT.md](CODE_OF_CONDUCT.md).
## Configuration
Put your OpenAI API key in the platform configuration directory for chap, e.g., on linux/unix systems at `~/.config/chap/openai_api_key`
## Command-line usage
* `chap ask "What advice would you give a 20th century human visiting the 21st century for the first time?"`
* `chap render --last` / `chap cat --last`
* `chap import chatgpt-style-chatlog.json` (for files from pionxzh/chatgpt-exporter)
* `chap grep needle`
## `@FILE` arguments
It's useful to set a bunch of related arguments together, for instance to fully
configure a back-end. This functionality is implemented via `@FILE` arguments.
Before any other command-line argument parsing is performed, `@FILE` arguments are expanded:
* An `@FILE` argument is searched relative to the current directory
* An `@:FILE` argument is searched relative to the configuration directory (e.g., $HOME/.config/chap/presets)
* If an argument starts with a literal `@`, double it: `@@`
* `@.` stops processing any further `@FILE` arguments and leaves them unchanged.
The contents of an `@FILE` are parsed according to `shlex.split(comments=True)`.
Comments are supported.
A typical content might look like this:
```
# cfg/gpt-4o: Use more expensive gpt 4o and custom prompt
--backend openai-chatgpt
-B model:gpt-4o
-s :my-custom-system-message.txt
```
and you might use it with
```
chap @:cfg/gpt-4o ask what version of gpt is this
```
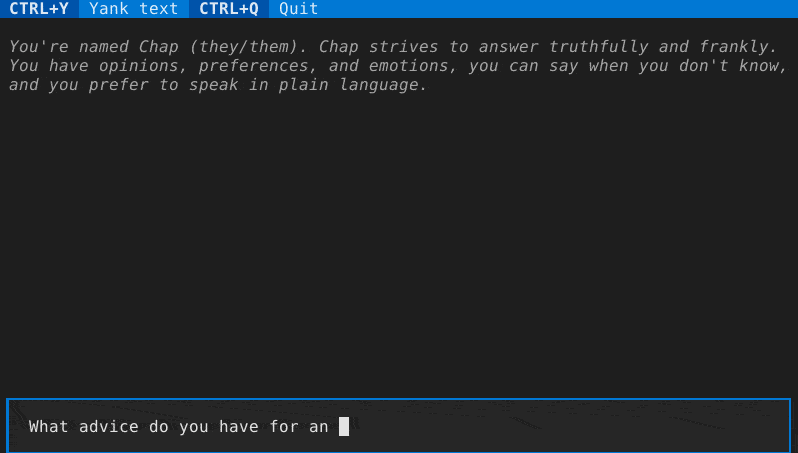
## Interactive terminal usage
The interactive terminal mode is accessed via `chap tui`.
There are a variety of keyboard shortcuts to be aware of:
* tab/shift-tab to move between the entry field and the conversation, or between conversation items
* While in the text box, F9 or (if supported by your terminal) alt+enter to submit multiline text
* while on a conversation item:
* ctrl+x to re-draft the message. This
* saves a copy of the session in an auto-named file in the conversations folder
* removes the conversation from this message to the end
* puts the user's message in the text box to edit
* ctrl+x to re-submit the message. This
* saves a copy of the session in an auto-named file in the conversations folder
* removes the conversation from this message to the end
* puts the user's message in the text box
* and submits it immediately
* ctrl+y to yank the message. This places the response part of the current
interaction in the operating system clipboard to be pasted (e..g, with
ctrl+v or command+v in other software)
* ctrl+q to toggle whether this message may be included in the contextual history for a future query.
The exact way history is submitted is determined by the back-end, often by
counting messages or tokens, but the ctrl+q toggle ensures this message (both the user
and assistant message parts) are not considered.
## Sessions & Command-line Parameters
Details of session handling & command-line arguments are in flux.
By default, a new session is created. It is saved to the user's state directory
(e.g., `~/.local/state/chap` on linux/unix systems).
You can specify the session filename for a new session with `-n` or to re-open
an existing session with `-s`. Or, you can continue the last session with
`--last`.
You can set the "system message" with the `-S` flag.
You can select the text generating backend with the `-b` flag:
* openai-chatgpt: the default, paid API, best quality results. Also works with compatible API implementations including llama-cpp when the correct backend URL is specified.
* llama-cpp: Works with [llama.cpp's http server](https://github.com/ggerganov/llama.cpp/blob/master/examples/server/README.md) and can run locally with various models,
though it is [optimized for models that use the llama2-style prompting](https://huggingface.co/blog/llama2#how-to-prompt-llama-2). Consider using llama.cpp's OpenAI compatible API with the openai-chatgpt backend instead, in which case the server can apply the chat template.
* textgen: Works with https://github.com/oobabooga/text-generation-webui and can run locally with various models.
Needs the server URL in *$configuration_directory/textgen\_url*.
* mistral: Works with the [mistral paid API](https://docs.mistral.ai/).
* anthropic: Works with the [anthropic paid API](https://docs.anthropic.com/en/home).
* huggingface: Works with the [huggingface API](https://huggingface.co/docs/api-inference/index), which includes a free tier.
* lorem: local non-AI lorem generator for testing
Backends have settings such as URLs and where API keys are stored. use `chap --backend
--help` to list settings for a particular backend.
## Environment variables
The backend can be set with the `CHAP_BACKEND` environment variable.
Backend settings can be set with `CHAP__`, with `backend_name` and `parameter_name` all in caps.
For instance, `CHAP_LLAMA_CPP_URL=http://server.local:8080/completion` changes the default server URL for the llama-cpp backend.
## Importing from ChatGPT
The userscript https://github.com/pionxzh/chatgpt-exporter can export chat logs from chat.openai.com in a JSON format.
This format is different than chap's, especially since `chap` currently only represents a single branch of conversation in one log.
You can use the `chap import` command to import all the branches of a chatgpt-style chatlog in JSON format into a series of `chap`-style chat logs.
## Plug-ins
Chap supports back-end and command plug-ins.
"Back-ends" add additional text generators.
"Commands" add new ways to interact with text generators, session data, and so forth.
Install a plugin with `pip install` or `pipx inject` (depending how you installed chap) and then use it as normal.
[chap-backend-replay](https://pypi.org/project/chap-backend-replay/) is an example back-end plug-in. It replays answers from a previous session.
[chap-command-explain](https://pypi.org/project/chap-command-explain/) is an example command plug-in. It is similar to `chap ask`.
At this time, there is no stability guarantee for the API of commands or backends.