https://github.com/jhackshaw/iplocate
Geolocate and plot ipv4 and ipv6 addresses
https://github.com/jhackshaw/iplocate
aws ipgeo ipgeolocation reactjs terraform
Last synced: over 1 year ago
JSON representation
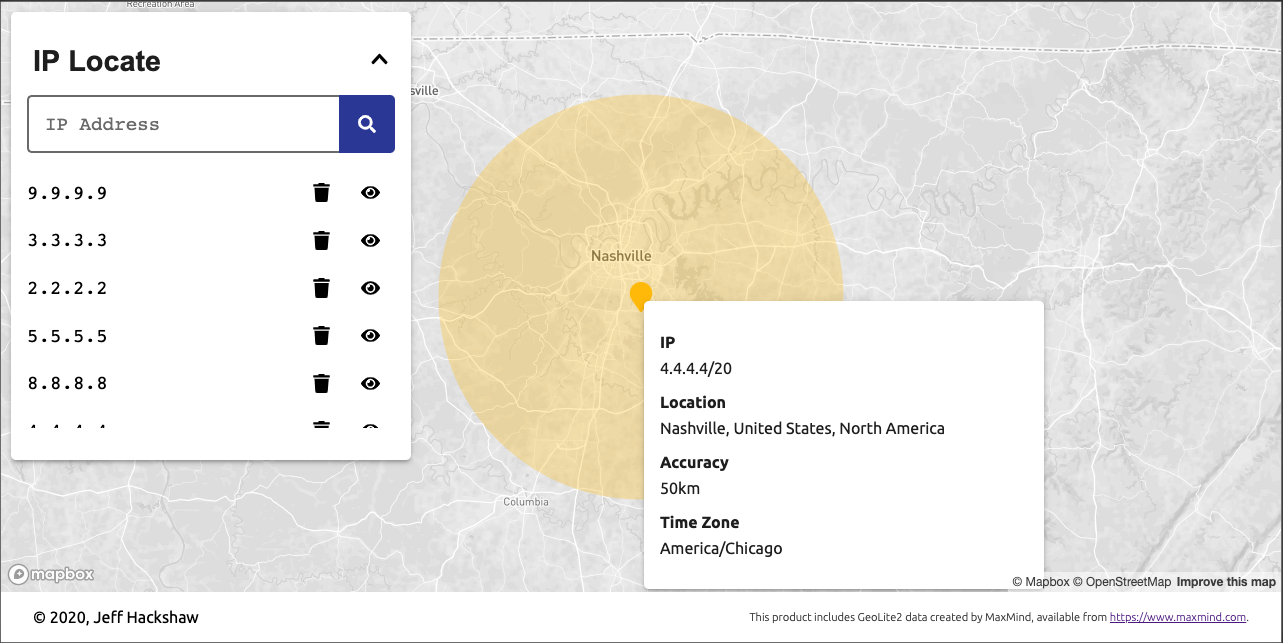
Geolocate and plot ipv4 and ipv6 addresses
- Host: GitHub
- URL: https://github.com/jhackshaw/iplocate
- Owner: jhackshaw
- License: mit
- Created: 2020-10-15T18:59:52.000Z (almost 6 years ago)
- Default Branch: master
- Last Pushed: 2023-01-07T21:47:11.000Z (over 3 years ago)
- Last Synced: 2024-11-06T08:43:03.173Z (over 1 year ago)
- Topics: aws, ipgeo, ipgeolocation, reactjs, terraform
- Language: TypeScript
- Homepage:
- Size: 4.59 MB
- Stars: 91
- Watchers: 4
- Forks: 6
- Open Issues: 39
-
Metadata Files:
- Readme: README.md
- License: LICENSE
Awesome Lists containing this project
README


[](https://github.com/prettier/prettier)
## About
IP Locate is a tool for querying and plotting geographic information for ipv4 and ipv6 addresses via the [MaxMind GeoLite2 dataset](https://www.maxmind.com/).
### Built with
- [TypeScript](https://www.typescriptlang.org/)
- [Jest](https://jestjs.io/)
- [ReactJS](https://reactjs.org/)
- [Styled Components](https://styled-components.com/)
- [Fastify](https://www.fastify.io/)
- [Terraform](https://www.terraform.io/)
### development
The development environment is configured using `docker-compose`. In order to run iplocate locally:
1. Configure environment:
- copy the dev.example.env file to a new file called .env: `cp example.env .env`
- add MaxMind account id and license key credentials to the `.env` file where appropriate. Access is free and an account can be created [here](https://www.maxmind.com/en/geolite2/signup).
2. Start the environment:
- From the root of the project, start environment using docker: `docker-compose up --build`
- Local changes in `backend/src` and `frontend/src` will be hot-reloaded
- Other changes will require stopping and starting the environment
3. Navigate to [http://localhost](http://localhost) in a browser
### testing
In order to run unit tests
1. Install backend dependencies (outside of docker)
- cd `./backend`
- `npm install`
2. Install frontend dependencies (outside of docker)
- cd `./frontend`
- `npm install`
3. From either directory
- Run unit tests: `npm run test`
- Run unit tests with coverage: `npm run test:coverage`
- Format code using prettier: `npm run format`
- Check formatting: `npm run format:check`
### Contributing
Pull requests are welcome. Prior to committing, run unit tests and formatting. Code coverage is required to be above 90%.
### CI/CD
GitHub Actions is used for CI/CD. Backend CI configuration can be found in [.github/workflows/backend.yml](https://github.com/jhackshaw/iplocate/blob/master/.github/workflows/backend.yml), and frontend configuration can be found in [.github/workflows/frontend.yml](https://github.com/jhackshaw/iplocate/blob/master/.github/workflows/frontend.yml). Every PR triggers the following steps in both:
1. Install nodejs and dependencies (npm ci)
2. Ensure prettier code style (npm format:check)
3. Run tests (npm run test:coverage)
4. Build production application (npm run build)
Every push to master triggers the following deployment steps with the deploy workflow in [.github/workflows/deploy.yml](https://github.com/jhackshaw/iplocate/blob/master/.github/workflows/deploy.yml)
1. Deploy infrastructure changes using terraform
2. Deploy backend using serverless framework
3. Deploy frontend to Netlify
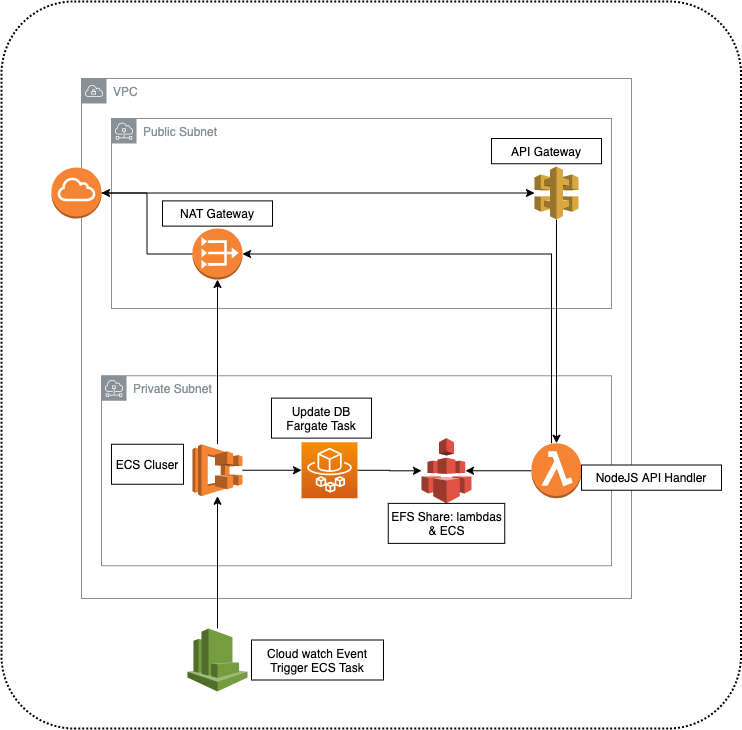
### Infrastructure setup