https://github.com/jhk0530/shinyroughjsbasic
https://github.com/jhk0530/shinyroughjsbasic
htmlwidgets roughjs shiny tutorial
Last synced: 11 months ago
JSON representation
- Host: GitHub
- URL: https://github.com/jhk0530/shinyroughjsbasic
- Owner: jhk0530
- License: mit
- Created: 2019-12-13T03:26:33.000Z (over 6 years ago)
- Default Branch: master
- Last Pushed: 2019-12-21T13:15:09.000Z (over 6 years ago)
- Last Synced: 2025-08-30T05:52:59.831Z (11 months ago)
- Topics: htmlwidgets, roughjs, shiny, tutorial
- Language: R
- Size: 4.09 MB
- Stars: 0
- Watchers: 2
- Forks: 0
- Open Issues: 0
-
Metadata Files:
- Readme: README.md
- License: LICENSE
Awesome Lists containing this project
README
# shinyRoughJSbasic
tutorial package for build shinyRoughJS with htmlwidgets as shinyRoughJSbasic
i learned with dean attali's this [awesome tutorial](https://deanattali.com/blog/htmlwidgets-tips/)
# step 0. think what to build, and decide package name
as my goal is use rough.js in shiny, we'll make some rectangles that given as example
and i prefer shiny package name as
shiny~~JS, shiny + ~~ + JavaScript
since my first shiny package shinyCyJS
so i'll use shinyRoughJS(+basic for tutorial)
# step 1. make R project and publish repository


# step 2. make directory and files.
R/shinyRoughJSbasic.R
inst/
inst/htmlwidgets
inst/htmlwidgets/shinyRoughJSbasic.js
inst/htmlwidgets/shinyRoughJSbasic.yaml
inst/htmlwidgets/lib
# step 3. put base javascript library (rough.js)
[rough.js](https://github.com/pshihn/rough)
inst/htmlwidgets/lib/rough-3.1.0
# step 4. write yaml file.
this yaml file will take format of
```
dependencies:
- name:
version:
src: (base javascript file's location)
script: (base javascript file)
stylesheet: (for dependent css file)
```
also need empty new line at end of file and make comment with #
i used this content as shinyRoughJSbasic
``` yaml
dependencies:
- name: rough
version: 3.1.0
src: htmlwidgets/lib/rough-3.1.0 # directory
script: rough-3.1.0.js # script
```
[For multiple](https://github.com/unistbig/shinyCyJS/blob/master/inst/htmlwidgets/shinyCyJS.yaml)
# step 5. write js file.
this javascript consists with
```
HTMLWidgets.widget({
name : ,
type : 'output',
factory : function(el,width,height){
return {
renderValue : function(input){
}
}
}
})
```
notice that, each base javascript needs different initiation.
i used this for shinyRoughJSbasic
``` javascript
HTMLWidgets.widget({
name : 'shinyRoughJSbasic',
type : 'output',
factory : function(el, width, height) {
var container = document.getElementById(el.id);
// Initialisation
var cv = document.createElement("canvas");
cv.id = 'minicv'; // mini canvas
container.appendChild(cv)
cv.setAttribute('width',container.clientWidth)
cv.setAttribute('height',container.clientHeight)
var rc = rough.canvas(document.getElementById('minicv'));
return {
renderValue: function(input) {
var Items = input.items;
for( var i = 0; iimport htmlwidgets
R file needs 3 function at least with export
1) widget function
this will take input and options
and make htmlwidgets with base javascript functions
for example, shinyRoughJSbasic will require element, with type, size, location
``` r
#' @export
shinyRoughJSbasic = function(items = list(),options = list(),width = NULL, height = NULL, elementId = NULL){
input = list( items = items, options = options )
htmlwidgets::createWidget(
name = 'shinyRoughJSbasic',
input,
width = width,
height = height,
package = 'shinyRoughJSbasic',
elementId = elementId
)
}
```
and remain two paired function will send/recieve r object to shiny application.
for more information, see this official [cheatsheet](https://shiny.rstudio.com/articles/cheatsheet.html)
2) render function
``` r
#' @export
renderRough = function(expr, env = parent.frame(), quoted = FALSE){
if(!quoted){ expr = substitute(expr) } # force quoted
htmlwidgets::shinyRenderWidget(expr, shinyRoughJSbasicOutput, env, quoted = TRUE)
}
```
3) output function
``` r
#' @export
shinyRoughJSbasicOutput = function(outputId, width = '100%', height = '400px'){
htmlwidgets::shinyWidgetOutput(outputId, 'shinyRoughJSbasic', width, height, package = 'shinyRoughJSbasic')
}
```
# step 7. build package with ctrl+shift+B and check run
to pass r object to shiny, it should be capsuled in list
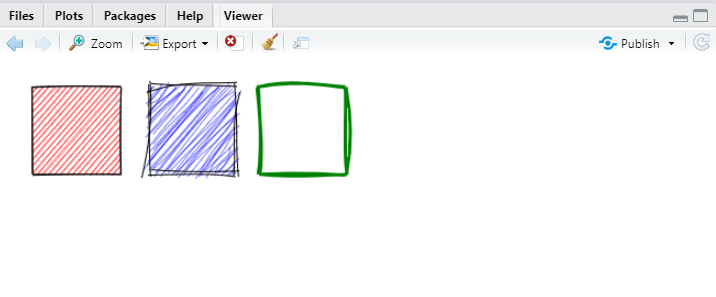
here are codes i used to check shinyRoughJSbasic in viewer or web browser
```r
// RoughRect is function to build rectangle object with (xpos, ypos, width, height)
// which also included in R file
shinyRoughJSbasic(
list(
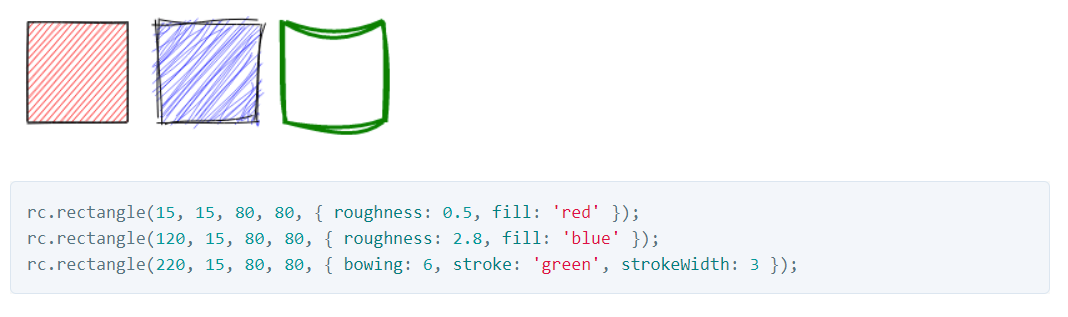
RoughRect(15,15,80,80, RoughOptions(roughness = 0.5, fill='red')),
RoughRect(120,15,80,80, RoughOptions(roughness = 2.8, fill='blue')),
RoughRect(220,15,80,80, RoughOptions(bowing = 6, stroke = 'green', strokeWidth = 3, fill = 'white'))
)
)
```
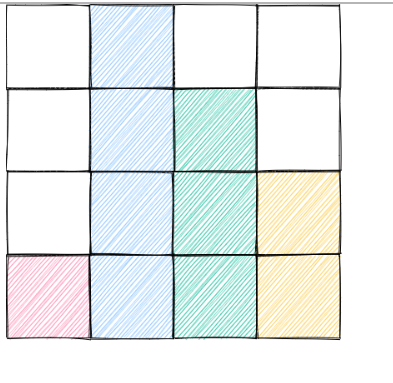
also this code is example code with render - output paired function
```r
library(shiny)
library(shinyRoughJSbasic)
library(shinyjs)
ui <- fluidPage(
shinyRoughJSbasicOutput(outputId = 'cv', height = '500px')
)
server <- function(input, output, session) {
output$cv = renderRough(
shinyRoughJSbasic(
items = list(
# x,y,w,h
RoughRect(1,1,100,100, RoughOptions(fill='#FFFFFF')),
RoughRect(101,1,100,100,RoughOptions(fill='#74b9ff')),
RoughRect(201,1,100,100, RoughOptions(fill='#FFFFFF')),
RoughRect(301,1,100,100, RoughOptions(fill='#FFFFFF')),
RoughRect(1,101,100,100, RoughOptions(fill='#FFFFFF')),
RoughRect(101,101,100,100,RoughOptions(fill='#74b9ff')),
RoughRect(201,101,100,100, RoughOptions(fill = '#00b894')),
RoughRect(301,101,100,100, RoughOptions(fill='#FFFFFF')),
RoughRect(1,201,100,100, RoughOptions(fill='#FFFFFF')),
RoughRect(101,201,100,100,RoughOptions(fill='#74b9ff')),
RoughRect(201,201,100,100, RoughOptions(fill = '#00b894')),
RoughRect(301,201,100,100, RoughOptions(fill ='#fbc531')),
RoughRect(1,301,100,100,RoughOptions(fill='#fd79a8')),
RoughRect(101,301,100,100,RoughOptions(fill='#74b9ff')),
RoughRect(201,301,100,100, RoughOptions(fill = '#00b894')),
RoughRect(301,301,100,100, RoughOptions(fill ='#fbc531'))
)
)
)
}
shinyApp(ui, server)
```
# step8. now you have build your own shiny application with Rough.js