https://github.com/jianchang512/clone-voice
A sound cloning tool with a web interface, using your voice or any sound to record audio / 一个带web界面的声音克隆工具,使用你的音色或任意声音来录制音频
https://github.com/jianchang512/clone-voice
clonevoice speech-analysis sts tts voice-assistant
Last synced: 7 months ago
JSON representation
A sound cloning tool with a web interface, using your voice or any sound to record audio / 一个带web界面的声音克隆工具,使用你的音色或任意声音来录制音频
- Host: GitHub
- URL: https://github.com/jianchang512/clone-voice
- Owner: jianchang512
- License: other
- Created: 2023-11-19T16:29:06.000Z (about 2 years ago)
- Default Branch: main
- Last Pushed: 2024-03-08T01:06:42.000Z (almost 2 years ago)
- Last Synced: 2024-04-17T22:19:58.248Z (over 1 year ago)
- Topics: clonevoice, speech-analysis, sts, tts, voice-assistant
- Language: Python
- Homepage: https://v.wonyes.org
- Size: 91.7 MB
- Stars: 6,159
- Watchers: 33
- Forks: 585
- Open Issues: 9
-
Metadata Files:
- Readme: README.md
- Changelog: change.md
- Funding: .github/FUNDING.yml
- License: LICENSE
Awesome Lists containing this project
- awesome-ai - clone-voice
- StarryDivineSky - jianchang512/clone-voice
- awesome-hacking-lists - jianchang512/clone-voice - A sound cloning tool with a web interface, using your voice or any sound to record audio / 一个带web界面的声音克隆工具,使用你的音色或任意声音来录制音频 (Python)
README
[English README](./README_EN.md) / [捐助项目](https://github.com/jianchang512/pyvideotrans/issues/80) / [Discord](https://discord.gg/7ZWbwKGMcx)
# CV声音克隆工具
> 本项目所用模型为[coqui.ai](https://coqui.ai/)出品的xtts_v2,模型开源协议为[Coqui Public Model License 1.0.0](https://coqui.ai/cpml.txt),使用本项目请遵循该协议,协议全文见 https://coqui.ai/cpml.txt
这是一个声音克隆工具,可使用任何人类音色,将一段文字合成为使用该音色说话的声音,或者将一个声音使用该音色转换为另一个声音。
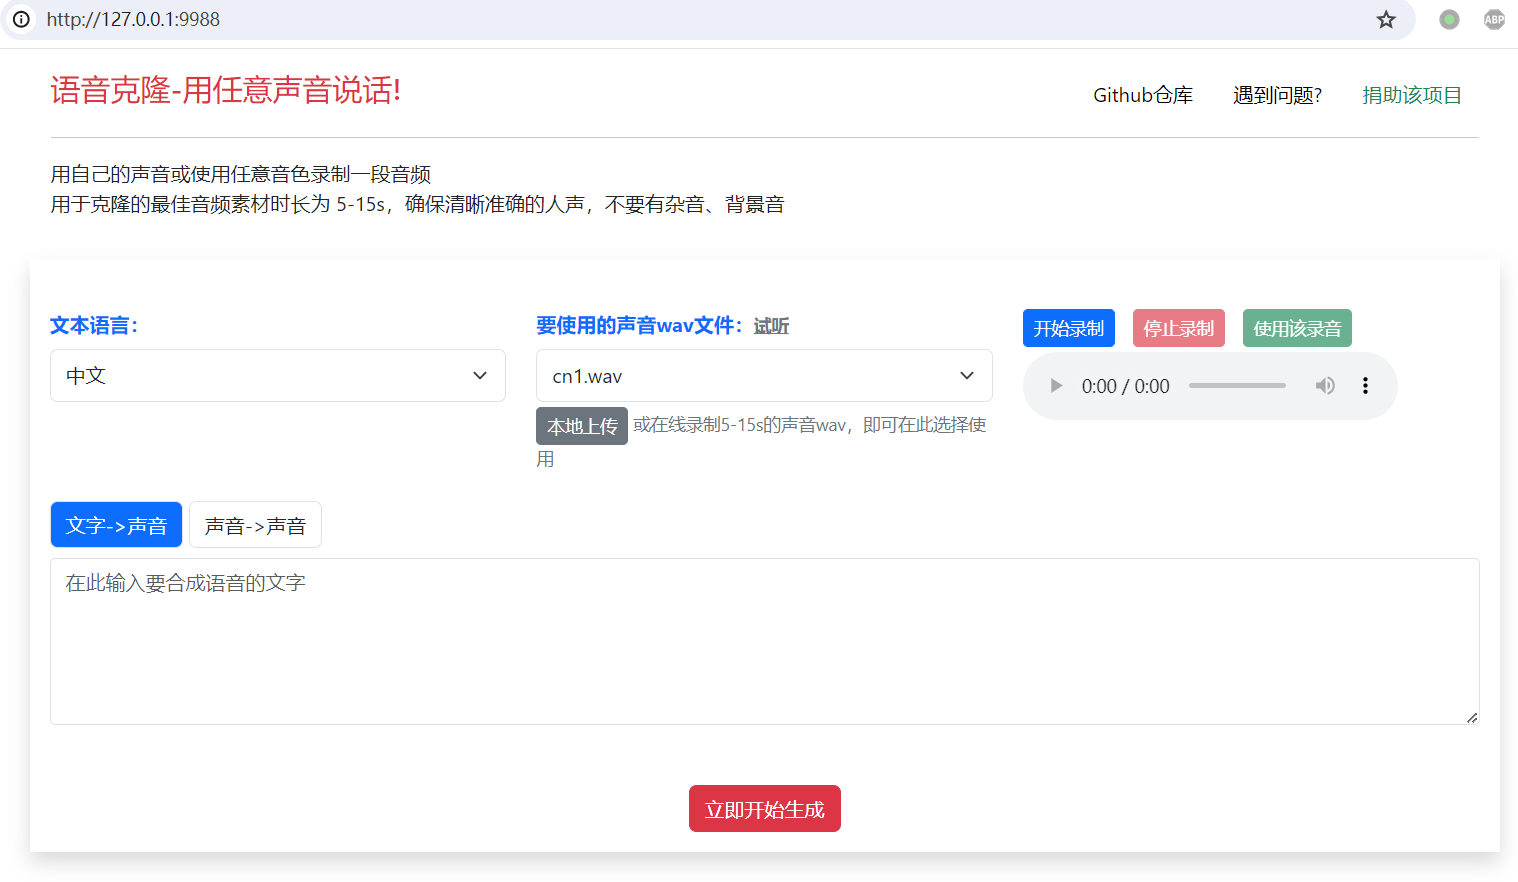
使用非常简单,没有N卡GPU也可以使用,下载预编译版本,双击 app.exe 打开一个web界面,鼠标点点就能用。
支持 **中、英、日、韩、法、德、意等16种语言**,可在线从麦克风录制声音。
为保证合成效果,建议录制时长5秒到20秒,发音清晰准确,不要存在背景噪声。
英文效果很棒,中文效果还凑合。
> **[赞助商]**
>
> [](https://gpt302.saaslink.net/teRK8Y)
> [302.AI](https://gpt302.saaslink.net/teRK8Y)是一个按需付费的一站式AI应用平台,开放平台,开源生态, [302.AI开源地址](https://github.com/302ai)
>
> 集合了最新最全的AI模型和品牌/按需付费零月费/管理和使用分离/所有AI能力均提供API/每周推出2-3个新应用
# 视频演示
https://github.com/jianchang512/clone-voice/assets/3378335/4e63f2ac-cc68-4324-a4d9-ecf4d4f81acd

# window预编译版使用方法(其他系统可源码部署)
1. [点击此处打开Releases下载页面](https://github.com/jianchang512/clone-voice/releases),下载预编译版主文件(1.7G) 和 模型(3G)
2. 下载后解压到某处,比如 E:/clone-voice 下
3. 双击 app.exe ,等待自动打开web窗口,**请仔细阅读cmd窗口的文字提示**,如有错误,均会在此显示
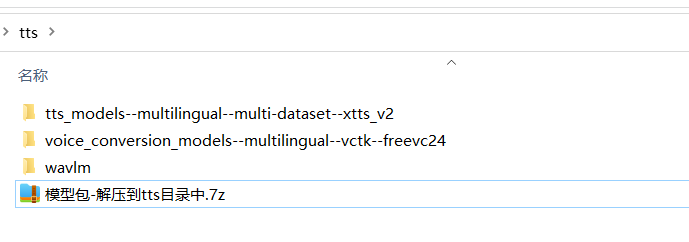
4. 模型下载后解压到软件目录下的 `tts` 文件夹内,解压后效果如图

5. 转换操作步骤
- 选择【文字->声音】按钮,在文本框中输入文字、或点击导入srt字幕文件,然后点击“立即开始”。
- 选择【声音->声音】按钮,点击或拖拽要转换的音频文件(mp3/wav/flac),然后从“要使用的声音文件”下拉框中选择要克隆的音色,如果没有满意的,也可以点击“本地上传”按钮,选择已录制好的5-20s的wav/mp3/flac声音文件。或者点击“开始录制”按钮,在线录制你自己的声音5-20s,录制完成点击使用。然后点击“立即开始”按钮
6. 如果机器拥有N卡GPU,并正确配置了CUDA环境,将自动使用CUDA加速
# 源码部署(linux mac window)
**源码版需要在 .env 中 HTTP_PROXY=设置代理(比如http://127.0.0.1:7890),要从 https://huggingface.co https://github.com 下载模型,而这个网址国内无法访问,必须保证代理稳定可靠,否则大模型下载可能中途失败**
0. 要求 python 3.9->3.11, 并且提前安装好 git-cmd 工具,[下载地址](https://github.com/git-for-windows/git/releases/download/v2.44.0.windows.1/Git-2.44.0-64-bit.exe)
1. 创建空目录,比如 E:/clone-voice, 在这个目录下打开 cmd 窗口,方法是地址栏中输入 `cmd`, 然后回车。
使用git拉取源码到当前目录 ` git clone git@github.com:jianchang512/clone-voice.git . `
2. 创建虚拟环境 `python -m venv venv`
3. 激活环境,win下 `E:/clone-voice/venv/scripts/activate`,
4. 安装依赖: `pip install -r requirements.txt --no-deps`,
windows 和 linux 如果要启用cuda加速,继续执行 `pip uninstall -y torch` 卸载,然后执行`pip install torch torchaudio --index-url https://download.pytorch.org/whl/cu121`。(必须有N卡并且配置好CUDA环境)
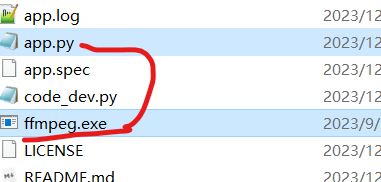
5. win下解压 ffmpeg.7z,将其中的`ffmpeg.exe`和`app.py`在同一目录下, linux和mac 到 [ffmpeg官网](https://ffmpeg.org/download.html)下载对应版本ffmpeg,解压其中的`ffmpeg`程序到根目录下,必须将可执行二进制文件 `ffmpeg` 和app.py放在同一目录下。

6. **首先运行** `python code_dev.py `,在提示同意协议时,输入 `y`,然后等待模型下载完毕。


下载模型需要挂全局代理,模型非常大,如果代理不够稳定可靠,可能会遇到很多错误,大部分的错误均是代理问题导致。
如果显示下载多个模型均成功了,但最后还是提示“Downloading WavLM model”错误,则需要修改库包文件 `\venv\Lib\site-packages\aiohttp\client.py`, 在大约535行附近,`if proxy is not None:` 上面一行添加你的代理地址,比如 `proxy="http://127.0.0.1:10809"`.
7. 下载完毕后,再启动 `python app.py`
8. **【训练说明】** 如果想训练,执行 `python train.py`, 训练参数在 `param.json`中调整,调整后重新执行训练脚本`python train.py`
8. 每次启动都会连接墙外检测或更新模型,请耐心等待。如果不想每次启动都检测或更新,需手动修改依赖包下文件,打开 \venv\Lib\site-packages\TTS\utils\manage.py ,大约 389 行附近,def download_model 方法中,注释掉如下代码
```
if md5sum is not None:
md5sum_file = os.path.join(output_path, "hash.md5")
if os.path.isfile(md5sum_file):
with open(md5sum_file, mode="r") as f:
if not f.read() == md5sum:
print(f" > {model_name} has been updated, clearing model cache...")
self.create_dir_and_download_model(model_name, model_item, output_path)
else:
print(f" > {model_name} is already downloaded.")
else:
print(f" > {model_name} has been updated, clearing model cache...")
self.create_dir_and_download_model(model_name, model_item, output_path)
```
9. 源码版启动时可能频繁遇到错误,基本都是代理问题导致无法从墙外下载模型或下载中断不完整。建议使用稳定的代理,全局开启。如果始终无法完整下载,建议使用预编译版。
# 常见问题
**模型xtts仅可用于学习研究,不可用于商业**
0. 源码版需要在 .env 中 HTTP_PROXY=设置代理(比如http://127.0.0.1:7890),要从 https://huggingface.co https://github.com 下载模型,而这个网址国内无法访问,必须保证代理稳定可靠,否则大模型下载可能中途失败
1. 启动后需要冷加载模型,会消耗一些时间,请耐心等待显示出`http://127.0.0.1:9988`, 并自动打开浏览器页面后,稍等两三分钟后再进行转换
2. 功能有:
文字到语音:即输入文字,用选定的音色生成声音。
声音到声音:即从本地选择一个音频文件,用选定的音色生成另一个音频文件.
3. 如果打开的cmd窗口很久不动,需要在上面按下回车才继续输出,请在cmd左上角图标上单击,选择“属性”,然后取消“快速编辑”和“插入模式”的复选框


4. 预编译版 声音-声音线程启动失败
首先确认模型已正确下载放置。tts文件夹内有3个文件夹,如下图

如果已正确放置了,但仍错误,[点击下载 extra-to-tts_cache.zip](https://github.com/jianchang512/clone-voice/releases/download/v0.0.1/extra-to-tts_cache.zip) ,将解压后得到的2个文件,复制到软件根目录的 tts_cache 文件夹内
如果上述方法无效,在 .env 文件中 HTTP_PROXY后填写代理地址比如 `HTTP_PROXY=http://127.0.0.1:7890`,可解决该问题,必须确保代理稳定,填写端口正确
5. 提示 “The text length exceeds the character limit of 182/82 for language”
这是因为由句号分隔的句子太长导致的,建议将太长的语句使用句号隔开,而不是大量使用逗号,或者你也可以打开 clone/character.json文件,手动修改限制
6. 提示"symbol not found __svml_cosf8_ha"
打开网页 https://www.dll-files.com/svml_dispmd.dll.html ,点击红色"Download"下载字样,下载后解压,将里面的dll文件复制粘贴到"C:\Windows\System32"
# CUDA 加速支持
**安装CUDA工具** [详细安装方法](https://juejin.cn/post/7318704408727519270)
如果你的电脑拥有 Nvidia 显卡,先升级显卡驱动到最新,然后去安装对应的
[CUDA Toolkit 11.8](https://developer.nvidia.com/cuda-downloads) 和 [cudnn for CUDA11.X](https://developer.nvidia.com/rdp/cudnn-archive)。
安装完成成,按`Win + R`,输入 `cmd`然后回车,在弹出的窗口中输入`nvcc --version`,确认有版本信息显示,类似该图

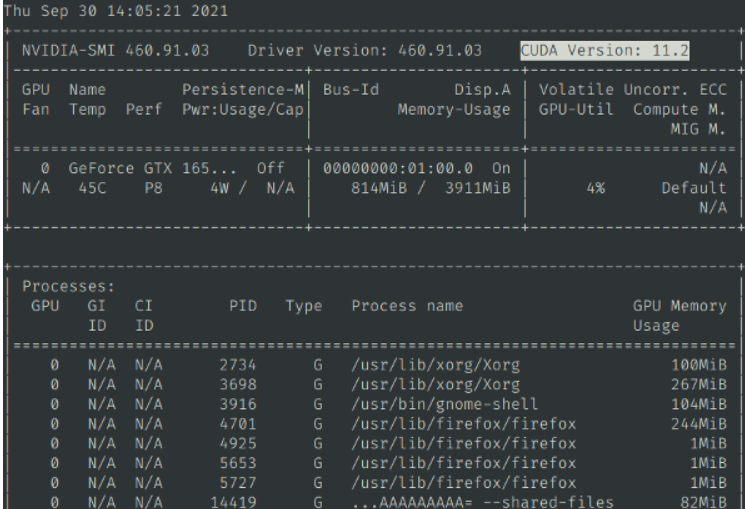
然后继续输入`nvidia-smi`,确认有输出信息,并且能看到cuda版本号,类似该图

说明安装正确,可以cuda加速了,否则需重新安装
# 相关联项目
[视频翻译配音工具:翻译字幕并配音](https://github.com/jianchang512/pyvideotrans)
[语音识别工具:本地离线的语音识别转文字工具](https://github.com/jianchang512/stt)
[人声背景乐分离:极简的人声和背景音乐分离工具,本地化网页操作](https://github.com/jianchang512/vocal-separate)
# [Youtube演示视频](https://youtu.be/CC227GXOJLk)