Ecosyste.ms: Awesome
An open API service indexing awesome lists of open source software.
https://github.com/jonathanstowe/rpi-device-dht11
Interface to the DHT11 digital temperature/humidity sensor
https://github.com/jonathanstowe/rpi-device-dht11
dht11 humidity raku raspberry-pi rpi sensor temperature
Last synced: about 2 months ago
JSON representation
Interface to the DHT11 digital temperature/humidity sensor
- Host: GitHub
- URL: https://github.com/jonathanstowe/rpi-device-dht11
- Owner: jonathanstowe
- License: artistic-2.0
- Created: 2023-01-07T09:51:35.000Z (about 2 years ago)
- Default Branch: main
- Last Pushed: 2023-01-07T19:24:13.000Z (about 2 years ago)
- Last Synced: 2024-11-05T18:56:44.730Z (3 months ago)
- Topics: dht11, humidity, raku, raspberry-pi, rpi, sensor, temperature
- Language: Raku
- Homepage:
- Size: 293 KB
- Stars: 1
- Watchers: 2
- Forks: 0
- Open Issues: 0
-
Metadata Files:
- Readme: README.md
- Changelog: Changes
Awesome Lists containing this project
README
# RPi::Device::DHT11
Interface to the DHT11 digital temperature/humidity sensor
[](https://github.com/jonathanstowe/RPi-Device-DHT11/actions/workflows/main.yml)
## Synopsis
```raku
use RPi::Device::DHT11;
sub MAIN() {
my $dht = RPi::Device::DHT11.new(pin => 0, supply-interval => 1.5);
react {
whenever $dht -> $reading {
say sprintf "{ DateTime.now.Str }: Humidity is %.2f %%, \t Temperature is %.2f *C", $reading.humidity, $reading.temperature;
}
}
}
```
## Description
The DHT11 is a common and inexpensive temperate and humidity sensor with a single pin digital interface. It has a reasonable degree of accuracy ( 1-2% on relative humidity and 0.2°C or so.)
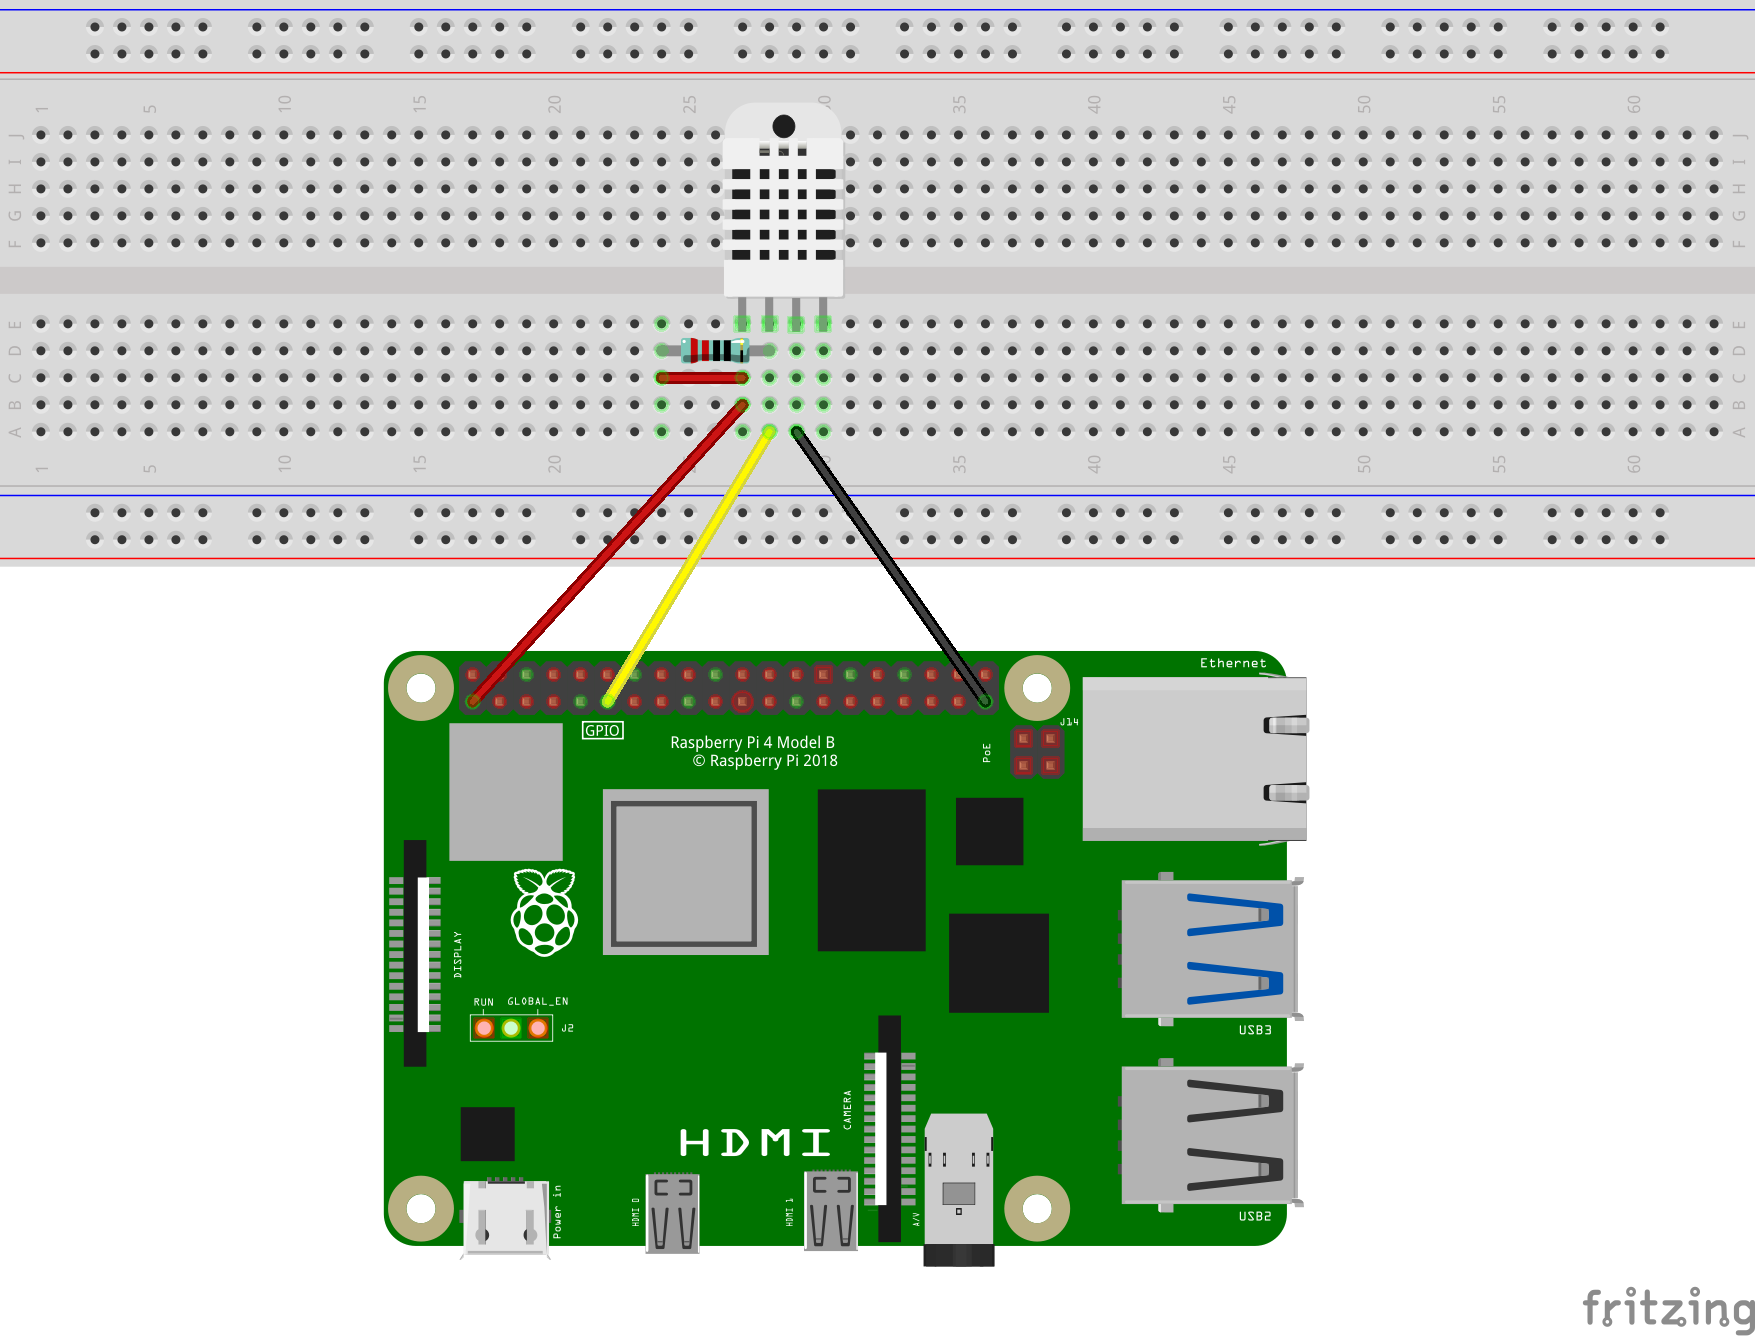
To hook the DHT11 up you only need a pull-up resistor (the datasheets indicate 5KΩ but 10K seems to work fine.) It will not work reliably (or at all,) without the pull-up.
A typical setup would be:
[](https://raw.githubusercontent.com/jonathanstowe/RPi-Device-DHT11/main/examples/hardware/dht11.png)
You may want to check the pinout of the actual device you have, there are, for example, some boards that mount the device on a little PCB with only the three used pins exposed, and I've seen pictures of some with the pins in the reverse direction (i.e. Vcc and Gnd swapped,) from that shown.
Please note that because this uses the wiringPi library under the hood the [wiringPi pin numbers](http://wiringpi.com/pins/) are used, so in the above the data line is connected to the sixth pin down from the top on the left (assuming the end with the USB is "down",) which is wiringPi pin 0 (or GPIO 17 in the Broadcom numbering.) You can find the actual numbering for your Raspberry Pi with:
gpio readall
which gives you a convenient table.
The easiest way to use this module is to use the object as a `Supply` as in the example above (it supplies a `Supply` coercion,) this will emit a `Reading` object at a minimum of `supply-interval` seconds frequency (the default is 1.5 seconds which is about the minimum usable value.) The `Reading` object has `temperature` (in degrees Celsius,) and `humidity` (in percentage relative humidity,) attribute.
The `read` method returns a `Reading` object if a valid reading is obtained in `read-retries` attempts, or a type object otherwise, this doesn't place a constraint on how frequently it is called but you are likely to get fewer valid readings if called more frequently than 1.5 seconds.
You could potentially use multiple instances of this on different pins (having more than one on the same pin is guaranteed not to work,) but you should bear in mind that the code has to spin in a tight loop while it is getting a reading so you might experience high processor load and/or unreliable readings if you have too many.
## Installation
You will need [WiringPi](https://github.com/WiringPi/WiringPi) to compile the C helper, your OS may have packages for it but since the original author discontinued support it has been removed from some more recent distributions, it is quite simple to install from source from the unofficial mirror.
If you have a working Raku installation with _zef_ you should be able to install this with:
zef install RPi::Device::DHT11
If you have a copy of this source locally and you want to run the tests separately before installing then you will need to build the C helper library first:
zef build .
zef test .
...
## Support
I have only tested this with a single DHT11 but there are a number of similar devices available which may or may not work, if you experience problems it would be useful if you can indicate the actual device you are trying to use, as well as a wiring diagram (or even a picture,) of how you have it hooked up.
Bear in mind that I may have dismantled the circuit I use to test this so it might take a while to reproduce any problems.
Please direct any questions or patches etc to [Github](https://github.com/jonathanstowe/RPi-Device-DHT11/issues) in the first instance.
## Copyright
© Jonathan Stowe 2023
This is free software, please see the [LICENCE](LICENCE) file in this distribution for details.
The [src/dht.c](src/dht.c) is modified from the [DHT.cpp](https://github.com/Freenove/Freenove_Ultimate_Starter_Kit_for_Raspberry_Pi/blob/master/Code/C_Code/21.1.1_DHT11/DHT.cpp) which is licensed [CC BY-NC-SA 3.0](https://github.com/Freenove/Freenove_Ultimate_Starter_Kit_for_Raspberry_Pi/blob/master/LICENSE.txt).