https://github.com/jpcadena/first-server
First WSGI server using Jinja2 templates.
https://github.com/jpcadena/first-server
Last synced: about 1 month ago
JSON representation
First WSGI server using Jinja2 templates.
- Host: GitHub
- URL: https://github.com/jpcadena/first-server
- Owner: jpcadena
- Created: 2022-12-22T20:26:18.000Z (about 3 years ago)
- Default Branch: master
- Last Pushed: 2022-12-22T20:27:47.000Z (about 3 years ago)
- Last Synced: 2025-01-15T18:47:04.904Z (12 months ago)
- Language: Python
- Size: 4.88 KB
- Stars: 0
- Watchers: 2
- Forks: 0
- Open Issues: 0
-
Metadata Files:
- Readme: README.md
Awesome Lists containing this project
README
# first-server
## First WSGI Python Server
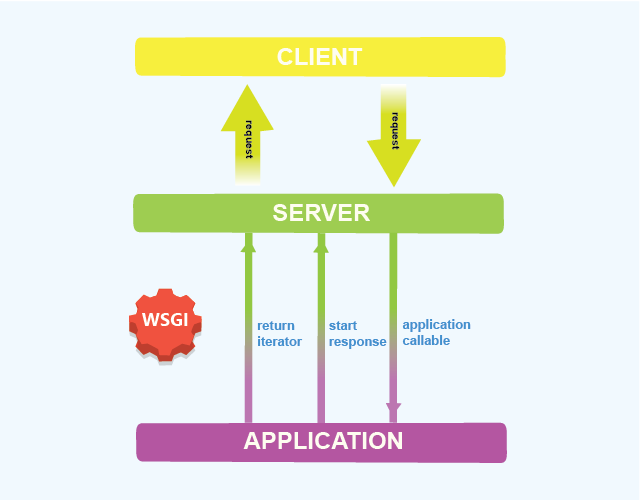
The Web Server Gateway Interface (WSGI) is a standard interface between web
server software and web applications written in Python. Having a standard
interface makes it easy to use an application that supports WSGI with a number
of different web servers.
The WSGI has two sides:
the server/gateway side. This is often running full web server software such as
Apache or Nginx, or is a lightweight application server that can communicate
with a webserver, such as flup.
the application/framework side. This is a Python callable, supplied by the
Python program or framework.
Between the server and the application, there may be one or more WSGI
middleware components, which implement both sides of the API, typically in
Python code.
WSGI does not specify how the Python interpreter should be started, nor how the
application object should be loaded or configured, and different frameworks and
webservers achieve this in different ways.
### Requirements
Python 3.10+
### Git
+ First, clone repository:
```
git clone https://github.com/jpcadena/first-server.git
```
+ Change directory to root project with:
```
cd first-server
```
+ Create your git branch with the following:
```
git checkout -b
```
For ** use some convention as following:
```
yourgithubusername
```
Or if some work in progress (WIP) or bug shows up, you can use:
```
yourgithubusername_feature
```
+ Switch to your branch:
```
git checkout
```
+ **Before** you start working on some section, retrieve the latest changes
with:
```
git pull
```
+ Add your new files and changes:
```
git add .
```
+ Make your commit with a reference message about the fix/changes.
```
git commit -m "Commit message"
```
+ First push for remote branch:
```
git push --set-upstream origin
```
+ Latter pushes:
```
git push origin
```
### Environment
+ Create a **virtual environment** 'sample_venv' with:
```
python3 -m venv sample_venv
```
+ Activate environment in Windows with:
```
.\sample_venv\Scripts\activate
```
+ Or with Unix or Mac:
```
source sample_venv/bin/activate
```
### Installation of libraries and dependencies
```
pip install -r requirements.txt
```
### Execution
```
python main.py
```
### Documentation
Use docstrings with **reStructuredText** format by adding triple double quotes
**"""** after function definition.\
Add a brief function description, also for the parameters including the return
value and its corresponding data type.
### Additional information
If you want to give more style and a better format to this README.md file,
check documentation
at [Github Docs](https://docs.github.com/en/get-started/writing-on-github/getting-started-with-writing-and-formatting-on-github/basic-writing-and-formatting-syntax).\
Please use **linting** to check your code quality
following [PEP 8](https://peps.python.org/pep-0008/). Check documentation
for [Visual Studio Code](https://code.visualstudio.com/docs/python/linting#_run-linting)
or
for [Jetbrains Pycharm](https://github.com/leinardi/pylint-pycharm/blob/master/README.md).\
Recommended plugin for
autocompletion: [Tabnine](https://www.tabnine.com/install)