https://github.com/jpf/dial-a-cat
855-MEOW-JAM
https://github.com/jpf/dial-a-cat
Last synced: 8 months ago
JSON representation
855-MEOW-JAM
- Host: GitHub
- URL: https://github.com/jpf/dial-a-cat
- Owner: jpf
- Created: 2013-07-23T20:47:35.000Z (almost 13 years ago)
- Default Branch: master
- Last Pushed: 2018-06-10T03:16:40.000Z (about 8 years ago)
- Last Synced: 2025-09-11T08:08:37.241Z (9 months ago)
- Language: OpenEdge ABL
- Size: 268 KB
- Stars: 71
- Watchers: 2
- Forks: 4
- Open Issues: 0
-
Metadata Files:
- Readme: README.md
Awesome Lists containing this project
README
# 1-855-MEOW JAM: Sending Cat Pictures Over The Phone Via Space Age Technology

**Note!** The text below was originally posted on the Twilio blog as
the post "[1-855-MEOW JAM: Sending Cat Pictures Over The Phone Via Space Age Technology](https://www.twilio.com/blog/2013/10/1-855-meow-jam-sending-cat-pictures-over-the-phone-via-space-age-technology.html)"
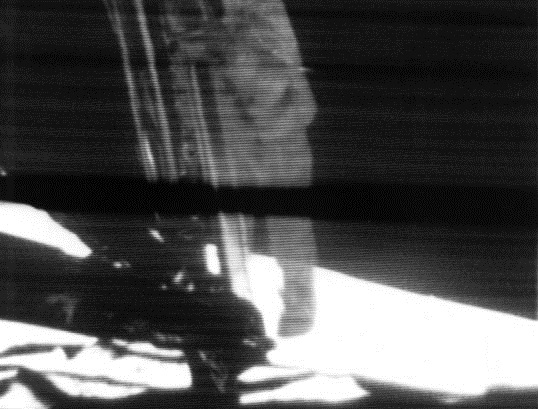
On July 20, 1969, at 20:18 UTC, Neil Armstrong was the first human to
set foot on the Moon. Video of Neil descending the ladder of the lunar
module was broadcast to earth at 10 frames a second via an image
transmission method known as Slow-scan Television, or “SSTV”.
Today I’ll be showing you how to use the space-age technology of
SSTV and your telephone to do something critical to human progress:
look at pictures of cats.
We’ll be using an SSTV transmission mode called “[Martin M2](http://en.wikipedia.org/wiki/Slow-scan_television#Modes)”. Martin
M2 is an SSTV transmission mode which is popular with European Ham
radio operators and differs significantly from the system that NASA
used to transmit images back from the moon.
Keep in mind that this post is just for fun and a little
complicated. If you want an easy way to send pictures to mobile
phones, you should look at [Twilio Picture Messaging](https://www.twilio.com/mms).
In any event, here is what I’ll be covering in this blog post:
- How to use Dial-A-Cat
- Motivation: Why I built dial-a-cat
- How it works
- How to convert an image to an SSTV transmission
- How to build an IVR with Twilio
## How To Use Dial-A-Cat
Are you wondering what this all looks like? Below is a video that
shows my cellphone and laptop to receiving a cat picture.
[](https://youtu.be/B7bVzBhg_GM?t=35s)
Want to try that out yourself? Before you can start “dialing” cat pictures, you’ll need the following:
- A telephone with good audio quality.
(If your cell-phone doesn’t work, try a hardwired phone)
One of the following:
- A computer running Linux, OS X, or Windows
- An iPhone or Android phone
- [SSTV software capable of decoding Martin M2 transmissions](http://en.wikipedia.org/wiki/Slow-scan_television#External_links)
- Linux – [qsstv](http://users.telenet.be/on4qz/) (Ubuntu users should use this [PPA](http://askubuntu.com/questions/4983/what-are-ppas-and-how-do-i-use-them): `ppa:kamalmostafa/qsstv`)
- OS X – [MultiScan 2SL](https://s3.amazonaws.com/jf-files/MultiScan_2SL.zip)
- Windows – [RX-SSTV](http://users.belgacom.net/hamradio/rxsstv.htm)
- iPhone – [SSTV](https://itunes.apple.com/us/app/sstv/id387910013) ($3)
- Android – [DroidSSTV](https://play.google.com/store/apps/details?id=com.wolphi.sstv&hl=en) ($7)
## How to dial your first cat:
- Use one of the links above to download and install the SSTV software
for your computer or smartphone.
- Use a telephone to dial this number: +1 855-MEOW-JAM (855 636-9526)
- You’ll hear some instructions on how to use “dial-a-cat”.
- When you hear “standby”, hold the speaker of your phone up to the microphone of the device running the SSTV decoding software.
- Wait for your cat picture to show up.
What to do after you’ve seen all of the pre-rendered images:
- Press the “8” at any time while you’re connected to dial-a-cat.
- A cat picture will be selected Just For You using [The Cat API](http://www.thecatapi.com/).
- This image will be rendered into an SSTV transmission for you on-the-fly.
- It takes about 15-30 seconds for this image to be rendered, be
patient.
What happens if you press the “7” button while connected to dial-a-cat? It’s a mystery.
## Tips For Receiving A Clear Transmission
SSTV is an analog audio transmission, so it is vulnerable to
interference from other audio sources in your environment. Try the
following things if you’re having trouble receiving images:
Call from a phone with good audio quality. A hardwired telephone is
ideal. Move to a quiet room. Plug earbuds into your phone and hold
the earbuds right next to the microphone on your device.
If you are running SSTV software on Android, you can use earbuds to
“loopback” the audio to your phone as follows:
- Plug earbuds into your phone.
- Dial +1 855-636-9526
- Turn the volume on your earbuds to a medium-low volume.
- When you start to hear the instructions, switch to DroidSSTV.
- Move your earbuds to bottom of your phone, near your phone’s microphone.
- Hold your earbuds in place until you receive the image. (I used
this method to get the cat image below)

## Motivation
When I first met Dave Rauchwerk, we quickly discovered that we both
shared a love of obscure or forgotten technology.
Among the things that we discussed, Dave told me about SSTV, how
SSTV was used to send images back from the moon and about an art
installation he had done using SSTV.
Dave’s art installation consisted of a room with digital picture
frames that would listen for SSTV audio nearby and display images
from those SSTV transmissions in the picture frame. Also inside the
room was a digital camera that Dave had modified to “play” the
pictures it took into the room. When a visitor took a picture with
the camera, the camera would use sound to transmit the image to the
picture frames.
I was so inspired by Dave’s art project that I knew I had to do
something with Twilio and SSTV.
Naturally, I wanted build something that would use the
telephone. But what to send? I had trouble deciding at first. Then I
realized that everybody likes pictures of cats.
(Incidentally, one of my co-workers suggested that dial-a-cat would
be a great way to generate album art for your band’s next album.)
## How It Works
Now that you’ve seen what dial-a-cat does and learned what inspired
me to build it. Let’s dig into how it works.
Here are the components that make up dial-a-cat:
- Twilio
- Python
- [Flask](http://flask.pocoo.org/)
- [pySSTV](https://github.com/dnet/pySSTV)
- [The Cat API](http://thecatapi.com/)
- [FileGenerator](https://github.com/jpf/FileGenerator)
The components above are combined into code to that generates an
SSTV transmission audio stream from an image, and a Twilio IVR to
control dial-a-cat. This allows people to switch between
pre-rendered and “live” SSTV transmissions.
My code makes heavy use of the excellent [pySSTV](https://github.com/dnet/pySSTV) library from [András
Veres-Szentkirályi](http://techblog.vsza.hu/). If you’re at all interested in learning more
about SSTV, I recommend that you read the source to pySSTV.
All the code that I used to build [dial-a-cat is available on
GitHub](https://github.com/jpf/dial-a-cat). I’m only going to be covering the key parts of dial-a-cat in
this post, so if you want to really get a good understand of how
everything works, you’ll need to look at the code.
## Transmitting SSTV images over the telephone
The simplest way to transmit SSTV images over the telephone is to
pre-render an audio file with the SSTV transmission and have Twilio
play that file.
Here’s the function that I use to do that. This function will
randomly pick a URL from a list of pre-rendered SSTV transmissions
and return that URL in TwiML:
@app.route('/voice/random-prerendered-cat', methods=['GET', 'POST'])
def voice_prerendered_cat():
f = open('image-list.txt')
images = [i.strip() for i in f.readlines()]
wav = 'https://s3.amazonaws.com/jf-sstv-cats/%s' % choice(images)
gather_args = get_gather_args()
r = twiml.Response()
with r.gather(**gather_args) as g:
g.play(wav)
g.say("Stand by for transmission")
r.redirect(url_for('voice_prerendered_cat', _external=True))
return str(r)
Easy, right? Almost too easy.
What if we wanted to generate an SSTV transmission from some random
image on the internet? Well, that’s a little bit more complicated
and involves approximately 30 methods across 5 files.
As you read the code, you’ll probably be wondering why it is so much
more complicated than what I just showed you above. Well, the key
obstacle that I needed to overcome here was getting data to Twilio
before the 15 second timeout. It takes about 20 seconds to generate
a Martin M2 SSTV transmission and Twilio will close the connection
if doesn’t get a response to a HTTP request after 15 seconds.
To overcome this obstacle, I wrote a little hack to stream the SSTV
transmission as it’s being generated. Read on to see how.
@app.route('/cat-api/v1/sstv-.wav')
def cat_sstv_wav(id):
cat = CatAPIPicture(id=id)
cat.image_get()
cat.image_scale_to_martin_m2()
rv = live_martin_m2_renderer(cat.image)
timeout = 14400 # 4 hours
rv.headers['Cache-Timeout'] = timeout
return rv
This is the core function that handles “live” conversion of a random image to a Martin M2 SSTV transmission. At a high level, this function gets an image from the Cat API, scales it to be appropriately sized for for Martin M2 (160 pixels by 256 pixels), passes the scaled image to a function that will render that image into Martin M2, then has Flask to feed rendered transmission to Twilio.
All the “heavy lifting” is done in the live\_martin\_m2\_render() function. So, let’s take a closer look at that:
def live_martin_m2_renderer(image):
generator = FileGenerator()
slowscan = MartinM2Generator(image, 48000, 16)
MartinM2GeneratorWorker(slowscan, generator).start()
rv = Response(generator.read_generator(), mimetype='audio/wav')
rv.headers['Content-Length'] = 5661190
return rv
Let’s cover this line by line.
generator = FileGenerator()
Here I am instantiating a file-like object that can be read via a
generator, I call this a `FileGenerator`. This is the key part of what
allows me to stream the WAV file as it is being written.
slowscan = MartinM2Generator(image, 48000, 16)
This is instantiating a `MartinM2Generator` object, a class that is
extended from the pySSTV’s `MartinM2` class and modified so that it
can be used with a `FileGenerator`.
MartinM2GeneratorWorker(slowscan, generator).start()
This starts up a thread which starts writing the WAV file to the
FileGenerator.
rv = Response(generator.read_generator(), mimetype='audio/wav')
rv.headers['Content-Length'] = 5661190
return rv
Finally, I return a generator that [Flask will use to stream](http://flask.pocoo.org/docs/patterns/streaming/) the
contents of the WAV file to the user, as the WAV file is being
written.
To fully understand what’s going on, you will also want to look at
the code for FileGenerator, MartinM2Generator, and
MartinM2GeneratorWorker classes.
Now that you know how I’m streaming cat pictures to you over the
telephone. Let’s take a look at how I built the controls for
dial-a-cat.
## Building an IVR with Twilio
By default, dial-a-cat will pick a pre-rendered SSTV transmission at
random, play it, and keep doing that until you hang up. However, you
can press “0” anytime during your call and hear about the other
buttons you can press. For example, you can press “8” to show have
dial-a-cat fetch a random cat image for you off of the internet and
render it into an SSTV transmission.
In the telecom world, a “phone tree” or “phone menu” is called an
“IVR” ([Interactive Voice Response](http://en.wikipedia.org/wiki/Interactive_voice_response)).
Here is how I built an IVR into dial-a-cat:
The key part of building an IVR with Twilio is to use the [TwiML tag](http://www.twilio.com/docs/api/twiml/gather)
(TwiML is the XML based instruction set that you use to tell Twilio
what to do with your call)
The tag tells Twilio to make an HTTP request to your application
when the user presses one or more buttons on their phones keypad.
Let’s take a look at my code to see how I do this.
@app.route('/voice', methods=['GET', 'POST'])
def voice_main():
r = twiml.Response()
r.say("Welcome to dial a cat.")
r.redirect(url_for('voice_instructions', _external=True))
return str(r)
This is the main entry point for dial-a-cat. It reads the text
“Welcome to dial a cat” to the user and then does a redirect to the
code below, which reads instructions for dial-a-cat to you:
def get_gather_args():
return {'action': url_for('voice_handle_gather', _external=True),
'numDigits': 1,
'timeout': 1}
@app.route('/voice/instructions', methods=['GET', 'POST'])
def voice_instructions():
gather_args = get_gather_args()
r = twiml.Response()
with r.gather(**gather_args) as g:
g.say(("An S S T V Transmission "
"in the Martin M Two format will be starting shortly."))
g.pause()
g.say("For help press 0")
g.pause()
g.say("Stand by for transmission.")
r.redirect(url_for('voice_prerendered_cat', _external=True))
return str(r)
The line to focus on here is this one: `with r.gather(**gather_args) as g:`
The twilio-python TwiML generator uses Python’s “with” statement to
generate TwiML that is wrapped in a tag. Here is the XML that the
statement above generates:
An S S T V Transmission in the Martin M Two format will be starting shortly.
For help press 0
Stand by for transmission.
http://twilio-dial-a-cat.herokuapp.com/voice/random-prerendered-cat
Note the “action” property in the tag, this is the URL that Twilio
will send button presses to. When building a complex phone tree,
this URL will change as your user traverses through your phone
tree. I just wanted users to be able to switch between “live”
rendered and pre-rendered cats, so I use the same handler for
everything. Here is what the code for my handler looks like:
@app.route('/voice/handle-gather', methods=['POST'])
def voice_handle_gather():
digit = request.form['Digits']
if digit == '0':
return redirect(url_for('voice_help', _external=True))
elif digit == '1':
return redirect(url_for('easter_egg', id='1', _external=True))
elif digit == '2':
return redirect(url_for('voice_prerendered_cat', _external=True))
elif digit == '4':
return redirect(url_for('easter_egg', id='2', _external=True))
elif digit == '7':
return redirect(url_for('easter_egg', id='3', _external=True))
elif digit == '8':
return redirect(url_for('voice_live_rendered_cat', _external=True))
else:
return redirect(url_for('voice_instructions', _external=True))
As you can see, this is pretty simple. Based on the digits that are
sent, we will return TwiML asking Twilo to the user to the
appropriate instructions.
I hope you’ve enjoyed using your telephone to receive pictures of
cats and I hope that you learned something useful while reading
about how I made dial-a-cat. The full source code for [this project
is available on GitHub](https://github.com/jpf/dial-a-cat).
