https://github.com/kazuhiro4949/PagingKit
PagingKit provides customizable menu UI. It has more flexible layout and design than the other libraries.
https://github.com/kazuhiro4949/PagingKit
ios pageviewcontroller paging segmentcontrol swift uicollectionview uicollectionviewlayout uikit uitableview
Last synced: 12 months ago
JSON representation
PagingKit provides customizable menu UI. It has more flexible layout and design than the other libraries.
- Host: GitHub
- URL: https://github.com/kazuhiro4949/PagingKit
- Owner: kazuhiro4949
- License: mit
- Created: 2017-07-02T16:16:40.000Z (about 9 years ago)
- Default Branch: master
- Last Pushed: 2022-08-08T23:47:02.000Z (almost 4 years ago)
- Last Synced: 2024-12-07T02:09:02.843Z (over 1 year ago)
- Topics: ios, pageviewcontroller, paging, segmentcontrol, swift, uicollectionview, uicollectionviewlayout, uikit, uitableview
- Language: Swift
- Homepage:
- Size: 1.23 MB
- Stars: 1,404
- Watchers: 20
- Forks: 123
- Open Issues: 8
-
Metadata Files:
- Readme: README.md
- License: LICENSE
Awesome Lists containing this project
- awesome-ios - PagingKit - PagingKit provides customizable menu UI It has more flexible layout and design than the other libraries. (UI / Menu)
- awesome-swift - PagingKit - PagingKit provides customizable menu UI. (Libs / UI)
- awesome-cocoa - PagingKit
- awesome-swift - PagingKit - PagingKit provides customizable menu UI. (Libs / UI)
- awesome-ios-star - PagingKit - PagingKit provides customizable menu UI It has more flexible layout and design than the other libraries. (UI / Menu)
- fucking-awesome-swift - PagingKit - PagingKit provides customizable menu UI. (Libs / UI)
- awesome-swift - PagingKit - PagingKit provides customizable menu UI. It has more flexible layout and design than the other libraries. ` 📝 a month ago` (UI [🔝](#readme))
- fucking-awesome-ios - PagingKit - PagingKit provides customizable menu UI It has more flexible layout and design than the other libraries. (UI / Menu)
README

[](http://cocoapods.org/pods/PagingKit)

[](http://cocoapods.org/pods/PagingKit)
[](http://cocoapods.org/pods/PagingKit)
[](https://github.com/Carthage/Carthage)
[](https://swift.org/package-manager/)
PagingKit provides customizable menu & content UI. It has more flexible layout and design than the other libraries.
# What's this?
There are many libraries providing "Paging UI" which have menu and content area.
They are convenient but not customizable because your app has to be made compatible with the libraries' layout and view components.
When a UI desgin in your app doesn't fit the libraries, you need to fork them or find another one.
PagingKit has more flexible layout and design than the other libraries.
You can construct "Menu" and "Content" UI, and they work together. That's all features this library provides.
You can fit any design to your apps as you like.
## Customized layout
You can align views as you like.
| changing position | placing a view between content and menu | added floating button on right-side | on navigation bar |
|:------------:|:------------:|:------------:|:------------:|
|  |  |  |  |
|
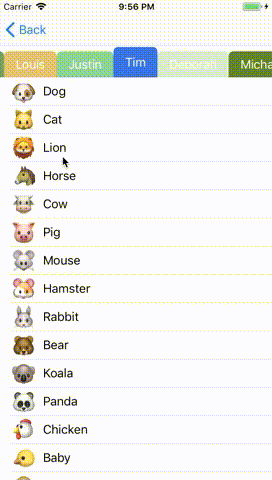
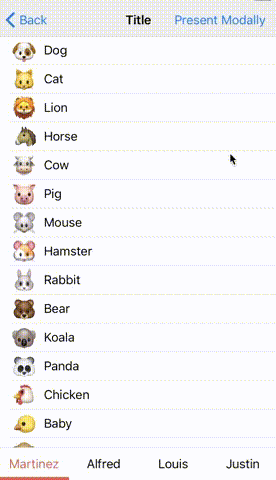
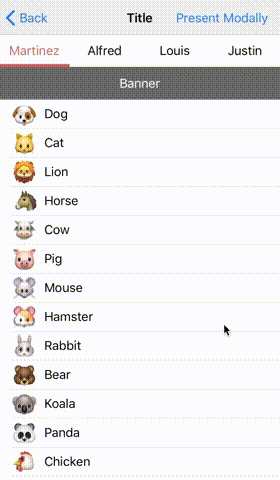
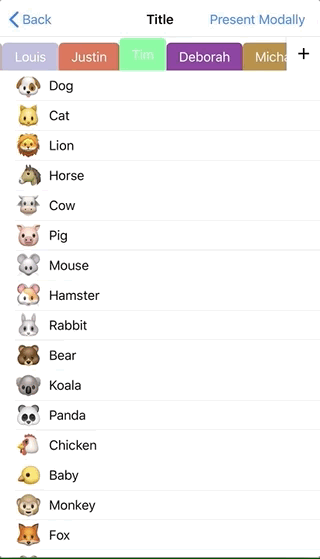
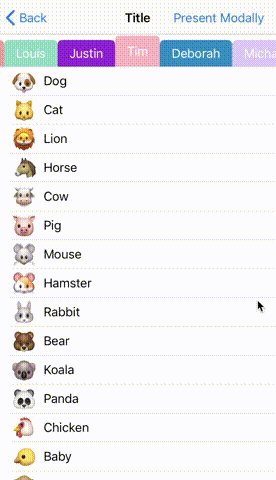
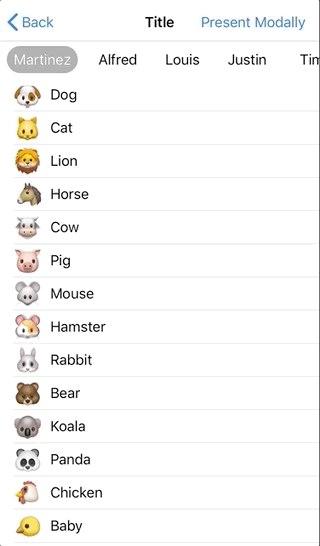
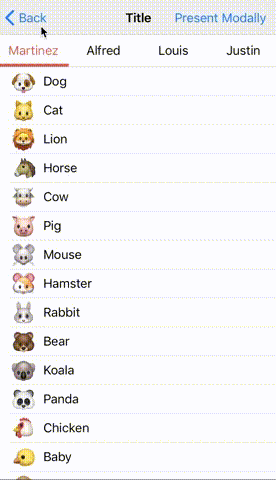
## Customized menu design
You can customize menu as you like.
| tag like menu | text highlighted menu | underscore menu | App Store app like indicator |
|:------------:|:------------:|:------------:|:------------:|
|  |  |  |  |
|  |  |
I'm looking for a pull request of your custom menu design :)
# Feature
- [x] easy to construct Paging UI
- [x] customizable layout and design
- [x] UIKit like API
- [x] Supporting iPhone, iPad and iPhone X
# Requirements
+ iOS 9.0+
+ Xcode 11.0+
+ Swift 5.1
# Installation
## Swift Package Manager
open Swift Packages (which is next to Build Settings). You can add and remove packages from this tab.
See [Adding Package Dependencies to Your App](https://developer.apple.com/documentation/xcode/adding_package_dependencies_to_your_app)
## CocoaPods
+ Install CocoaPods
```
> gem install cocoapods
> pod setup
```
+ Create Podfile
```
> pod init
```
+ Edit Podfile
```ruby
target 'YourProject' do
use_frameworks!
pod "PagingKit" # add
target 'YourProject' do
inherit! :search_paths
end
target 'YourProject' do
inherit! :search_paths
end
end
```
+ Install
```
> pod install
```
open .xcworkspace
## Carthage
+ Install Carthage from Homebrew
```
> ruby -e "$(curl -fsSL https://raw.githubusercontent.com/Homebrew/install/master/install)"
> brew update
> brew install carthage
```
+ Move your project dir and create Cartfile
```
> touch Cartfile
```
+ add the following line to Cartfile
```
github "kazuhiro4949/PagingKit"
```
+ Create framework
```
> carthage update --platform iOS
```
+ In Xcode, move to "Genera > Build Phase > Linked Frameworks and Library"
+ Add the framework to your project
+ Add a new run script and put the following code
```
/usr/local/bin/carthage copy-frameworks
```
+ Click "+" at Input file and Add the framework path
```
$(SRCROOT)/Carthage/Build/iOS/PagingKit.framework
```
+ Write Import statement on your source file
```
import PagingKit
```
# Getting Started
There are some samples in this library.
https://github.com/kazuhiro4949/PagingKit/tree/master/iOS%20Sample/iOS%20Sample
You can fit PagingKit into your project as the samples do. Check out this repository and open the workspace.
PagingKit has two essential classes.
- PagingMenuViewController
- PagingContentViewController
PagingMenuViewController provides interactive menu for each content. PagingContentViewController provides the contents on a scrollview.
If you make a new project which contains PagingKit, follow the steps.
1. Add PagingMenuViewController & PagingContentViewController
2. Assign them to properties
3. Create menu UI
4. display data
5. Synchronize Menu and Content view controllers
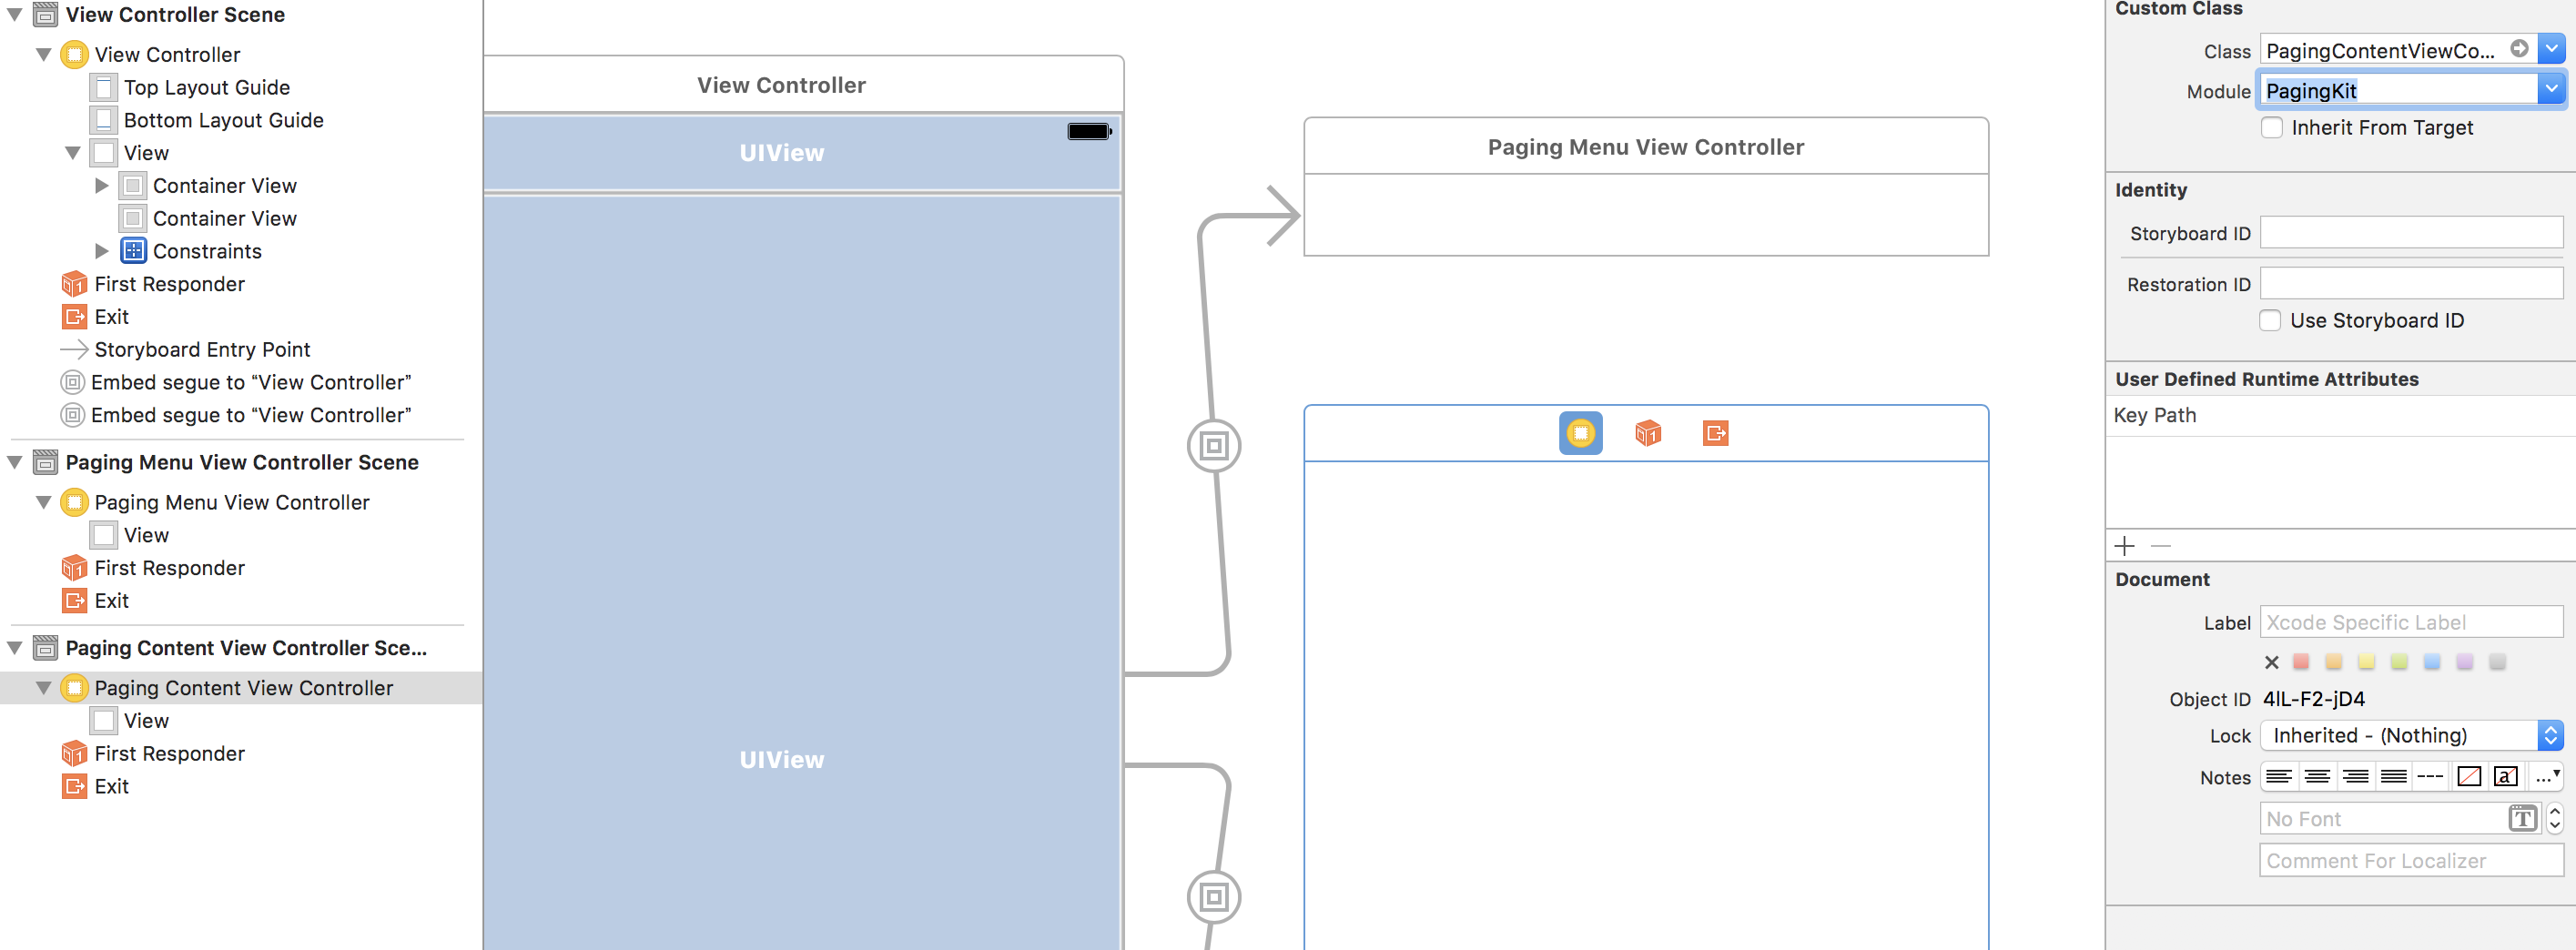
## 1. Add PagingMenuViewController & PagingContentViewController
First, add PagingMenuViewController & PagingContentViewController on container view with Stroyboard.
### 1. Put container views on Storyboard
Put container views on stroyboard for each the view controllers.
### 2. Change class names
input PagingMenuViewController on custom class setting.

input PagingContentViewController on custom class setting.
## 2. Assign them to properties
Assign them on code of the container view controller.
### 1. Declare properties for the view controllers
Declare properties in container view controller.
```swift
class ViewController: UIViewController {
var menuViewController: PagingMenuViewController!
var contentViewController: PagingContentViewController!
```
### 2. override prepare(segue:sender:) and assign the view controllers
Assigin view controllers to each the property on ```prepare(segue:sender:)```.
```swift
override func prepare(for segue: UIStoryboardSegue, sender: Any?) {
if let vc = segue.destination as? PagingMenuViewController {
menuViewController = vc
} else if let vc = segue.destination as? PagingContentViewController {
contentViewController = vc
}
}
```
### 3. Build App
Change menu color.

Build and check the current state.
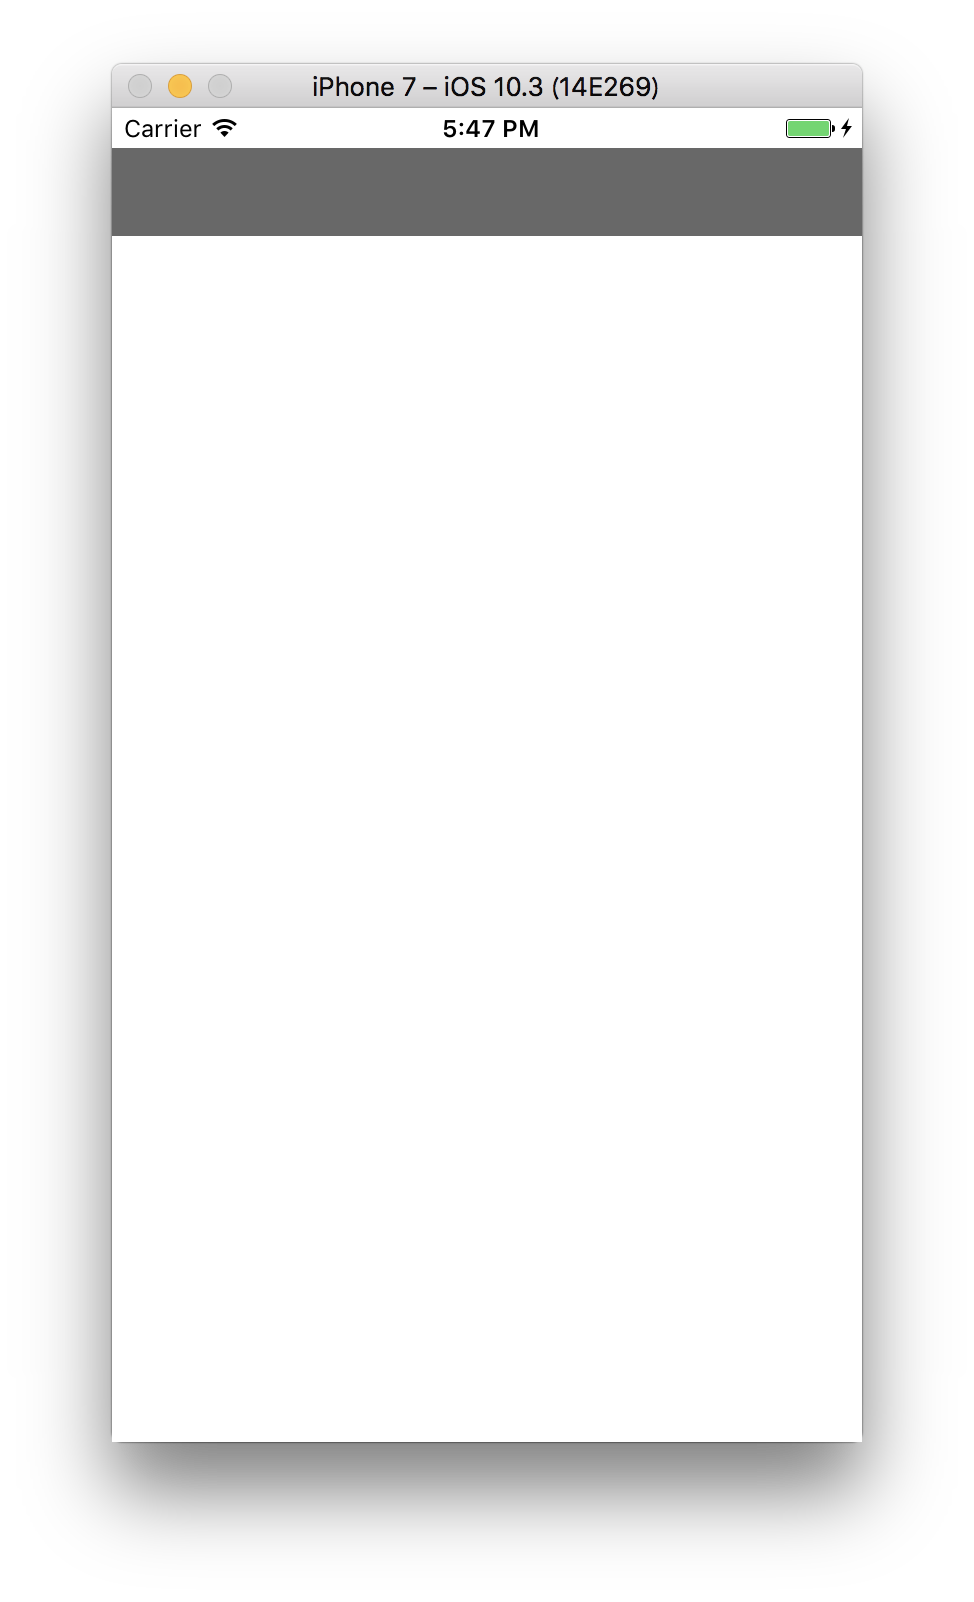
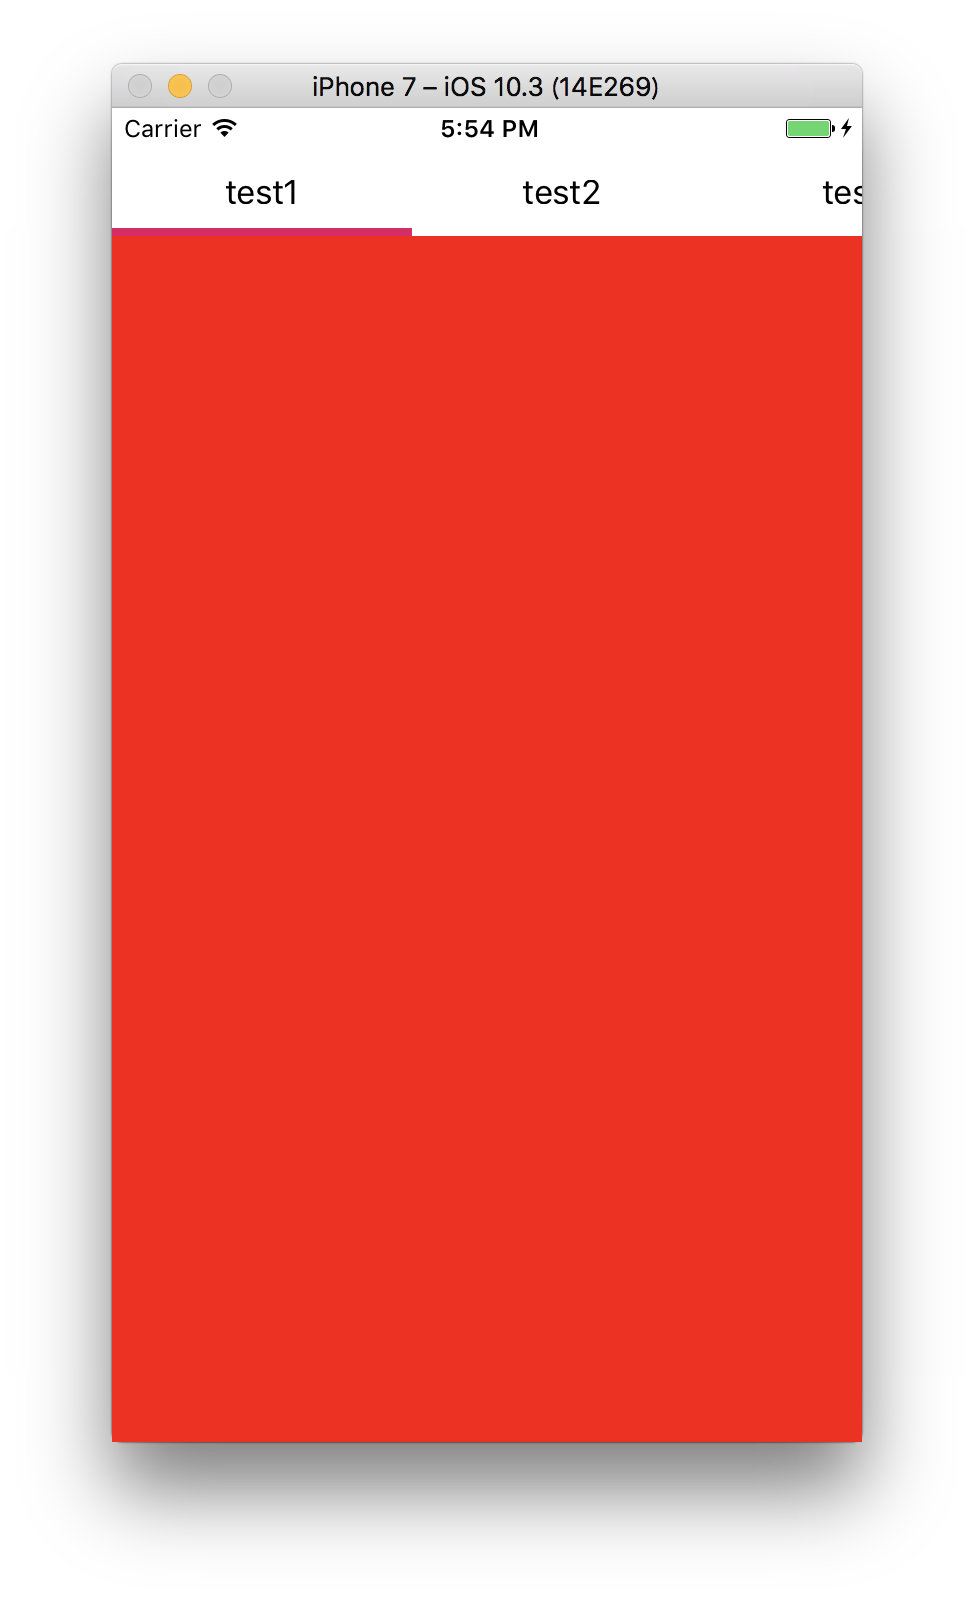
It shows a container view controller that has PagingMenuViewController and PagingContentViewController.
## 3. Create menu UI
Next, you needs to prepare the menu elements.
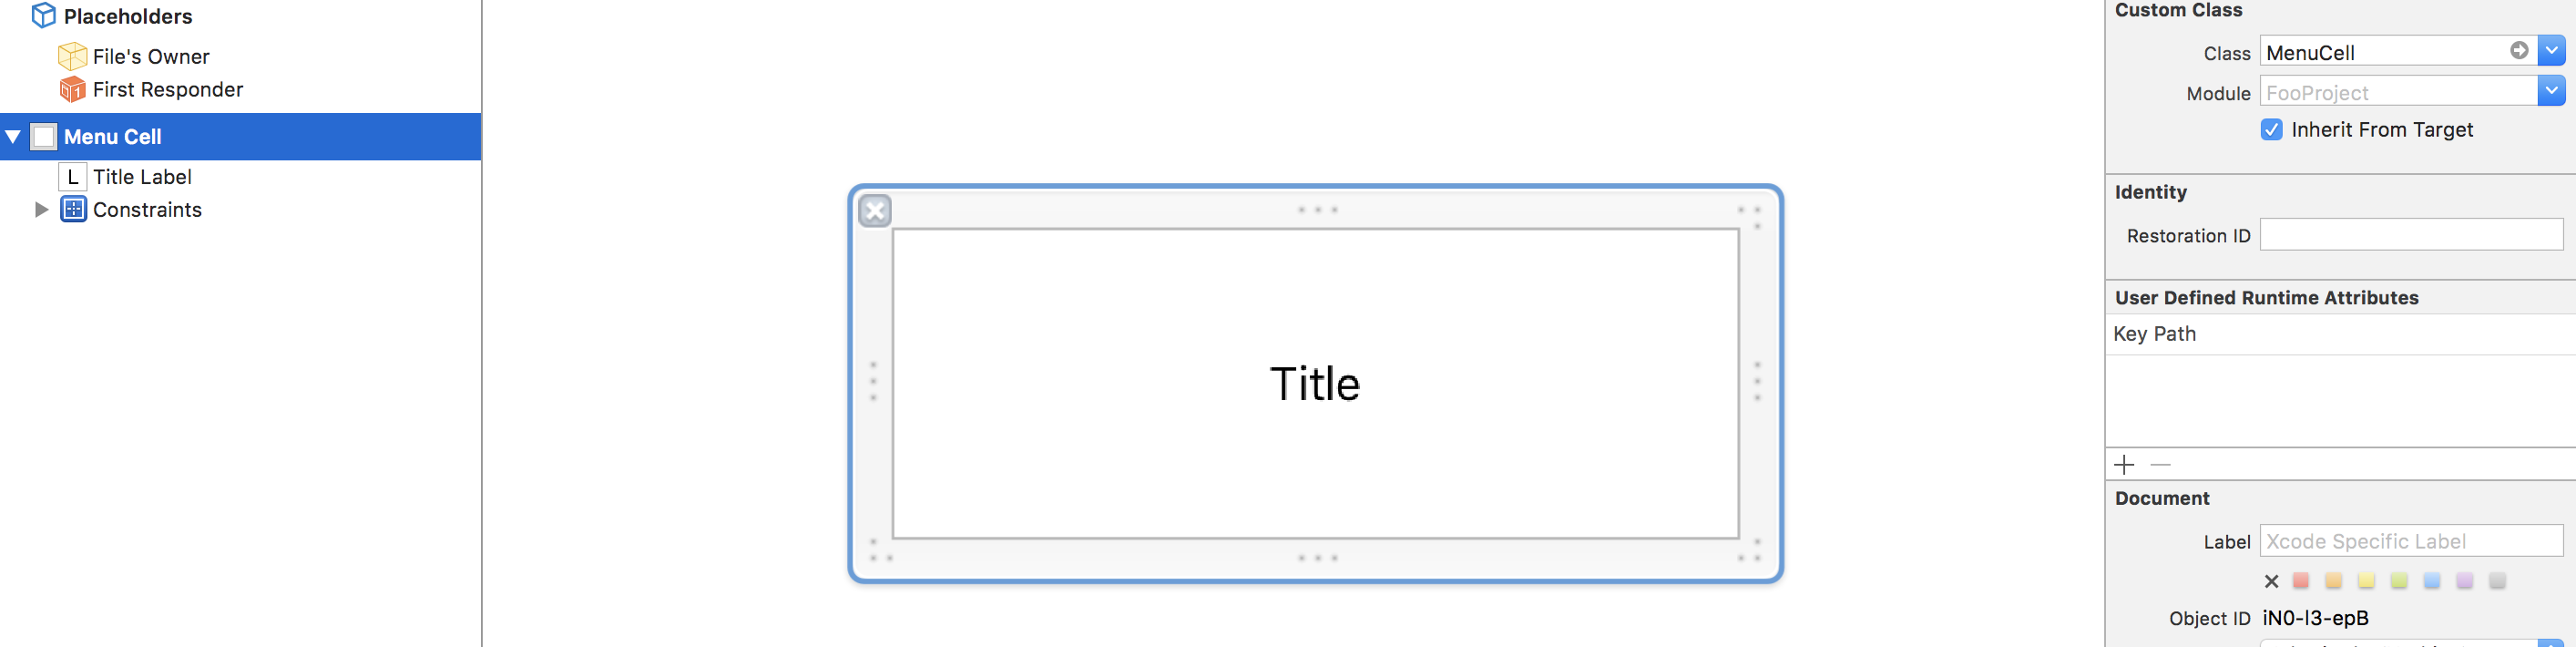
### 1. Inherite PagingMenuViewCell and create custom cell
PagingKit has PagingMenuViewCell. PagingMenuViewController uses it to construct each menu element.
```swift
import UIKit
import PagingKit
class MenuCell: PagingMenuViewCell {
@IBOutlet weak var titleLabel: UILabel!
}
```
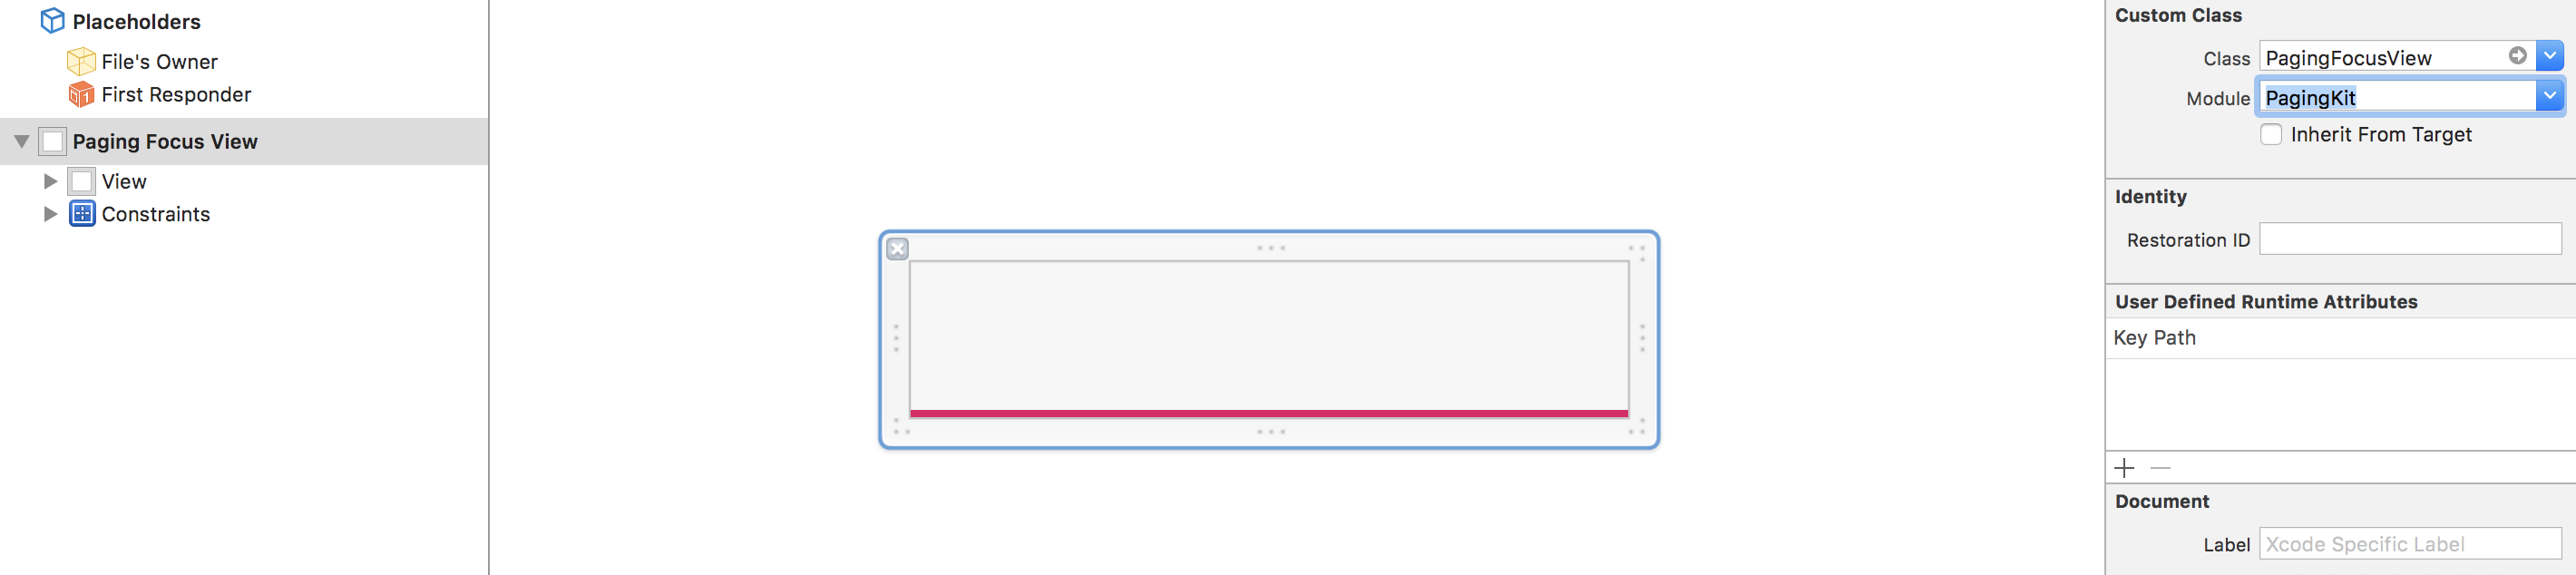
### 2. Inherite PagingFocusView and create custom view
PagingKit has PagingFocusView. PagingMenuViewController uses it to point the current focusted menu.
### 3. register the above views to PagingMenuViewController
```swift
class ViewController: UIViewController {
var menuViewController: PagingMenuViewController!
var contentViewController: PagingContentViewController!
override func viewDidLoad() {
super.viewDidLoad()
menuViewController.register(nib: UINib(nibName: "MenuCell", bundle: nil), forCellWithReuseIdentifier: "MenuCell")
menuViewController.registerFocusView(nib: UINib(nibName: "FocusView", bundle: nil))
}
```
## 4. display data
Then, implement the data sources to display contents. They are a similar to UITableViewDataSource.
### 1. prepare data
```swift
class ViewController: UIViewController {
static var viewController: (UIColor) -> UIViewController = { (color) in
let vc = UIViewController()
vc.view.backgroundColor = color
return vc
}
var dataSource = [(menuTitle: "test1", vc: viewController(.red)), (menuTitle: "test2", vc: viewController(.blue)), (menuTitle: "test3", vc: viewController(.yellow))]
```
### 2. set menu data source
Return number of menus, menu widthes and PagingMenuViewCell objects.
```swift
override func prepare(for segue: UIStoryboardSegue, sender: Any?) {
if let vc = segue.destination as? PagingMenuViewController {
menuViewController = vc
menuViewController.dataSource = self // <- set menu data source
} else if let vc = segue.destination as? PagingContentViewController {
contentViewController = vc
}
}
}
extension ViewController: PagingMenuViewControllerDataSource {
func numberOfItemsForMenuViewController(viewController: PagingMenuViewController) -> Int {
return dataSource.count
}
func menuViewController(viewController: PagingMenuViewController, widthForItemAt index: Int) -> CGFloat {
return 100
}
func menuViewController(viewController: PagingMenuViewController, cellForItemAt index: Int) -> PagingMenuViewCell {
let cell = viewController.dequeueReusableCell(withReuseIdentifier: "MenuCell", for: index) as! MenuCell
cell.titleLabel.text = dataSource[index].menuTitle
return cell
}
}
```
### 3. configure content data source
Return the number of contents and view controllers.
```swift
override func prepare(for segue: UIStoryboardSegue, sender: Any?) {
if let vc = segue.destination as? PagingMenuViewController {
menuViewController = vc
menuViewController.dataSource = self
} else if let vc = segue.destination as? PagingContentViewController {
contentViewController = vc
contentViewController.dataSource = self // <- set content data source
}
}
}
extension ViewController: PagingContentViewControllerDataSource {
func numberOfItemsForContentViewController(viewController: PagingContentViewController) -> Int {
return dataSource.count
}
func contentViewController(viewController: PagingContentViewController, viewControllerAt index: Int) -> UIViewController {
return dataSource[index].vc
}
}
```
### 4. load UI
Call reloadData() methods with starting point.
```swift
override func viewDidLoad() {
super.viewDidLoad()
//...
//...
menuViewController.reloadData()
contentViewController.reloadData()
}
```
Build and display data source.
## 5. Synchronize Menu and Content view controllers
Last, synchronize user interactions between Menu and Content.
### 1. set menu delegate
```swift
override func prepare(for segue: UIStoryboardSegue, sender: Any?) {
if let vc = segue.destination as? PagingMenuViewController {
menuViewController = vc
menuViewController.dataSource = self
menuViewController.delegate = self // <- set menu delegate
} else if let vc = segue.destination as? PagingContentViewController {
contentViewController = vc
contentViewController.dataSource = self
}
}
}
```
Implement menu delegate to handle the event. It is a similar to UITableViewDelegate. You need to implement scroll method of PagingContentViewController in the delegate method.
```swift
extension ViewController: PagingMenuViewControllerDelegate {
func menuViewController(viewController: PagingMenuViewController, didSelect page: Int, previousPage: Int) {
contentViewController.scroll(to: page, animated: true)
}
}
```
### 2. set content delegate
```swift
override func prepare(for segue: UIStoryboardSegue, sender: Any?) {
if let vc = segue.destination as? PagingMenuViewController {
menuViewController = vc
menuViewController.dataSource = self
menuViewController.delegate = self
} else if let vc = segue.destination as? PagingContentViewController {
contentViewController = vc
contentViewController.dataSource = self
contentViewController.delegate = self // <- set content delegate
}
}
}
```
Implement content delegate to handle the event. It is similar to UIScrollViewDelegate. You need to implement the scroll event of PagingMenuViewController. "percent" is distance from "index" argument to the right-side page index.
```swift
extension ViewController: PagingContentViewControllerDelegate {
func contentViewController(viewController: PagingContentViewController, didManualScrollOn index: Int, percent: CGFloat) {
menuViewController.scroll(index: index, percent: percent, animated: false)
}
}
```
That's it.
# Tips
- [Build-in UI components](https://github.com/kazuhiro4949/PagingKit/blob/master/Documentation/Tips.md#build-in-ui-components)
- [Focused Cell Style](https://github.com/kazuhiro4949/PagingKit/blob/master/Documentation/Tips.md#focused-cell-style)
- [Cell Alignment](https://github.com/kazuhiro4949/PagingKit/blob/master/Documentation/Tips.md#cell-alignment)
- [Underline to have the same width as each title label](https://github.com/kazuhiro4949/PagingKit/blob/master/Documentation/Tips.md#underline-to-have-the-same-width-as-each-title-label)
- [Controlling PagingContentViewController's scroll](https://github.com/kazuhiro4949/PagingKit/blob/master/Documentation/Tips.md#controlling-pagingcontentviewcontrollers-scroll)
- [Initializing without Storyboard](https://github.com/kazuhiro4949/PagingKit/blob/master/Documentation/Tips.md#initializing-without-storyboard)
- [Put menu on UINavigationBar](https://github.com/kazuhiro4949/PagingKit/blob/master/Documentation/Tips.md#put-menu-on-uinavigationbar)
- [Animating alongside PagingMenuFocusView](https://github.com/kazuhiro4949/PagingKit/blob/master/Documentation/Tips.md#animating-alongside-pagingmenufocusview)
- [RTL Support](https://github.com/kazuhiro4949/PagingKit/blob/master/Documentation/Tips.md#rtl-support)
- [Code Snippets](https://github.com/kazuhiro4949/PagingKit/blob/master/Documentation/Tips.md#code-snippets)
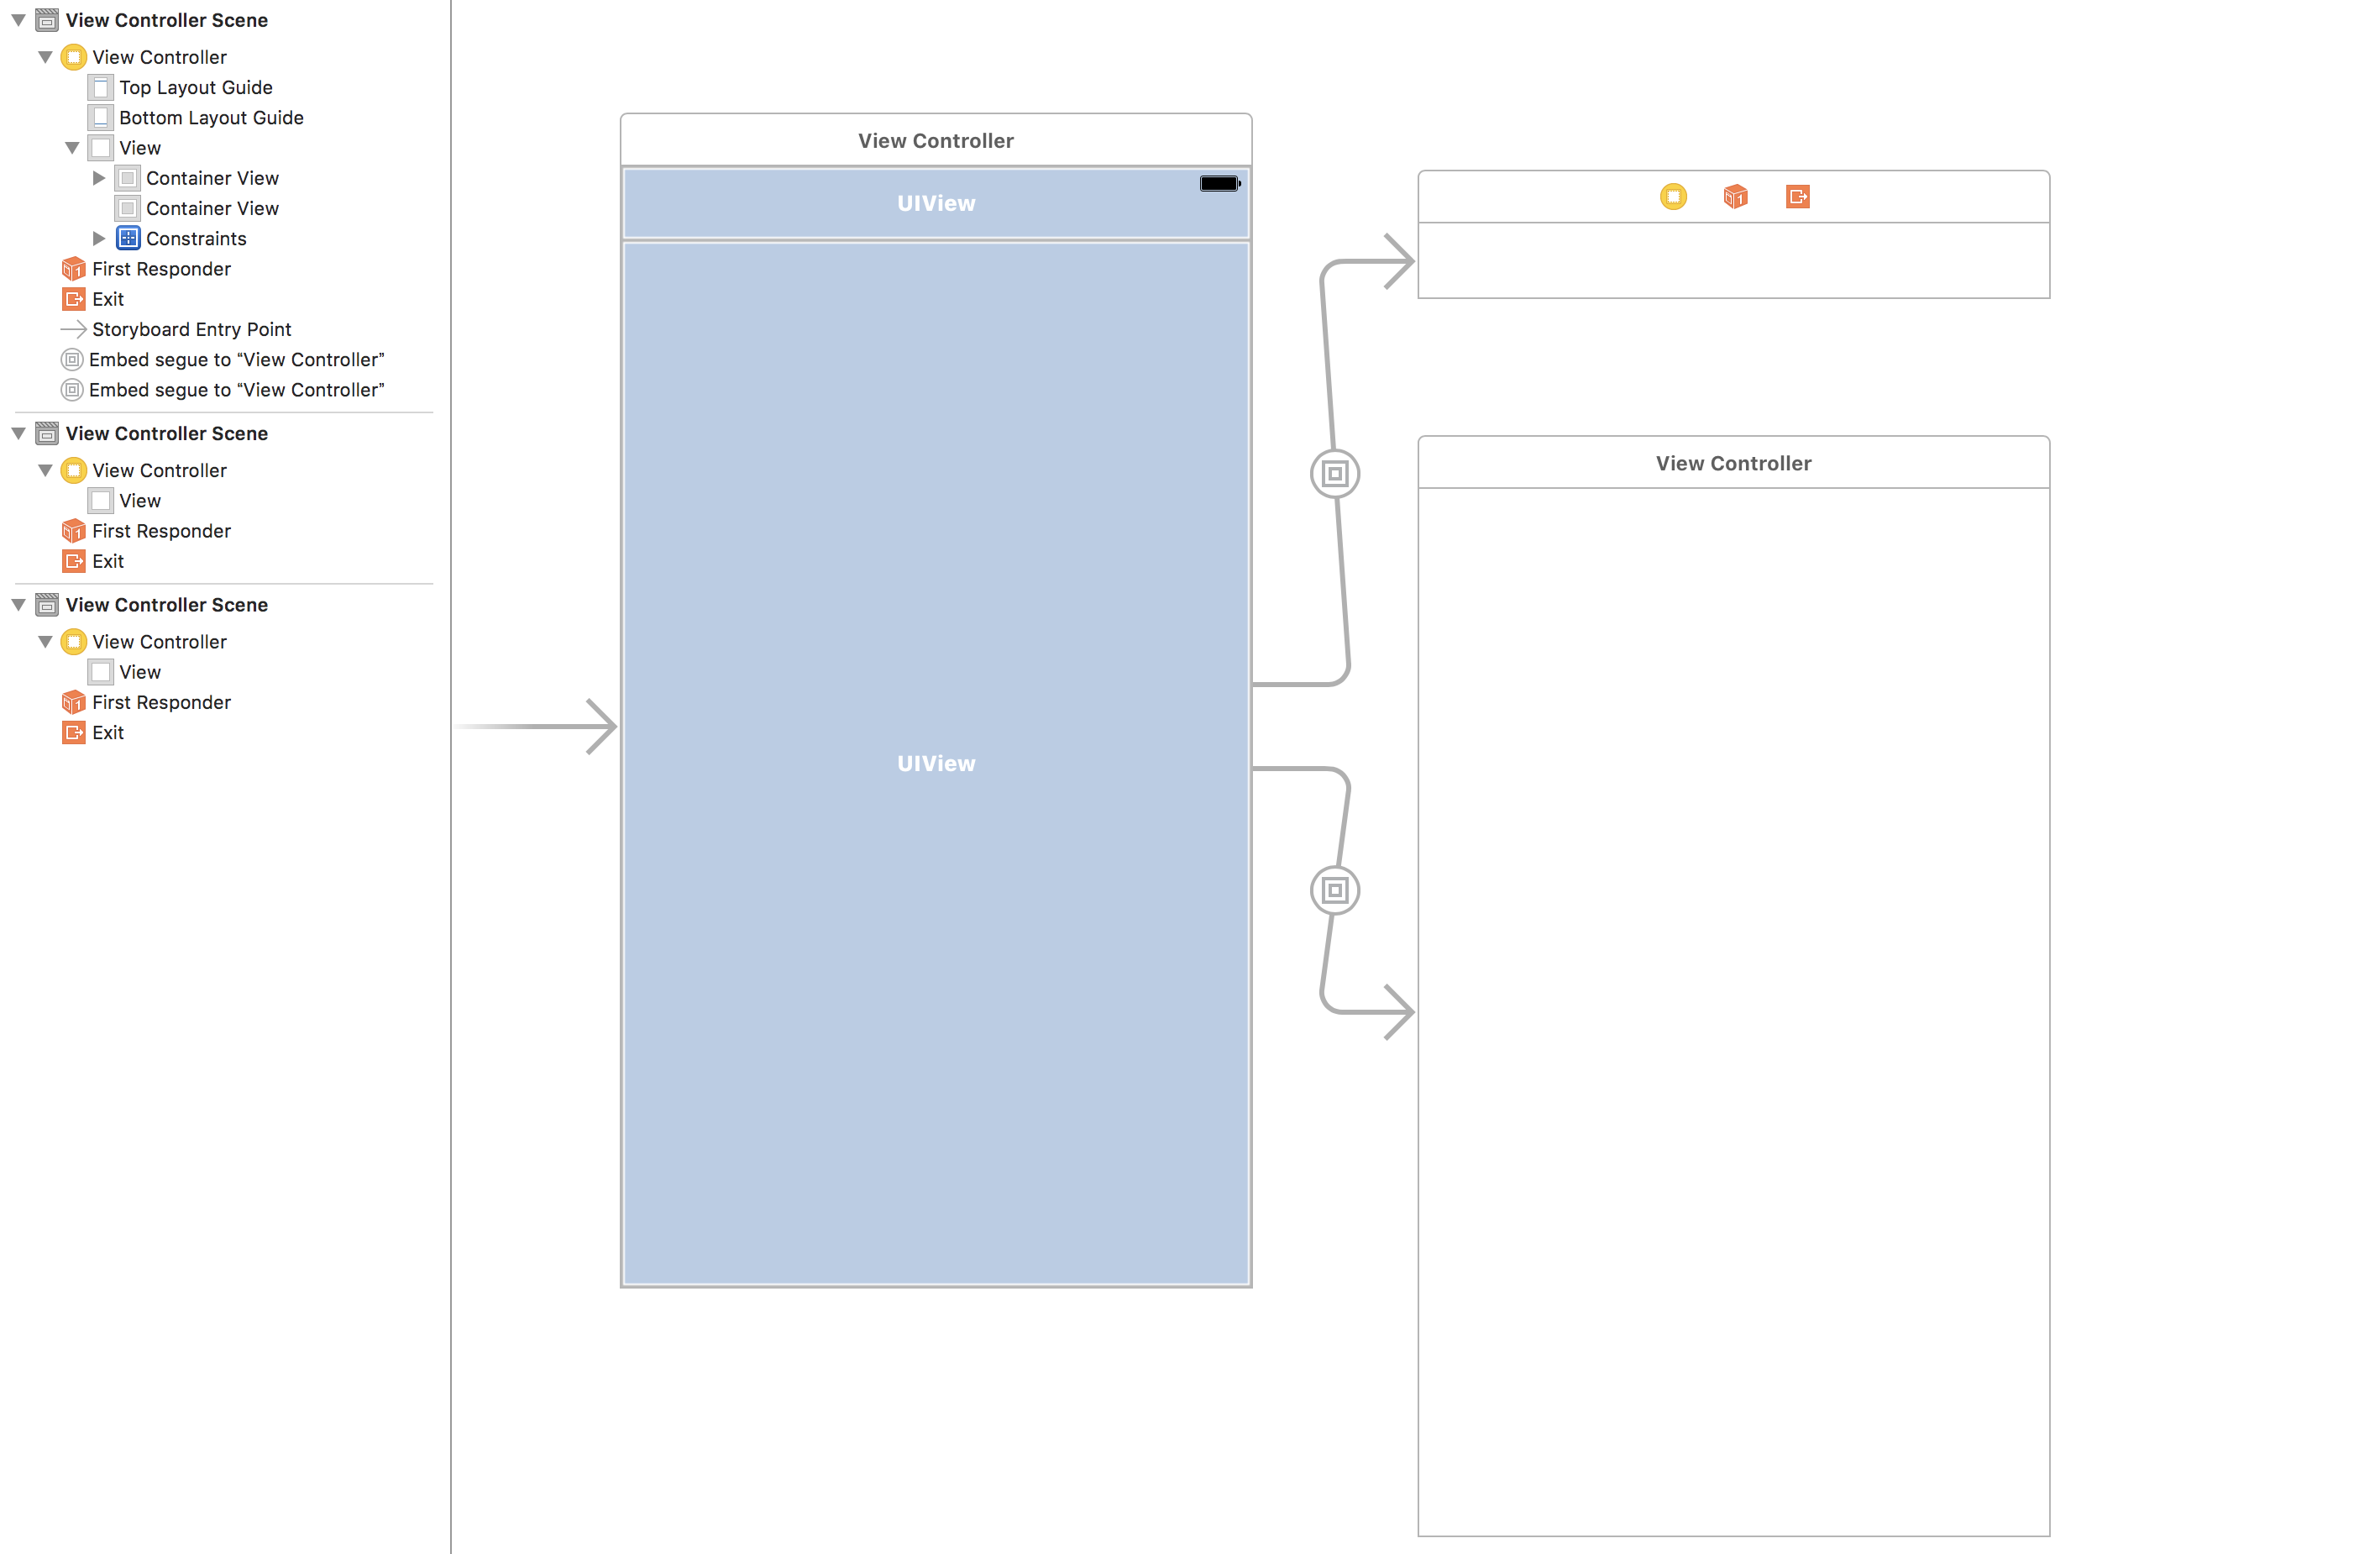
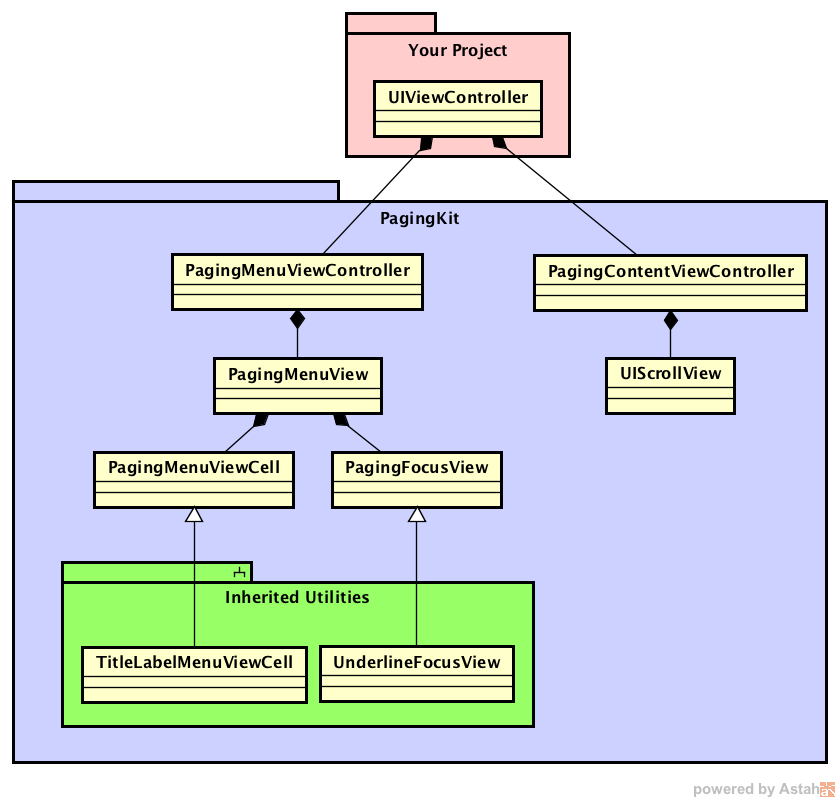
# Class Design
There are some design policy in this library.
- The behavior needs to be specified by the library.
- The layout should be left to developers.
- Arrangement of the internal components must be left to developers.
Because of that, PagingKit has responsiblity for the behavior. But it doesn't specify a structure of the components.
PagingKit favours composition over inheritance. This figure describes overview of the class diagram.
# Work with RxSwift
PagingKit goes well with RxSwift.
https://github.com/kazuhiro4949/RxPagingKit
```swift
let items = PublishSubject<[(menu: String, width: CGFloat, content: UIViewController)]>()
override func viewDidLoad() {
super.viewDidLoad()
menuViewController?.register(type: TitleLabelMenuViewCell.self, forCellWithReuseIdentifier: "identifier")
menuViewController?.registerFocusView(view: UnderlineFocusView())
// PagingMenuViewControllerDataSource
items.asObserver()
.map { items in items.map({ ($0.menu, $0.width) }) }
.bind(to: menuViewController.rx.items(
cellIdentifier: "identifier",
cellType: TitleLabelMenuViewCell.self)
) { _, model, cell in
cell.titleLabel.text = model
}
.disposed(by: disposeBug)
// PagingContentViewControllerDataSource
items.asObserver()
.map { items in items.map({ $0.content }) }
.bind(to: contentViewController.rx.viewControllers())
.disposed(by: disposeBug)
// PagingMenuViewControllerDelegate
menuViewController.rx.itemSelected.asObservable().subscribe(onNext: { [weak self] (page, prev) in
self?.contentViewController.scroll(to: page, animated: true)
}).disposed(by: disposeBug)
// PagingContentViewControllerDelegate
contentViewController.rx.didManualScroll.asObservable().subscribe(onNext: { [weak self] (index, percent) in
self?.menuViewController.scroll(index: index, percent: percent, animated: false)
}).disposed(by: disposeBug)
}
```
# License
Copyright (c) 2017 Kazuhiro Hayashi
Permission is hereby granted, free of charge, to any person obtaining a copy of this software and associated documentation files (the "Software"), to deal in the Software without restriction, including without limitation the rights to use, copy, modify, merge, publish, distribute, sublicense, and/or sell copies of the Software, and to permit persons to whom the Software is furnished to do so, subject to the following conditions:
The above copyright notice and this permission notice shall be included in all copies or substantial portions of the Software.
THE SOFTWARE IS PROVIDED "AS IS", WITHOUT WARRANTY OF ANY KIND, EXPRESS OR IMPLIED, INCLUDING BUT NOT LIMITED TO THE WARRANTIES OF MERCHANTABILITY, FITNESS FOR A PARTICULAR PURPOSE AND NONINFRINGEMENT. IN NO EVENT SHALL THE AUTHORS OR COPYRIGHT HOLDERS BE LIABLE FOR ANY CLAIM, DAMAGES OR OTHER LIABILITY, WHETHER IN AN ACTION OF CONTRACT, TORT OR OTHERWISE, ARISING FROM, OUT OF OR IN CONNECTION WITH THE SOFTWARE OR THE USE OR OTHER DEALINGS IN THE SOFTWARE.