Ecosyste.ms: Awesome
An open API service indexing awesome lists of open source software.
https://github.com/kennytian/learning-iot
用 JavaScript 切入机器人和物联网
https://github.com/kennytian/learning-iot
arduino iot javascript johnny-five robot
Last synced: about 2 months ago
JSON representation
用 JavaScript 切入机器人和物联网
- Host: GitHub
- URL: https://github.com/kennytian/learning-iot
- Owner: Kennytian
- License: mit
- Created: 2018-02-24T10:29:33.000Z (almost 7 years ago)
- Default Branch: master
- Last Pushed: 2024-06-16T11:07:48.000Z (7 months ago)
- Last Synced: 2024-06-16T12:26:43.313Z (7 months ago)
- Topics: arduino, iot, javascript, johnny-five, robot
- Language: JavaScript
- Homepage:
- Size: 1.11 MB
- Stars: 2
- Watchers: 3
- Forks: 0
- Open Issues: 0
-
Metadata Files:
- Readme: README.md
- License: LICENSE
- Security: SECURITY.md
Awesome Lists containing this project
README
## 机器人爱 JavaScript
[机器人爱 JavaScript 系列一](https://github.com/Kennytian/learning-iot/blob/master/docs/doc1.md)
[机器人爱 JavaScript 系列二](https://github.com/Kennytian/learning-iot/blob/master/docs/doc2.md)
### 配置项目
1. git clone https://github.com/Kennytian/learning-iot.git
2. cd learning-iot & yarn
3. 配置`WebStorm + nodemon`,在`Node parameters`里加入:`/usr/local/bin/nodemon --exec /usr/local/bin/node`
### 采购:
1. Arduino UNO 开发板。刚开始学习只需买一块开发板即可,会送一根线,板载有 led 灯,淘宝一般在 30 块钱左右。
2. Arduino 电子元件。随着后期深入学习,就自然明白需要什么元件,再买不迟。
### 环境:
1. Mac、Windows、Linux 电脑均可(以后我以 Mac 电脑为开发环境)。
2. 安装 Node 4.3.0 及以上版本,建议安装 LTS 版,下载地址 https://nodejs.org/en/download/ 。
3. 安装 Arduino 相应驱动,并重启电脑。具体驱动请自行搜索开发板型号+当前操作系统,如:`ch340g mac`。 如果你买的是`Arduino UNO R3(CH340G)`开发板,就下载
http://www.wch.cn/download/CH341SER_MAC_ZIP.html 。
4. 安装 Arduino IDE 开发环境,下载地址:https://www.arduino.cc/en/main/software
### 开发板:
1. 将 USB 数据线把电脑与开发板连接后,正常情况下你会在 Arduino IDE 上看到你开发板的端口,如图:
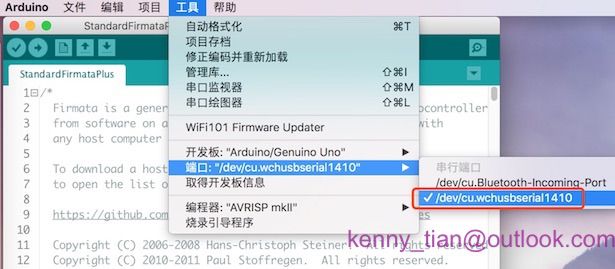
你开发板的端口很有可能与图中的端口不一样,但没有关系,只要识别出来就行。一般是:'/dev/cu.xxxusbxxx' 字样的标识。
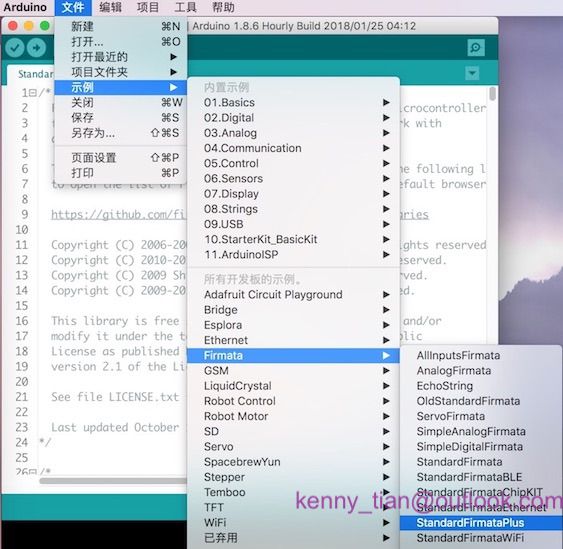
2. 打开 Arduino IDE, 选择: File > Examples > Firmata > StandardFirmataPlus,如图:
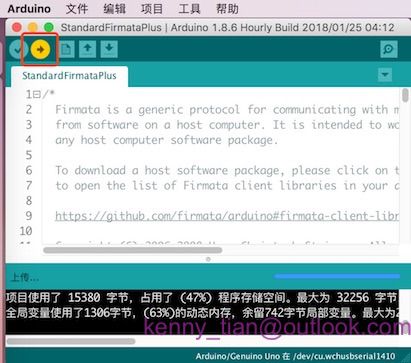
3. 在 Arduino IDE 界面点击 "上传" 按钮,如图:
### 第一个程序
1. 新建一个目录,比如:firstIoT,在命令行下进入该目录,执行:`npm install johnny-five`。
2. 在 firstIot 里新建一个文件 `led-blink.js`,输入如下代码:
```javascript
const { Board, Led } = require('johnny-five');
new Board().on('ready', function() {
var led = new Led(13);
led.blink(500);
});
```
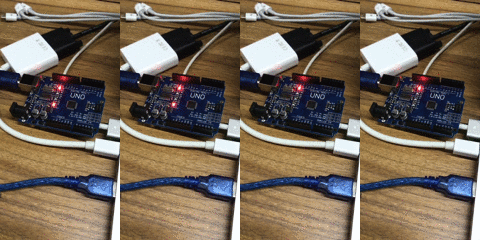
3. 在该目录下执行 `node led-blink.js`,如果程序不出错,就会出现下面的一闪一闪亮晶晶
----------------------------------推广分隔线----------------------------------
欢迎 QQ 群加入交流 [700434239](http://shang.qq.com/wpa/qunwpa?idkey=11cd472ee62461eed296856bfe97e15e02fc551c4ff476ec4eba16e6a9c27000)
