https://github.com/kodular/tinywebdb-php
TinyWebDB System written in PHP
https://github.com/kodular/tinywebdb-php
apache appinventor database ftp kodular php tinywebdb vps
Last synced: 11 months ago
JSON representation
TinyWebDB System written in PHP
- Host: GitHub
- URL: https://github.com/kodular/tinywebdb-php
- Owner: Kodular
- License: other
- Created: 2018-07-04T14:35:01.000Z (almost 8 years ago)
- Default Branch: master
- Last Pushed: 2020-09-07T19:01:18.000Z (almost 6 years ago)
- Last Synced: 2025-04-25T11:42:45.059Z (about 1 year ago)
- Topics: apache, appinventor, database, ftp, kodular, php, tinywebdb, vps
- Language: PHP
- Size: 17.6 KB
- Stars: 15
- Watchers: 3
- Forks: 21
- Open Issues: 4
-
Metadata Files:
- Readme: README.md
- Funding: .github/FUNDING.yml
- License: LICENSE
Awesome Lists containing this project
README
# TinyWebDB-PHP
**TinyWebDB System written in PHP**, compatible with Apache & PHP
---
---
# How to host your own TinyWebDB Instance
This tutorial will help you to host your **own TinyWebDB Instance** for FREE using an alternative [**PHP** version](https://github.com/Makeroid/TinyWebDB-PHP)
This means that you can use _any hosting provider_ or a _VPS with a running Apache & PHP server_
The tutorial is divided in **4 different sections**:
1. [Signup into a hosting service](#1-signup-into-a-hosting-service)
2. [Uploading the files](#2-uploading-the-files)
3. [Configuration](#3-configuration)
4. [Makeroid Builder setup](#4-makeroid-builder-setup)
---
### 1. Signup into a hosting service
You can skip this step and go to "[2. Uploading the files](#2-uploading-the-files)" if you already have a hosting provider or a VPS
One provider that will suit you is [AwardSpace](https://www.awardspace.com/), so we'll use that one for this guide. But you can use any other if they allow API hostings (_this means that websites can be accessed with JavaScript disabled basically_)

1. **Signup** into [AwardSpace](https://www.awardspace.com/free-web-hosting-registration/) by clicking on the "_Give it a try_" button

2. **Fill the following form** with your _details_ (or use a Social Login) and click on _Register Now!_

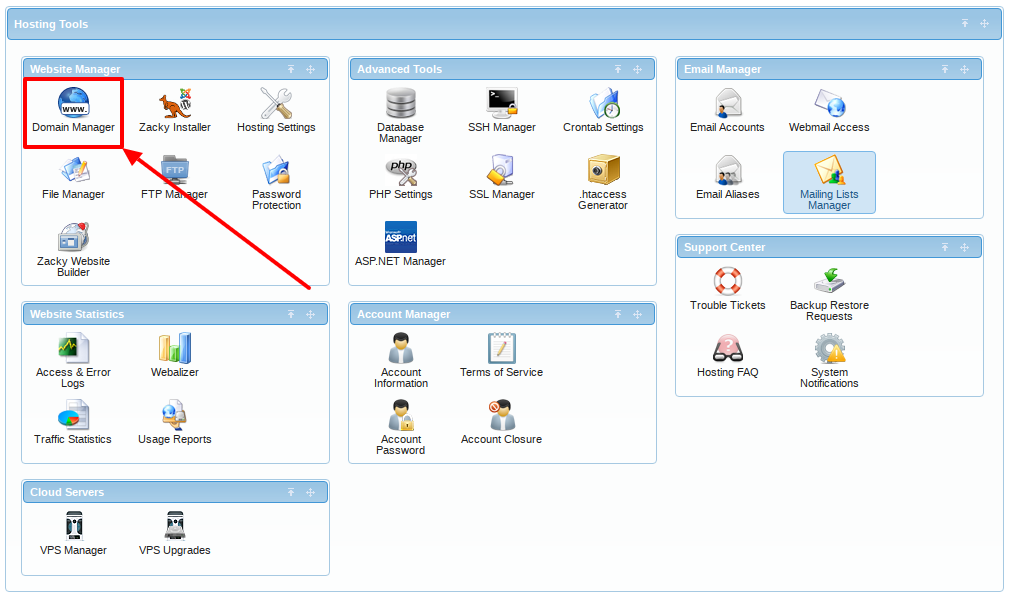
3. After closing all _Welcome Dialogs_, **scroll down** and click on **Domain Manager**:
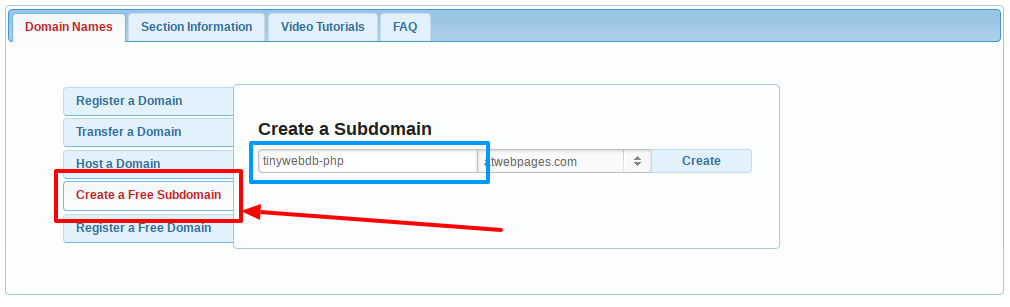
4. Click on "_Create a Free Subdomain_", input the desired name for your project and hit "_Create_":
5. **You are done!** In a few minutes your new website will be ready
### 2. Uploading the files
For this section, we'll use the File Transfer Protocol ([FTP](https://en.wikipedia.org/wiki/File_Transfer_Protocol)) to upload the files as all hosting providers allow it, and you can easily configure it for your VPS (just run `sudo apt-get install vsftpd` if FTP is not yet enabled)
1. First of all, we'll need to **install a FTP Client** on our computer to access the files. I strongly recommed [FileZilla](https://filezilla-project.org/). For me, it's the best one due to its simplicity and functionalities.
- For _Windows_ users: [Windows x64](https://download.filezilla-project.org/client/FileZilla_3.34.0_win64-setup_bundled.exe) or [Windows x32](https://download.filezilla-project.org/client/FileZilla_3.34.0_win32-setup_bundled.exe)
- For _Mac OS X_ users: [Mac OS X](https://download.filezilla-project.org/client/FileZilla_3.34.0_macosx-x86_setup_bundled.dmg)
- For _Linux_ users: Execute `sudo apt-get install filezila`
Or just Google "_FileZilla Client `your_platform_name` Installation_"
2. Now we will need the **FTP Access Credentials**
_If you use a VPS, those credentials are the ones used to login via SSH_
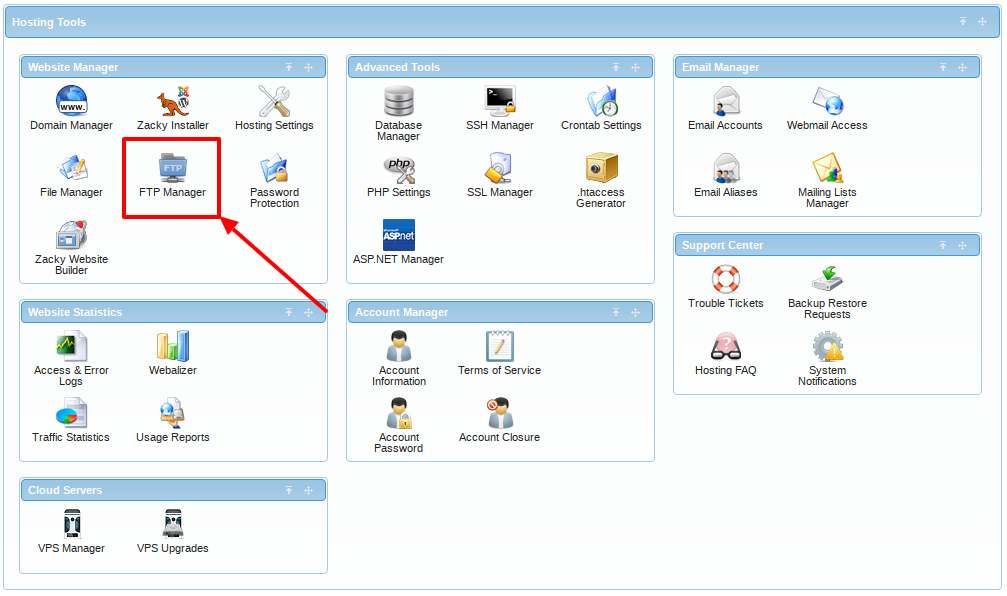
Let's go back to [AwardSpace](https://awardspace.net). To get those credentials, you'll need to Login to the _Dashboard_, and click on _FTP Manager_
Now create a new FTP Account by filling these textboxes (leave `FTP Path` blank):
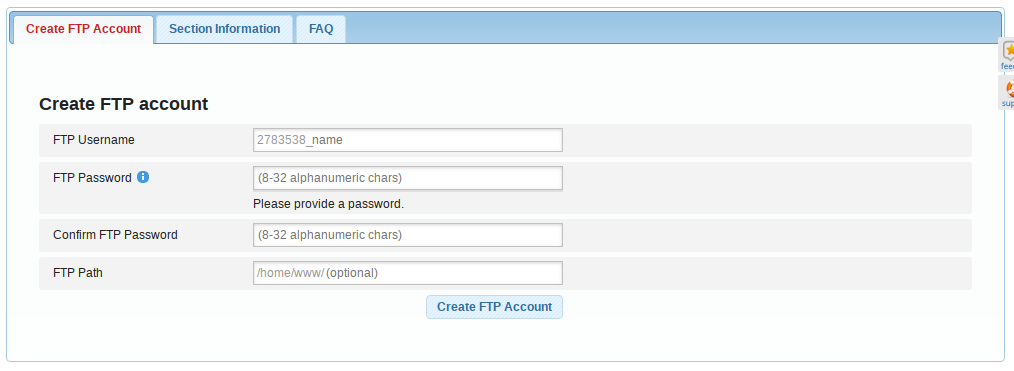
Finally, **scroll down** and click on "_Information_"

We’ll need the `FTP Username` and one of the `Hostnames` (`FTP Password` is the one you inputted before) only
3. **Open FileZilla**, and **fill the textboxes** that are on the top with this data:

**Host**: `your_website_url` or _your hosting provider FTP URL_ or _your VPS IP Address_
**Username**: `FTP Username` _from the last step_ or the _FTP Username of your hosting provider_ or _your VPS username_
**Password**: `FTP Password` _from the last step_ or the _FTP Password of your hosting provider_ or _your VPS password of the username_
**Port**: `21` _if you use a hosting provider_ or `22` _if you have a VPS_
4. Now hit **_Quickconnect_**, and **if** appears check the "_Always trust certificate in future sessions_" and hit "_OK_":

5. You'll see these new folders:

**Access to `your_website_url`** (if you are using a VPS go to `/var/www/html`) folder (it can sometimes be `public_html` or `public`) and **delete ALL its files** (except the `..` folder)
6. **Now download [this ZIP file](https://github.com/Makeroid/TinyWebDB-PHP/archive/master.zip)**
Extract the ZIP, navigate to `TinyWebDB-PHP-master` and you'll see the following files:

You need to upload the following files: `.htaccess`, `database.txt`, `getvalue.php` and `storeavalue.php`. Select them and drag to the FTP Client to upload

It should look like this:

### 3. Configuration
1. In FileZilla, make right click to `database.txt` and click on "_File permissions..._":
You need to make the new dialog like this:

What is important is the **Numeric value**, which should be **666**
Hit "_OK_" and _configuration will be done for hosting providers_
- If you are using a VPS, you will need to **allow HTAccess Override** and **Mod Rewrite Module** manuall
Login via SSH and:
- Execute `sudo nano /etc/apache2/apache.conf` and browse to a block of code like this:

You need to change the `AllowOverride None` to `AllowOverride All`
After this, hit Ctrl+X, Y and Enter
- Execute `sudo a2enmod rewrite`
- Execute `sudo systemctl restart apache2`
### 4. Makeroid Builder setup
1. In all **TinyWebDB Components**, you need to change in **Properties** the **Service URL** to _the URL of your service_ or _the IP of your VPS_. In my case, it is `http://tinywebdb-php.epizy.com`

2. **Enjoy your own TinyWebDB Service!** :tada: