https://github.com/kuingsmile/word-gpt-plus
Word GPT Plus is a word add-in which integrates the chatGPT model into Microsoft Word. Both official and web api is supported.
https://github.com/kuingsmile/word-gpt-plus
ai chatgpt copilot office office365 openai word
Last synced: 5 months ago
JSON representation
Word GPT Plus is a word add-in which integrates the chatGPT model into Microsoft Word. Both official and web api is supported.
- Host: GitHub
- URL: https://github.com/kuingsmile/word-gpt-plus
- Owner: Kuingsmile
- License: mit
- Created: 2023-04-24T01:22:51.000Z (over 2 years ago)
- Default Branch: master
- Last Pushed: 2025-05-08T07:15:17.000Z (5 months ago)
- Last Synced: 2025-05-08T07:31:22.546Z (5 months ago)
- Topics: ai, chatgpt, copilot, office, office365, openai, word
- Language: TypeScript
- Homepage:
- Size: 822 KB
- Stars: 836
- Watchers: 19
- Forks: 148
- Open Issues: 2
-
Metadata Files:
- Readme: README.md
- Changelog: CHANGELOG.md
- License: LICENSE
Awesome Lists containing this project
- awesome-ChatGPT-repositories - word-GPT-Plus - Word GPT Plus is a word add-in which integrates the chatGPT model into Microsoft Word. Both official and web api is supported. (Chatbots)
README

Word GPT Plus
Integrate AI directly into Microsoft Word
Features •
Getting Started •
Installation •
Usage
English | [简体中文](https://github.com/Kuingsmile/word-GPT-Plus/blob/master/README_cn.md)
## 📋 Introduction
Word GPT Plus seamlessly integrates AI models into Microsoft Word, allowing you to generate, translate, summarize, and polish text directly within your documents. Enhance your writing workflow without leaving your Word environment.
## ✨ Features
- **Multiple AI Models Support**:
- OpenAI API (compatible with DeepSeek and other OpenAI-compatible endpoints)
- Azure OpenAI API
- Google Gemini Pro API
- Ollama (for local deployment)
- Groq API
- **Built-in Templates**:
- Translation (40+ languages)
- Text polishing and improvement
- Academic writing enhancement
- Content summarization
- Grammar checking
- **Customization Options**:
- Save custom prompts for repeated use
- Adjust temperature and max tokens
- Support for proxies
- Local storage for privacy
## 🚀 Getting Started
### Requirements
#### Software
- Microsoft Word 2016/2019 (retail version), Word 2021, or Microsoft 365
- [Edge WebView2 Runtime](https://developer.microsoft.com/en-us/microsoft-edge/webview2/)
- Node.js 18+ (only for self-hosting)
> **Note**: Works only with .docx files (not compatible with older .doc format)
#### API Access
- **OpenAI**: Obtain an API key from [OpenAI Platform](https://platform.openai.com/account/api-keys)
- **Azure OpenAI**: Apply for access at [Azure OpenAI Service](https://go.microsoft.com/fwlink/?linkid=2222006)
- **Google Gemini**: Request API access from [Google AI Studio](https://developers.generativeai.google/)
- **Groq**: Get your API key from [Groq Console](https://console.groq.com/keys)
## 💻 Installation
Choose one of the following installation methods:
### Option 1: Use Hosted Service (Recommended)
1. Download [manifest.xml](https://github.com/Kuingsmile/word-GPT-Plus/blob/master/release/instant-use/manifest.xml)
2. Save it to a directory on your computer (e.g., `C:\Users\username\Documents\WordGPT`)
3. Follow the [Add-in Installation Guide](#adding-the-add-in-to-word) below
> **Note for users in China**: If you experience connectivity issues, try adding `msq.pub` to your proxy rules or use the self-hosted option.
### Option 2: Docker Deployment
```bash
docker pull kuingsmile/word-gpt-plus
docker run -d -p 3000:80 kuingsmile/word-gpt-plus
```
You need to modify all `[localhost:3000](http://localhost:3000)` in manifest.xml to your server address.
Follow the [Add-in Installation Guide](#adding-the-add-in-to-word) below.
### Option 3: Self-hosted
If you want to host the add-in yourself, you will need to clone this repo and install dependencies, then run the project. Need Node.js 16+.
```bash
git clone https://github.com/Kuingsmile/Word-GPT-Plus.git
yarn
yarn run serve
```
[manifest.xml](https://github.com/Kuingsmile/word-GPT-Plus/blob/master/release/self-hosted/manifest.xml)
Then, follow the [Add-in Installation Guide](#adding-the-add-in-to-word) below.
### Add-in Installation Guide
To get started with Word GPT Plus, you will need to sideload the add-in into Microsoft Word.
You can find instructions provided by MicroSoft at the following link: [sideload office add-ins](https://learn.microsoft.com/en-us/office/dev/add-ins/testing/create-a-network-shared-folder-catalog-for-task-pane-and-content-add-ins)
1. Go to the folder where you saved the `manifest.xml` file, for example `C:\Users\username\Documents\WordGPT`.
2. Open the context menu for the folder(right-click the folder) and select **Properties**.
3. Within the **Properties** dialog box, select the **Sharing** tab, and then select **Share**.
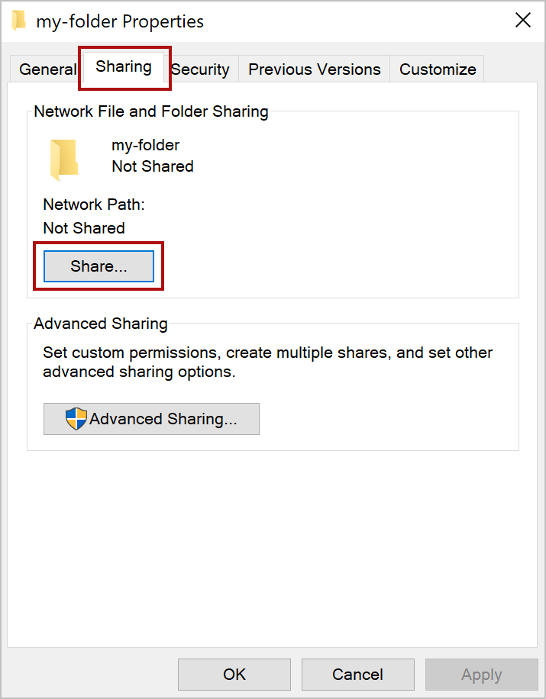
4. Within the **Network access** dialog box, add yourself and any other users you want to share, choose the **Share** button, When you see confirmation that Your folder is shared, note the **full network path** that's displayed immediately following the folder name.

5. Open a new document in Word, choose the **File** tab, and then choose **Options**.
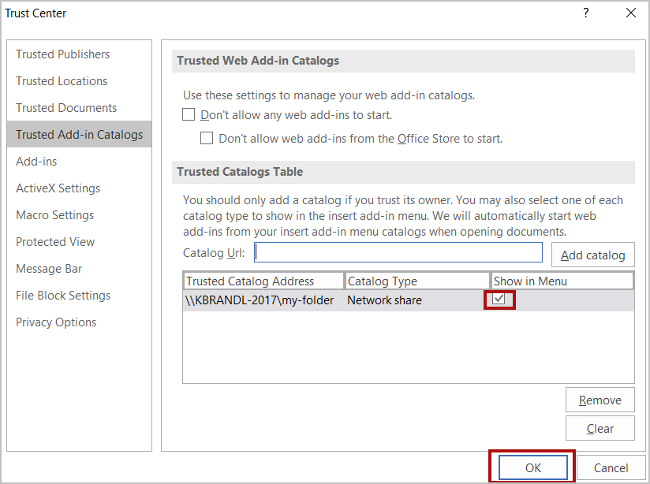
6. Choose **Trust Center**, and then choose the **Trust Center Settings** button.
7. Choose **Trusted Add-in Catalogs**.
8. In the **Catalog Url** box, enter the **full network path** and then choose **Add Catalog**.
9. Select the **Show in Menu** check box, and then choose **OK**.
10. Close and then restart Word.
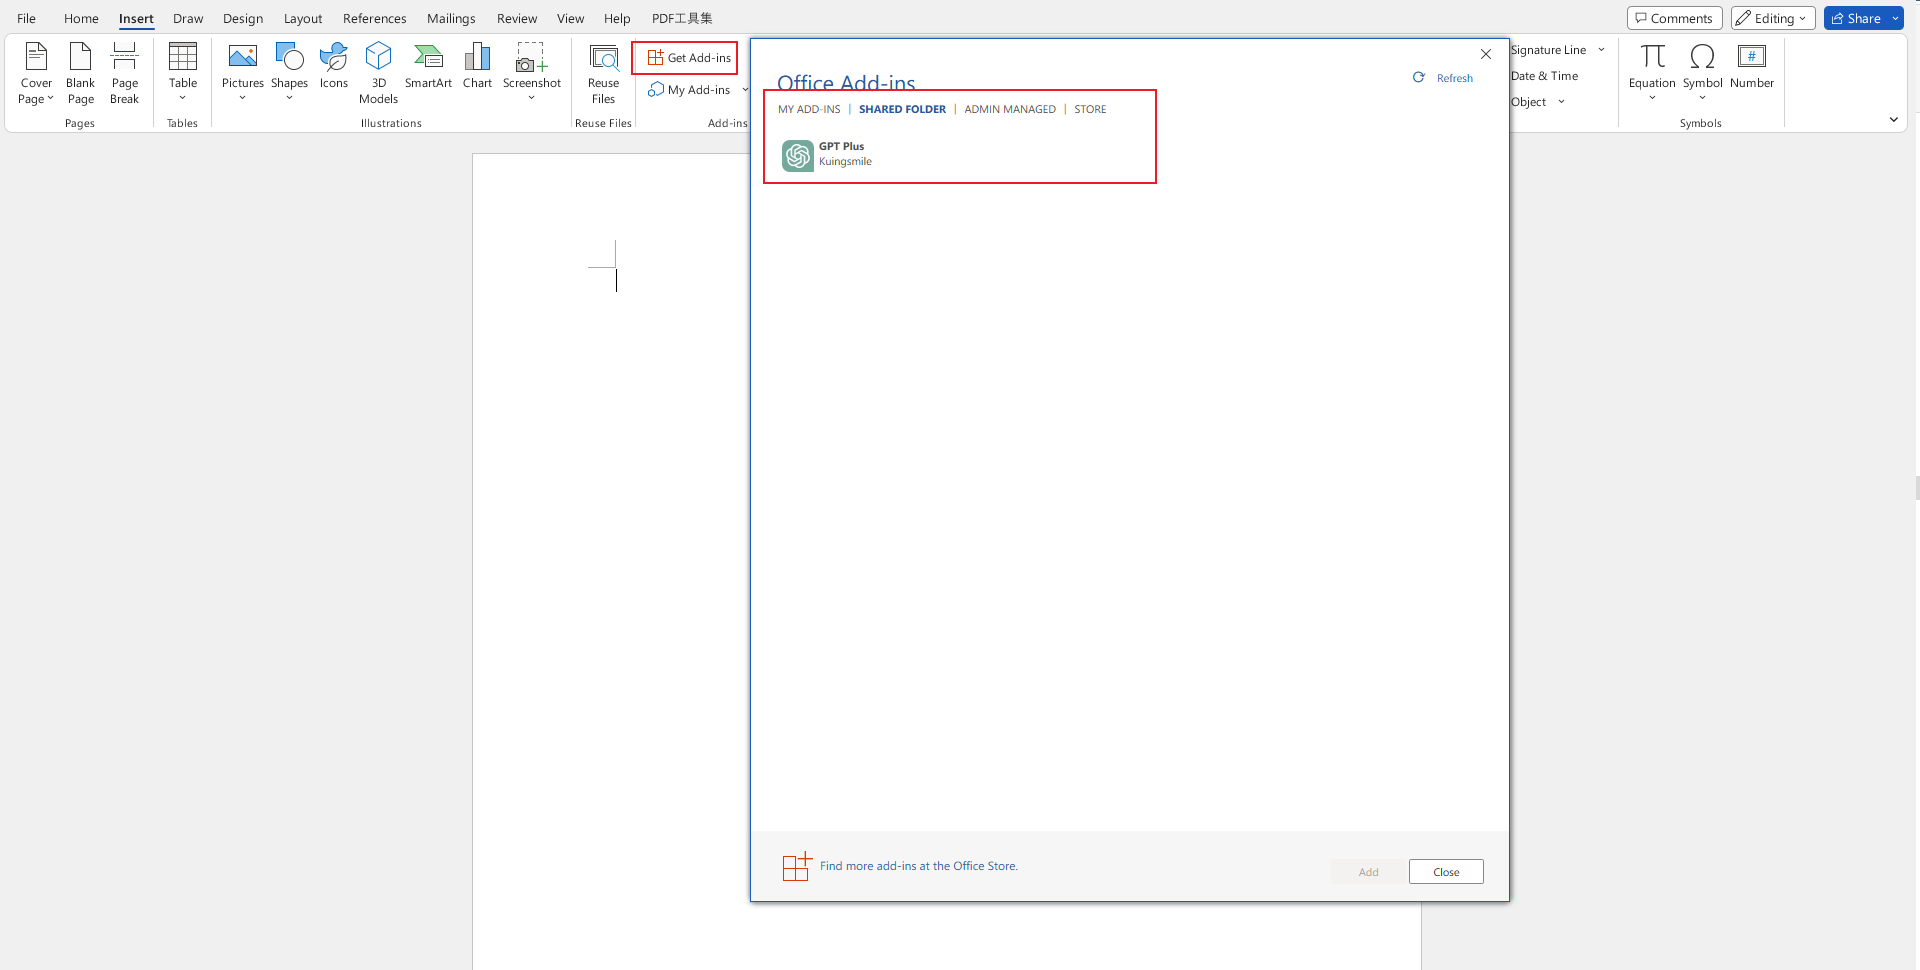
11. Click **Insert** > **My Add-ins** > **Shared Folder**, choose **GPT Plus**, and then choose **Add**.
12. Enjoy it!
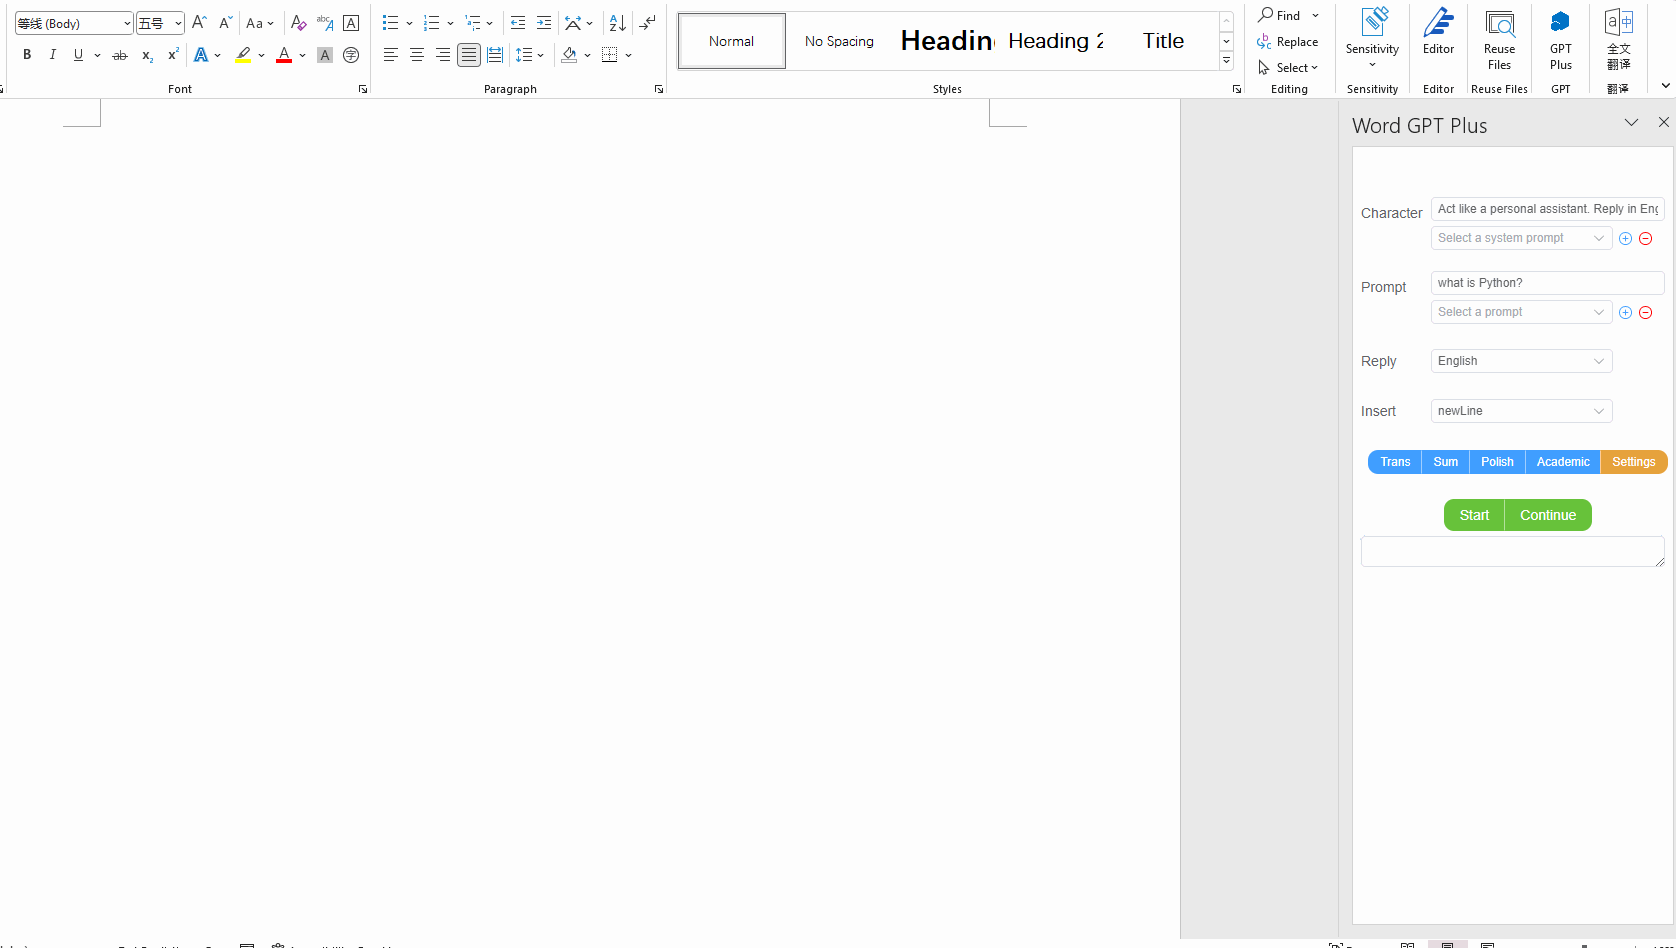
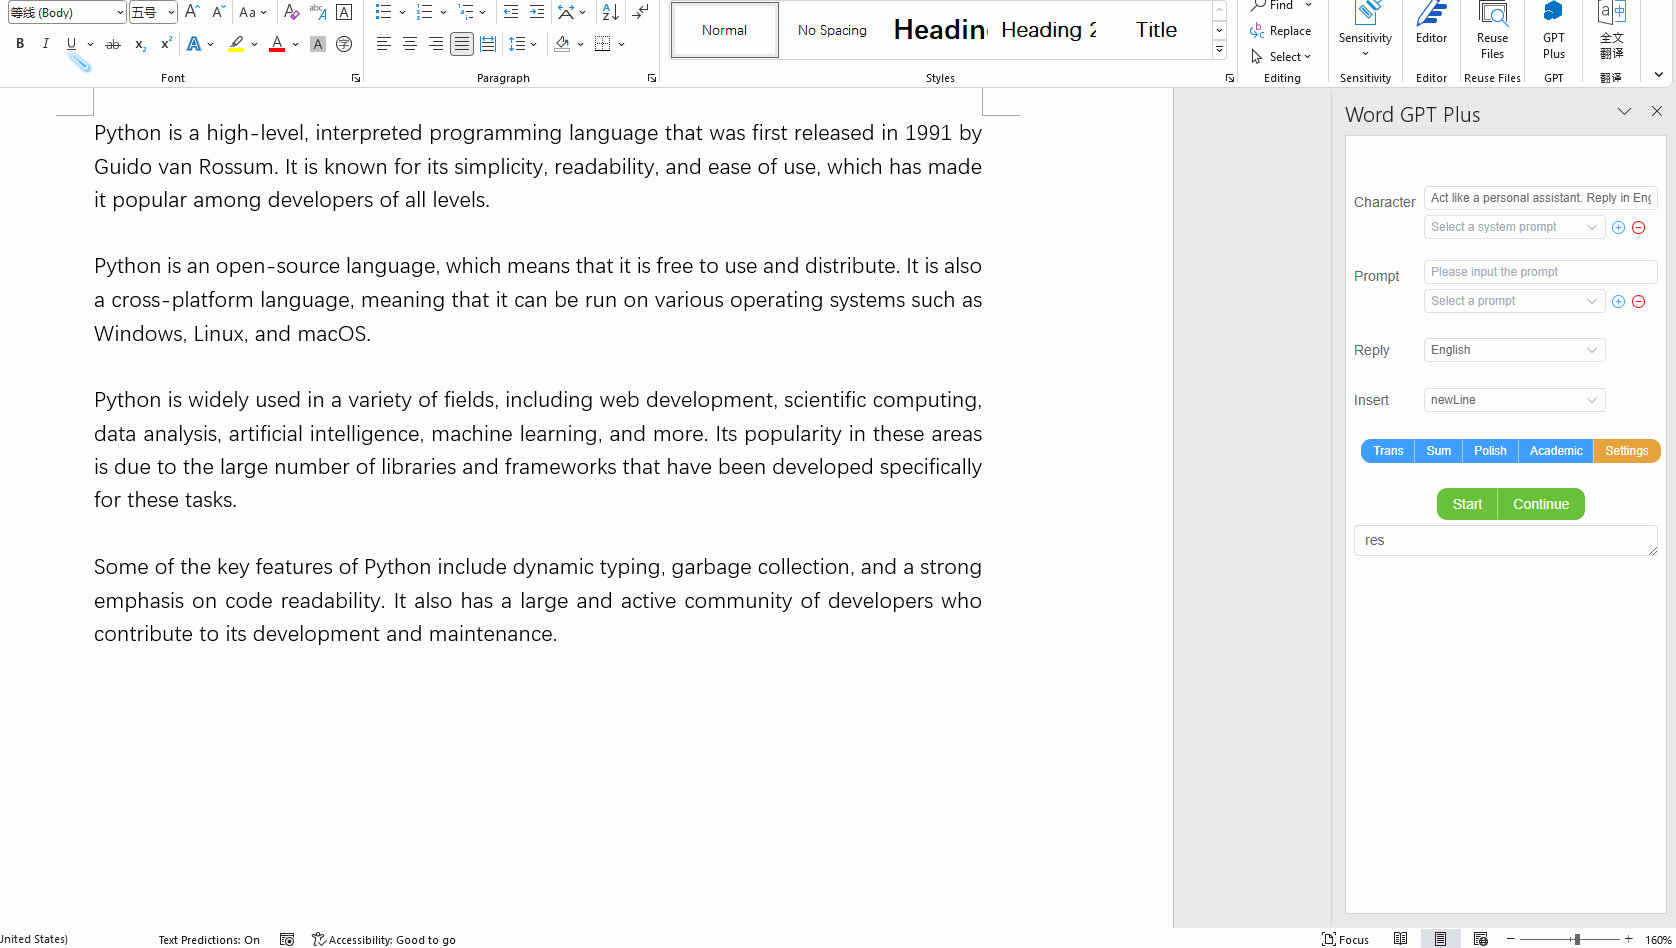
## How to fill in API key
After entering Word GPT Plus, click the orange `Settings` button on the homepage to enter the settings page, where you can switch APIs and fill in API keys.
## Contributing
If you have a suggestion that would make this better, please fork the repo and create a pull request.
## License
MIT License
## Show your support
Give a ⭐️ if this project helped you!