https://github.com/kurama622/plotneuralnet
Changes and additions based on HarisIqbal88/PlotNeuralNet (https://github.com/HarisIqbal88/PlotNeuralNet)
https://github.com/kurama622/plotneuralnet
Last synced: 5 months ago
JSON representation
Changes and additions based on HarisIqbal88/PlotNeuralNet (https://github.com/HarisIqbal88/PlotNeuralNet)
- Host: GitHub
- URL: https://github.com/kurama622/plotneuralnet
- Owner: Kurama622
- License: mit
- Created: 2020-07-02T16:07:24.000Z (over 5 years ago)
- Default Branch: master
- Last Pushed: 2020-07-16T14:10:05.000Z (about 5 years ago)
- Last Synced: 2024-09-03T16:37:36.590Z (about 1 year ago)
- Language: Python
- Size: 4.12 MB
- Stars: 21
- Watchers: 2
- Forks: 4
- Open Issues: 0
-
Metadata Files:
- Readme: README.md
- License: LICENSE
Awesome Lists containing this project
README
# Changes and additions based on PlotNeuralNet
## Box.sty
Path: layers/Box.sty
```diff
diff --git a/B.sty b/Box.sty
index 38818a8..854edbb 100644
--- a/B.sty
+++ b/Box.sty
@@ -42,13 +42,13 @@
\coordinate (a1) at (0 , \y/2 , \z/2);
\coordinate (b1) at (0 ,-\y/2 , \z/2);
- \tikzstyle{depthlabel}=[pos=0,text width=14*\z,text centered,sloped]
+ \tikzstyle{depthlabel}=[pos=0.5,text width=14*\z,text centered,sloped]
\path (c) edge ["\small\zlabel"',depthlabel](f); %depth label
\path (b1) edge ["\ylabel",midway] (a1); %height label
- \tikzstyle{captionlabel}=[text width=15*\LastEastx/\scale,text centered]
+ \tikzstyle{captionlabel}=[text width=2cm,text centered]
\path (\LastEastx/2,-\y/2,+\z/2) + (0,-25pt) coordinate (cap)
edge ["\textcolor{black}{ \bf \caption}"',captionlabel](cap) ; %Block caption/pic object label
```
`Box.sty` is the revised version.
## RightBandedBox.sty
Path: layers/RightBandedBox.sty
```diff
diff --git a/R.sty b/RightBandedBox.sty
index 7d74a51..adad188 100644
--- a/R.sty
+++ b/RightBandedBox.sty
@@ -60,12 +60,12 @@
\coordinate (a1) at (0 , \y/2 , \z/2);
\coordinate (b1) at (0 ,-\y/2 , \z/2);
- \tikzstyle{depthlabel}=[pos=0,text width=14*\z,text centered,sloped]
+ \tikzstyle{depthlabel}=[pos=0.5,text width=14*\z,text centered,sloped]
\path (c) edge ["\small\zlabels"',depthlabel](f); %depth label
\path (b1) edge ["\ylabel",midway] (a1); %height label
- \tikzstyle{captionlabel}=[text width=15*\LastEastx/\scale,text centered]
+ \tikzstyle{captionlabel}=[text width=3cm,text centered]
\path (\LastEastx/2,-\y/2,+\z/2) + (0,-25pt) coordinate (cap)
edge ["\textcolor{black}{ \bf \caption}"',captionlabel] (cap); %Block caption/pic object label
```
`RightBandedBox.sty` is the revised version.
## tikzeng.py
Path: pycore/tikzeng.py
- Modify SoftmaxColor
- Add PoolReluColor
- Add to_Linear function
- Add to_LinearRelu function
- Modify to_Conv function
- Input parameters changed from "s_fiter, n_filter" to "x, y, n_filter"
- x: depth (the length of feature map)
- y: height (the width of feature map)
- n_filter: width (number of the convolution kernel)
- Modify to_Pool function
- Add to_PoolRelu function
- Add to_ConvRelu function
- Add to_dashed_connection function
- Add to_dashed_connection_half function
- Add to_Flatten function
More details at [tikzeng.py](./pycore/tikzeng.py)
## My example

my example
Code of the example in [my_example.py](./my_examples/my_example.py)

EEGNet
Code of the example in [EEGNet.py](./EEGNet/EEGNet.py)
The following is the original description
---
# PlotNeuralNet
[](https://doi.org/10.5281/zenodo.2526396)
Latex code for drawing neural networks for reports and presentation. Have a look into examples to see how they are made. Additionally, lets consolidate any improvements that you make and fix any bugs to help more people with this code.
## Examples
Following are some network representations:
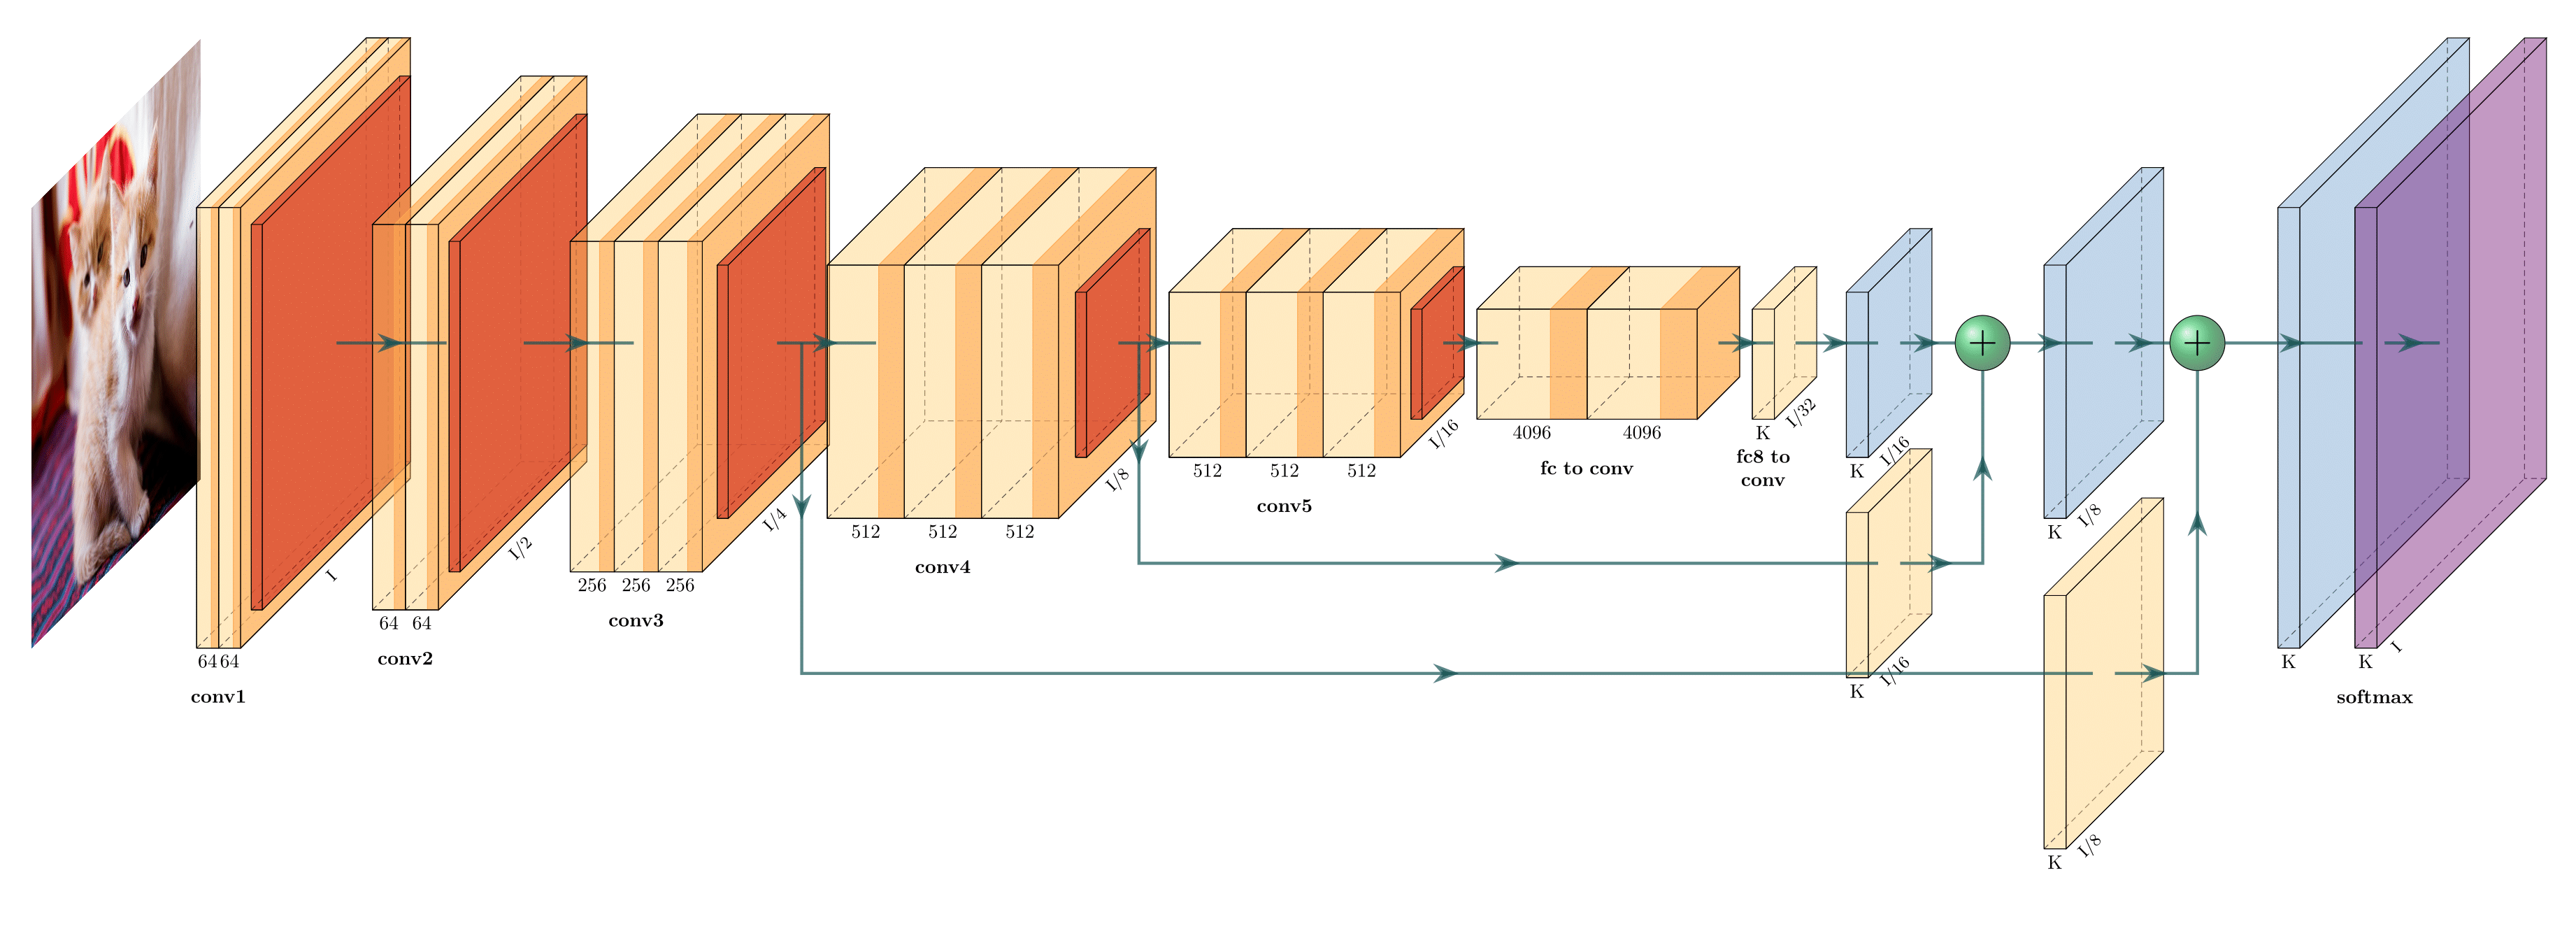
FCN-8
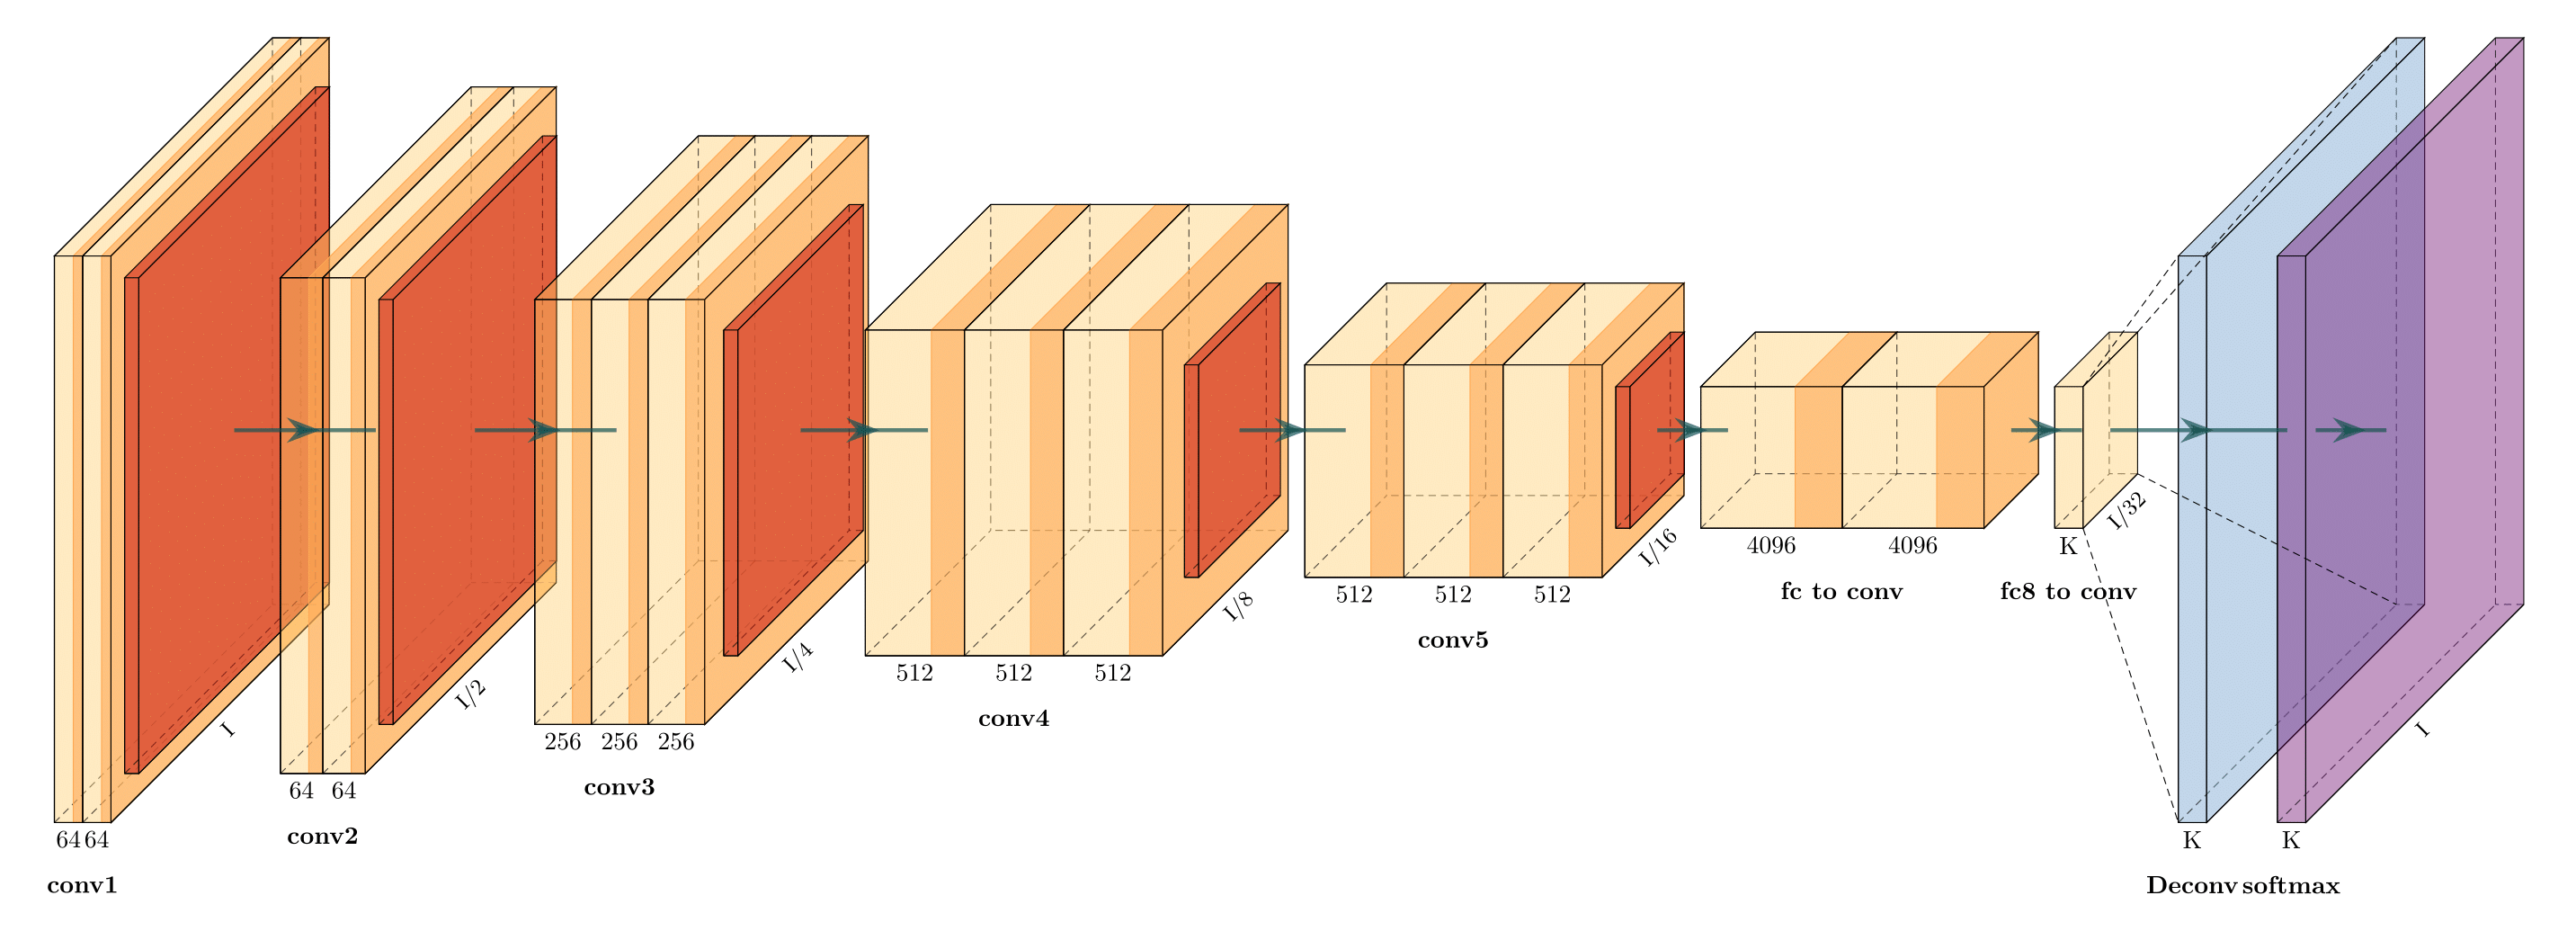
FCN-32

Holistically-Nested Edge Detection
## Getting Started
1. Install the following packages on Ubuntu.
* Ubuntu 16.04
```
sudo apt-get install texlive-latex-extra
```
* Ubuntu 18.04.2
Base on this [website](https://gist.github.com/rain1024/98dd5e2c6c8c28f9ea9d), please install the following packages.
```
sudo apt-get install texlive-latex-base
sudo apt-get install texlive-fonts-recommended
sudo apt-get install texlive-fonts-extra
sudo apt-get install texlive-latex-extra
```
* Windows
1. Download and install [MikTeX](https://miktex.org/download).
2. Download and install bash runner on Windows, recommends [Git bash](https://git-scm.com/download/win) or Cygwin(https://www.cygwin.com/)
2. Execute the example as followed.
```
cd pyexamples/
bash ../tikzmake.sh test_simple
```
## TODO
- [X] Python interface
- [ ] Add easy legend functionality
- [ ] Add more layer shapes like TruncatedPyramid, 2DSheet etc
- [ ] Add examples for RNN and likes.
## Latex usage
See [`examples`](examples) directory for usage.
## Python usage
First, create a new directory and a new Python file:
$ mkdir my_project
$ cd my_project
vim my_arch.py
Add the following code to your new file:
```python
import sys
sys.path.append('../')
from pycore.tikzeng import *
# defined your arch
arch = [
to_head( '..' ),
to_cor(),
to_begin(),
to_Conv("conv1", 512, 64, offset="(0,0,0)", to="(0,0,0)", height=64, depth=64, width=2 ),
to_Pool("pool1", offset="(0,0,0)", to="(conv1-east)"),
to_Conv("conv2", 128, 64, offset="(1,0,0)", to="(pool1-east)", height=32, depth=32, width=2 ),
to_connection( "pool1", "conv2"),
to_Pool("pool2", offset="(0,0,0)", to="(conv2-east)", height=28, depth=28, width=1),
to_SoftMax("soft1", 10 ,"(3,0,0)", "(pool1-east)", caption="SOFT" ),
to_connection("pool2", "soft1"),
to_end()
]
def main():
namefile = str(sys.argv[0]).split('.')[0]
to_generate(arch, namefile + '.tex' )
if __name__ == '__main__':
main()
```
Now, run the program as follows:
bash ../tikzmake.sh my_arch