https://github.com/kwakubiney/safehaven
Proof of concept for a VPN over UDP
https://github.com/kwakubiney/safehaven
linux networking tunnel udp
Last synced: over 1 year ago
JSON representation
Proof of concept for a VPN over UDP
- Host: GitHub
- URL: https://github.com/kwakubiney/safehaven
- Owner: kwakubiney
- License: mit
- Created: 2023-07-07T14:23:18.000Z (about 3 years ago)
- Default Branch: master
- Last Pushed: 2025-03-10T13:39:02.000Z (over 1 year ago)
- Last Synced: 2025-04-02T02:15:01.445Z (over 1 year ago)
- Topics: linux, networking, tunnel, udp
- Language: Go
- Homepage:
- Size: 25.4 KB
- Stars: 117
- Watchers: 2
- Forks: 1
- Open Issues: 1
-
Metadata Files:
- Readme: README.md
- License: LICENSE
Awesome Lists containing this project
README
# SafeHaven
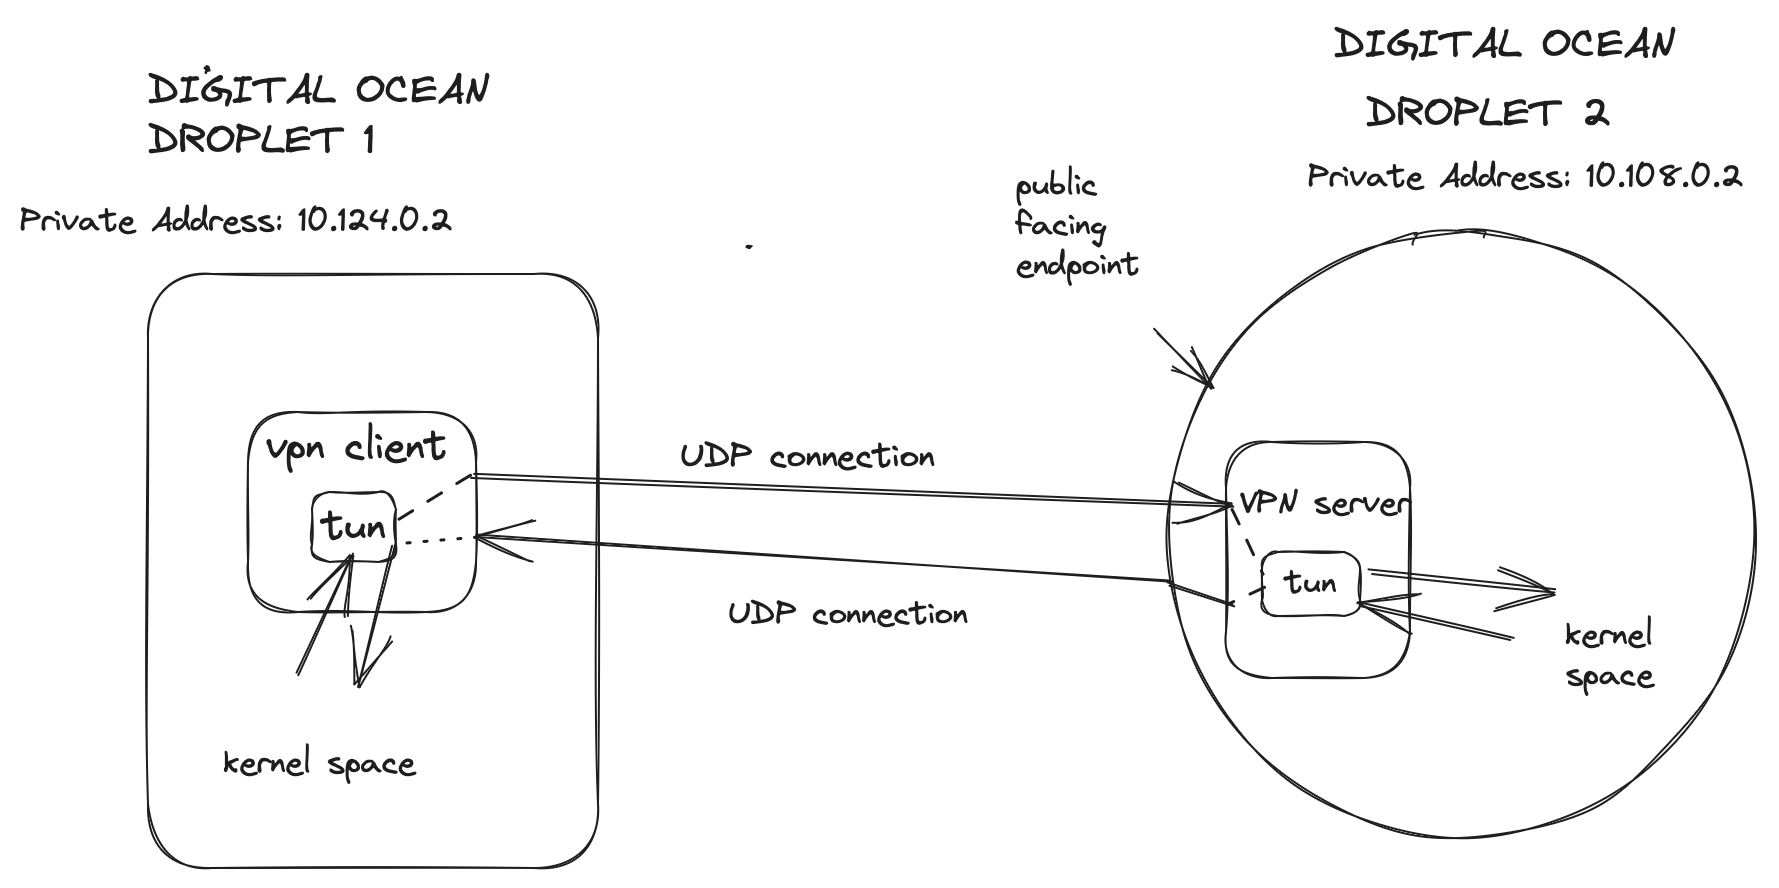
## Architecture
## How does it work?
Checkout my blog [post](https://kwakubiney.github.io/posts/UDP-Tunneling-With-Safehaven/) for implementation details.
## Demo
[Click here to watch demo](https://www.youtube.com/watch?v=BJcXyx5ae1Ac)
## How to use?
### Basic Usage
SafeHaven is only available on Linux.
```sh
Usage:
-d string
private network destination (default "10.108.0.2")
-g global
routes all traffic to tunnel server
-l string
local address
-s string
remote server address (default "138.197.32.138")
-srv
server mode
-tc string
client tun device ip (default "192.168.1.100/24")
-tname string
tunname (default "tun0")
-ts string
server tun device ip (default "192.168.1.102/24")
-wg string
path to WireGuard configuration file (JSON)
```
### WireGuard Encryption Support
SafeHaven now supports an optional WireGuard encryption layer. To enable it, pass the `-wg` flag with the path to a WireGuard configuration JSON file.
#### Example Command:
```sh
safehaven -tc 192.168.1.100/24 -ts 192.168.1.102/24 -s 138.197.32.138:3000 -l 3000 -wg /path/to/wg-config.json
```
#### WireGuard Configuration File Format:
The JSON configuration file should have the following structure:
```json
{
"client_private_key": "YOUR_CLIENT_PRIVATE_KEY",
"client_public_key": "YOUR_CLIENT_PUBLIC_KEY",
"server_private_key": "YOUR_SERVER_PRIVATE_KEY",
"server_public_key": "YOUR_SERVER_PUBLIC_KEY",
"server_allowed_ips": "IPS_YOU_WANT_TO_ALLOW_INTO_SERVER"
}
```
### Steps to Run:
1. **Build the project**
2. **Run on the client** with the appropriate flags, including `-wg` if using WireGuard.
3. **Run on the server** in `server mode`:
```sh
safehaven -srv -tc 192.168.1.102/24 -ts 192.168.1.100/24 -wg /path/to/wg-config.json
```
4. **Enable IP forwarding** on the server:
```sh
sysctl -w net.ipv4.ip_forward=1
```
**NB**: Your server must know how to reach the private network, otherwise packets will be lost in transit.