https://github.com/laispace/puppeteer-explore
介绍操作 Chrome 浏览器无头模式的工具库 Puppeteer
https://github.com/laispace/puppeteer-explore
Last synced: 9 months ago
JSON representation
介绍操作 Chrome 浏览器无头模式的工具库 Puppeteer
- Host: GitHub
- URL: https://github.com/laispace/puppeteer-explore
- Owner: laispace
- Created: 2017-10-16T13:13:09.000Z (about 8 years ago)
- Default Branch: master
- Last Pushed: 2017-10-19T05:30:08.000Z (about 8 years ago)
- Last Synced: 2024-10-26T18:29:58.207Z (about 1 year ago)
- Homepage: https://juejin.im/post/59e5a86c51882578bf185dba
- Size: 2.66 MB
- Stars: 147
- Watchers: 6
- Forks: 43
- Open Issues: 0
-
Metadata Files:
- Readme: README.md
Awesome Lists containing this project
- awesome-puppeteer - puppeteer-explore
- awesome-puppeteer-zh - puppeteer-explore - Puppeteer的实用程序库. (包 / 贡献)
- awesome-puppeteer - puppeteer-explore - Utility library for puppeteer. (Packages)
README
# Puppeteer 初探
我们日常使用浏览器或者说是有头浏览器时的步骤为:启动浏览器、打开一个网页、进行交互。
无头浏览器指的是我们使用脚本来执行以上过程的浏览器,能模拟真实的浏览器使用场景。
有了无头浏览器,我们就能做包括但不限于以下事情:
- 对网页进行截图保存为图片或 pdf
- 抓取单页应用(SPA)执行并渲染(解决传统 HTTP 爬虫抓取单页应用难以处理异步请求的问题)
- 做表单的自动提交、UI的自动化测试、模拟键盘输入等
- 用浏览器自带的一些调试工具和性能分析工具帮助我们分析问题
- 在最新的无头浏览器环境里做测试、使用最新浏览器特性
- 写爬虫做你想做的事情(奸笑
无头浏览器很多,包括但不限于:
- PhantomJS, 基于 Webkit
- SlimerJS, 基于 Gecko
- HtmlUnit, 基于 Rhnio
- TrifleJS, 基于 Trident
- Splash, 基于 Webkit
这里主要介绍 Google 提供的无头浏览器(headless Chrome), 他基于 [Chrome DevTools protocol](https://chromedevtools.github.io/devtools-protocol/) 提供了不少高度封装的接口方便我们控制浏览器。
## 简单的代码示例
> 为了能使用 `async`/`await` 等新特性,需要使用 v7.6.0 或更高版本的 Node.
### 启动/关闭浏览器、打开页面
```
// 启动浏览器
const browser = await puppeteer.launch({
// 关闭无头模式,方便我们看到这个无头浏览器执行的过程
// headless: false,
timeout: 30000, // 默认超时为30秒,设置为0则表示不设置超时
});
// 打开空白页面
const page = await browser.newPage();
// 进行交互
// ...
// 关闭浏览器
// await browser.close();
```
### 设置页面视窗大小
```
// 设置浏览器视窗
page.setViewport({
width: 1376,
height: 768,
});
```
### 输入网址
```
// 地址栏输入网页地址
await page.goto('https://google.com/', {
// 配置项
// waitUntil: 'networkidle', // 等待网络状态为空闲的时候才继续执行
});
```
### 保存网页为图片
打开一个网页,然后截图保存到本地:
```
await page.screenshot({
path: 'path/to/saved.png',
});
```
[完整示例代码](https://github.com/laispace/puppeteer-explore/blob/master/demo/save-screenshot.js)
### 保存网页为 pdf
打开一个网页,然后保存 pdf 到本地:
```
await page.pdf({
path: 'path/to/saved.pdf',
format: 'A4', // 保存尺寸
});
```
[完整示例代码](https://github.com/laispace/puppeteer-explore/blob/master/demo/save-pdf.js)
### 执行脚本
要获取打开的网页中的宿主环境,我们可以使用 `Page.evaluate` 方法:
```
// 获取视窗信息
const dimensions = await page.evaluate(() => {
return {
width: document.documentElement.clientWidth,
height: document.documentElement.clientHeight,
deviceScaleFactor: window.devicePixelRatio
};
});
console.log('视窗信息:', dimensions);
// 获取 html
// 获取上下文句柄
const htmlHandle = await page.$('html');
// 执行计算
const html = await page.evaluate(body => body.outerHTML, htmlHandle);
// 销毁句柄
await htmlHandle.dispose();
console.log('html:', html);
```
`Page.$` 可以理解为我们常用的 `document.querySelector`, 而 `Page.$$` 则对应 `document.querySelectorAll`。
[完整示例代码](https://github.com/laispace/puppeteer-explore/blob/master/demo/evalute-script.js)
### 自动提交表单
打开谷歌首页,输入关键字,回车进行搜索:
```
// 地址栏输入网页地址
await page.goto('https://google.com/', {
waitUntil: 'networkidle', // 等待网络状态为空闲的时候才继续执行
});
// 聚焦搜索框
// await page.click('#lst-ib');
await page.focus('#lst-ib');
// 输入搜索关键字
await page.type('辣子鸡', {
delay: 1000, // 控制 keypress 也就是每个字母输入的间隔
});
// 回车
await page.press('Enter');
```

[完整示例代码](https://github.com/laispace/puppeteer-explore/blob/master/demo/auto-submit-form.js)
## 复杂点的代码示例
每一个简单的动作连接起来,就是一连串复杂的交互,接下来我们看两个更具体的示例。
### 抓取单页应用: 模拟饿了么外卖下单
传统的爬虫是基于 HTTP 协议,模拟 UserAgent 发送 http 请求,获取到 html 内容后使用正则解析出需要抓取的内容,这种方式面对服务端渲染直出 html 的网页时非常便捷。
但遇到单页应用(SPA)时,或遇到登录校验时,这种爬虫就显得比较无力。
而使用无头浏览器,抓取网页时完全使用了人机交互时的操作,所以页面的初始化完全能使用宿主浏览器环境渲染完备,不再需要关心这个单页应用在前端初始化时需要涉及哪些 HTTP 请求。
无头浏览器提供的各种点击、输入等指令,完全模拟人的点击、输入等指令,也就再也不用担心正则写不出来了啊哈哈哈
当然,有些场景下,使用传统的 HTTP 爬虫(写正则匹配) 还是比较高效的。
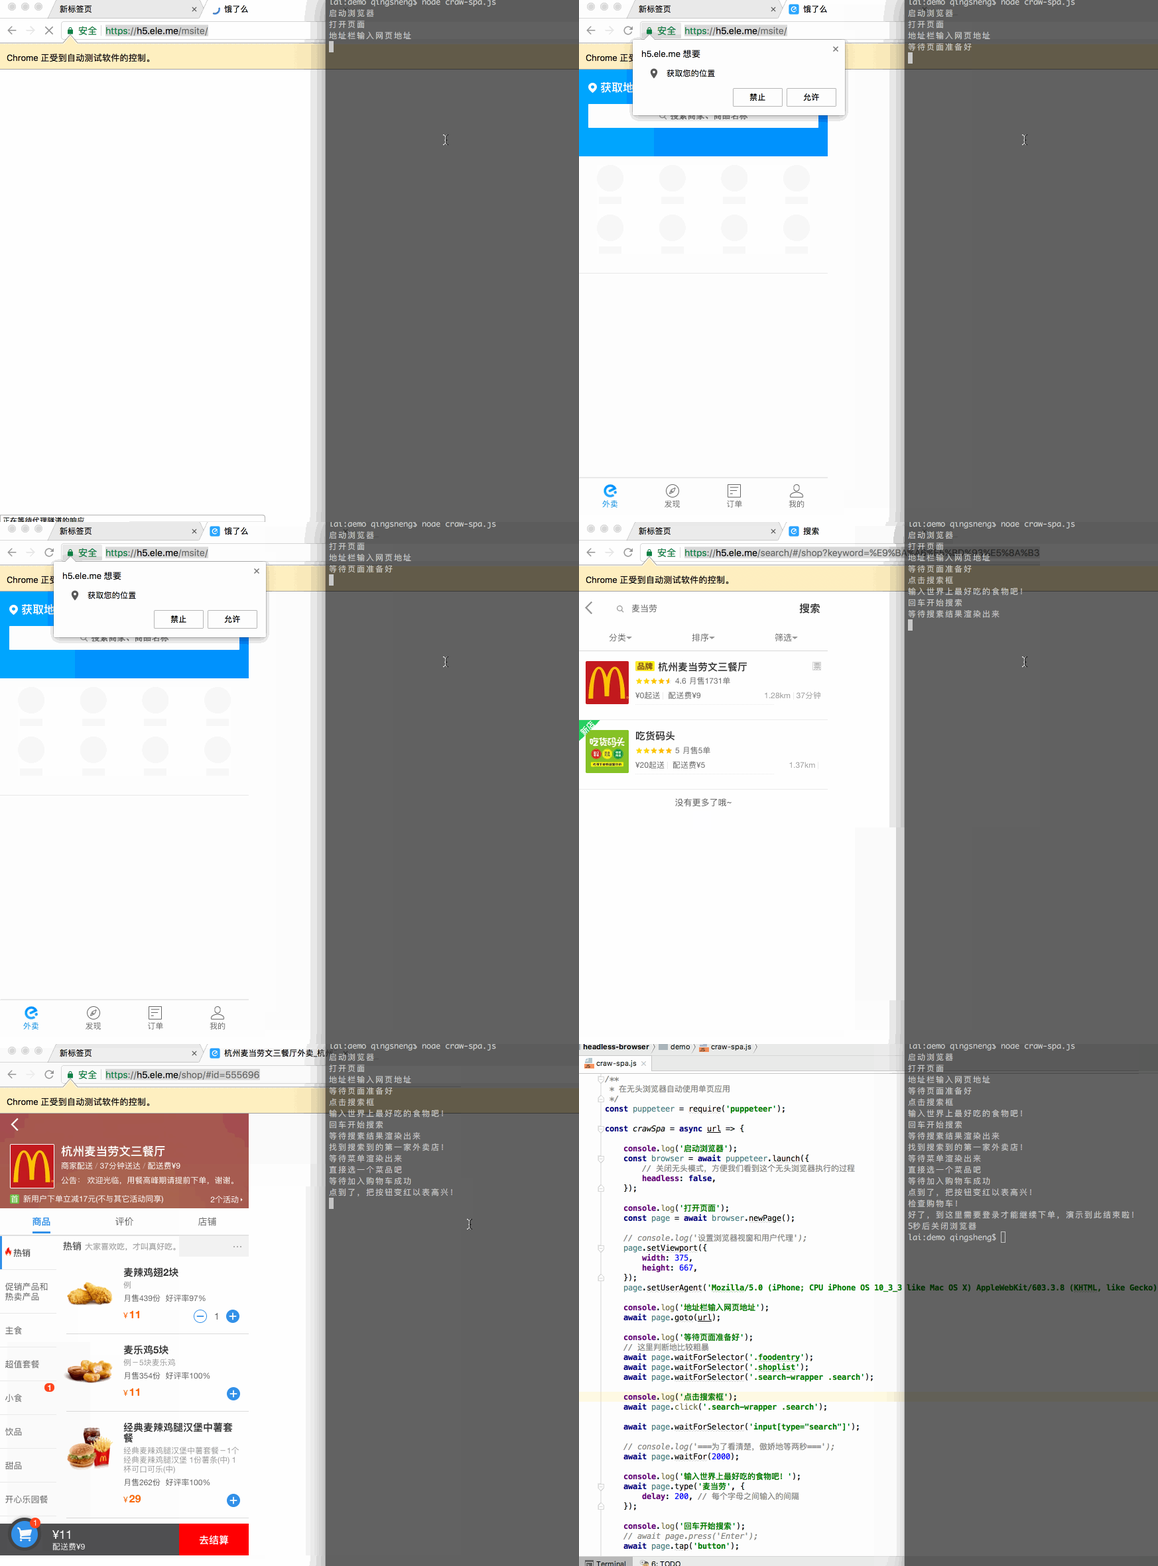
在这里就不再详细对比这些差异了,以下这个例子仅作为展示模拟一个完整的人机交互:使用移动版饿了么点外卖。
先看下效果:

代码比较长就不全贴了,关键是几行:
```
const puppeteer = require('puppeteer');
const devices = require('puppeteer/DeviceDescriptors');
const iPhone6 = devices['iPhone 6'];
console.log('启动浏览器');
const browser = await puppeteer.launch();
console.log('打开页面');
const page = await browser.newPage();
// 模拟移动端设备
await page.emulate(iPhone6);
console.log('地址栏输入网页地址');
await page.goto(url);
console.log('等待页面准备好');
await page.waitForSelector('.search-wrapper .search');
console.log('点击搜索框');
await page.tap('.search-wrapper .search');
await page.type('麦当劳', {
delay: 200, // 每个字母之间输入的间隔
});
console.log('回车开始搜索');
await page.tap('button');
console.log('等待搜素结果渲染出来');
await page.waitForSelector('[class^="index-container"]');
console.log('找到搜索到的第一家外卖店!');
await page.tap('[class^="index-container"]');
console.log('等待菜单渲染出来');
await page.waitForSelector('[class^="fooddetails-food-panel"]');
console.log('直接选一个菜品吧');
await page.tap('[class^="fooddetails-cart-button"]');
// console.log('===为了看清楚,傲娇地等两秒===');
await page.waitFor(2000);
await page.tap('[class^=submit-btn-submitbutton]');
// 关闭浏览器
await browser.close();
```
关键步骤是:
- 加载页面
- 等待需要点击的 DOM 渲染出来后点击
- 继续等待下一步需要点击的 DOM 渲染出来再点击
关键的几个指令:
- `page.tap`(或 `page.click`) 为点击
- `page.waitForSelector` 意思是等待指定元素出现在网页中,如果已经出现了,则立即继续执行下去, 后面跟的参数为 `selector` 选择器,与我们常用的 `document.querySelector` 接收的参数一致
- `page.waitFor` 后面可以传入 `selector` 选择器、`function` 函数或 `timeout` 毫秒时间,如 `page.waitFor(2000)` 指等待2秒再继续执行,例子中用这个函数暂停操作主要是为了演示
以上几个指令都可接受一个 `selector` 选择器作为参数,这里额外介绍几个方法:
- `page.$(selector)` 与我们常用的 `document.querySelector(selector)` 一致,返回的是一个 `ElementHandle` 元素句柄
- `page.$$(selector)` 与我们常用的 `document.querySelectorAll(selector)` 一致,返回的是一个数组
在有头浏览器上下文中,我们选择一个元素的方法是:
```
const body = document.querySelector('body');
const bodyInnerHTML = body.innerHTML;
console.log('bodyInnerHTML: ', bodyInnerHTML);
```
而在无头浏览器里,我们首先需要获取一个句柄,通过句柄获取到环境中的信息后,销毁这个句柄。
```
// 获取 html
// 获取上下文句柄
const bodyHandle = await page.$('body');
// 执行计算
const bodyInnerHTML = await page.evaluate(dom => dom.innerHTML, bodyHandle);
// 销毁句柄
await bodyHandle.dispose();
console.log('bodyInnerHTML:', bodyInnerHTML);
```
除此之外,还可以使用 `page.$eval`:
```
const bodyInnerHTML = await page.$eval('body', dom => dom.innerHTML);
console.log('bodyInnerHTML: ', bodyInnerHTML);
```
`page.evaluate` 意为在浏览器环境执行脚本,可传入第二个参数作为句柄,而 `page.$eval` 则针对选中的一个 DOM 元素执行操作。
[完整示例代码](https://github.com/laispace/puppeteer-explore/blob/master/demo/craw-spa.js)
### 导出批量网页:下载图灵图书
我在 [图灵社区](http://www.ituring.com.cn/) 上买了不少电子书,以前支持推送到 `mobi` 格式到 `kindle` 或推送 `pdf` 格式到邮箱进行阅读,不过经常会关闭这些推送渠道,只能留在网页上看书。
对我来说不是很方便,而这些书籍的在线阅读效果是服务器渲染出来的(带了大量标签,无法简单抽取出好的排版),最好的方式当然是直接在线阅读并保存为 pdf 或图片了。
借助浏览器的无头模式,我写了个简单的下载已购买书籍为 `pdf` 到本地的脚本,支持批量下载已购买的书籍。
使用方法,传入帐号密码和保存路径,如:
```
$ node ./demo/download-ituring-books.js '用户名' '密码' './books'
```
注意:`puppeteer` 的 `Page.pdf()` 目前仅支持在无头模式中使用,所以要想看有头状态的抓取过程的话,执行到 `Page.pdf()` 这步会先报错:

所以启动这个脚本时,需要保持无头模式:
```
const browser = await puppeteer.launch({
// 关闭无头模式,方便我们看到这个无头浏览器执行的过程
// 注意若调用了 Page.pdf 即保存为 pdf,则需要保持为无头模式
// headless: false,
});
```
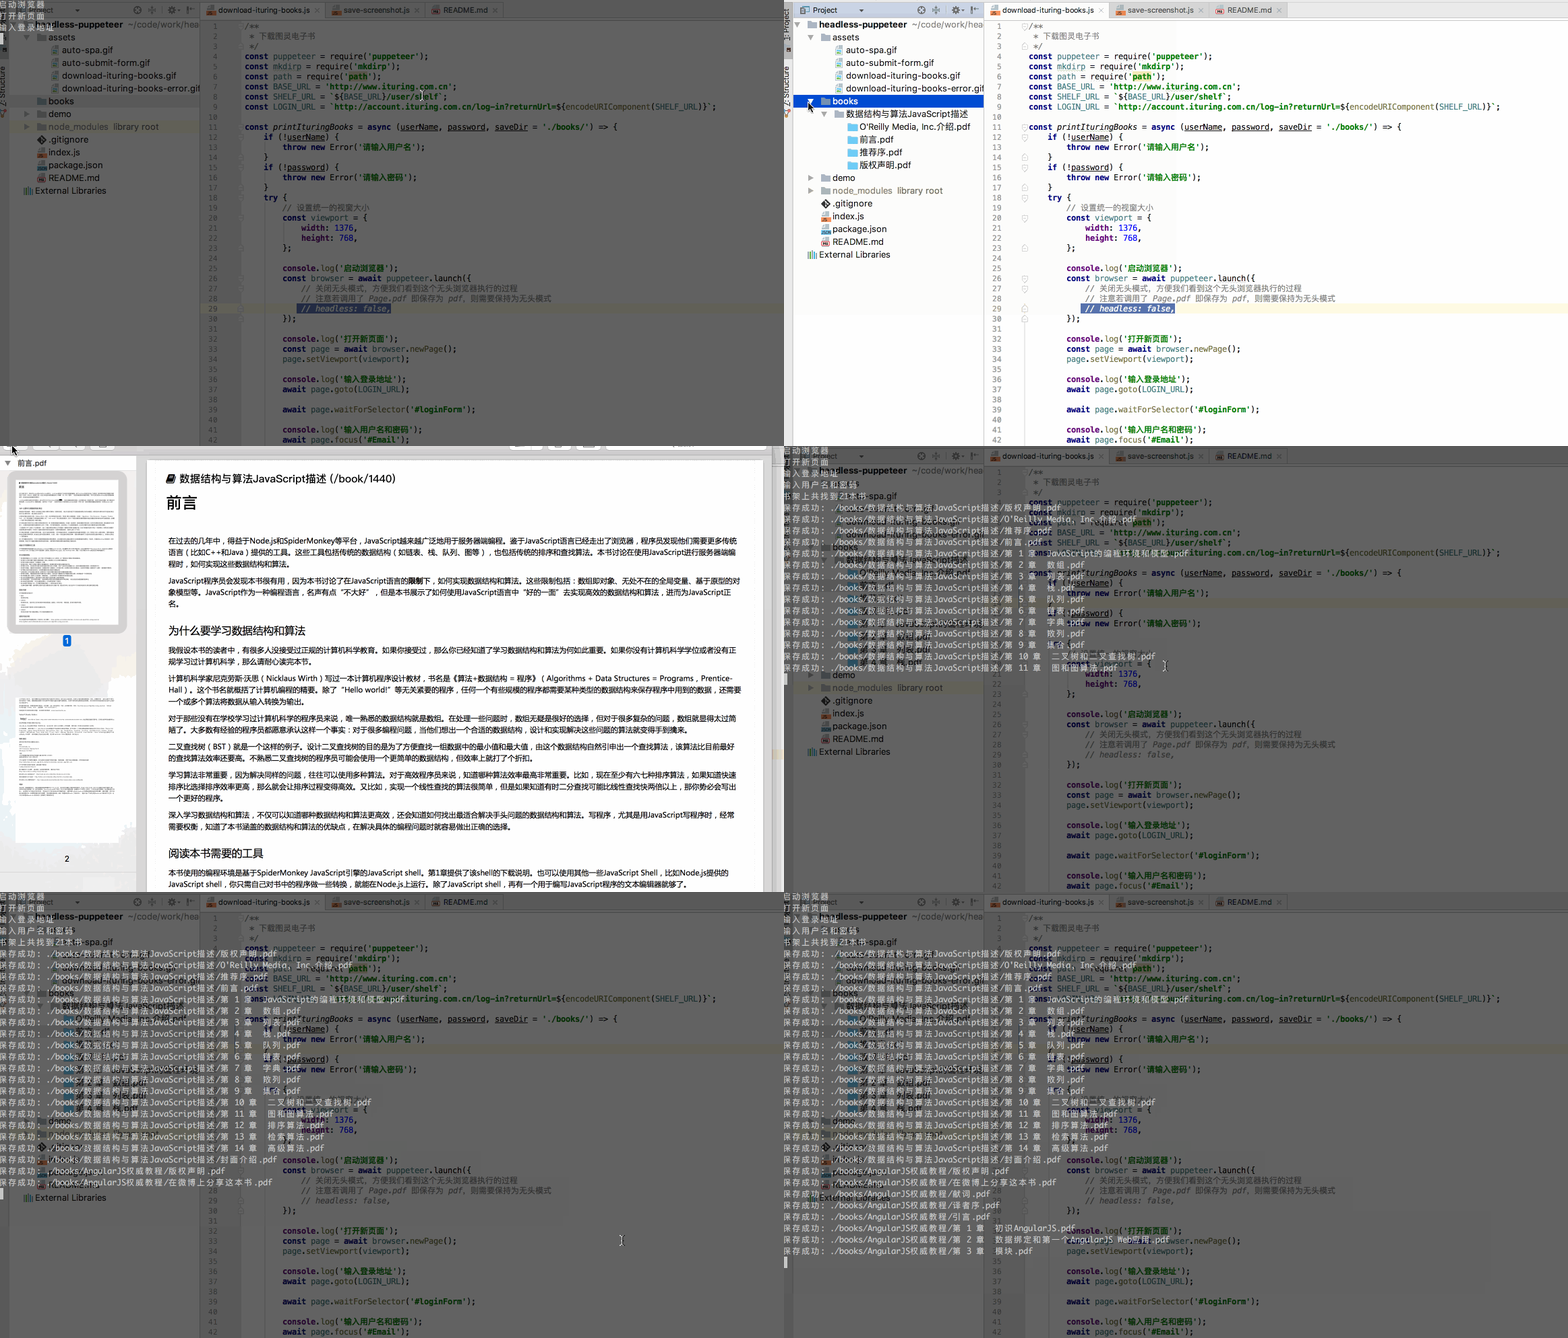
看下执行效果:

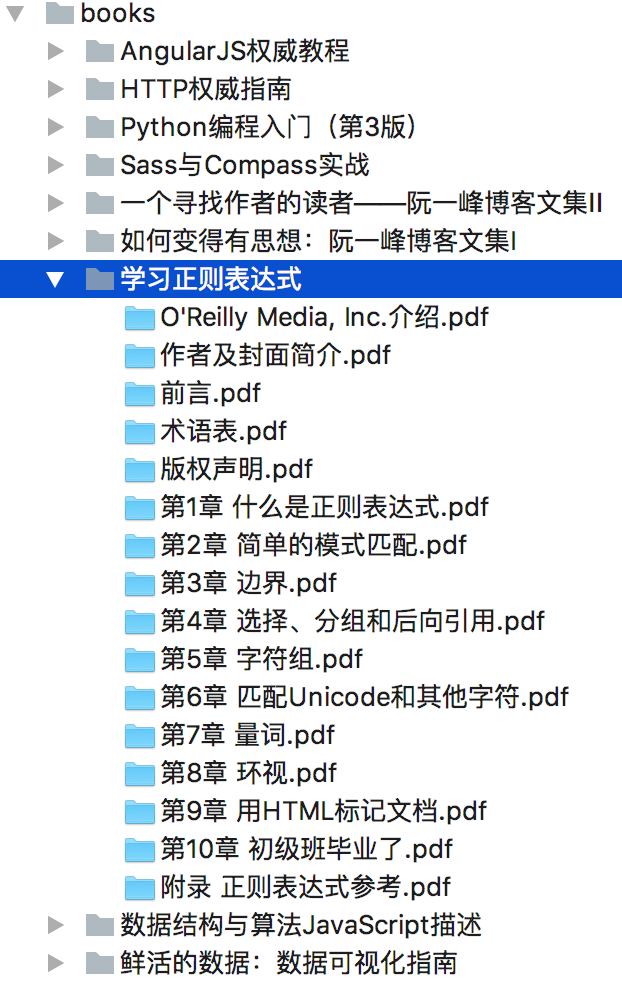
我的书架里有20多本书,下载完后是这样子:

[完整示例代码](https://github.com/laispace/puppeteer-explore/blob/master/demo/download-ituring-books.js)
## 无头浏览器还能做什么?
无头浏览器说白了就是能模拟人工在有头浏览器中的各种操作,那自然很多人力活,都能使用无头浏览器来做(比如上面这个下载 pdf 的过程,其实是人力打开每一个文章页面,然后按 `ctrl+p` 或 `command+p` 保存到本地的自动化过程)。
那既然用自动化工具能解决的事情,就不应该浪费重复的人力劳动了,所以我们还可以做:
- 自动化工具
如自动提交表单,自动下载
- 自动化 UI 测试
如记录下正确 DOM 结构或截图,然后自动执行指定操作后,检查 DOM 结构或截图是否匹配(UI 断言)
- 定时监控工具
如定时截图发周报,或定时巡查重要业务路径下的页面是否处于可用状态,配合邮件告警
- 爬虫
如传统 HTTP 爬虫怕不到的地方,就可配合无头浏览器渲染能力来做
- etc
感谢阅读!
(全文完)