https://github.com/layer-se7en/dev-setup
How to set up Web-Dev Enviroment on M1 Mac
https://github.com/layer-se7en/dev-setup
airbnb-eslint airbnb-javascript eslint eslint-config-airbnb github homebrew homebrew-cask node nvm oh-my-zsh oh-my-zsh-theme ohmyzsh prettier prettier-eslint ssh-key visual-studio-code visual-studio-code-extension visual-studio-code-theme zsh zshrc
Last synced: 6 months ago
JSON representation
How to set up Web-Dev Enviroment on M1 Mac
- Host: GitHub
- URL: https://github.com/layer-se7en/dev-setup
- Owner: layer-se7en
- Created: 2020-12-12T04:17:58.000Z (over 4 years ago)
- Default Branch: main
- Last Pushed: 2021-03-03T08:16:45.000Z (over 4 years ago)
- Last Synced: 2024-12-31T03:29:32.832Z (6 months ago)
- Topics: airbnb-eslint, airbnb-javascript, eslint, eslint-config-airbnb, github, homebrew, homebrew-cask, node, nvm, oh-my-zsh, oh-my-zsh-theme, ohmyzsh, prettier, prettier-eslint, ssh-key, visual-studio-code, visual-studio-code-extension, visual-studio-code-theme, zsh, zshrc
- Homepage: https://github.com/eliasbnk/dev-setup
- Size: 18.6 MB
- Stars: 2
- Watchers: 1
- Forks: 0
- Open Issues: 0
-
Metadata Files:
- Readme: README.md
Awesome Lists containing this project
README
# How to set up Web-Dev Enviroment on M1 Mac
# In this guide I will show you
- how to install homebrew
- how to install all necessary apps and extensions
- how to install Spaceship theme with Oh-My-Zsh
- how to install node
- how to setup eslint with airbnb style guide
- how to add SSH-KEY to github account
## 1. Downlod dev-setup-scripts.zip
download link for dev-setup-scripts.zip
------------------------------------------------------------------------------------------------------------------------------------------------------------------
## 2. Setting Up Rosetta Terminal
#### `[press command + Space]`
that should open Spotlight

type the following into Spotlight:
```
/applications
```
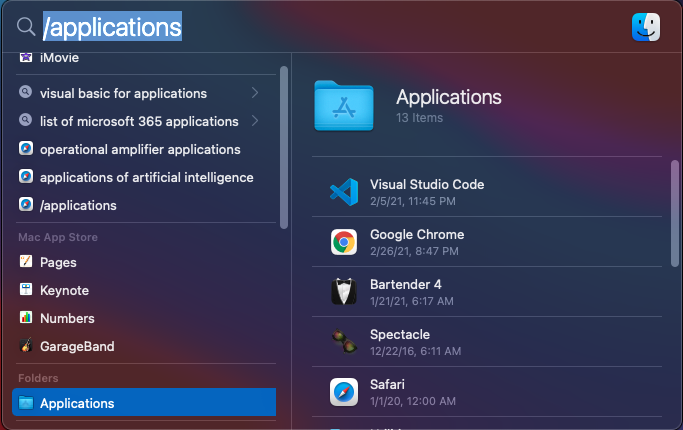
#### double click on Applications Folder
------------------------------------------------------------------------------------------------------------------------------------------------------------------
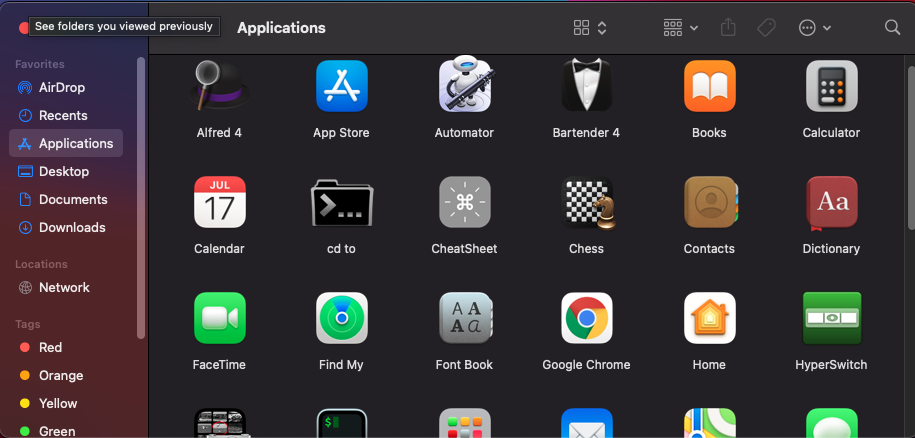
### Applications Folder should open
------------------------------------------------------------------------------------------------------------------------------------------------------------------
type the following into search:

```
Terminal
```
choose search Applications

right-click Terminal
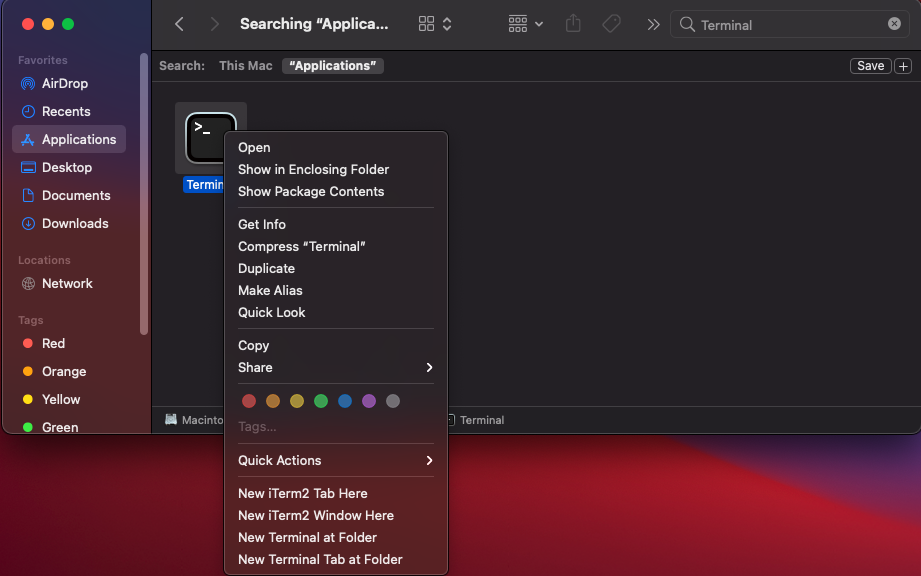
click on Duplicate
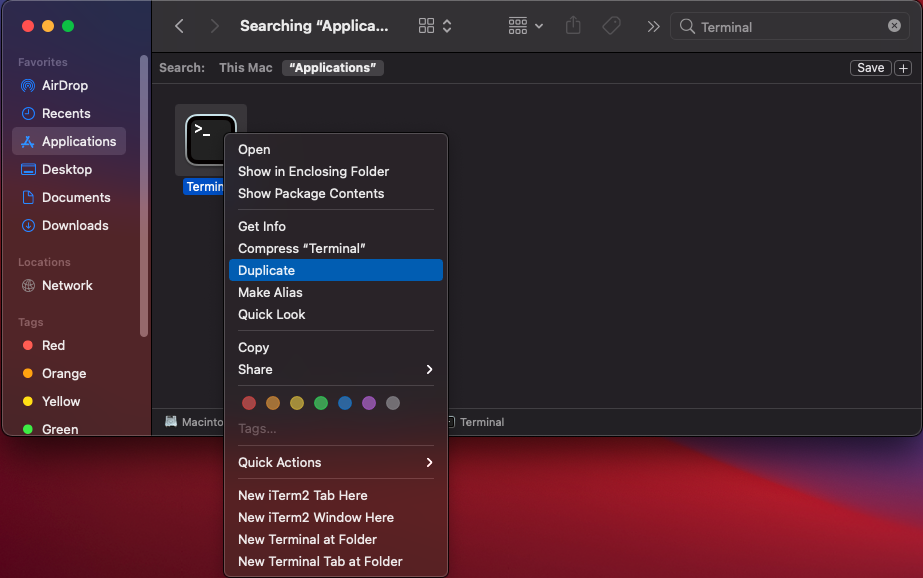
if asked enter your password & press ok
right-click duplicated Terminal & click on Rename
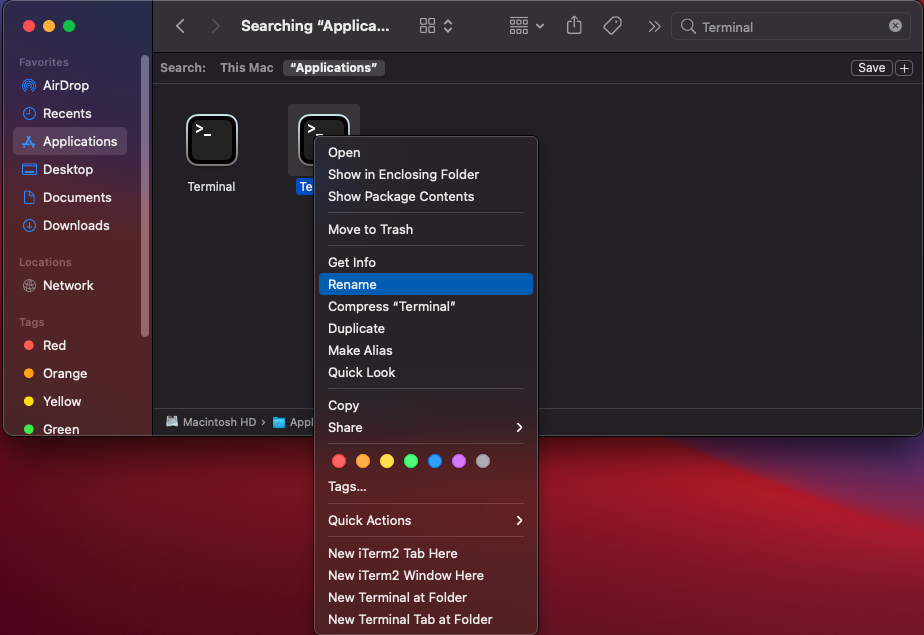
rename the duplicated Terminal to:
```
Rosetta Terminal
```
if asked enter your password & press ok
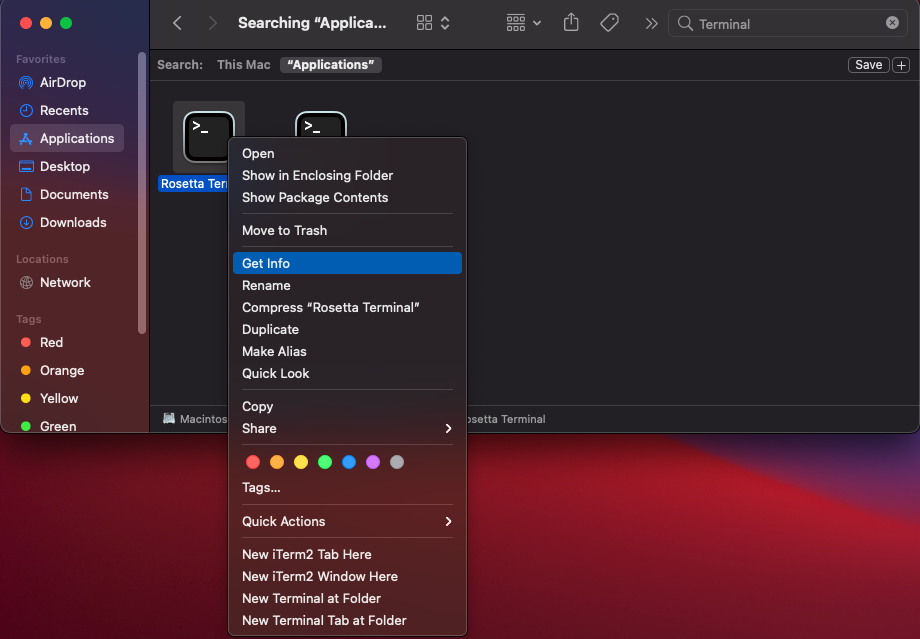
right-click Rosetta Terminal & click on Get Info
in the Rosetta Terminal Info window make sure Open using Rosetta is checked
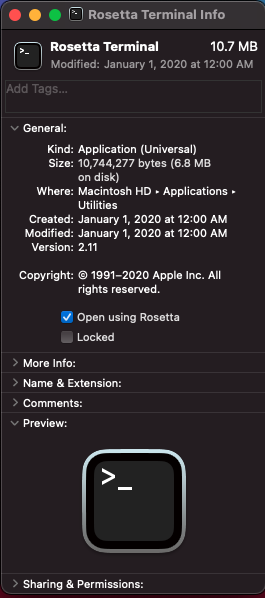
#### Close Rosetta Terminal Info by clicking red ❌
double click on Rosseta Terminal
------------------------------------------------------------------------------------------------------------------------------------------------------------------
### Rosetta Terminal should open
----------------------------------------------------------------------------------------------------------------------------------------------------------------
lets check if we are using Rosetta
type the following into Terminal:
```
arch
```
#### `[press Enter]`
if your Rosetta Terminal returned
i386

Good Job you did everything correct so far.
------------------------------------------------------------------------------------------------------------------------------------------------------------------
## 3. Installing Homebrew
type the following into Rosetta Terminal:
```
cd
```
#### `[press Enter]`
type the following into Rosetta Terminal:
```
mkdir homebrew && curl -L https://github.com/Homebrew/brew/tarball/master | tar xz --strip 1 -C homebrew
```
#### `[press Enter]`
type the following into Rosetta Terminal:
```
/bin/bash -c "$(curl -fsSL https://raw.githubusercontent.com/Homebrew/install/HEAD/install.sh)"
```
#### `[press Enter]`
#### &
### if prompted to enter your Password, enter your Password, after entering your Password `[press Enter]`
## AFTER A LITTLE WHILE TERMINAL WILL PROMPT YOU "TO CONTINUE WITH DOWNLOADING HOMEBREW PRESS RETURN" = `[press Enter]`
## IF YOU DON'T `[press Enter]` DOWNLOAD WILL NOT BEGIN!
------------------------------------------------------------------------------------------------------------------------------------------------------------------
Wait patiently as this may takes a while (install can take around 4-5 minutes).🧐
After a little awhile Homebrew should be installed. 😊
------------------------------------------------------------------------------------------------------------------------------------------------------------------
### only continue to step 4 after Homebrew is installed
------------------------------------------------------------------------------------------------------------------------------------------------------------------
## 4. Setting Up Download Scripts
type the following into Rosetta Terminal:
```
cd /Users/`whoami`/Downloads/dev-setup-scripts
```
#### `[press Enter]`
------------------------------------------------------------------------------------------------------------------------------------------------------------------
type the following into Terminal:
```
ls
```
#### `[press Enter]`
#### if any prompts open click on ok/allow
------------------------------------------------------------------------------------------------------------------------------------------------------------------
### Compare this list to what your Terminal returned (if you are in dev-setup-scripts folder you should have all of these files)
------------------------------------------------------------------------------------------------------------------------------------------------------------------
- brew-install-cask.txt
- brew-install.txt
- vscode-settings.txt
- zshrc.txt
------------------------------------------------------------------------------------------------------------------------------------------------------------------
### If you indeed have all those files skip over to step 5 Installing Packages & Applications
------------------------------------------------------------------------------------------------------------------------------------------------------------------
### if your Terminal didn't return that or you dont have those files do the following
------------------------------------------------------------------------------------------------------------------------------------------------------------------
#### `[press command + SPACE]`

in Spotlight type:
```
dev-setup-scripts
```
#### `[press Enter]`
------------------------------------------------------------------------------------------------------------------------------------------------------------------
### Finder should open where dev-setup-scripts folder has been downloded
------------------------------------------------------------------------------------------------------------------------------------------------------------------
#### click on dev-setup-scripts folder
#### &
#### `[press command + C]`
------------------------------------------------------------------------------------------------------------------------------------------------------------------
### go back into Terminal
------------------------------------------------------------------------------------------------------------------------------------------------------------------
type the following into Terminal:
```
cd
```
#### `[press Space]`
#### &
#### `[press command + V]`
### it should like something like this
cd /Users/{YOUR_USERNAME}/{FOLDER_NAME_THE_FILE_IS_IN}/dev-setup-scripts
### if it does great, if not redownload the dev-setup-scripts.zip file into Downloads folder and repeat step 3 from beginning.
#### `[press Enter]`
------------------------------------------------------------------------------------------------------------------------------------------------------------------
### you should now be in dev-setup-scripts folder
------------------------------------------------------------------------------------------------------------------------------------------------------------------
type the following into Terminal:
```
ls
```
#### `[press Enter]`
------------------------------------------------------------------------------------------------------------------------------------------------------------------
### Compare this list to what your Terminal returned (if you are in dev-setup-scripts folder you should have all of these files)
------------------------------------------------------------------------------------------------------------------------------------------------------------------
- brew-install-cask.txt
- brew-install.txt
- vscode-settings.txt
- zshrc.txt
------------------------------------------------------------------------------------------------------------------------------------------------------------------
### If Terminal still doesnt return this repeat step 4 from beginning again.
------------------------------------------------------------------------------------------------------------------------------------------------------------------
## 5. Installing Packages & Applications
type all of the following into Terminal at once :
```
sudo chown -R $(whoami) /usr/local/Homebrew /usr/local/etc/bash_completion.d /usr/local/share/doc /usr/local/share/man /usr/local/share/man/man1 /usr/local/var/homebrew/locks &&
chmod u+w /usr/local/Homebrew /usr/local/etc/bash_completion.d /usr/local/share/doc /usr/local/share/man /usr/local/share/man/man1 /usr/local/var/homebrew/locks
```
#### `[press Enter]`
#### if prompted to input your Password, after inputing your Password `[press Enter]`
type all of the following into Terminal at once :
```
brew tap homebrew/cask-fonts
brew install $(GitHub Login Page
------------------------------------------------------------------------------------------------------------------------------------------------------------------
### login
#### click on your profile picture or this icon 
#### &
#### click on settings
#### &
#### click on SSH and GPG key
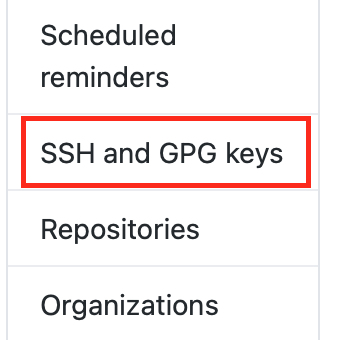
#### &
#### Click on New SSH key

------------------------------------------------------------------------------------------------------------------------------------------------------------------
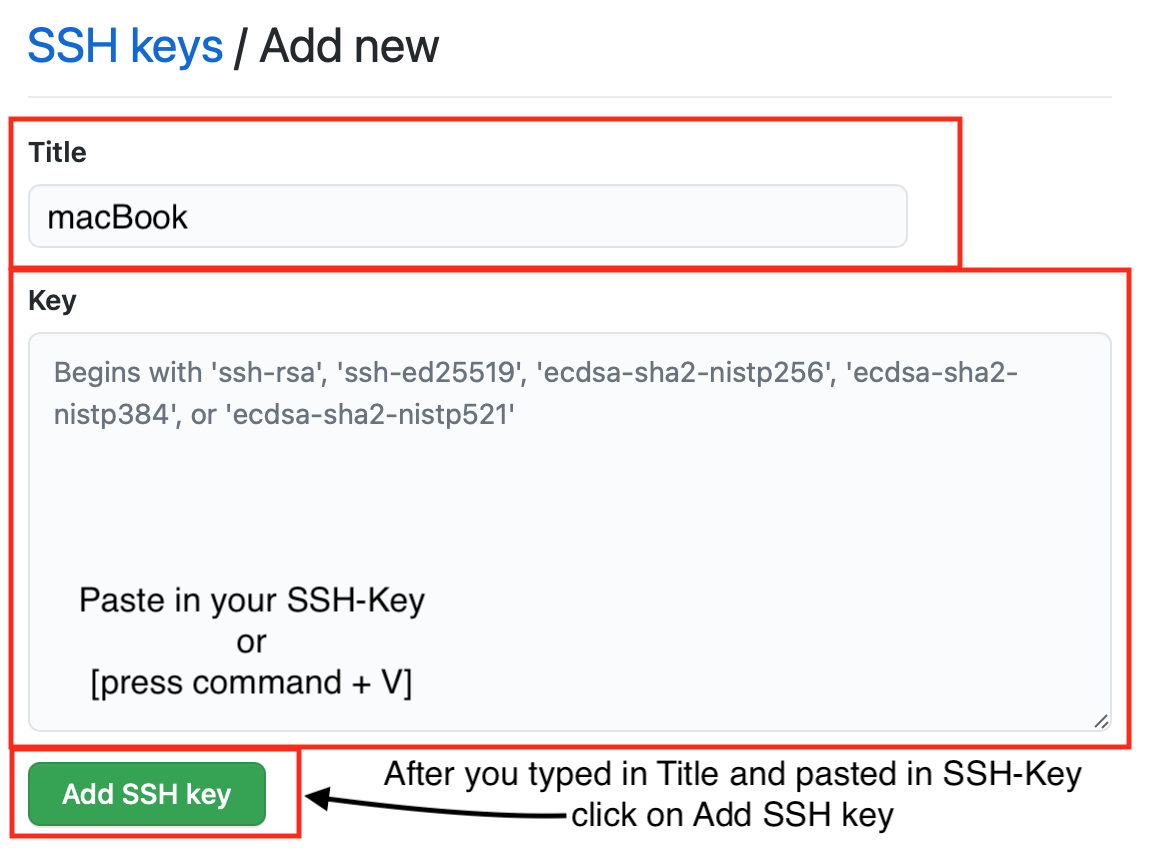
#### click into Key text area
#### &
#### `[press command + V]`
------------------------------------------------------------------------------------------------------------------------------------------------------------------
### SSH-KEY should paste into Key text area
------------------------------------------------------------------------------------------------------------------------------------------------------------------
### for title write:
```
macBook
```
------------------------------------------------------------------------------------------------------------------------------------------------------------------
### After you wrote the title and pasted in the SSH Key
------------------------------------------------------------------------------------------------------------------------------------------------------------------
#### click on Add SSH key
------------------------------------------------------------------------------------------------------------------------------------------------------------------
#### enter in your github password
#### click Confirm Password
------------------------------------------------------------------------------------------------------------------------------------------------------------------
# you're finished, good job 😀👍
------------------------------------------------------------------------------------------------------------------------------------------------------------------