https://github.com/leukipp/touchkio
Home Assistant Touch Panel Kiosk application for a Linux device (e.g. Raspberry Pi) with Touch Display.
https://github.com/leukipp/touchkio
home-assistant kiosk-touchscreen raspberry-pi
Last synced: over 1 year ago
JSON representation
Home Assistant Touch Panel Kiosk application for a Linux device (e.g. Raspberry Pi) with Touch Display.
- Host: GitHub
- URL: https://github.com/leukipp/touchkio
- Owner: leukipp
- License: mit
- Created: 2024-12-11T21:51:49.000Z (over 1 year ago)
- Default Branch: main
- Last Pushed: 2025-02-23T21:33:33.000Z (over 1 year ago)
- Last Synced: 2025-04-03T03:09:16.348Z (over 1 year ago)
- Topics: home-assistant, kiosk-touchscreen, raspberry-pi
- Language: JavaScript
- Homepage: https://community.home-assistant.io/t/kiosk-mode-for-raspberry-pi-with-touch-display/821196
- Size: 627 KB
- Stars: 92
- Watchers: 4
- Forks: 8
- Open Issues: 7
-
Metadata Files:
- Readme: README.md
- License: LICENSE
Awesome Lists containing this project
- starred - leukipp/touchkio - Home Assistant Touch Panel Kiosk application for a Linux device (e.g. Raspberry Pi) with Touch Display. (JavaScript)
README
# TouchKio
**TouchKio** is a Node.js application that utilizes Electron to create a kiosk mode window specifically designed for a Home Assistant dashboard.
This tool is packaged as a **.deb** file, making it easy to launch the kiosk application on any Debian based Linux [hardware](https://github.com/leukipp/touchkio/blob/main/HARDWARE.md) (e.g. **Raspberry Pi**) equipped with a **DSI or HDMI** Touch Display.
Additional releases for other Linux systems are available as **.zip** file.
[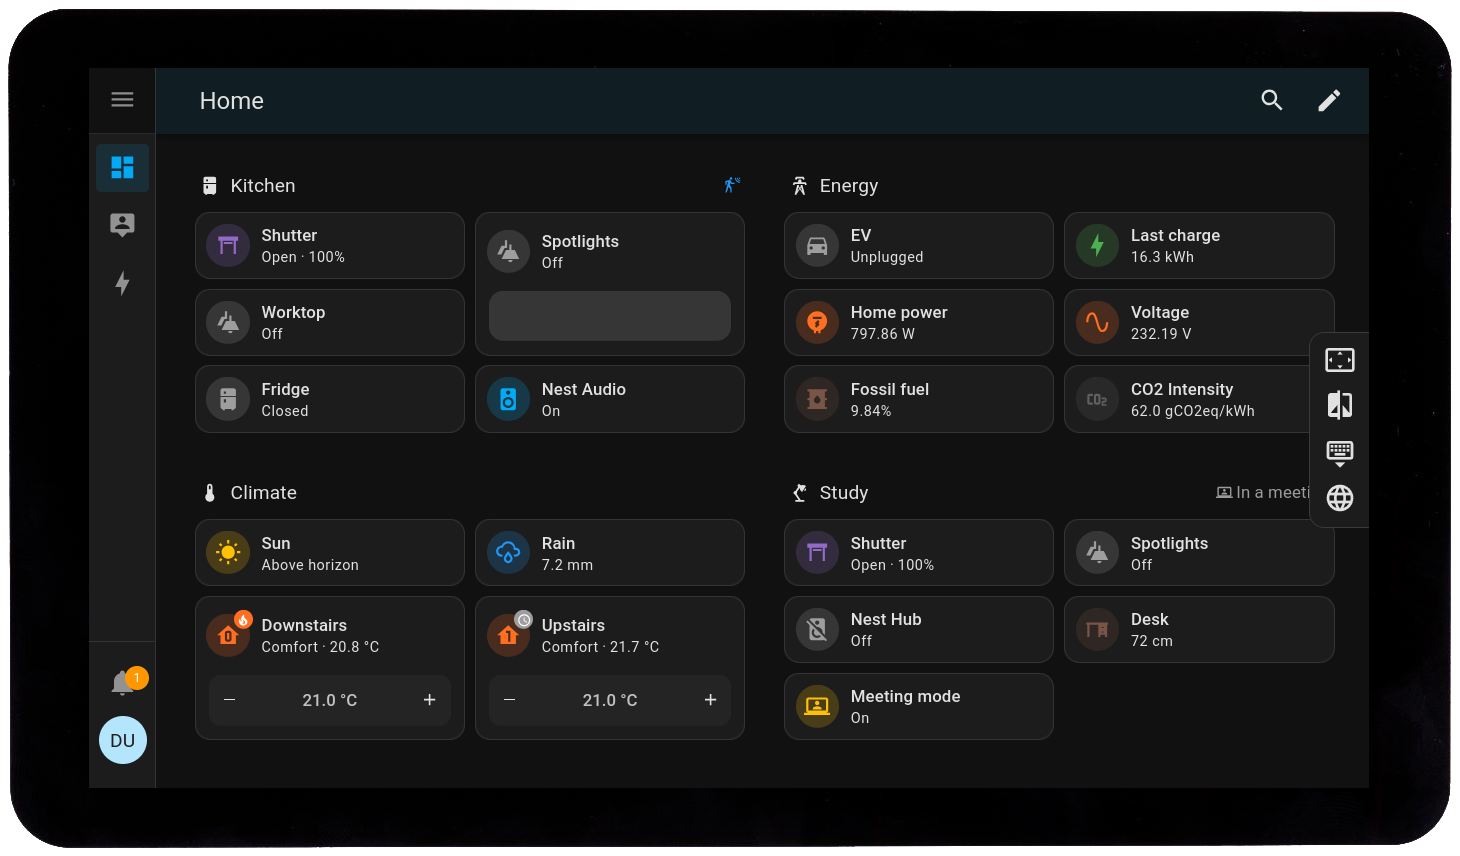](https://github.com/leukipp/touchkio/blob/main/img/display.png)
This implementation addresses common issues encountered when using the built-in browser running in fullscreen mode on a Linux device with Touch Display.
Moreover, the device running the **kiosk application** also offers several **Home Assistant MQTT** sensors, enhancing it's functionality for automation purposes.
## Features
- [x] Fast and easy setup.
- [x] Remember login credentials.
- [x] Side panel widget for kiosk control.
- [x] Touch friendly web browser interface.
- [x] Configurable zoom and theme support.
- [x] Single-tap screen wake-up functionality.
- [x] Remote controllable via MQTT.
- [x] Manage kiosk window status.
- [x] Manage touch keyboard status.
- [x] Touch display power and brightness.
- [x] Show available system package upgrades.
- [x] Execute system reboot and shutdown commands.
- [x] Monitor temperature, processor and memory usage.
The kiosk application can be executed with command line arguments to load a **Home Assistant dashboard in fullscreen** mode.
Additionally, a **MQTT endpoint** can be defined, allowing the application to provide controls and sensors for the Linux device and the connected Touch Display.
## Setup
Before you begin, make sure that you have a Linux device configured and operational with a [compatible](https://github.com/leukipp/touchkio/blob/main/HARDWARE.md) Touch Display.
This guide assumes that you are using a Raspberry Pi with the latest version of Raspberry Pi OS **(64-bit)**, along with a desktop environment (preferred using **labwc**).
However, the **.deb** setup procedure is also compatible with any other Debian based 64-bit system.
### Optional
To utilize the sensor features of your device through Home Assistant, it's essential to have a **MQTT broker running** and the **MQTT integration installed** on your Home Assistant instance.
This setup allows seamless communication between your kiosk device and Home Assistant, enabling **real-time data exchange**.
[](https://github.com/leukipp/touchkio/blob/main/img/mqtt.png)
For a comprehensive guide on setting up MQTT with Home Assistant, please refer to the official documentation available here: https://www.home-assistant.io/integrations/mqtt.
## Installation
On the first run of the application, you may encounter a **setup procedure** and the Home Assistant **login screen**.
It's recommended to create a **dedicated user** (local access only) for your kiosk device.
You might also need a physical keyboard or remote VNC access to input these credentials once.
If your hardware is [supported](https://github.com/leukipp/touchkio/blob/main/HARDWARE.md) you may be able to activate the on-screen keyboard using the side [widget](https://github.com/leukipp/touchkio/issues/16).
#### Option 1 - The easy way
Run this command to download and install the latest **.deb** (arm64 or x64) release.
It will also create a systemd user file for auto-startup and will guide you through the setup process:
```bash
bash <(wget -qO- https://raw.githubusercontent.com/leukipp/touchkio/main/install.sh)
```
Make sure that you run this with your **standard user** and not with root (sudo).
If you are paranoid, or smart, or both, have a look into the [install.sh](https://github.com/leukipp/touchkio/blob/main/install.sh) script before executing external code on your machine.
The script can also be re-run to **update** an existing installation to the latest version.
The systemd **user service** is enabled by default and the kiosk application should start automatically the next time you boot.
If you need manual control use:
```bash
systemctl --user start|stop|status|restart touchkio.service
```
Alternatives
#### Option 2 - The standard way
When connected via SSH, it's necessary to export the display variables first, as outlined in the [development](https://github.com/leukipp/touchkio?tab=readme-ov-file#development) section.
The [install.sh](https://github.com/leukipp/touchkio/blob/main/install.sh) script mentioned above performs the following tasks (and you just have to do it manually):
- [Download](https://github.com/leukipp/touchkio/releases/latest) the latest version file that is suitable for your architecture (arm64 or x64).
- Debian (**deb**): Open a terminal and execute the following command to install the application, e.g:
`sudo dpkg -i touchkio_1.x.x_arm64.deb && touchkio --setup`
- Others (**zip**): Extract the archive and run the binary, e.g: `unzip touchkio-linux-x64-1.x.x.zip && cd touchkio-linux-x64 && ./touchkio --setup`
- If you just want to load a Home Assistant dashboard without further control you are good to go, e.g: `touchkio --web-url=https://demo.home-assistant.io`
- The `--web-url` doesn't necessarily need to be a Home Assistant url, any kind of website can be shown in kiosk mode.
- Only when using the MQTT integration via `--mqtt-*`, a running Home Assistant instance is required.
- If you need the application to be automatically started on boot, create a systemd file.
#### Option 3 - The hard way
Pre-built release files are available for arm64 and x64 Linux systems.
If you are using a different architecture, you can still utilize this repository to build your own application.
For more information please refer to the [development](https://github.com/leukipp/touchkio?tab=readme-ov-file#development) section, however this will do the job:
```bash
yarn build
```
## Configuration
Running `touchkio --setup` will prompt you to enter arguments that will be used when the application starts without any specified arguments.
These default arguments are stored in `~/.config/touchkio/Arguments.json`, where they can also be modified.
### WEB
The available arguments to control the kiosk application via terminal are as follows:
| Name | Default | Description |
| ------------------------- | ------- | ------------------------------------------------------ |
| `--web-url` (Required) | - | Url of the Home Assistant instance (HTTP(S)://IP:PORT) |
| `--web-theme` (Optional) | `dark` | Theme settings of the web browser (`light` or `dark`) |
| `--web-zoom` (Optional) | `1.25` | Zoom settings of the web browser (`1.0` is `100%`) |
| `--web-widget` (Optional) | `true` | Enables the sidebar widget (`true` or `false`) |
These arguments allow you to customize the appearance of the web browser view.
For example:
```bash
touchkio --web-url=http://192.168.1.42:8123 --web-theme=light --web-zoom=1.0
```
### MQTT
To broadcast your local sensor data to Home Assistant, you can use the following arguments, which require a running MQTT broker:
| Name | Default | Description |
| ----------------------------- | --------------- | ---------------------------------------------------------------------------------------- |
| `--mqtt-url` (Required) | - | Url of the MQTT broker instance (MQTT(S)://IP:PORT) |
| `--mqtt-user` (Required) | - | Username which is available in Home Assistant (e.g. create a user named `kiosk`) |
| `--mqtt-password` (Required) | - | The password of the user (e.g. use `password`, because it's secure and easy to remember) |
| `--mqtt-discovery` (Optional) | `homeassistant` | The discovery prefix for MQTT (`homeassistant` works with default setups) |
When you start the application with the MQTT arguments, the Home Assistant auto-discovery feature will automatically add controls and sensors that can be used for further integration.
You can find them under **Settings** -> **Devices and Services** -> **Devices** by searching for **TouchKio**.
For example:
```bash
touchkio --web-url=http://192.168.1.42:8123 --mqtt-url=mqtt://192.168.1.42:1883 --mqtt-user=kiosk --mqtt-password=password
```
## Development
To create your own local build, you first need to install [Node.js](https://pimylifeup.com/raspberry-pi-nodejs) and [Yarn](https://classic.yarnpkg.com/lang/en/docs/install).
Clone this repository and run `yarn install` to install the dependencies.
Then use `yarn start` to execute the start script located in the [package.json](https://github.com/leukipp/touchkio/blob/main/package.json) file.
There you can adjust the `--web-url` and other arguments for development runs.
If you connect to your device via SSH, you may have to export display variables so that the kiosk application can be loaded inside the desktop environment:
```bash
export DISPLAY=":0"
export WAYLAND_DISPLAY="wayland-0"
```
To make this permanent, consider adding the export variables into the `~/.bashrc` file.
### Extensions
You probably won't need this.
Incorporating custom extensions and external hardware (like motion sensors, ultrasonic sensors, cameras, relays and switches) via **Raspberry Pi's GPIO/USB** involves several steps.
While using external sensors that directly integrate with Home Assistant and by utilizing automation's to interact with **TouchKio via MQTT** is generally easier and **recommended**, here's a rough guide on how to proceed with custom hardware integration:
1. **Install Node.js library**: Use Yarn to add a library that can interact with your hardware (GPIO, USB, etc.):
```bash
yarn add [package-name]
```
This will update the `package.json` file with the required dependencies.
2. **Import the library**: Open the `hardware.js` file and import the library using:
```javascript
const package = require("[package-name]");
```
Then implement your custom methods and logic to handle the hardware. Don't forget to export the methods at the end of the file:
```javascript
module.exports = { ... };
```
3. **Expose sensors via MQTT**: If you want to publish sensor data through MQTT, implement some init and update methods in the `integration.js` file:
```javascript
const initCustomSensor = (client) => { ... }
const updateCustomSensor = (client) => { ... }
```
To get started have a look at the existing methods. Don't forget to call the custom sensor initialization method inside the global init method, where the MQTT connection is established:
```javascript
const init = async (args) => { ... }
```
From there, you will need to further refine your code by tinkering with sensor updates. This can be achieved through either periodic update calls or event based triggers.
### The nitty gritty
Don't waste your time reading this.
The Raspberry Pi's **build-in on-screen keyboard** named `squeekboard` (it squeaks because some *Rust* got inside), is specifically designed for Wayland environments and features a **D-Bus interface** that allows applications to show or hide the keyboard as needed.
The kiosk application interacts with squeekboard via this `D-Bus` object path `/sm/puri/OSK0`, enabling the keyboard to be hidden or shown based on **MQTT** user input or system events.
The Raspberry Pi's **build-in screen blanking** function uses the command `swayidle -w timeout 600 'wlopm --off \*' resume 'wlopm --on \*' &` inside `~/.config/labwc/autostart` to blank the screen after **10 minutes**.
The `wlopm --off \*` command changes the `bl_power` value to **4**, when setting the value to **0** the screen will turn on again.
However, `swayidle` still seems to consider the screen to be off and as a result it will not turn off again unless there is some interaction in the meantime.
When using the MQTT integration, the kiosk application must be able to **detect changes** made on the **device** itself.
I managed to achieve this for the `brightness` file by implementing a simple `fs.watch(..)` file listener.
However, I found that it **never triggered** for the `bl_power` file.
Although the file content changes, none of the filesystem listeners where fired.
This could be due to `swayidle`/`wlopm` performing write actions at a deeper level that are not detectable by file listeners.
As a result, I went for a **polling solution**, checking the state of the file **every second** for any changes.
While I understand this is not ideal, it's necessary to ensure proper functionality.
The display power status and brightness can be adjusted via the MQTT integration.
**Support** for changing the power status on **DSI and HDMI** displays is achieved by checking for connected screens in `/sys/class/drm/*/status`.
Support for changing the brightness of connected display is implemented by using `/sys/class/backlight/*/brightness`.
In cases where no supported backlight device is found, the Home Assistant light entity will only show an on/off switch without brightness control.
Keep in mind that default arguments are stored as plain text in `~/.config/touchkio/Arguments.json`.
This file also includes the **MQTT user password**, which is somewhat obfuscated/encrypted, but in a way that it could be easily reverse engineered.
Implementing stronger **security measures** would complicate the setup process and could discourage some users from configuring the application properly.
When using the kiosk application without initializing the default arguments, you will need to provide them with every command.
This means that the password may be stored as plain text in various files, such as `touchkio.service`, `~/.bash_history`, etc.
To resolve the issue where the first **touch** on a **turned-off screen** triggers a **click event** (which could inadvertently activate Home Assistant actions), a workaround needed to be implemented.
When the screen **turns off** the **focus** is removed from the kiosk window.
This way, the first click only turns the screen on and focuses the window, allowing subsequent clicks to work as expected.
Additionally, to address the problem that scrolling only works with the **web browser scrollbar** on the right, the application is configured to **simulate a touch device** using `Emulation.setEmitTouchEventsForMouse`.
This adjustment provides a user experience similar to that of a proper mobile device.
Electron apps are known to be **resource intensive** due to their architecture and the inclusion of a full web browser environment. If you just run the kiosk application without other heavy loads, everything should run smoothly.
## Issues
Please have a look into the [hardware](https://github.com/leukipp/touchkio/blob/main/HARDWARE.md) documentation if you ran into any issues.
**Minimal features** are designed to run on any system without issues:
- A webview kiosk window launched in fullscreen mode and loading the specified `--web-url` website should not cause any problems.
**Extended features** become available when the `--mqtt-*` arguments are provided and the hardware is supported:
- Sensor features that may work out-of-the-box include those that do not require any interaction with the display or keyboard.
- If your hardware is not fully compatible there should be no crashes, but you may miss some sensors.
- On some Debian based systems (e.g. Ubuntu), the display status control may only be available when using X11.
**Known Issues** that are by-design or for which there isn't a solution so far:
- You can use Raspberry Pi's build-in screen blanking functionality, however, if the screen is turned on through Home Assistant after being automatically turned off, it will remain on indefinitely.
- It's recommended to either use the built-in screen blanking feature or implement a Home Assistant automation (e.g. presence detection) to manage the screen status.
- When using a Raspberry Pi, the on-screen keyboard doesn't automatically pop-out when entering a text field.
- This [issue](https://github.com/leukipp/touchkio/issues/4) also occurs in the default browser but as a current workaround you can use the side [widget](https://github.com/leukipp/touchkio/issues/16) to toggle the keyboard.
- Hyperlinks that redirect the browser away from the main window are intentionally disabled.
- This decision was made to maintain a clean design, as navigation buttons to move back and forth between different sites were not included.
- On the terminal you may see some *ERROR:gbm_wrapper.cc* messages.
- This appears to be a [known issue](https://github.com/electron/electron/issues/42322) that currently lacks a fix, but the webview still works.
## Credits
Inspired by the one and only Raspberry Pi Master Lord, [Jeff Geerling](https://www.jeffgeerling.com/blog/2024/home-assistant-and-carplay-pi-touch-display-2).
## License
[MIT](https://github.com/leukipp/touchkio/blob/main/LICENSE)