https://github.com/lianjiatech/retrofit-spring-boot-starter
A spring-boot starter for retrofit, supports rapid integration and feature enhancements.(适用于retrofit的spring-boot-starter,支持快速集成和功能增强)
https://github.com/lianjiatech/retrofit-spring-boot-starter
http java okhttp3 retrofit spring-boot
Last synced: 5 months ago
JSON representation
A spring-boot starter for retrofit, supports rapid integration and feature enhancements.(适用于retrofit的spring-boot-starter,支持快速集成和功能增强)
- Host: GitHub
- URL: https://github.com/lianjiatech/retrofit-spring-boot-starter
- Owner: LianjiaTech
- License: apache-2.0
- Created: 2020-04-04T01:44:57.000Z (over 6 years ago)
- Default Branch: master
- Last Pushed: 2025-05-09T10:35:27.000Z (about 1 year ago)
- Last Synced: 2025-05-09T11:51:03.297Z (about 1 year ago)
- Topics: http, java, okhttp3, retrofit, spring-boot
- Language: Java
- Homepage:
- Size: 1.02 MB
- Stars: 1,818
- Watchers: 25
- Forks: 344
- Open Issues: 10
-
Metadata Files:
- Readme: README.md
- License: LICENSE
Awesome Lists containing this project
README
# retrofit-spring-boot-starter
[](https://www.apache.org/licenses/LICENSE-2.0.html)

[](https://docs.oracle.com/javase/8/docs/index.html)
[](https://docs.spring.io/spring-boot/docs/2.1.5.RELEASE/reference/htmlsingle/)
[](https://deepwiki.com/LianjiaTech/retrofit-spring-boot-starter)
[English Document](https://github.com/LianjiaTech/retrofit-spring-boot-starter/blob/master/README_EN.md)
**[retrofit](https://square.github.io/retrofit/)支持将HTTP API转化成JAVA接口,本组件将Retrofit和SpringBoot深度整合,并支持了多种实用功能增强。**
- **Spring Boot 3.x 项目,请使用retrofit-spring-boot-starter 3.x**
- **Spring Boot 1.x/2.x
项目,请使用[retrofit-spring-boot-starter 2.x](https://github.com/LianjiaTech/retrofit-spring-boot-starter/tree/2.x)**
,支持Spring Boot
1.4.2及以上版本。
> 🚀项目持续优化迭代,欢迎大家提ISSUE和PR!麻烦大家能给一颗star⭐️,您的star是我们持续更新的动力!
github项目地址:[https://github.com/LianjiaTech/retrofit-spring-boot-starter](https://github.com/LianjiaTech/retrofit-spring-boot-starter)
gitee项目地址:[https://gitee.com/lianjiatech/retrofit-spring-boot-starter](https://gitee.com/lianjiatech/retrofit-spring-boot-starter)
## 快速开始
### 引入依赖
```xml
com.github.lianjiatech
retrofit-spring-boot-starter
3.2.1
```
对于绝大部分Spring-Boot项目,引入依赖即可使用。如果引入依赖之后,组件无法正常工作,可尝试如下方案解决:
#### 手动自动配置导入
有些场景下RetrofitAutoConfiguration可能无法正常加载执行,可以尝试手动配置导入,代码如下:
```java
@Configuration
@ImportAutoConfiguration({RetrofitAutoConfiguration.class})
public class SpringBootAutoConfigBridge {
}
```
如果项目仍然采用Spring XML配置文件,需要在XML配置文件加上SpringBoot自动配置类。
```xml
```
### 定义HTTP JAVA接口
**接口必须使用`@RetrofitClient`注解标记!**
```java
@RetrofitClient(baseUrl = "http://localhost:8080/api/user/")
public interface UserService {
/**
* 根据id查询用户姓名
*/
@POST("getName")
String getName(@Query("id") Long id);
}
```
> 注意:**方法请求路径慎用`/`开头**。对于`Retrofit`而言,如果`baseUrl=http://localhost:8080/api/test/`,方法请求路径如果是`person`,则该方法完整的请求路径是:`http://localhost:8080/api/test/person`。而方法请求路径如果是`/person`,则该方法完整的请求路径是:`http://localhost:8080/person`。
### 注入使用
**将接口注入到其它Service中即可使用!**
```java
@Service
public class BusinessService {
@Autowired
private UserService userService;
public void doBusiness() {
// call userService
}
}
```
**默认情况下,自动使用`SpringBoot`扫描路径进行`RetrofitClient`注册**,你也可以在配置类加上`@RetrofitScan`手动指定扫描路径。
## HTTP请求相关注解
`HTTP`请求相关注解,全部使用了`Retrofit`原生注解,以下是一个简单说明:
| 注解分类|支持的注解 |
|------------|-----------|
|请求方式|`@GET` `@HEAD` `@POST` `@PUT` `@DELETE` `@OPTIONS` `@HTTP`|
|请求头|`@Header` `@HeaderMap` `@Headers`|
|Query参数|`@Query` `@QueryMap` `@QueryName`|
|path参数|`@Path`|
|form-encoded参数|`@Field` `@FieldMap` `@FormUrlEncoded`|
| 请求体 |`@Body`|
|文件上传|`@Multipart` `@Part` `@PartMap`|
|url参数|`@Url`|
> 详细信息可参考官方文档:[retrofit官方文档](https://square.github.io/retrofit/)
## 功能特性
- [x] [HTTP响应结果自动适配JAVA接口返回类型](#HTTP响应结果自动适配JAVA接口返回类型)
- [x] [自定义数据转换器](#自定义数据转换器)
- [x] [自定义OkHttpClient](#自定义OkHttpClient)
- [x] [日志打印](#日志打印)
- [x] [请求重试](#请求重试)
- [x] [全局应用拦截器](#全局应用拦截器)
- [x] [全局网络拦截器](#全局网络拦截器)
- [x] [注解式url路径匹配拦截器](#注解式url路径匹配拦截器)
- [x] [自定义拦截器注解](#自定义拦截器注解)
- [x] [熔断降级](#熔断降级)
- [x] [错误解码器](#错误解码器)
- [x] [微服务之间的HTTP调用](#微服务之间的HTTP调用)
- [x] [自定义RetrofitClient注解](#自定义RetrofitClient注解)
- [x] [配置属性](#配置属性)
### HTTP响应结果自动适配JAVA接口返回类型
本组件会将HTTP响应结果自动适配成JAVA接口定义的返回类型,目前支持以下几种返回类型:
- `Call`: 不执行适配处理,直接返回`Call`对象
- `String`:将`Response Body`适配成`String`返回。
- 基础类型(`Long`/`Integer`/`Boolean`/`Float`/`Double`):将`Response Body`适配成上述基础类型
- `CompletableFuture`: 将`Response Body`适配成`CompletableFuture`对象返回
- `Void`: 不关注返回类型可以使用`Void`
- `Response`: 将`Response`适配成`Response`对象返回
- `Mono`: `Project Reactor`响应式返回类型
- `Single`:`Rxjava`响应式返回类型(支持`Rxjava2/Rxjava3`)
- `Completable`:`Rxjava`响应式返回类型,`HTTP`请求没有响应体(支持`Rxjava2/Rxjava3`)
- 任意`POJO`类型: 将`Response Body`适配成对应的`POJO`对象返回
#### 适配实现方式
`Retrofit`底层是通过`CallAdapterFactory`将`Call`对象适配成接口方法的返回值类型,本组件扩展了一些`CallAdapterFactory`实现:
- `BodyCallAdapterFactory`
- 同步执行`HTTP`请求,将响应体内容适配成方法的返回值类型。
- 任意方法返回值类型都可以使用`BodyCallAdapterFactory`,优先级最低。
- `ResponseCallAdapterFactory`
- 同步执行`HTTP`请求,将响应体内容适配成`Retrofit.Response`返回。
- 只有方法返回值类型为`Retrofit.Response`,才可以使用`ResponseCallAdapterFactory`。
- 响应式编程相关`CallAdapterFactory`
通过继承`CallAdapter.Factory`,可以实现任何方式的HTTP响应报文到JAVA接口返回类型的适配处理。 组件支持通过`retrofit.global-call-adapter-factories`配置全局调用适配器工厂:
```yaml
retrofit:
# 全局适配器工厂(组件扩展的`CallAdaptorFactory`工厂已经内置,这里请勿重复配置)
global-call-adapter-factories:
# ...
```
针对每个JAVA接口,还可以通过`@RetrofitClient.callAdapterFactories`指定当前接口采用的`CallAdapter.Factory`。
### 自定义数据转换器
`Retrofit`使用`Converter`将`@Body`注解的对象转换成HTTP请求体,将HTTP响应体转换成一个`Java`对象,支持以下几种`Converter`:
- [Gson](https://github.com/google/gson): com.squareup.Retrofit:converter-gson
- [Jackson](https://github.com/FasterXML/jackson): com.squareup.Retrofit:converter-jackson
- [Moshi](https://github.com/square/moshi/): com.squareup.Retrofit:converter-moshi
- [Protobuf](https://developers.google.com/protocol-buffers/): com.squareup.Retrofit:converter-protobuf
- [Wire](https://github.com/square/wire): com.squareup.Retrofit:converter-wire
- [Simple XML](http://simple.sourceforge.net/): com.squareup.Retrofit:converter-simplexml
- [JAXB](https://docs.oracle.com/javase/tutorial/jaxb/intro/index.html): com.squareup.retrofit2:converter-jaxb
- fastJson:com.alibaba.fastjson.support.retrofit.Retrofit2ConverterFactory
组件支持通过`retrofit.global-converter-factories`配置全局`Converter.Factory`,默认的是`retrofit2.converter.jackson.JacksonConverterFactory`。
如果需要修改`Jackson`配置,自行覆盖`JacksonConverterFactory`的`bean`配置即可。
```yaml
retrofit:
# 全局转换器工厂
global-converter-factories:
- com.github.lianjiatech.retrofit.spring.boot.core.BasicTypeConverterFactory
- retrofit2.converter.jackson.JacksonConverterFactory
```
针对每个`Java`接口,还可以通过`@RetrofitClient.converterFactories`指定当前接口采用的`Converter.Factory`。
### 自定义OkHttpClient
对于OkHttpClient超时相关配置,可以通过配置文件或者`@RetrofitClient`设置。但是如果需要修改更灵活复杂的`OkHttpClient`配置,推荐通过自定义`OkHttpClient`来实现,步骤如下:
#### 实现`SourceOkHttpClientRegistrar`接口
```java
@Component
public class CustomOkHttpClientRegistrar implements SourceOkHttpClientRegistrar {
@Override
public void register(SourceOkHttpClientRegistry registry) {
// 注册customOkHttpClient,超时时间设置为1s
registry.register("customOkHttpClient", new OkHttpClient.Builder()
.connectTimeout(Duration.ofSeconds(1))
.writeTimeout(Duration.ofSeconds(1))
.readTimeout(Duration.ofSeconds(1))
.addInterceptor(chain -> chain.proceed(chain.request()))
.build());
}
}
```
#### 通过`@RetrofitClient.sourceOkHttpClient`指定当前接口要使用的`OkHttpClient`
```java
@RetrofitClient(baseUrl = "${test.baseUrl}", sourceOkHttpClient = "customOkHttpClient")
public interface CustomOkHttpUserService {
/**
* 根据id查询用户信息
*/
@GET("getUser")
User getUser(@Query("id") Long id);
}
```
### 日志打印
组件支持支持全局日志打印和声明式日志打印。
#### 全局日志打印
默认情况下,全局日志打印是开启的,默认配置如下:
```yaml
retrofit:
# 全局日志打印配置
global-log:
# 启用日志打印
enable: true
# 全局日志打印级别
log-level: info
# 全局日志打印策略
log-strategy: basic
# 是否聚合打印请求日志
aggregate: true
# 日志名称,默认为{@link LoggingInterceptor} 的全类名
logName: com.github.lianjiatech.retrofit.spring.boot.log.LoggingInterceptor
# 日志中需要隐藏的敏感请求头
redact-headers:
```
四种日志打印策略含义如下:
1. `NONE`:No logs.
2. `BASIC`:Logs request and response lines.
3. `HEADERS`:Logs request and response lines and their respective headers.
4. `BODY`:Logs request and response lines and their respective headers and bodies (if present).
#### 声明式日志打印
如果只需要部分请求才打印日志,可以在相关接口或者方法上使用`@Logging`注解。
#### 日志打印自定义扩展
如果需要修改日志打印行为,可以继承`LoggingInterceptor`,并将其配置成`Spring bean`。
### 请求重试
组件支持支持全局重试和声明式重试。
#### 全局重试
全局重试默认关闭,默认配置项如下:
```yaml
retrofit:
# 全局重试配置
global-retry:
# 是否启用全局重试
enable: false
# 全局重试间隔时间
interval-ms: 100
# 全局最大重试次数
max-retries: 2
# 全局重试规则
retry-rules:
- response_status_not_2xx
- occur_io_exception
```
重试规则支持三种配置:
1. `RESPONSE_STATUS_NOT_2XX`:响应状态码不是`2xx`时执行重试
2. `OCCUR_IO_EXCEPTION`:发生IO异常时执行重试
3. `OCCUR_EXCEPTION`:发生任意异常时执行重试
#### 声明式重试
如果只有一部分请求需要重试,可以在相应的接口或者方法上使用`@Retry`注解。
#### 请求重试自定义扩展
如果需要修改请求重试行为,可以继承`RetryInterceptor`,并将其配置成`Spring bean`。
### 全局应用拦截器
如果我们需要对整个系统的的`HTTP`请求执行统一的拦截处理,可以实现全局拦截器`GlobalInterceptor`, 并配置成`spring Bean`。
```java
@Component
public class MyGlobalInterceptor implements GlobalInterceptor {
@Override
public Response intercept(Chain chain) throws IOException {
Response response = chain.proceed(chain.request());
// response的Header加上global
return response.newBuilder().header("global", "true").build();
}
}
```
### 全局网络拦截器
实现`NetworkInterceptor`接口,并配置成`spring Bean`。
### 注解式url路径匹配拦截器
很多场景下,我们需要仅针对某些HTTP接口做一些特殊逻辑,此时可以使用url路径匹配拦截器,优雅实现该功能,使用的步骤如下:
#### 继承`BasePathMatchInterceptor`编写拦截处理器
```java
@Component
public class PathMatchInterceptor extends BasePathMatchInterceptor {
@Override
protected Response doIntercept(Chain chain) throws IOException {
Response response = chain.proceed(chain.request());
// response的Header加上path.match
return response.newBuilder().header("path.match", "true").build();
}
}
```
#### 接口上使用`@Intercept`进行标注
```java
@RetrofitClient(baseUrl = "${test.baseUrl}")
@Intercept(handler = PathMatchInterceptor.class, include = {"/api/user/**"}, exclude = "/api/user/getUser")
// @Intercept() 如果需要使用多个路径匹配拦截器,继续添加@Intercept即可
public interface InterceptorUserService {
/**
* 根据id查询用户姓名
*/
@POST("getName")
Response getName(@Query("id") Long id);
/**
* 根据id查询用户信息
*/
@GET("getUser")
Response getUser(@Query("id") Long id);
}
```
上面的`@Intercept`配置表示:拦截`InterceptorUserService`接口下`/api/user/**`路径下(排除`/api/user/getUser`)的请求,拦截处理器使用`PathMatchInterceptor`。如果需要使用多个拦截器,在接口上标注多个`@Intercept`注解即可。
### 自定义拦截器注解
有的时候,我们需要在"拦截注解"动态传入一些参数,然后在拦截的时候使用这些参数。 这时候,我们可以使用"自定义拦截注解",步骤如下:
1. 自定义注解。必须使用`@InterceptMark`标记,并且注解中必须包括`include、exclude、handler`字段。
2. 继承`BasePathMatchInterceptor`编写拦截处理器
3. 接口上使用自定义注解
例如,我们需要"在请求头里面动态加入`accessKeyId`、`accessKeySecret`签名信息才能再发起HTTP请求",这时候可以自定义`@Sign`注解来实现。
#### 自定义`@Sign`注解
```java
@Retention(RetentionPolicy.RUNTIME)
@Target(ElementType.TYPE)
@Documented
@InterceptMark
public @interface Sign {
String accessKeyId();
String accessKeySecret();
String[] include() default {"/**"};
String[] exclude() default {};
Class extends BasePathMatchInterceptor> handler() default SignInterceptor.class;
}
```
在`@Sign`注解中指定了使用的拦截器是`SignInterceptor`。
#### 实现`SignInterceptor`
```java
@Component
@Setter
public class SignInterceptor extends BasePathMatchInterceptor {
private String accessKeyId;
private String accessKeySecret;
@Override
public Response doIntercept(Chain chain) throws IOException {
Request request = chain.request();
Request newReq = request.newBuilder()
.addHeader("accessKeyId", accessKeyId)
.addHeader("accessKeySecret", accessKeySecret)
.build();
Response response = chain.proceed(newReq);
return response.newBuilder().addHeader("accessKeyId", accessKeyId)
.addHeader("accessKeySecret", accessKeySecret).build();
}
}
```
> 注意:`accessKeyId`和`accessKeySecret`字段必须提供`setter`方法。
拦截器的`accessKeyId`和`accessKeySecret`字段值会依据`@Sign`注解的`accessKeyId()`和`accessKeySecret()`值自动注入,如果`@Sign`指定的是占位符形式的字符串,则会取配置属性值进行注入。
#### 接口上使用`@Sign`
```java
@RetrofitClient(baseUrl = "${test.baseUrl}")
@Sign(accessKeyId = "${test.accessKeyId}", accessKeySecret = "${test.accessKeySecret}", include = "/api/user/getAll")
public interface InterceptorUserService {
/**
* 查询所有用户信息
*/
@GET("getAll")
Response> getAll();
}
```
### 熔断降级
熔断降级默认关闭,当前支持`sentinel`和`resilience4j`两种实现。
```yaml
retrofit:
# 熔断降级配置
degrade:
# 熔断降级类型。默认none,表示不启用熔断降级
degrade-type: sentinel
```
#### Sentinel
配置`degrade-type=sentinel`开启,然后在相关接口或者方法上声明`@SentinelDegrade`注解即可。
记得手动引入`Sentinel`依赖:
```xml
com.alibaba.csp
sentinel-core
1.6.3
```
此外,还支持全局`Sentinel`熔断降级:
```yaml
retrofit:
# 熔断降级配置
degrade:
# 熔断降级类型。默认none,表示不启用熔断降级
degrade-type: sentinel
# 全局sentinel降级配置
global-sentinel-degrade:
# 是否开启
enable: true
# ...其他sentinel全局配置
```
#### Resilience4j
配置`degrade-type=resilience4j`开启。然后在相关接口或者方法上声明`@Resilience4jDegrade`即可。
记得手动引入`Resilience4j`依赖:
```xml
io.github.resilience4j
resilience4j-circuitbreaker
1.7.1
```
通过以下配置可开启全局resilience4j熔断降级:
```yaml
retrofit:
# 熔断降级配置
degrade:
# 熔断降级类型。默认none,表示不启用熔断降级
degrade-type: resilience4j
# 全局resilience4j降级配置
global-resilience4j-degrade:
# 是否开启
enable: true
# 根据该名称从#{@link CircuitBreakerConfigRegistry}获取CircuitBreakerConfig,作为全局熔断配置
circuit-breaker-config-name: defaultCircuitBreakerConfig
```
熔断配置管理:
实现`CircuitBreakerConfigRegistrar`接口,注册`CircuitBreakerConfig`。
```java
@Component
public class CustomCircuitBreakerConfigRegistrar implements CircuitBreakerConfigRegistrar {
@Override
public void register(CircuitBreakerConfigRegistry registry) {
// 替换默认的CircuitBreakerConfig
registry.register(Constants.DEFAULT_CIRCUIT_BREAKER_CONFIG, CircuitBreakerConfig.ofDefaults());
// 注册其它的CircuitBreakerConfig
registry.register("testCircuitBreakerConfig", CircuitBreakerConfig.custom()
.slidingWindowType(CircuitBreakerConfig.SlidingWindowType.TIME_BASED)
.failureRateThreshold(20)
.minimumNumberOfCalls(5)
.permittedNumberOfCallsInHalfOpenState(5)
.build());
}
}
```
通过`circuitBreakerConfigName`指定`CircuitBreakerConfig`。包括`retrofit.degrade.global-resilience4j-degrade.circuit-breaker-config-name`或者`@Resilience4jDegrade.circuitBreakerConfigName`
#### 扩展熔断降级
如果用户需要使用其他的熔断降级实现,继承`BaseRetrofitDegrade`,并将其配置`Spring Bean`。
#### 配置fallback或者fallbackFactory (可选)
如果`@RetrofitClient`不设置`fallback`或者`fallbackFactory`,当触发熔断时,会直接抛出`RetrofitBlockException`异常。 用户可以通过设置`fallback`或者`fallbackFactory`来定制熔断时的方法返回值。
> 注意:`fallback`类必须是当前接口的实现类,`fallbackFactory`必须是`FallbackFactory`
> 实现类,泛型参数类型为当前接口类型。另外,`fallback`和`fallbackFactory`实例必须配置成`Spring Bean`。
`fallbackFactory`相对于`fallback`,主要差别在于能够感知每次熔断的异常原因(cause),参考示例如下:
```java
@Slf4j
@Service
public class HttpDegradeFallback implements HttpDegradeApi {
@Override
public Result test() {
Result fallback = new Result<>();
fallback.setCode(100)
.setMsg("fallback")
.setBody(1000000);
return fallback;
}
}
```
```java
@Slf4j
@Service
public class HttpDegradeFallbackFactory implements FallbackFactory {
@Override
public HttpDegradeApi create(Throwable cause) {
log.error("触发熔断了! ", cause.getMessage(), cause);
return new HttpDegradeApi() {
@Override
public Result test() {
Result fallback = new Result<>();
fallback.setCode(100)
.setMsg("fallback")
.setBody(1000000);
return fallback;
}
};
}
}
```
### 错误解码器
在`HTTP`发生请求错误(包括发生异常或者响应数据不符合预期)的时候,错误解码器可将`HTTP`相关信息解码到自定义异常中。你可以在`@RetrofitClient`注解的`errorDecoder()`
指定当前接口的错误解码器,自定义错误解码器需要实现`ErrorDecoder`接口。 可以通过配置`retrofit.enable-error-decoder=false`配置关闭ErrorDecoder功能。
### 微服务之间的HTTP调用
#### 继承`ServiceInstanceChooser`
用户可以自行实现`ServiceInstanceChooser`接口,完成服务实例的选取逻辑,并将其配置成`Spring Bean`。对于`Spring Cloud`
应用,可以使用如下实现。
```java
@Service
public class SpringCloudServiceInstanceChooser implements ServiceInstanceChooser {
private LoadBalancerClient loadBalancerClient;
@Autowired
public SpringCloudServiceInstanceChooser(LoadBalancerClient loadBalancerClient) {
this.loadBalancerClient = loadBalancerClient;
}
/**
* Chooses a ServiceInstance URI from the LoadBalancer for the specified service.
*
* @param serviceId The service ID to look up the LoadBalancer.
* @return Return the uri of ServiceInstance
*/
@Override
public URI choose(String serviceId) {
ServiceInstance serviceInstance = loadBalancerClient.choose(serviceId);
Assert.notNull(serviceInstance, "can not found service instance! serviceId=" + serviceId);
return serviceInstance.getUri();
}
}
```
#### 指定`serviceId`和`path`
```java
@RetrofitClient(serviceId = "user", path = "/api/user")
public interface ChooserOkHttpUserService {
/**
* 根据id查询用户信息
*/
@GET("getUser")
User getUser(@Query("id") Long id);
}
```
### 自定义RetrofitClient注解
有些时候,JAVA接口上的`@RetrofitClient`、`@Retry`、`@Logging`、`@Resilience4jDegrade`等注解上的默认值不符合业务需要。 此时一种方式是每个接口都修改对应注解属性,但是会导致很多接口都要做相同的逻辑,不够优雅。 另外一种方式就是自定义RetrofitClient注解,后续其他接口只需要使用自定义注解即可。
比如下面代码定义了自定义注解`@MyRetrofitClient`:
```java
@Retention(RetentionPolicy.RUNTIME)
@Target(ElementType.TYPE)
@Documented
@Inherited
@RetrofitClient(baseUrl = "${test.baseUrl}")
@Logging(logLevel = LogLevel.WARN)
@Retry(intervalMs = 200)
public @interface MyRetrofitClient {
@AliasFor(annotation = RetrofitClient.class, attribute = "converterFactories")
Class extends Converter.Factory>[] converterFactories() default {GsonConverterFactory.class};
@AliasFor(annotation = Logging.class, attribute = "logStrategy")
LogStrategy logStrategy() default LogStrategy.BODY;
}
```
## 配置属性
组件支持了多个可配置的属性,用来应对不同的业务场景。具体可支持的配置属性及默认值如下:
```yaml
retrofit:
# 全局转换器工厂
global-converter-factories:
- com.github.lianjiatech.retrofit.spring.boot.core.BasicTypeConverterFactory
- retrofit2.converter.jackson.JacksonConverterFactory
# 全局日志打印配置
global-log:
# 启用日志打印
enable: true
# 全局日志打印级别
log-level: info
# 全局日志打印策略
log-strategy: basic
# 是否聚合打印请求日志
aggregate: true
# 全局重试配置
global-retry:
# 是否启用全局重试
enable: false
# 全局重试间隔时间
interval-ms: 100
# 全局最大重试次数
max-retries: 2
# 全局重试规则
retry-rules:
- response_status_not_2xx
- occur_io_exception
# 全局超时时间配置
global-timeout:
# 全局读取超时时间
read-timeout-ms: 10000
# 全局写入超时时间
write-timeout-ms: 10000
# 全局连接超时时间
connect-timeout-ms: 10000
# 全局完整调用超时时间
call-timeout-ms: 0
# 全局连接池配置
global-connection-pool:
# 最大空闲连接数
max-idle-connections: 5
keep-alive-duration-ms: 300_000
# 熔断降级配置
degrade:
# 熔断降级类型。默认none,表示不启用熔断降级
degrade-type: none
# 全局sentinel降级配置
global-sentinel-degrade:
# 是否开启
enable: false
# 各降级策略对应的阈值。平均响应时间(ms),异常比例(0-1),异常数量(1-N)
count: 1000
# 熔断时长,单位为 s
time-window: 5
# 降级策略(0:平均响应时间;1:异常比例;2:异常数量)
grade: 0
# 全局resilience4j降级配置
global-resilience4j-degrade:
# 是否开启
enable: false
# 根据该名称从#{@link CircuitBreakerConfigRegistry}获取CircuitBreakerConfig,作为全局熔断配置
circuit-breaker-config-name: defaultCircuitBreakerConfig
# 自动设置PathMathInterceptor的scope为prototype
auto-set-prototype-scope-for-path-math-interceptor: true
# 是否开启ErrorDecoder功能
enable-error-decoder: true
```
绝大部分场景下,在Spring Boot配置文件(application.yml或者application.properties)中加上上述配置,即可自定义修改组件功能。
**如果Spring Boot配置文件无法生效,可以手动配置RetrofitProperties Bean**,代码如下:
```java
@Bean
public RetrofitProperties retrofitProperties() {
RetrofitProperties retrofitProperties = new RetrofitProperties();
// 手动修改retrofitProperties各项配置值
return retrofitProperties;
}
```
## 其他功能示例
### form参数
```java
@FormUrlEncoded
@POST("token/verify")
Object tokenVerify(@Field("source") String source,@Field("signature") String signature,@Field("token") String token);
@FormUrlEncoded
@POST("message")
CompletableFuture sendMessage(@FieldMap Map param);
```
### 文件上传
#### 创建MultipartBody.Part
```java
// 对文件名使用URLEncoder进行编码
public ResponseEntity importTerminology(MultipartFile file){
String fileName=URLEncoder.encode(Objects.requireNonNull(file.getOriginalFilename()),"utf-8");
okhttp3.RequestBody requestBody=okhttp3.RequestBody.create(MediaType.parse("multipart/form-data"),file.getBytes());
MultipartBody.Part part=MultipartBody.Part.createFormData("file",fileName,requestBody);
apiService.upload(part);
return ok().build();
}
```
#### `HTTP`上传接口
```java
@POST("upload")
@Multipart
Void upload(@Part MultipartBody.Part file);
```
### 文件下载
#### `HTTP`下载接口
```java
@RetrofitClient(baseUrl = "https://img.ljcdn.com/hc-picture/")
public interface DownloadApi {
@GET("{fileKey}")
Response download(@Path("fileKey") String fileKey);
}
```
#### `HTTP`下载使用
```java
@SpringBootTest(classes = {RetrofitBootApplication.class})
@RunWith(SpringRunner.class)
public class DownloadTest {
@Autowired
DownloadApi downLoadApi;
@Test
public void download() throws Exception {
String fileKey = "6302d742-ebc8-4649-95cf-62ccf57a1add";
Response response = downLoadApi.download(fileKey);
ResponseBody responseBody = response.body();
// 二进制流
InputStream is = responseBody.byteStream();
// 具体如何处理二进制流,由业务自行控制。这里以写入文件为例
File tempDirectory = new File("temp");
if (!tempDirectory.exists()) {
tempDirectory.mkdir();
}
File file = new File(tempDirectory, UUID.randomUUID().toString());
if (!file.exists()) {
file.createNewFile();
}
FileOutputStream fos = new FileOutputStream(file);
byte[] b = new byte[1024];
int length;
while ((length = is.read(b)) > 0) {
fos.write(b, 0, length);
}
is.close();
fos.close();
}
}
```
### 动态URL
使用`@url`注解可实现动态URL。此时,`baseUrl`配置任意合法url即可。例如: `http://github.com/` 。运行时只会根据`@Url`地址发起请求。
> 注意:`@url`必须放在方法参数的第一个位置,另外,`@GET`、`@POST`等注解上,不需要定义端点路径。
```java
@GET
Map test3(@Url String url,@Query("name") String name);
```
### `DELETE`请求添加请求体
```java
@HTTP(method = "DELETE", path = "/user/delete", hasBody = true)
```
### `GET`请求添加请求体
`okhttp3`自身不支持`GET`请求添加请求体,源码如下:
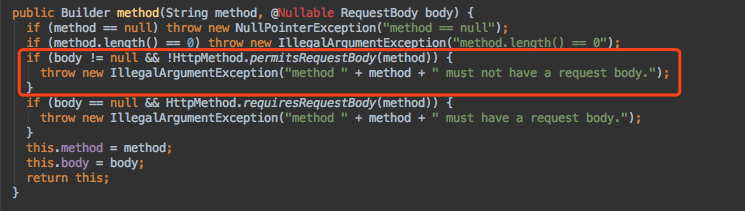

作者给出了具体原因,可以参考: [issue](https://github.com/square/okhttp/issues/3154)
但是,如果实在需要这么做,可以使用:`@HTTP(method = "get", path = "/user/get", hasBody = true)`,使用小写`get`绕过上述限制。
## 反馈建议
如有任何问题,欢迎提issue或者加QQ群反馈。
群号:806714302
