https://github.com/lm2343635/shapeview
A customized shape view with shadow and transparent background supported.
https://github.com/lm2343635/shapeview
customized-shape cut-layer ios ios-lib mask shadow shadowview shape-layer swift transparent-view uiview
Last synced: about 1 year ago
JSON representation
A customized shape view with shadow and transparent background supported.
- Host: GitHub
- URL: https://github.com/lm2343635/shapeview
- Owner: lm2343635
- License: mit
- Created: 2018-11-28T06:00:23.000Z (over 7 years ago)
- Default Branch: master
- Last Pushed: 2023-08-25T12:55:30.000Z (almost 3 years ago)
- Last Synced: 2025-05-13T21:43:55.589Z (about 1 year ago)
- Topics: customized-shape, cut-layer, ios, ios-lib, mask, shadow, shadowview, shape-layer, swift, transparent-view, uiview
- Language: Swift
- Homepage: https://cocoapods.org/pods/ShapeView
- Size: 738 KB
- Stars: 99
- Watchers: 2
- Forks: 14
- Open Issues: 2
-
Metadata Files:
- Readme: README.md
- License: LICENSE
Awesome Lists containing this project
README
# ShapeView [](https://travis-ci.org/lm2343635/ShapeView) [](https://cocoapods.org/pods/ShapeView) [](https://cocoapods.org/pods/ShapeView) [](https://cocoapods.org/pods/ShapeView)
ShapeView support to create a view with the customized shape, shadow and transparent background at the same time.
## Installation
ShapeView is available through [CocoaPods](https://cocoapods.org).
To install it, simply add the following line to your Podfile:
```ruby
pod 'ShapeView'
```
### Using ShapeView
ShapeView supports the following attributes.
- `path: ShapePath?`
- `outerShadow: ShapeShadow`
- `innerShadow: ShapeShadow`
- `effect: UIVisualEffect?`
- `effectAlpha: CGFloat`
- `backgroundColor: UIColor?`
To create a customized shape, use `.custom` to draw the shape as the following.
```Swift
view.path = .custom { [unowned view] in
let labelHeight = view.frame.height - Const.height
let radius = labelHeight / 2
$0.move(to: CGPoint(x: radius, y: 0))
$0.addArc(
withCenter: CGPoint(x: view.frame.width - radius, y: radius),
radius: radius,
startAngle: -.pi / 2,
endAngle: .pi / 2,
clockwise: true
)
$0.addLine(to: CGPoint(x: Const.left + Const.height, y: labelHeight))
$0.addLine(to: CGPoint(x: Const.left + Const.height / 2, y: view.frame.height))
$0.addLine(to: CGPoint(x: Const.left, y: labelHeight))
$0.addArc(
withCenter: CGPoint(x: radius, y: radius),
radius: radius,
startAngle: .pi / 2,
endAngle: -.pi / 2,
clockwise: true
)
}
```
### Using prepared shapes
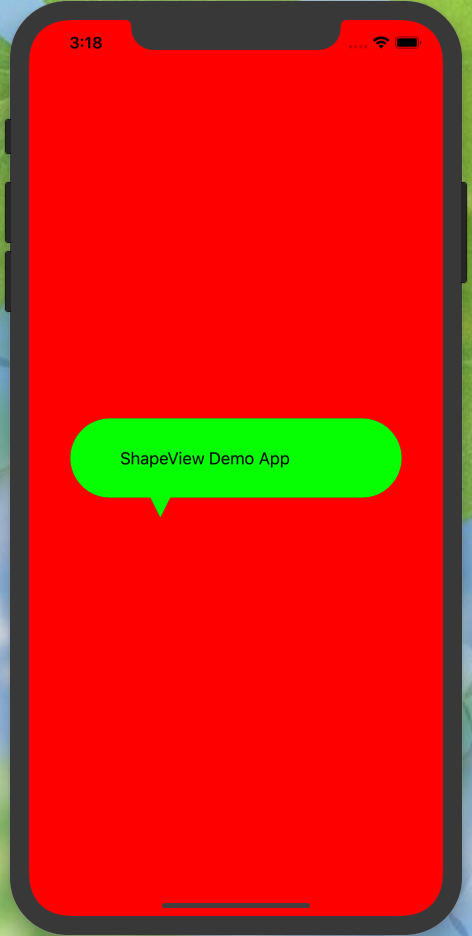
In the demo app, a dialog view is created with the code above.
The following shapes are prepared.
```Swift
corner(radius: CGFloat, bounds: @escaping GetBounds)
dialog(radius: CGFloat, arrowPosition: DialogArrowPosition, bounds: @escaping GetBounds)
cuteDialog(radius: CGFloat, arrowPosition: CuteDialogArrowPosition, bounds: @escaping GetBounds)
star(vertex: Int, extrusion: CGFloat = 10, bounds: GetBounds)
```
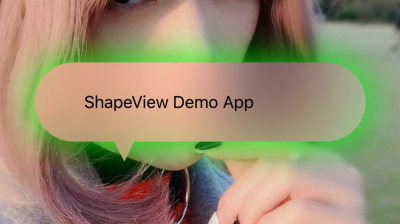
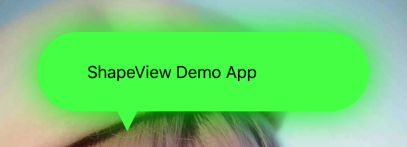
Here is a demo to create a dialog view.
```Swift
view.path = .dialog(radius: 10, arrowPosition: .right(center: 50, width: 40, height: 20)) { [unowned self] in
return self.bounds
}
view.outerShadow = ShapeShadow(
radius: 10,
color: .green,
opacity: 1,
offset: .zero
)
```
### Multiple shapes
ShapeView supports to add multiple shapes with `.multiple()` as the following.
```swift
view.path = .multiple(
.hollowCorner(radius: 12, outlineWidth: 2) { [unowned view] in
view.bounds
},
.star(vertex: 5, extrusion: 20) { [unowned view] in
view.bounds
},
.custom { [unowned view] in
// Add a custom shape here.
}
)
```
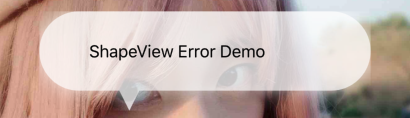
Run the demp application to find more.
### Using ShapeLayer
We provide `ShapeLayer` for developers to apply it to your customized view directly.
- `layerPath: ShapePath?`
- `var outerShadow: ShapeShadow?`
- `var innerShadow: ShapeShadow?`
- `effect: UIVisualEffect?`
- `effectAlpha: CGFloat`
- `var didUpdateLayer: ((CAShapeLayer) -> Void)?`
- `var backgroundColor: CGColor?`
When the shape layer finish drawing the layer, it calls the `didUpdateLayer` cloure to notify the parent view.
Developers can update the parent view with the first parameter in this closure.
## About the Implementation
**This part introduces how we implement the ShapeView, skip it if you are not interested.**
### Necessity to implement by ourselves
It is hard to create a customized shape with shadow and transparent background for UIView using the SDK provided by Apple.
We have tried to and shadow into the customized shape layer directly with the following code.
```Swift
let shapeLayer = CAShapeLayer()
shapeLayer.path = shapePath.cgPath
shapeLayer.shadow = UIColor.green.cgColor
shapeLayer.shadowRadius = 10
shapeLayer.shadowOffset = .zero
shapeLayer.shadowOpacity = 1
ShapeShadow(
radius: 10,
color: .green,
opacity: 1,
offset: .zero
)
layer.masksToBounds = true
```
- Using a mask
```Swift
layer.mask = shapeLayer
```
- Adding a sublayer
```Swift
layer.addSublayer(shapeLayer)
```
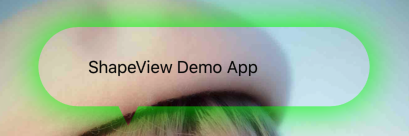
Using a mask or adding a sublayer cannot implement the effect shown in our demo screenshoot.
### Structure
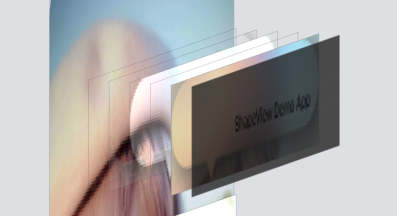
In the ShapeLayer, we add a shadow layer for the shape and effect, and a container view for storing subviews..
If the developer add subview to the ShapeView by the method ```addSubview(_ view:)```, we move it to the container view.
### Creating a hollow mask layer
To solve the problems, we need to creare a hollow mask layer by ourselves.
Firstly, we create a shadow layer, and insert it to the ```shapeLayerView```.
```Swift
let shadowLayer = CAShapeLayer()
shadowLayer.path = shapePath.cgPath
if shadowRadius > 0 && shadowColor != .clear {
shadowLayer.shadowRadius = shadowRadius
shadowLayer.shadowColor = shadowColor.cgColor
shadowLayer.shadowOpacity = shadowOpacity
shadowLayer.shadowOffset = shaowOffset
shadowLayer.fillColor = shadowColor.cgColor
}
shadowLayerView.layer.sublayers?.forEach { $0.removeFromSuperlayer() }
shadowLayerView.layer.insertSublayer(shadowLayer, at: 0)
```
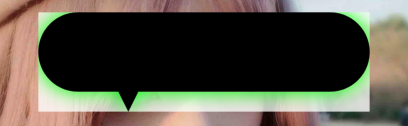
The shadow layer created by ```CAShapeLayer``` is a solid layer.
We need to make a cut layer shown as the red area in the following screenshoot, as a mask layer to create a hollow mask layer.
```Swift
let cutLayer = CAShapeLayer()
cutLayer.path = { () -> UIBezierPath in
let path = UIBezierPath()
path.append(shapePath)
path.append(screenPath)
path.usesEvenOddFillRule = true
return path
}().cgPath
cutLayer.fillRule = .evenOdd
```
The range of the cut layer is outside of the shape's border and inside of the screen's border.
After creating the cut layer, we set it as the mask of the shadow layer view.
```Swift
shadowLayerView.layer.mask = cutLayer
```
By setting the cut layer for the shadow layer view, we get a hollow shape view with a shadow as the following picture.
Next, we create a container view above the shadow view, and use the same shape path to create a shape layer as the mask of this container view.
```Swift
let shapeLayer = CAShapeLayer()
shapeLayer.path = shapePath.cgPath
containerView.layer.mask = shapeLayer
```
The introduction above shows how to create a outer shadow, the method to create a inner shadow is same as the outer shadow.
At last, we get a customized shape view with the transparent background and shadow as shown in the demo screenshot.
## Author
lm2343635, lm2343635@126.com
## License
ShapeView is available under the MIT license. See the LICENSE file for more info.