https://github.com/m-shahbaz-kharal/opencv-help
Tutorials for working with OpenCV
https://github.com/m-shahbaz-kharal/opencv-help
Last synced: about 2 months ago
JSON representation
Tutorials for working with OpenCV
- Host: GitHub
- URL: https://github.com/m-shahbaz-kharal/opencv-help
- Owner: m-shahbaz-kharal
- Created: 2020-01-07T17:57:49.000Z (over 5 years ago)
- Default Branch: master
- Last Pushed: 2020-01-07T19:33:10.000Z (over 5 years ago)
- Last Synced: 2025-02-13T14:53:46.574Z (4 months ago)
- Size: 17.6 KB
- Stars: 0
- Watchers: 2
- Forks: 0
- Open Issues: 0
-
Metadata Files:
- Readme: README.md
Awesome Lists containing this project
README
# OpenCV-Help
Tutorials for working with OpenCV
# 1 - Compiling OpenCV with Contrib for Windows
* Download sources for OpenCV 4.1.1 and the OpenCV Contrib 4.1.1 Module. (link: https://github.com/opencv)
* Download and Install CMake (I used 3.16.2)
* Download and Install MinGW (I used mingw-get version 0.6.3 to install mingw).
* After installation open “MinGW Installation Manager” from Start Menu and install Basic->minw32-base-bin. Apply Changes. (it’ll be used by VS 16 2019 for CMake, make sure to add “C:\MinGW\bin\” directory to system environment variables).
* Now you are ready for compilations. Make any changes to OpenCV sources as required.
* Open a CMD or Windows PowerShell in directory containing OpenCV and OpenCV Contrib folders.
* Type “cmake-gui.exe” hit enter.
* In “where is the source code” select the directory “opencv/sources”
* In “where to build binaries” select any location where the final build files will be.
* Press Configure.
* Select “Visual Studio 16 2019” as generator.
* Click finish.
* There will be an error about “python 2.7”, ignore that. Augmented Reality Project doesn’t need OpenCV python build.
* Keep an active internet connection during configuration process as I’ve noticed that it downloads a few files also.
* Once done. Search for “OPENCV_EXTRA_MODULES_PATH”. Set value to “opencv_contrib/modules” path. (this will add the opencv_contrib sources to CMake configurations.
* Uncheck “BUILD_opencv_python3”.
* Add entry OpenCV_RUNTIME (STRING = vc15)
* You can also add some extra features here like build for cuda etc. (not tested though)
* Press Configure again and once done, press Generate.
* Once done. Navigate to your build directory (in your CMD or PowerShell).
* Type “cmake.exe --build . --config Debug --target INSTALL” and press enter. Now wait as this is going to take about half an hour.
* Done. :D
# 2 - Computing Calibration Matrix for Android Phone Camera easily.
* Download an android app called Vizario.cam (link: https://play.google.com/store/apps/details?id=io.ar4.vizarcam&hl=en)
* Open it.
* Select Camera for which you want to compute calibration.
* Select a resolution in which you will be working after calibration.
* Select calibration target (easiest is to use a checker board)
* Print a checker board on a page and stick it some flat surface. Corners count are like following.
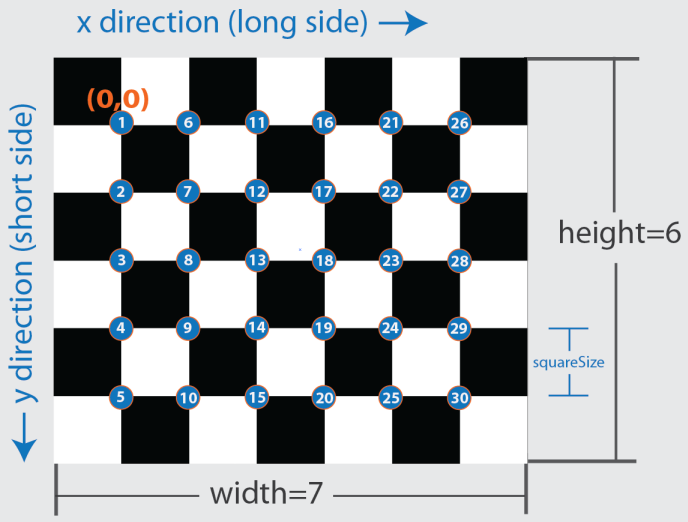
*Image By MathWorks*
* The above image has 5 vertical and 6 horizontal corners.
* Set fixed principle point to YES.
* Select number of images you want to use for calibraion.
* Press Calibrate button at the bottom and move your camera around to capture imaages of the checker-board from different angles/orientations and positions.
* Once done it will get you to the results page.
* Download [this XML file](calibration_template.xml).
* Open in some editor.
* Now type values from "Vizario.Cam" results page to XML file.
* Copy K values (results page of app) to CameraMatrixValues tags. (each ArrayOfDouble in XML is a row in K matrix of result page)
* Copy Distortion values to XML DistCoeffsValues.
* Copy Error value to ReprojectionErrors tag.
* Copy Resolution values to ImageHeights and Image Widths tags.
* Save the XML file.
* You can now use this XML file as calibration file for your OpenCV project.
* :D