https://github.com/mahmud0808/nexutalk
Realtime chatting platform built with Next.js 14, React, Tailwind CSS, Prisma, MongoDB, NextAuth and Pusher.
https://github.com/mahmud0808/nexutalk
mongodb next-auth nextjs14 prisma pusher react shadcn-ui tailwind-css zod-validation
Last synced: 3 months ago
JSON representation
Realtime chatting platform built with Next.js 14, React, Tailwind CSS, Prisma, MongoDB, NextAuth and Pusher.
- Host: GitHub
- URL: https://github.com/mahmud0808/nexutalk
- Owner: Mahmud0808
- Created: 2024-07-30T18:43:28.000Z (almost 2 years ago)
- Default Branch: master
- Last Pushed: 2026-03-21T13:50:38.000Z (3 months ago)
- Last Synced: 2026-03-22T04:16:14.295Z (3 months ago)
- Topics: mongodb, next-auth, nextjs14, prisma, pusher, react, shadcn-ui, tailwind-css, zod-validation
- Language: TypeScript
- Homepage: https://nexutalk.vercel.app
- Size: 1.2 MB
- Stars: 1
- Watchers: 1
- Forks: 1
- Open Issues: 1
-
Metadata Files:
- Readme: README.md
Awesome Lists containing this project
README
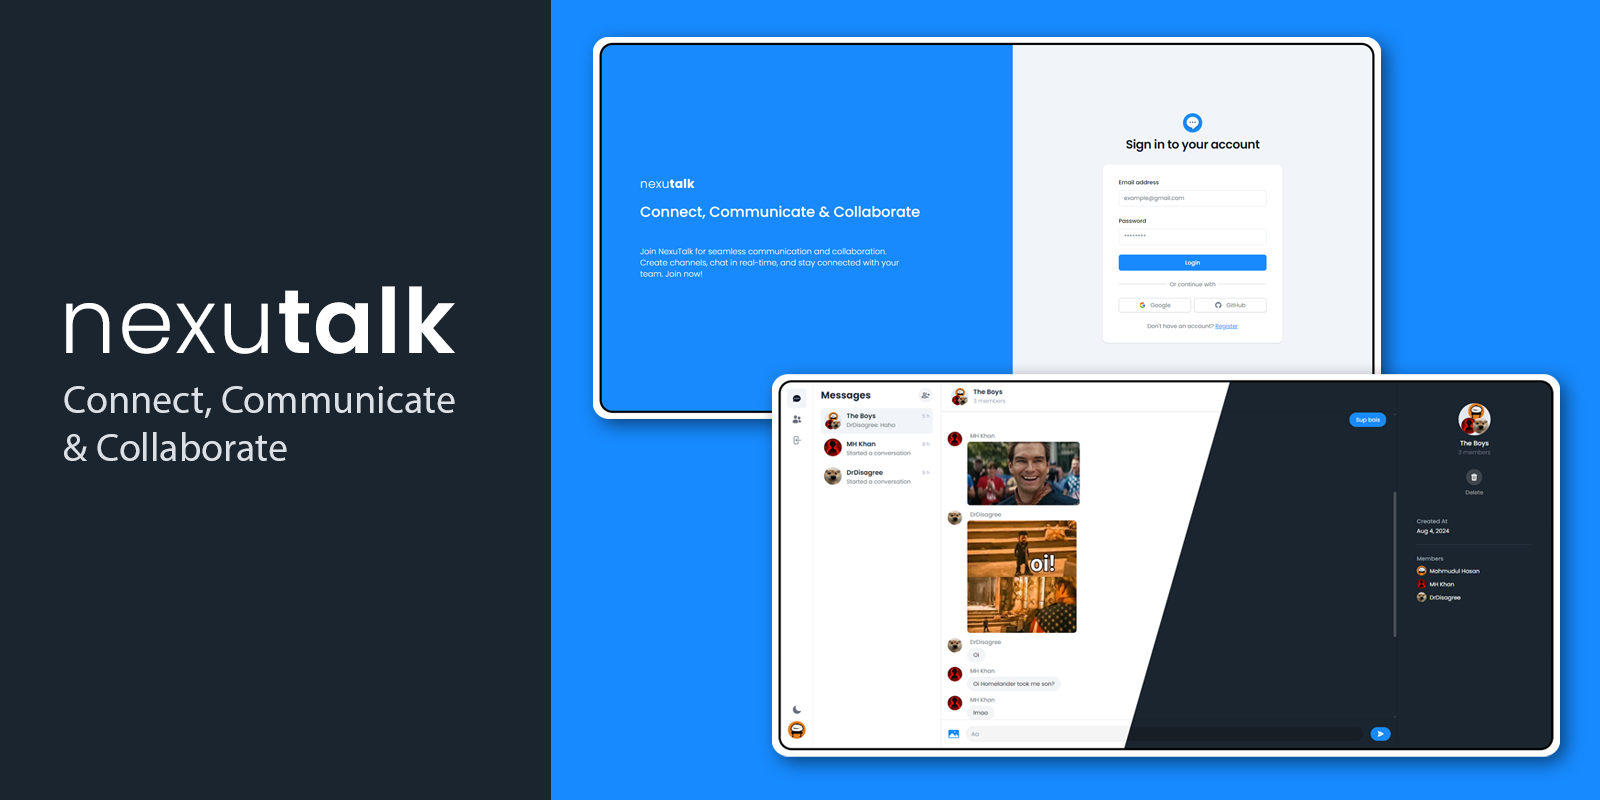


  NexuTalk


     NexuTalk is a real-time chatting platform built with cutting-edge technologies, offering seamless communication with a modern UI. It supports features such as group conversations, single conversations, online status, responsive design for various devices, image sharing, and dark/light mode.


  ➥ Visit NexuTalk App


## ✨ Features

- **Real-time Messaging:** Instant messaging with real-time updates.

- **Group Conversations:** Create and manage group chats.

- **Single Conversations:** One-on-one messaging.

- **Online Status:** See who's online.

- **Responsive Design:** Optimized for mobile, tablet, and desktop views.

- **Image Sharing:** Share images within conversations.

- **Dark/Light Mode:** Switch between dark and light themes.

- and many more, including code architecture and reusability.

## ⚙️ Tech Stack

- **Frontend:** Next.js 14, React, Tailwind CSS, Shadcn

- **Backend:** Next.js, Prisma, MongoDB, Pusher

- **Authentication:** NextAuth

- **Validation:** Zod

- **Image Upload:** Cloudinary

## 🚀 Quick Start

Follow these steps to set up the project locally on your machine.

### Prerequisites

Make sure you have the following installed on your machine:

- [Git](https://git-scm.com/)

- [Node.js](https://nodejs.org/en)

- [npm](https://www.npmjs.com/) (Node Package Manager)

### Cloning the Repository

```bash

git clone https://github.com/Mahmud0808/NexuTalk.git

cd NexuTalk

```

### Installation

Install the project dependencies using npm:

```bash

npm install

```

### Set Up Environment Variables

Create a new file named `.env` in the root of your project and add the following content:

```env

DATABASE_URL=

GOOGLE_CLIENT_ID=

GOOGLE_CLIENT_SECRET=

GITHUB_ID=

GITHUB_SECRET=

NEXTAUTH_URL="http://localhost:3000/"

NEXTAUTH_SECRET=

NEXTAUTH_JWT_SECRET=

NEXT_PUBLIC_CLOUDINARY_CLOUD_NAME=

PUSHER_APP_ID=

NEXT_PUBLIC_PUSHER_APP_KEY=

PUSHER_SECRET=

NEXT_PUBLIC_PUSHER_CLUSTER=

```

Replace the placeholder values with your actual credentials. You can obtain these credentials by signing up for the corresponding websites on [MongoDB](https://www.mongodb.com/), [Google Cloud Console](https://console.cloud.google.com/), [GitHub](https://github.com/), [Cloudinary](https://cloudinary.com/), and [Pusher](https://pusher.com/).

#### Google Cloud Console secrets:

- Go to Google Cloud Console > Create new project > Select the project > Search for APIs & Services > OAuth consent screen > Make sure to select External User Type > Continue, add app domain, authorized domain and developer contact information.

- Then go to Credentials > Create Credentials > OAuth client ID:

  - Application type: Web application

  - Add your site home page URL without any forward slash `/` at the end in Authorized JavaScript origins field, skip this if you are not deploying your site and using it in localhost. e.g: `https://nexutalk.vercel.app`

  - Add your site URL in this format `{site_url}/api/auth/callback/google`. e.g: `http://localhost:3000/api/auth/callback/google`

#### GitHub secrets:

- Go to GitHub > Settings > Developer settings > OAuth Apps > New OAuth App:

  - Add your site URL in Homepage URL and Authorized callback URL fields.

#### Cloudinary secrets:

- Go to Cloudinary > Settings > Upload > Add upload preset:

  - Signing Mode: Unsigned

  - Copy the name and use it in environment variables.

#### Pusher secrets:

- Go to Pusher > Channels:

  - Front end: React


  - Back end: Node.js

  - Get the environment variables from App Keys page.

### Setting up Database

Run the following commands in terminal:

```bash

npx prisma db push

npx prisma generate

```

### Running the Project

```bash

npm run dev

```

Open [http://localhost:3000](http://localhost:3000) in your browser to view the project.

## 🤝 Contributing

Contributions are welcome! Here's how you can contribute:

- Fork the repository.

- Create your feature branch (`git checkout -b feature/AmazingFeature`).

- Commit your changes (`git commit -m 'Add some AmazingFeature'`).

- Push to the branch (`git push origin feature/AmazingFeature`).

- Open a pull request.

## 📬 Contact

Wanna reach out to me? DM me at 👇

Email: mahmudul15-13791@diu.edu.bd