https://github.com/malith-rukshan/auto-reaction-bot
A Telegram Bot that automatically reacts to posts in Telegram Channels, groups, and private messages, developed as a server-less application.✨
https://github.com/malith-rukshan/auto-reaction-bot
auto-reactions cloudflare-workers serverless telegram-bot telegram-bot-api vercel
Last synced: 2 months ago
JSON representation
A Telegram Bot that automatically reacts to posts in Telegram Channels, groups, and private messages, developed as a server-less application.✨
- Host: GitHub
- URL: https://github.com/malith-rukshan/auto-reaction-bot
- Owner: Malith-Rukshan
- License: mit
- Created: 2024-04-17T05:40:46.000Z (about 1 year ago)
- Default Branch: main
- Last Pushed: 2024-10-23T12:45:18.000Z (8 months ago)
- Last Synced: 2025-03-28T16:04:03.261Z (2 months ago)
- Topics: auto-reactions, cloudflare-workers, serverless, telegram-bot, telegram-bot-api, vercel
- Language: JavaScript
- Homepage: https://t.me/Auto_ReactionBOT
- Size: 6.21 MB
- Stars: 70
- Watchers: 3
- Forks: 166
- Open Issues: 1
-
Metadata Files:
- Readme: README.md
- License: LICENSE
Awesome Lists containing this project
README

❤️ Auto Reaction Bot ✨
✨ Automate Your Telegram Chats with this Auto Reaction Bot! React to Messages Effortlessly! 🚀
##

## ✨ Features
- Automatic Reactions ✓
- Supports Multiple Chats ✓
- Customizable Reactions ✓
- Efficient Real-Time Processing ✓
- Serverless Architecture ✓
- Supports for Groups & Channels ✓
- Compliance with Telegram API Updates ✓
- Lightweight Code - Easy Setup ✓
- More Comming Soon...
## 🚀 Deploy on PasS
Set All Environmental variables before deploy. - [Instructions](#-configuring-environments)
[](https://heroku.com/deploy)
[](https://app.netlify.com/start/deploy?repository=https://github.com/Malith-Rukshan/Auto-Reaction-Bot)
[](https://railway.app/template/xAf8hY?referralCode=jC4ZQ_)
[](https://render.com/deploy)
### ✅ Serverless - Free
[](https://vercel.com/new/clone?repository-url=https://github.com/Malith-Rukshan/Auto-Reaction-Bot)
[](https://deploy.workers.cloudflare.com/?url=https://github.com/Malith-Rukshan/Auto-Reaction-Bot)
## 🚀 Deploy with Workers
Deploying this Telegram Auto-Reaction Bot on Cloudflare is straightforward thanks to the Deploy to Cloudflare button. Follow the steps below to get started:
1. **Start the Deployment**:
- Click the "Deploy to Cloudflare Workers" button below.
- [](https://deploy.workers.cloudflare.com/?url=https://github.com/Malith-Rukshan/Auto-Reaction-Bot)
2. **Set up your Cloudflare account**:
- If you do not already have a Cloudflare account, you will be prompted to create one.
- Follow the on-screen instructions to set up your new Worker.
3. **Configure and Deploy**:
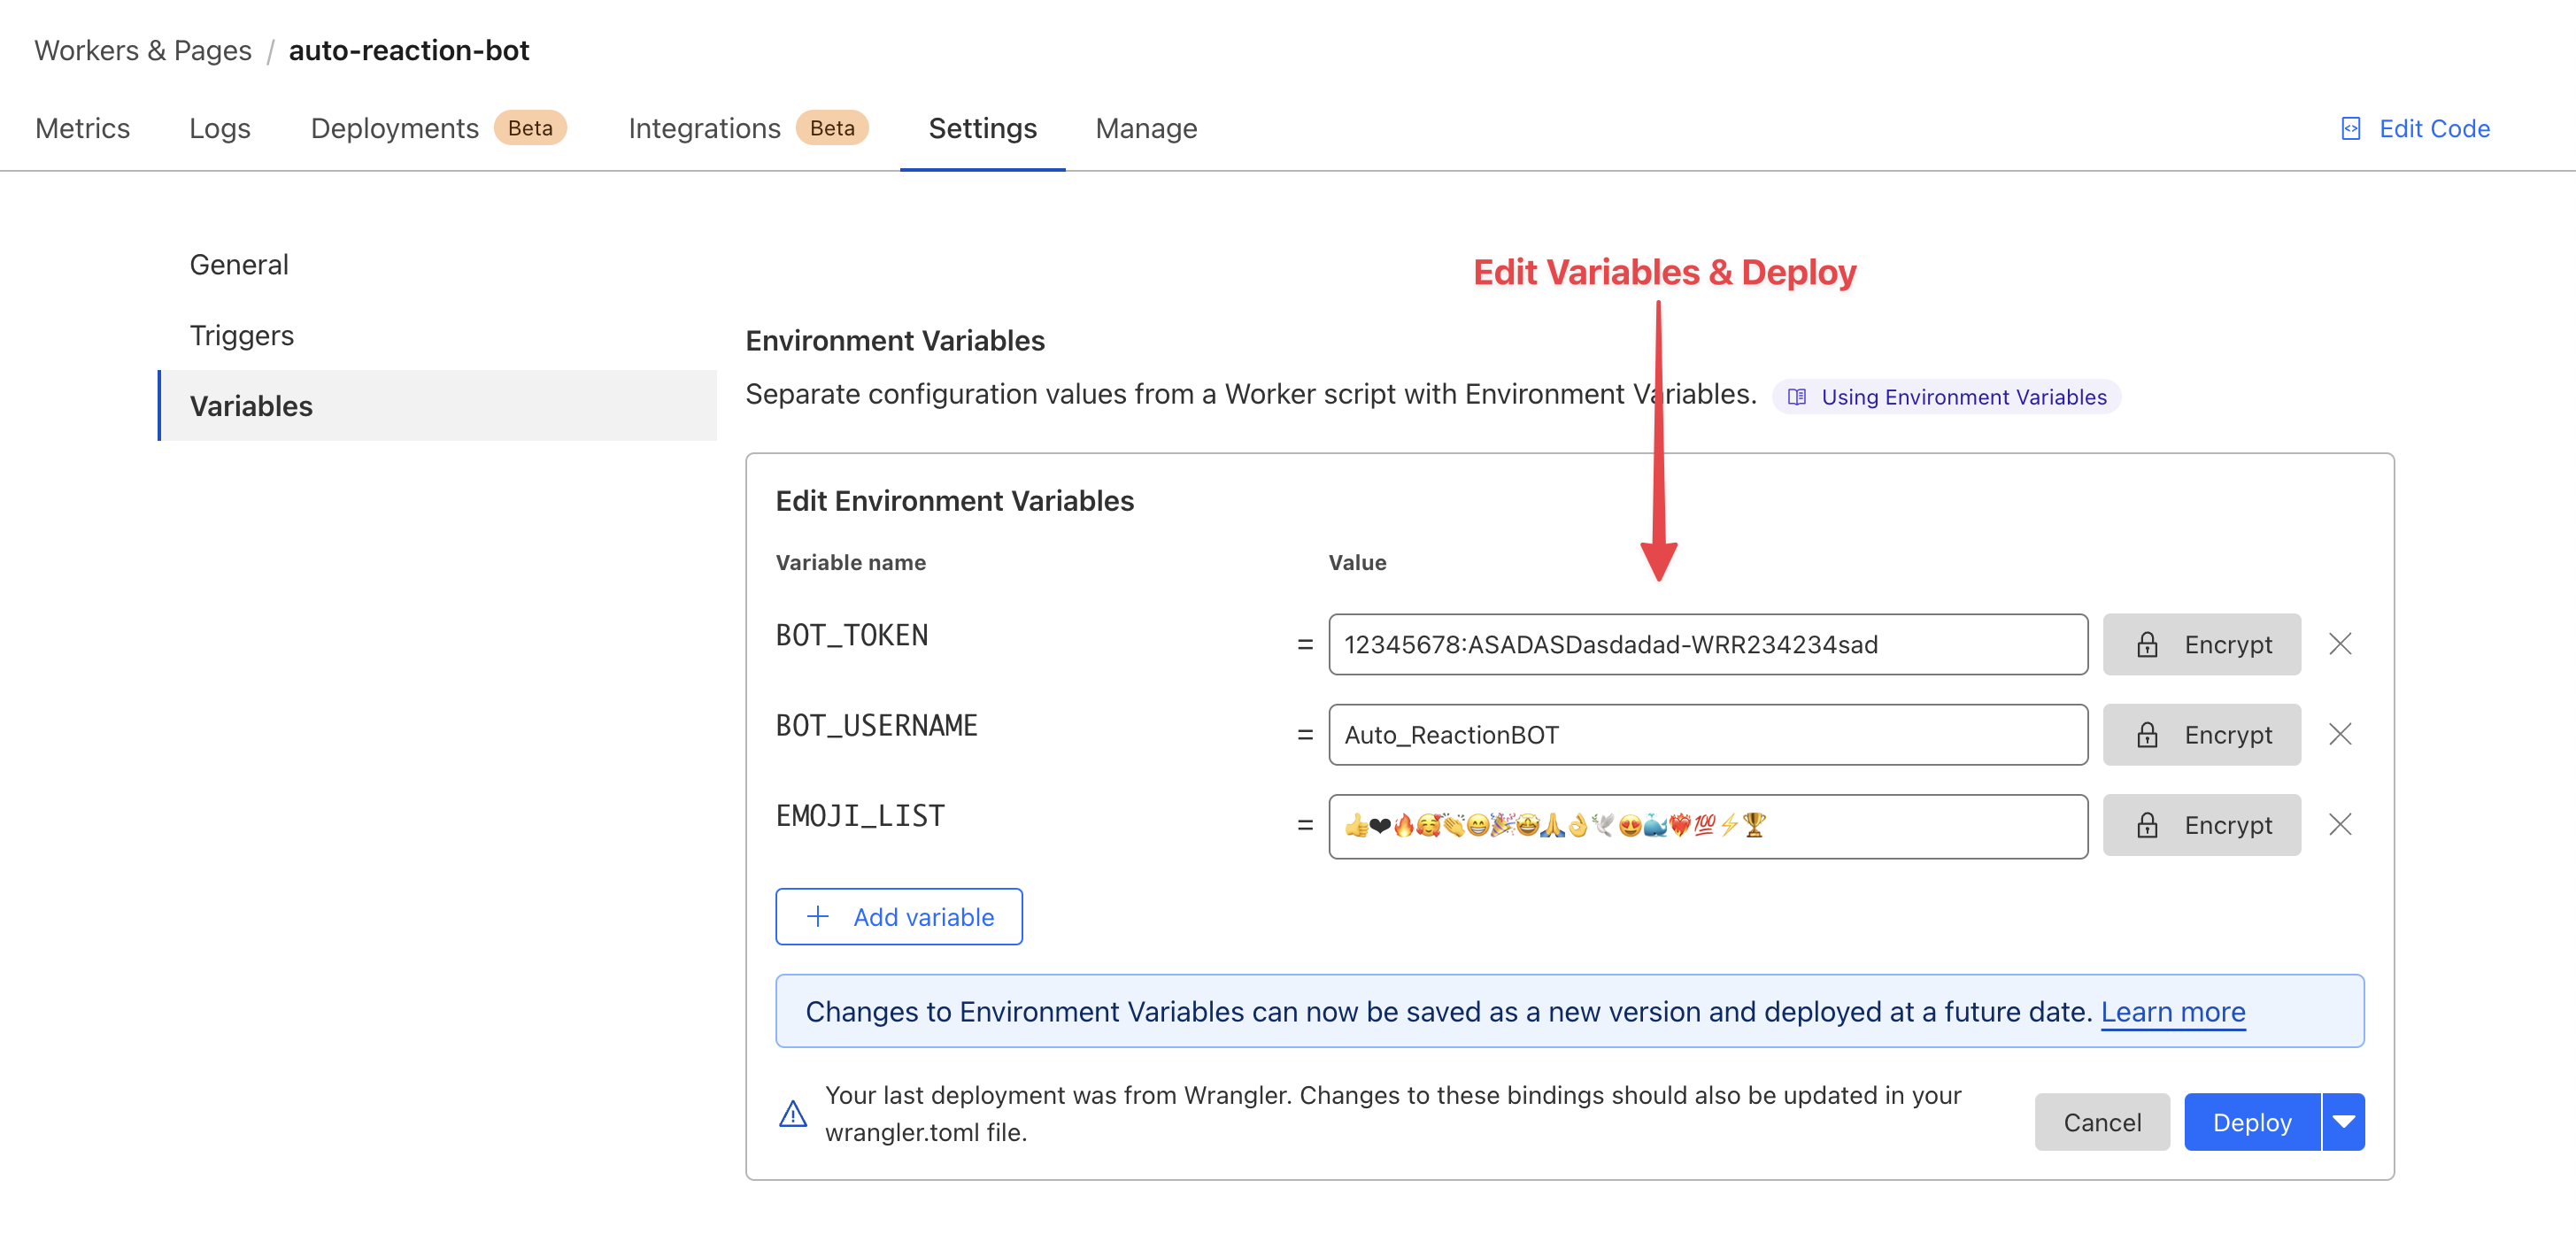
- Once logged in, authorize the deployment and configure the Worker with the environment variables described below.
- Review and adjust the Worker’s settings as needed before finalizing the deployment.
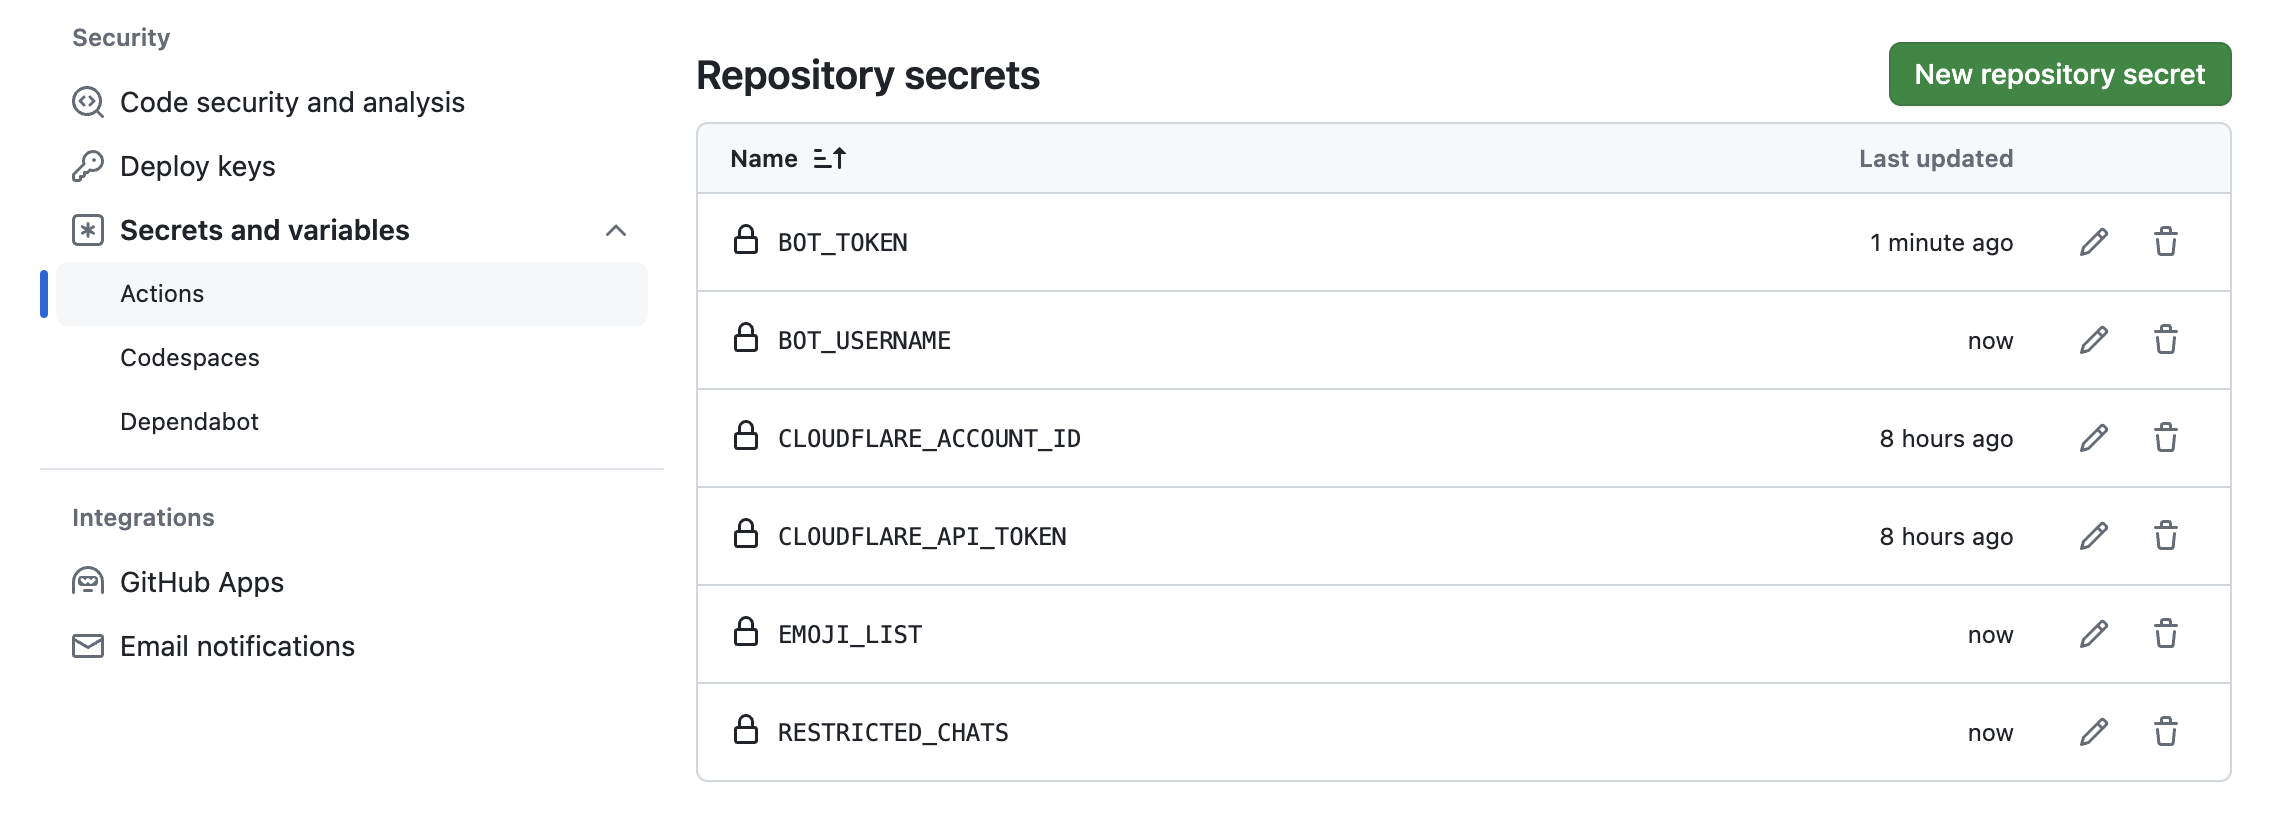
- You must add Repository secrets according to instructions before deployment.
- After Deploy you must [Configure the Webhook](#-configure-the-webhook)
Cloudflare Worker Settings
✅ **Demo**: Experience the Auto Reaction Bot in demo: [Auto Reaction Bot ✨](https://t.me/Auto_ReactionBOT).
## 🚀 Deploy with Github Actions
First you must Add Repository secrets as follows
Add Repository secrets
After that [Click Here](https://github.com/Malith-Rukshan/Auto-Reaction-Bot/actions/workflows/deploy.yml) to Run Action.
## 🛠 Configuring Environments
To ensure that your Telegram Auto-Reaction Bot operates correctly, you will need to configure several environment variables in your Cloudflare Worker settings:
- `BOT_TOKEN`: This is your bot's token, which you can generate from [BotFather](https://t.me/BotFather). This token allows your bot to authenticate and interact with the Telegram API.
- `BOT_USERNAME`: The username you have set for your bot. This is used within the script to identify messages intended for your bot.
- `EMOJI_LIST`: A string of emojis that the bot will use to react to messages. You can customize this list to include any emojis you prefer, such as 👍❤🔥🥰👏😁🎉🤩🙏👌🕊😍🐳❤🔥💯⚡🏆.
- `RANDOM_LEVEL`: An integer that determines the randomness of reactions in **group chats**. Lower values result in more predictable reactions, while higher values increase randomness. Default is `0`, meaning reactions are consistent by default.
- `RESTRICTED_CHATS`: A list of chat IDs where the bot should not react to messages (Optional). Split each chat ID by " , ". Example : `-1001233434,3434234`
## 🧩 Configure the Webhook
Open your web browser and enter the following URL (replace with your actual bot token and https://your.cloudflare.worker.url/ with your Cloudflare Worker URL):
```
https://api.telegram.org/bot/setWebhook?url=https://your.cloudflare.worker.url/
```
**Verify the Webhook Configuration**:
To check if the webhook is set up correctly, navigate to:
```
https://api.telegram.org/bot/getWebhookInfo
```
## 🚀 Deploy Manually with Cloudflare Wrangler
If you prefer to manually deploy the Auto Reaction Bot using Cloudflare Wrangler, follow these detailed steps to get started:
### Prerequisites
Before you begin, you will need to have git installed on your local machine to clone the repository.
### Step 1: Clone the Repository
Start by cloning the repository to your local machine. Open your terminal and run the following command:
```
git clone https://github.com/Malith-Rukshan/Auto-Reaction-Bot.git
cd Auto-Reaction-Bot
```
### Step 2: Configure wrangler.toml
Edit the `wrangler.toml` file in your project directory to include your environment variables (like `example.wrangler.toml`). You will need to replace the placeholder values with your actual data : [🛠 Configuring Environments](#-configuring-environments)
### Step 3: Install Cloudflare Wrangler
To deploy using Cloudflare Wrangler, you must first install it. You can find the installation instructions and more information on the [official Cloudflare Wrangler documentation](https://developers.cloudflare.com/workers/wrangler/install-and-update/).
### Step 4: Deploy Using Wrangler
Once Wrangler is installed and you've configured your wrangler.toml file, deploy your project to Cloudflare Workers by running the following command in your terminal:
```
wrangler publish
```
This command will deploy your bot to Cloudflare Workers, now you must [Configure the Webhook](#-configure-the-webhook). After All it will start reacting to messages in Telegram chats as configured.
## 🎯 Credits and Other
- Based on [Telegram BOT API](https://core.telegram.org/bots/api)
- 🧑💻 Built with 💖 by [Single Developers > ](https://t.me/SingleDevelopers)
## ⚖️ License
And of course:
MIT: http://opensource.org/licenses/MIT

