https://github.com/manfredipist/homebridge-gpio-rgb-ledstrip
A revamp of my previous release now based on a different core to handle PWM which doesn't require root privileges to run
https://github.com/manfredipist/homebridge-gpio-rgb-ledstrip
homebridge homekit homekit-accessory js ledstrip raspberry raspberry-pi raspberrypi rgb rgb-led
Last synced: 2 months ago
JSON representation
A revamp of my previous release now based on a different core to handle PWM which doesn't require root privileges to run
- Host: GitHub
- URL: https://github.com/manfredipist/homebridge-gpio-rgb-ledstrip
- Owner: manfredipist
- License: gpl-3.0
- Created: 2020-11-15T20:30:54.000Z (over 4 years ago)
- Default Branch: master
- Last Pushed: 2020-12-04T21:02:21.000Z (over 4 years ago)
- Last Synced: 2025-04-29T04:26:29.319Z (3 months ago)
- Topics: homebridge, homekit, homekit-accessory, js, ledstrip, raspberry, raspberry-pi, raspberrypi, rgb, rgb-led
- Language: JavaScript
- Homepage:
- Size: 88.9 KB
- Stars: 9
- Watchers: 1
- Forks: 5
- Open Issues: 0
-
Metadata Files:
- Readme: README.md
- Changelog: CHANGELOG.md
- License: LICENSE
Awesome Lists containing this project
README
# homebridge-gpio-rgb-ledstrip
[](https://github.com/homebridge/homebridge/wiki/Verified-Plugins)
[](https://badge.fury.io/js/homebridge-gpio-rgb-ledstrip)

[](https://www.paypal.com/donate?hosted_button_id=KLP7YU6F9HHTY)
[RPi](https://www.raspberrypi.org) GPIO based LED Strip plugin for [Homebridge](https://github.com/nfarina/homebridge)
Due to all the changes and updated that have occured in Homebridge since the original release of this plugin, i decided to replace its core to extend its usability and compatibility.
This plugin now relies on pi-blaster.js which you need to install beforehand.
Originally inspired by [GiniaE/homebridge-gpio-ledstrip](https://github.com/GiniaE/homebridge-gpio-ledstrip)
# Installation
1. Install [pi-blaster](https://github.com/sarfata/pi-blaster).
2. Update pi-blaster DAEMON_OPTS configuration under the path /etc/default/pi-blaster to enable your specific pin layout ([instructions](https://github.com/sarfata/pi-blaster#warnings-and-other-caveats)).
3. Install [homebridge-gpio-rgb-ledstrip] directly from Homebridge Plugin Page or by running sudo npm install -g homebridge-gpio-rgb-ledstrip.
4. Update your configuration file. See sample config.json snippet below. Remember to use BCM GPIO layout.
To identify the correct pin configuration, have a look at the following layout
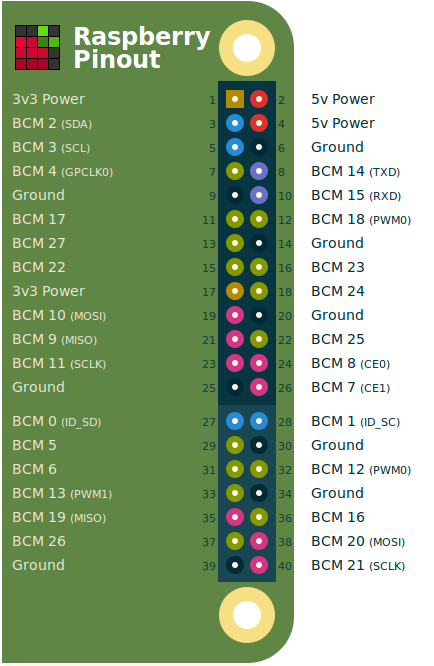
P.S: if pi-blaster seems not to work (e.g running the command 'echo "$PIN=1" > /dev/pi-blaster' doesn't yield the desired output), try restarting manually the service with root privileges
# Configuration
Configuration sample:
```
"accessories": [
{
"accessory": "SmartLedStrip",
"name": "Bedroom LedStrip",
"rPin": 22,
"gPin": 27,
"bPin": 17
}
]
```
Fields:
* "accessory": Must always be "SmartLedStrip" (required)
* "name": Can be anything (required)
* "rPin": GPIO pin that is used to set red value (required)
* "gPin": GPIO pin that is used to set green value (required)
* "bPin": GPIO pin that is used to set blue value (required)