https://github.com/mattermost-community/mattermost-plugin-skype4business
https://github.com/mattermost-community/mattermost-plugin-skype4business
hacktoberfest mattermost mattermost-plugin skype skype4business
Last synced: 2 months ago
JSON representation
- Host: GitHub
- URL: https://github.com/mattermost-community/mattermost-plugin-skype4business
- Owner: mattermost-community
- License: apache-2.0
- Created: 2019-03-24T17:55:13.000Z (over 6 years ago)
- Default Branch: master
- Last Pushed: 2024-06-13T07:13:36.000Z (over 1 year ago)
- Last Synced: 2024-12-10T04:10:24.714Z (11 months ago)
- Topics: hacktoberfest, mattermost, mattermost-plugin, skype, skype4business
- Language: Go
- Homepage:
- Size: 640 KB
- Stars: 19
- Watchers: 36
- Forks: 21
- Open Issues: 8
-
Metadata Files:
- Readme: README.md
- License: LICENSE
Awesome Lists containing this project
README
# Disclaimer
**This repository is community supported and not maintained by Mattermost. Mattermost disclaims liability for integrations, including Third Party Integrations and Mattermost Integrations. Integrations may be modified or discontinued at any time.**
# Mattermost Skype for Business Plugin (Beta)
[](https://circleci.com/gh/mattermost/mattermost-plugin-skype4business)
[](https://codecov.io/gh/mattermost/mattermost-plugin-skype4business)
**Maintainer:** [@kosgrz](https://github.com/kosgrz)
**Co-Maintainer:** [@mickmister](https://github.com/mickmister)
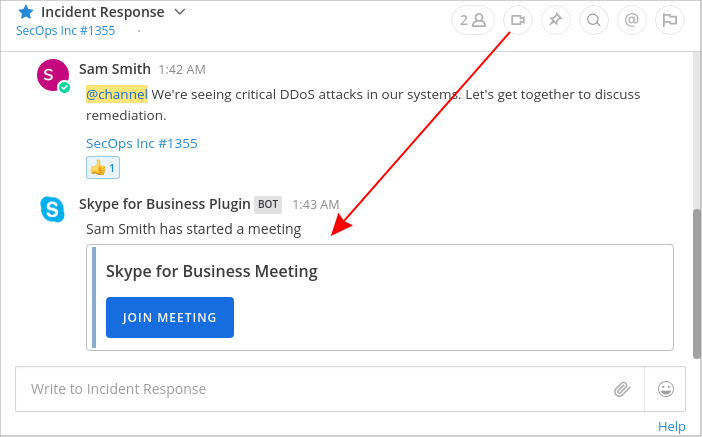
Start and join voice calls, video calls and use screen sharing with your team members with a Skype for Business plugin for Mattermost.
Clicking a video icon in a Mattermost channel posts a message that invites team members to join a Skype for Business meetings call.
Originally developed by [kosgrz](https://github.com/kosgrz).
## Installation
### Skype for Business Online
1. Install the plugin
1. Download the latest version of the plugin from the GitHub releases page
2. In Mattermost, go to **System Console -> Plugins -> Management**
3. Upload the plugin
2. Register an Azure Active Directory app
1. Sign in to https://portal.azure.com/#home
2. On the left-hand sidebar, select **Azure Active Directory**, then navigate to **App registrations -> New application registration**
3. Set the following values:
- **Name**: Mattermost Skype for Business Plugin - [your company name]
- **Supoorted account types**: Accounts in any organizational directory and personal Microsoft accounts (e.g. Skype, Xbox, Outlook.com)
- **Redirect URI (optional)**: Web, then enter "https://your-mattermost-url.com/plugins/skype4business/api/v1/auth_redirect" replacing `https://your-mattermost-url.com` with your Mattermost URL
4. Click **Register** to submit
3. Grant permissions for your application in Azure Active Directory
1. Select **API permissions** in the application sidebar menu, then **Add a permision -> Skype for Business -> Delegated permissions**
2. Click the **Meetings** dropdown, then check `Meetings.ReadWrite`.
3. Click **Add permissions** to submit
4. Click **Grant admin consent for ...**, then **Yes** to confirm
4. Allow implicit flow in Azure Active Directory
1. Select **Manifest** in the application sidebar menu
2. Set the `oauth2AllowImplicitFlow` and `oauth2AllowIdTokenImplicitFlow` values to true
3. Click **Save**
5. Configure the plugin in Mattermost
1. Select **Overview** in the application sidebar menu
2. Copy the **Application (client) ID** value
3. In Mattermost, go to **System Console -> Plugins -> Skype for Business**, and enter the **Application ID** you copied on the previous step
4. Choose ``Online`` as the **Skype for Business Product Type**.
5. Click **Save**
6. Enable the plugin
1. Go to **System Console -> Plugins -> Management** and click **Enable** underneath the Skype for Business plugin
7. Try it out
1. Go to a Mattermost channel and click the Skype for Business icon in the channel header
2. A dialog will open asking you to sign in to microsoftonline.com
3. Once signed in, the dialog will close and a new message posted to the channel, with a link to the newly created meeting
4. By clicking the "Join meeting" button, you will be redirected to a meet. page, which in turn opens a Skype for Business client installed on your computer or smartphone to join the meeting
### Skype for Business Server
1. Install the plugin
1. Download the latest version of the plugin from the GitHub releases page
2. In Mattermost, go to **System Console -> Plugins -> Management**
3. Upload the plugin
2. Configure the plugin
1. Go to **System Console -> Plugins -> Skype for Business**
2. Choose ``Server`` as the **Skype for Business Product Type**
3. Enter the **Server Domain** of your Skype for Business server instance. For example, ``contoso.com.``
4. Enter the **Skype for Business Bot Username** of your bot user created in the Skype for Business domain. For example, bot@contoso.com. We strongly recommend using a dedicated bot account for this plugin, rather than an existing Skype for Business user account.
5. Enter the **Skype for Business Bot Password** of your bot user created in the Skype for Business domain.
6. Click **Save**
3. Enable the plugin
1. Go to **System Console -> Plugins -> Management** and click **Enable** underneath the Skype for Business plugin
4. Try it out
1. Go to a Mattermost channel and click the Skype for Business icon in the channel header
2. Observe a new message posted to the channel, with a link to the newly created meeting
3. By clicking the "Join meeting" button, you will be redirected to a meet. page, which in turn opens a Skype for Business client installed on your computer or smartphone to join the meeting
## Developing
This plugin contains both a server and web app portion.
Use `make dist` to build distributions of the plugin that you can upload to a Mattermost server for testing.
Use `make check-style` to check the style for the whole plugin.
### Server
Inside the `/server` directory, you will find the Go files that make up the server-side of the plugin. Within there, build the plugin like you would any other Go application.
### Web App
Inside the `/webapp` directory, you will find the JS and React files that make up the client-side of the plugin. Within there, modify files and components as necessary. Test your syntax by running `npm run build`.