https://github.com/matthias-bs/bresserweathersensorreceiver
Bresser 5-in-1/6-in-1/7-in-1 868 MHz Weather Sensor Radio Receiver for Arduino based on CC1101, SX1276/RFM95W, SX1262 or LR1121
https://github.com/matthias-bs/bresserweathersensorreceiver
868mhz arduino arduino-library arduino-pico cc1101 data-logger environmental-monitoring esp32 esp32-arduino esp8266 esp8266-arduino lr1121 mqtt radiolib rp2040 sensor-data sx1262 sx1276 weather
Last synced: 5 months ago
JSON representation
Bresser 5-in-1/6-in-1/7-in-1 868 MHz Weather Sensor Radio Receiver for Arduino based on CC1101, SX1276/RFM95W, SX1262 or LR1121
- Host: GitHub
- URL: https://github.com/matthias-bs/bresserweathersensorreceiver
- Owner: matthias-bs
- License: mit
- Created: 2022-05-23T09:02:08.000Z (about 4 years ago)
- Default Branch: main
- Last Pushed: 2026-01-11T19:29:28.000Z (6 months ago)
- Last Synced: 2026-01-11T19:47:29.890Z (6 months ago)
- Topics: 868mhz, arduino, arduino-library, arduino-pico, cc1101, data-logger, environmental-monitoring, esp32, esp32-arduino, esp8266, esp8266-arduino, lr1121, mqtt, radiolib, rp2040, sensor-data, sx1262, sx1276, weather
- Language: C++
- Homepage:
- Size: 6.08 MB
- Stars: 161
- Watchers: 7
- Forks: 31
- Open Issues: 10
-
Metadata Files:
- Readme: README.md
- License: LICENSE
- Code of conduct: CODE_OF_CONDUCT.md
Awesome Lists containing this project
README
# BresserWeatherSensorReceiver
[](https://github.com/matthias-bs/BresserWeatherSensorReceiver/actions/workflows/CI.yml)
[](https://github.com/matthias-bs/BresserWeatherSensorReceiver/actions/workflows/CppUTest.yml)
[](https://github.com/matthias-bs/BresserWeatherSensorReceiver/releases)
[](https://github.com/matthias-bs/BresserWeatherSensorReceiver/blob/main/LICENSE)
Bresser 5-in-1/6-in-1/7-in-1 868 MHz Weather Sensor Radio Receiver for Arduino based on [RadioLib](https://github.com/jgromes/RadioLib) using CC1101, SX1276/RFM95W, SX1262 or LR1121
**See the [Wiki](https://github.com/matthias-bs/BresserWeatherSensorReceiver/wiki) for additional information.**
To allow automatic handling of all Bresser weather station variants, the decoders are tried in the following order until decoding succeeded:
1. 7-in-1-Decoder
2. 6-in-1-Decoder
3. 5-in-1 Decoder
4. Lightning Sensor Decoder
5. Water Leakage Sensor Decoder
(The Bresser 5-in-1 Weather Stations seem to use two different protocols - 5-in-1 and 6-in-1.)
| Model | Type | Decoder Function |
| ------------- | ---- | ------------------------------- |
| 7002510..12, 9602510 | Weather Station | decodeBresser**5In1**Payload() |
| 7902510..12 | Weather Station (Base) | decodeBresser**5In1**Payload() |
| 7002530 | Professional Rain Gauge | decodeBresser**7In1**Payload() |
| 7002531 | 3-in-1 Professional Wind Gauge / Anemometer | decodeBresser**6In1**Payload() **1)** |
| 7002585 | Weather Station | decodeBresser**6In1**Payload() |
| 7009999 | Thermo-/Hygrometer Sensor | decodeBresser**6in1**Payload() |
| 7009970 | Air Quality Sensor PM 2.5 / PM 10 | decodeBresser**7In1**Payload() |
| 7009972 | Soil Moisture/Temperature Sensor | decodeBresser**6In1**Payload() |
| 7009973 | Pool / Spa Thermometer | decodeBresser**6In1**Payload() |
| 7009975 | Water Leakage Sensor | decodeBresser**Leakage**Payload() |
| 7009976 | Lightning Sensor | decodeBresser**Lightning**Payload() |
| 7009977 | CO2 Sensor | decodeBresser**7In1**Payload() **2)** |
| 7009978 | Air Quality Sensor HCHO / VOC | decodeBresser**7In1**Payload() **3)** |
| 7003600 and WSX3001 | Weather Station | decodeBresser**7In1**Payload() **4)** |
| 7003210 | Weather Station | decodeBresser**7In1**Payload() |
| 7803200 | Weather Sensor | decodeBresser**7In1**Payload() |
| 7003300 | Weather Station | decodeBresser**7In1**Payload() |
| 7803300 | Weather Sensor | decodeBresser**7In1**Payload() |
| 7003150 | 8-in-1 Weather Station | decodeBresser**7In1**Payload() **5)** |
Some guesswork:
| Numbering Scheme | Type |
| ---------------- | ---- |
| 700[25\|31\|32\|33\|36]* | Weather Station, Base + Sensor |
| 780[25\|31\|32\|33]* | Weather Station Sensor (Replacement) |
| 790* | Weather Station Base (Replacement) |
| 700[99]* | Accessory Sensor |
**1)** The flag `DATA_COMPLETE` must not be set in `getData()`, otherwise the return value would always indicate a timeout. (I.e. use `#define RX_STRATEGY 0` in some of the example sketches.)
**2)** Request for testing, see https://github.com/matthias-bs/BresserWeatherSensorReceiver/issues/138
**3)** Request for testing, see https://github.com/matthias-bs/BresserWeatherSensorReceiver/issues/139
**4)** The part number is specific to the actual variant, i.e. some more characters are appended
**5)** The value `tglobe_c` is preliminary, see https://github.com/matthias-bs/BresserWeatherSensorReceiver/issues/220
> [!NOTE]
> Weather sensors which are using the 6-in-1 protocol are actually transmitting two different kind of messages alternately:
> 1. Temperature, Humidity, Wind and Battery status
> 2. Wind and Rain
>
> All other sensors/protocols are transmitting a single type of message which contains a complete set of data.
>
> The behavior described above can be observed with [BresserWeatherSensorBasic](examples/BresserWeatherSensorBasic), which just shows each message as it is received by using the function [`getMessage()`](https://matthias-bs.github.io/BresserWeatherSensorReceiver/class_weather_sensor.html#a05fbfc16fb2e13543591cb0b3cd8baaf).
>
> The other examples are using the function [`getData()`](https://matthias-bs.github.io/BresserWeatherSensorReceiver/class_weather_sensor.html#a558191760f9d9b9bf12f79f6f3e5370a),
which buffers and combines messages from the 6-in-1 protocol until a complete set of data — with some configuration options regarding *completeness*, see [BresserWeatherSensorOptions](examples/BresserWeatherSensorOptions) — is available.
## Contents
* [Configuration](#configuration)
* [Predefined Board Configurations](#predefined-board-configurations)
* [User-Defined Configuration](#user-defined-configuration)
* [Rain Statistics](#rain-statistics)
* [Lightning Sensor Post-Processing](#lightning-Sensor-post-processing)
* [SW Examples](#sw-examples)
* [BresserWeatherSensorBasic](#bresserweathersensorbasic)
* [BresserWeatherSensorWaiting](#bresserweathersensorwaiting)
* [BresserWeatherSensorCallback](#bresserweathersensorcallback)
* [BresserWeatherSensorOptions](#bresserweathersensoroptions)
* [BresserWeatherSensorOLED](#bresserweathersensoroled)
* [BresserWeatherSensorMQTT](#bresserweathersensormqtt)
* [BresserWeatherSensorMQTTCustom](#bresserweathersensormqttcustom)
* [BresserWeatherSensorMQTTWiFiMgr](#bresserweathersensormqttwifimgr)
* [BresserWeatherSensorDomoticz](#bresserweathersensordomoticz)
* [BresserWeatherSensorM5Core2](#bresserweathersensorm5core2)
* [BresserWeatherSensorCanvasGauges](#bresserweathersensorcanvasgauges)
* [BresserWeatherSensorSDCard](#bresserweathersensorsdcard)
* [BresserWeatherSensorFreqTest](#bresserweathersensorfreqtest)
* [MQTT Integrations](#mqtt-integrations)
* [Home Assistant](#home-assistant)
* [Datacake](#datacake)
* [Debug Output Configuration](#debug-output-configuration)
* [HW Examples](#hw-examples)
* [ESP8266 D1 Mini with CC1101](#esp8266-d1-mini-with-cc1101)
* [Adafruit Feather ESP32S2 with Adafruit LoRa Radio FeatherWing](#adafruit-feather-esp32s2-with-adafruit-lora-radio-featherwing)
* [Adafruit Feather ESP32 or ThingPulse ePulse Feather with Adafruit LoRa Radio FeatherWing](#adafruit-feather-esp32-or-thingpulse-epulse-feather-with-adafruit-lora-radio-featherwing)
* [Adafruit RFM95W LoRa Radio Transceiver Breakout](#adafruit-rfm95w-lora-radio-transceiver-breakout)
* [DFRobot FireBeetle ESP32 with FireBeetle Cover LoRa Radio 868MHz](#dfrobot-firebeetle-esp32-with-firebeetle-cover-lora-radio-868mhz)
* [Antennas and RF Connectors](#antennas-and-rf-connectors)
* [Software Build Tutorial](#software-build-tutorial)
* [Source Documentation](#source-documentation)
* [Legal](#legal)
## Configuration
### Predefined Board Configurations
By selecting a Board and a Board Revision in the Arduino IDE, a define is passed to the preprocessor/compiler. For the boards in the table below, the default configuration is assumed based on this define. I.e. you could could use an Adafruit Feather ESP32-S2 with a CC1101 connected to the pins of your choice of course, but the code assumes you are using it with a LoRa Radio Featherwing with the wiring given below. In some cases (**bold** entries in the table below) an additional define has to be enabled manually in `WeatherSensorCfg.h`.
If you are not using the Arduino IDE, you can use the defines in the table below with your specific tool chain to get the same result.
If this is not what you need, you have to switch to **Manual Configuration**
| Setup | Board | Board Revision | Defines
bold: to be enabled manually in `WeatherSensorCfg.h` | Radio Module | Notes |
| -------------------------------------------------------------- | ------------------ | ---------------------------- | ---------------------- | -------- | ------- |
| [LILYGO®TTGO-LORA32 V1](https://github.com/Xinyuan-LilyGo/TTGO-LoRa-Series) | "TTGO LoRa32-OLED" | "TTGO LoRa32 V1 (No TFCard)" | ARDUINO_TTGO_LORA32_V1 | SX1276 (HPD13A) | - |
| [LILYGO®TTGO-LORA32 V2](https://github.com/LilyGO/TTGO-LORA32) | "TTGO LoRa32-OLED" | "TTGO LoRa32 V2" | ARDUINO_TTGO_LoRa32_V2 | SX1276 (HPD13A) | Only needed for LMIC: Wire DIO1 to GPIO33 |
| [LILYGO®TTGO-LORA32 V2.1](https://www.lilygo.cc/products/lora3?variant=42272562282677) | "TTGO LoRa32-OLED" | "TTGO LoRa32 V2.1 (1.6.1)" | ARDUINO_TTGO_LoRa32_v21new | SX1276 (HPD13A) | - |
| [LILYGO®T3 S3 SX1262](https://lilygo.cc/products/t3s3-v1-0?variant=42586879721653) | "LilyGo T3-S3" | "Radio-SX1262" | ARDUINO_LILYGO_T3S3_SX1262 | SX1262 | - |
| [LILYGO®T3 S3 LR1121](https://lilygo.cc/products/t3-s3-lr1121) | "LilyGo T3-S3" | "Radio-LR1121" | ARDUINO_LILYGO_T3S3_LR1121 | LR1121 | - |
| [Heltec Wireless Stick](https://heltec.org/project/wireless-stick/) | "Heltec Wireless Stick" | n.a. | ARDUINO_HELTEC_WIRELESS_STICK | SX1276 | - |
| [Heltec Wireless Stick V3](https://heltec.org/project/wireless-stick-v3/) | "Heltec Wireless Stick" | n.a. | ARDUINO_HELTEC_WIRELESS_STICK_V3 | SX1262 | - |
| [Heltec WiFi LoRa 32 V2](https://heltec.org/project/wifi-lora-32/) | "Heltec WiFi LoRa 32(V2)" | n.a. | ARDUINO_HELTEC_WIFI_LORA_32_V2 | SX1276 | - |
| [Heltec WiFi LoRa 32 V3](https://heltec.org/project/wifi-lora-32-v3/) | "Heltec WiFi LoRa 32(V3)" | n.a. | ARDUINO_HELTEC_WIFI_LORA_32_V3 | SX1262 | - |
| [Adafruit Feather ESP32S2 with Adafruit LoRa Radio FeatherWing](https://github.com/matthias-bs/BresserWeatherSensorReceiver#adafruit-feather-esp32s2-with-adafruit-lora-radio-featherwing) | "Adafruit Feather ESP32-S2" | n.a. | ARDUINO_ADAFRUIT_FEATHER_ESP32S2 | SX1276 (RFM95W) | Wiring on the Featherwing:
E to IRQ
D to CS
C to RST
A to DI01 |
| [Adafruit Feather ESP32 or Adafruit Feather ESP32 V2 with Adafruit LoRa Radio FeatherWing](https://github.com/matthias-bs/BresserWeatherSensorReceiver/blob/main/README.md#adafruit-feather-esp32-or-thingpulse-epulse-feather-with-adafruit-lora-radio-featherwing) | "Adafruit ESP32 Feather"
"Adafruit Feather ESP32 V2" | n.a. | ARDUINO_FEATHER_ESP32 | SX1276 (RFM95W) | Wiring on the Featherwing:
A to RST
B to DIO1
D to IRQ
E to CS |
| [ThingPulse ePulse Feather with Adafruit LoRa Radio FeatherWing](https://github.com/matthias-bs/BresserWeatherSensorReceiver/blob/main/README.md#adafruit-feather-esp32-or-thingpulse-epulse-feather-with-adafruit-lora-radio-featherwing) | "Thingpulse ePulse Feather" | n.a. | ARDUINO_THINGPULSE_EPULSE_FEATHER | SX1276 (RFM95W) | Wiring on the Featherwing:
A to RST
B to DIO1
D to IRQ
E to CS |
| [DFRobot FireBeetle with FireBeetle Cover LoRa Radio 868MHz](https://github.com/matthias-bs/BresserWeatherSensorReceiver/blob/main/README.md#dfrobot-firebeetle-esp32-with-firebeetle-cover-lora-radio-868mhz) | "FireBeetle-ESP32" | n.a. | ARDUINO_DFROBOT_FIREBEETLE_ESP32 & **DFROBOT_COVER_LORA** | SX1276 (LoRa1276) | Wiring on the cover:
D2 to RESET
D3 to DIO0
D4 to CS
D5 to DIO1
Additional connections required for battery voltage measurement. |
| [M5Stack Core2](https://docs.m5stack.com/en/core/core2) with [M5Stack Module LoRa868](https://docs.m5stack.com/en/module/lora868) | "M5Core2" | n.a. | ARDUINO_M5STACK_CORE2 | SX1276
(RA-01H) | Only needed for LMIC - wiring on the LoRa868 Module:
DIO1 to GPIO35
"M5Unified" must be installed
`M5.begin()`is called to control power management |
| [ESP32-S3 PowerFeather](https://www.powerfeather.dev/) with [Adafruit LoRa Radio FeatherWing](https://www.adafruit.com/product/3231) | "ESP32-S3 PowerFeather" | n.a. | ARDUINO_ESP32S3_POWERFEATHER | SX1276 (RFM95W) | Wiring on the Featherwing:
A to RST
B to DIO1
D to IRQ
E to CS
"PowerFeather-SDK" must be installed
`Board.init();` is called to control power management |
| [Seeed Studio XIAO ESP32S3 & Wio-SX1262 Kit](https://wiki.seeedstudio.com/wio_sx1262_with_xiao_esp32s3_kit_class) | "XIAO_ESP32S3" | n.a. | ARDUINO_XIAO_ESP32S3 | SX1262 | (B2B connector) |
| [Adafruit Feather RP2040 with Adafruit LoRa Radio FeatherWing](https://www.adafruit.com/product/4884) | "Adafruit Feather RP2040" | n.a. | ARDUINO_ADAFRUIT_FEATHER_RP2040 | SX1276 (RFM95W) | Wiring on the Featherwing:
A to RST
B to DIO1
D to IRQ
E to CS
External voltage divider required for battery voltage measurement. |
The preprocessor will provide some output regarding the selected configuration if enabled in the Arduino IDE's Preferences ("Verbose Output"), e.g.
```
ARDUINO_ADAFRUIT_FEATHER_ESP32S2 defined; assuming RFM95W FeatherWing will be used
[...]
Receiver chip: [SX1276]
Pin config: RST->0 , CS->6 , GD0/G0/IRQ->5 , GDO2/G1/GPIO->11
```
> [!NOTE]
> The AVR architecture — including Adafruit Feather 32u4 RFM95 LoRa Radio — is no longer supported due to code size.
### User-Defined Configuration
See `WeatherSensorCfg.h` for configuration options.
* Set the desired radio module by (un-)commenting `USE_CC1101`, `USE_SX1262`, `USE_SX1276` or `LR1121`.
RFM95W, HPD13A and RA-01H are compatible with SX1276.
* Set the I/O pinning according to your hardware
| Define | Radio Module | Configuration |
| -------------------------- | --------------- | ---------------------------------------------------------------- |
| ESP32 | user-defined | generic, used for ESP32 boards if none of the above is defined |
| ESP8266 | user-defined | generic, used for ESP8266 boards if none of the above is defined |
* Data from multiple sensors can be received by setting `MAX_SENSORS_DEFAULT` to an appropriate value in `WeatherSensorCfg.h`.
e.g. `#define MAX_SENSORS_DEFAULT 1`
* The sensors to be handled can be configured by two ways:
* Add any unwanted sensor IDs to the exclude list `SENSOR_IDS_EXC`
e.g. `#define SENSOR_IDS_EXC { 0x39582376 }`
* Specify the wanted sensors explicitly in the include list `SENSOR_IDS_EXC` - if empty, all sensors will be used
e.g. `#define SENSOR_IDS_INC { 0x83750871 }`
* Unused decoders can be disabled to save computation time/power by commenting out:
e.g. `//#define BRESSER_LEAKAGE`
See [How Sensor Reception works](https://github.com/matthias-bs/BresserWeatherSensorReceiver/wiki/02.-How-Sensor-Reception-works) for a detailed description.
## Rain Statistics
The weather sensors transmit the accumulated rainfall since the last battery change or reset. This raw value is provided as `rain_mm`. To provide the same functionality as the original weather stations, the class `RainGauge` (see
[RainGauge.h](src/RainGauge.h))
is used to calculate
* hourly (past 60 minutes) rainfall,
* daily rainfall,
* weekly rainfall,
* and monthly rainfall.
These values are named `rain_h`, `rain_d`, `rain_w` and `rain_m` in the MQTT software examples.
> [!NOTE]
> Time and date must be set correctly in order to reset the daily, weekly and monthly rain values correctly.
> This is achieved by setting the real time clock (RTC) from an available time source, e.g. via SNTP from a network time server if the device has internet connection via WiFi.
> The user must set the appropriate time zone (`TZ_INFO`) in the sketch.
See
[Implementing Rain Gauge Statistics](https://github.com/matthias-bs/BresserWeatherSensorReceiver/wiki/04.-Implementing-Rain-Gauge-Statistics) for more details.
## Lightning Sensor Post-Processing
The lightning sensor transmits the accumulated number of strikes and the estimated distance from the storm front (at the time of the last strike) at an interval. The post-processing algorithm implemented in the class `Lightning` (see
[Lightning.h](src/Lightning.h)) calculates the number of events during the past 60 minutes — using the same algorithm as the rain statistics — and stores information of the last event:
* Timestamp (UTC),
* Estimated distance and
* Number of strikes since the previous event.
> [!NOTE]
> Time and date must be set correctly in order to store the timestamp.
> This is achieved by setting the real time clock (RTC) from an available time source, e.g. via SNTP from a network time server if the device has internet connection via WiFi.
## SW Examples
### [BresserWeatherSensorBasic](https://github.com/matthias-bs/BresserWeatherSensorReceiver/tree/main/examples/BresserWeatherSensorBasic)
Uses default configuration [src/WeatherSensorCfg.h](https://github.com/matthias-bs/BresserWeatherSensorReceiver/blob/main/src/WeatherSensorCfg.h)
Really a very basic example. Good for testing the SW build, wiring and sensor reception/decoding. Output is printed to the serial console ([example](https://github.com/matthias-bs/BresserWeatherSensorReceiver/blob/main/examples/BresserWeatherSensorBasic/example.log)).
Data is provided by the `getMessage()`-method, which returns almost immediately (i.e. after a small multiple of expected time-on-air), even if no data has been received.
### [BresserWeatherSensorWaiting](https://github.com/matthias-bs/BresserWeatherSensorReceiver/tree/main/examples/BresserWeatherSensorWaiting)
Uses default configuration [src/WeatherSensorCfg.h](https://github.com/matthias-bs/BresserWeatherSensorReceiver/blob/main/src/WeatherSensorCfg.h)
Very similar to [BresserWeatherSensorBasic](https://github.com/matthias-bs/BresserWeatherSensorReceiver/tree/main/examples/BresserWeatherSensorBasic), but data is provided by the `getData()`-method, which waits until a complete set of data has been received or a timeout occurred. Output is printed to the serial console ([example](https://github.com/matthias-bs/BresserWeatherSensorReceiver/blob/main/examples/BresserWeatherSensorWaiting/example.log)).
### [BresserWeatherSensorCallback](https://github.com/matthias-bs/BresserWeatherSensorReceiver/tree/main/examples/BresserWeatherSensorCallback)
Uses default configuration [src/WeatherSensorCfg.h](https://github.com/matthias-bs/BresserWeatherSensorReceiver/blob/main/src/WeatherSensorCfg.h)
Based on [BresserWeatherSensorWaiting](https://github.com/matthias-bs/BresserWeatherSensorReceiver/tree/main/examples/BresserWeatherSensorWaiting), but repeatedly invokes a callback function while waiting for data. In this example, in each iteration of the wait-loop, a dot is printed. Output is printed to the serial console ([example](https://github.com/matthias-bs/BresserWeatherSensorReceiver/blob/main/examples/BresserWeatherSensorCallback/example.log)).
### [BresserWeatherSensorOptions](https://github.com/matthias-bs/BresserWeatherSensorReceiver/tree/main/examples/BresserWeatherSensorOptions)
Uses default configuration [src/WeatherSensorCfg.h](https://github.com/matthias-bs/BresserWeatherSensorReceiver/blob/main/src/WeatherSensorCfg.h)
Based on [BresserWeatherSensorWaiting](https://github.com/matthias-bs/BresserWeatherSensorReceiver/tree/main/examples/BresserWeatherSensorWaiting), but demonstrates the different options of the `getData()`-method which defined if enough sensor data has been received before returning. Output is printed to the serial console ([example](https://github.com/matthias-bs/BresserWeatherSensorReceiver/blob/main/examples/BresserWeatherSensorOptions/example.log)).
### [BresserWeatherSensorOLED](BresserWeatherSensorReceiver/examples/BresserWeatherSensorOLED)
Uses default configuration [src/WeatherSensorCfg.h](https://github.com/matthias-bs/BresserWeatherSensorReceiver/blob/main/src/WeatherSensorCfg.h)
Prints the received weather sensor values to the on-board OLED display. See [Adafruit_SSD1306/examples](https://github.com/adafruit/Adafruit_SSD1306/tree/master/examples) for text style options and scrolling.

> [!NOTE]
> Currently only the LILYGO boards listed in [Predefined Board Configurations](#predefined-board-configurations) are supported.
### [BresserWeatherSensorMQTT](https://github.com/matthias-bs/BresserWeatherSensorReceiver/examples/BresserWeatherSensorMQTT)
Uses default configuration [src/WeatherSensorCfg.h](https://github.com/matthias-bs/BresserWeatherSensorReceiver/blob/main/src/WeatherSensorCfg.h)
This is finally a useful application.
At startup, first a WiFi connection and then a connection to the MQTT broker is established. (Edit `secrets.h` accordingly!) Then receiving data of all sensors (as defined in NUM_SENSORS, see WeatherSensorCfg.h) is tried periodically. If successful, sensor data is published as MQTT messages, one message per sensor.
If the sensor ID can be mapped to a name (edit `sensor_map[]`), this name is used as the MQTT topic, otherwise the ID is used. From the sensor data, some additional data is calculated and published with the _extra_ topic.
The data topics are published at an interval of >`DATA_INTERVAL`. The _status_ and the _radio_ topics are published at an interval of `STATUS_INTERVAL`.
Furthermore, Home Assistant MQTT discovery messages are published at an interval of DISCOVERY_INTERVAL. See section [Home Assistant](#home-assistant) for more details.
If sleep mode is enabled (`SLEEP_EN`), the device goes into deep sleep mode after data has been published. If `AWAKE_TIMEOUT` is reached before data has been published, deep sleep is entered, too. After `SLEEP_INTERVAL`, the controller is restarted.
MQTT publications:
`/data/` sensor data as JSON string - see `publishWeatherdata()`
`/extra` calculated data
`/radio` radio transceiver info as JSON string - see `publishRadio()`
`/status` "online"|"offline"|"dead"$
`homeassistant/sensor/_/config` Home Assistand auto discovery for sensor data
`homeassistant/sensor/_/config` Home Assistand auto discovery for receiver control/status
MQTT subscriptions:
`/reset ` reset rain counters (see RainGauge.h for ``) and lightning post-processing (`flags & 0x10`)
`/get_sensors_inc` get sensors include list
`/get_sensors_exc` get sensors exclude list
`/set_sensors_inc {"ids": [, ... ]}` set sensors include list, e.g. `{"ids": ["0x89ABCDEF"]}`
`/set_sensors_exc {"ids": [, ... ]}` set sensors exclude list, e.g. `{"ids": ["0x89ABCDEF"]}`
\$ via LWT
`` is set by `#define HOSTNAME ...`
`/data` JSON Example:
```
{"sensor_id":12345678,"ch":0,"battery_ok":true,"humidity":44,"wind_gust":1.2,"wind_avg":1.2,"wind_dir":150,"rain":146}
```
**Dashboard with [IoT MQTT Panel](https://snrlab.in/iot/iot-mqtt-panel-user-guide) (Example)**

### [BresserWeatherSensorMQTTCustom](https://github.com/matthias-bs/BresserWeatherSensorReceiver/examples/BresserWeatherSensorMQTTCustom)
Customized version of the example [BresserWeatherSensorMQTT](https://github.com/matthias-bs/BresserWeatherSensorReceiver/blob/main/examples/BresserWeatherSensorMQTT/BresserWeatherSensorMQTT.ino)
The file [BresserWeatherSensorReceiver/examples/BresserWeatherSensorMQTTCustom/src/WeatherSensorCfg.h](https://github.com/matthias-bs/BresserWeatherSensorReceiver/blob/main/examples/BresserWeatherSensorMQTTCustom/src/WeatherSensorCfg.h) has been customized
(from [BresserWeatherSensorReceiver/src/WeatherSensorCfg.h](https://github.com/matthias-bs/BresserWeatherSensorReceiver/blob/main/src/WeatherSensorCfg.h)).
See [examples/BresserWeatherSensorMQTTCustom/Readme.md](https://github.com/matthias-bs/BresserWeatherSensorReceiver/blob/main/examples/BresserWeatherSensorMQTTCustom/Readme.md) for details.
### [BresserWeatherSensorMQTTWiFiMgr](https://github.com/matthias-bs/BresserWeatherSensorReceiver/examples/BresserWeatherSensorMQTTWiFiMgr)
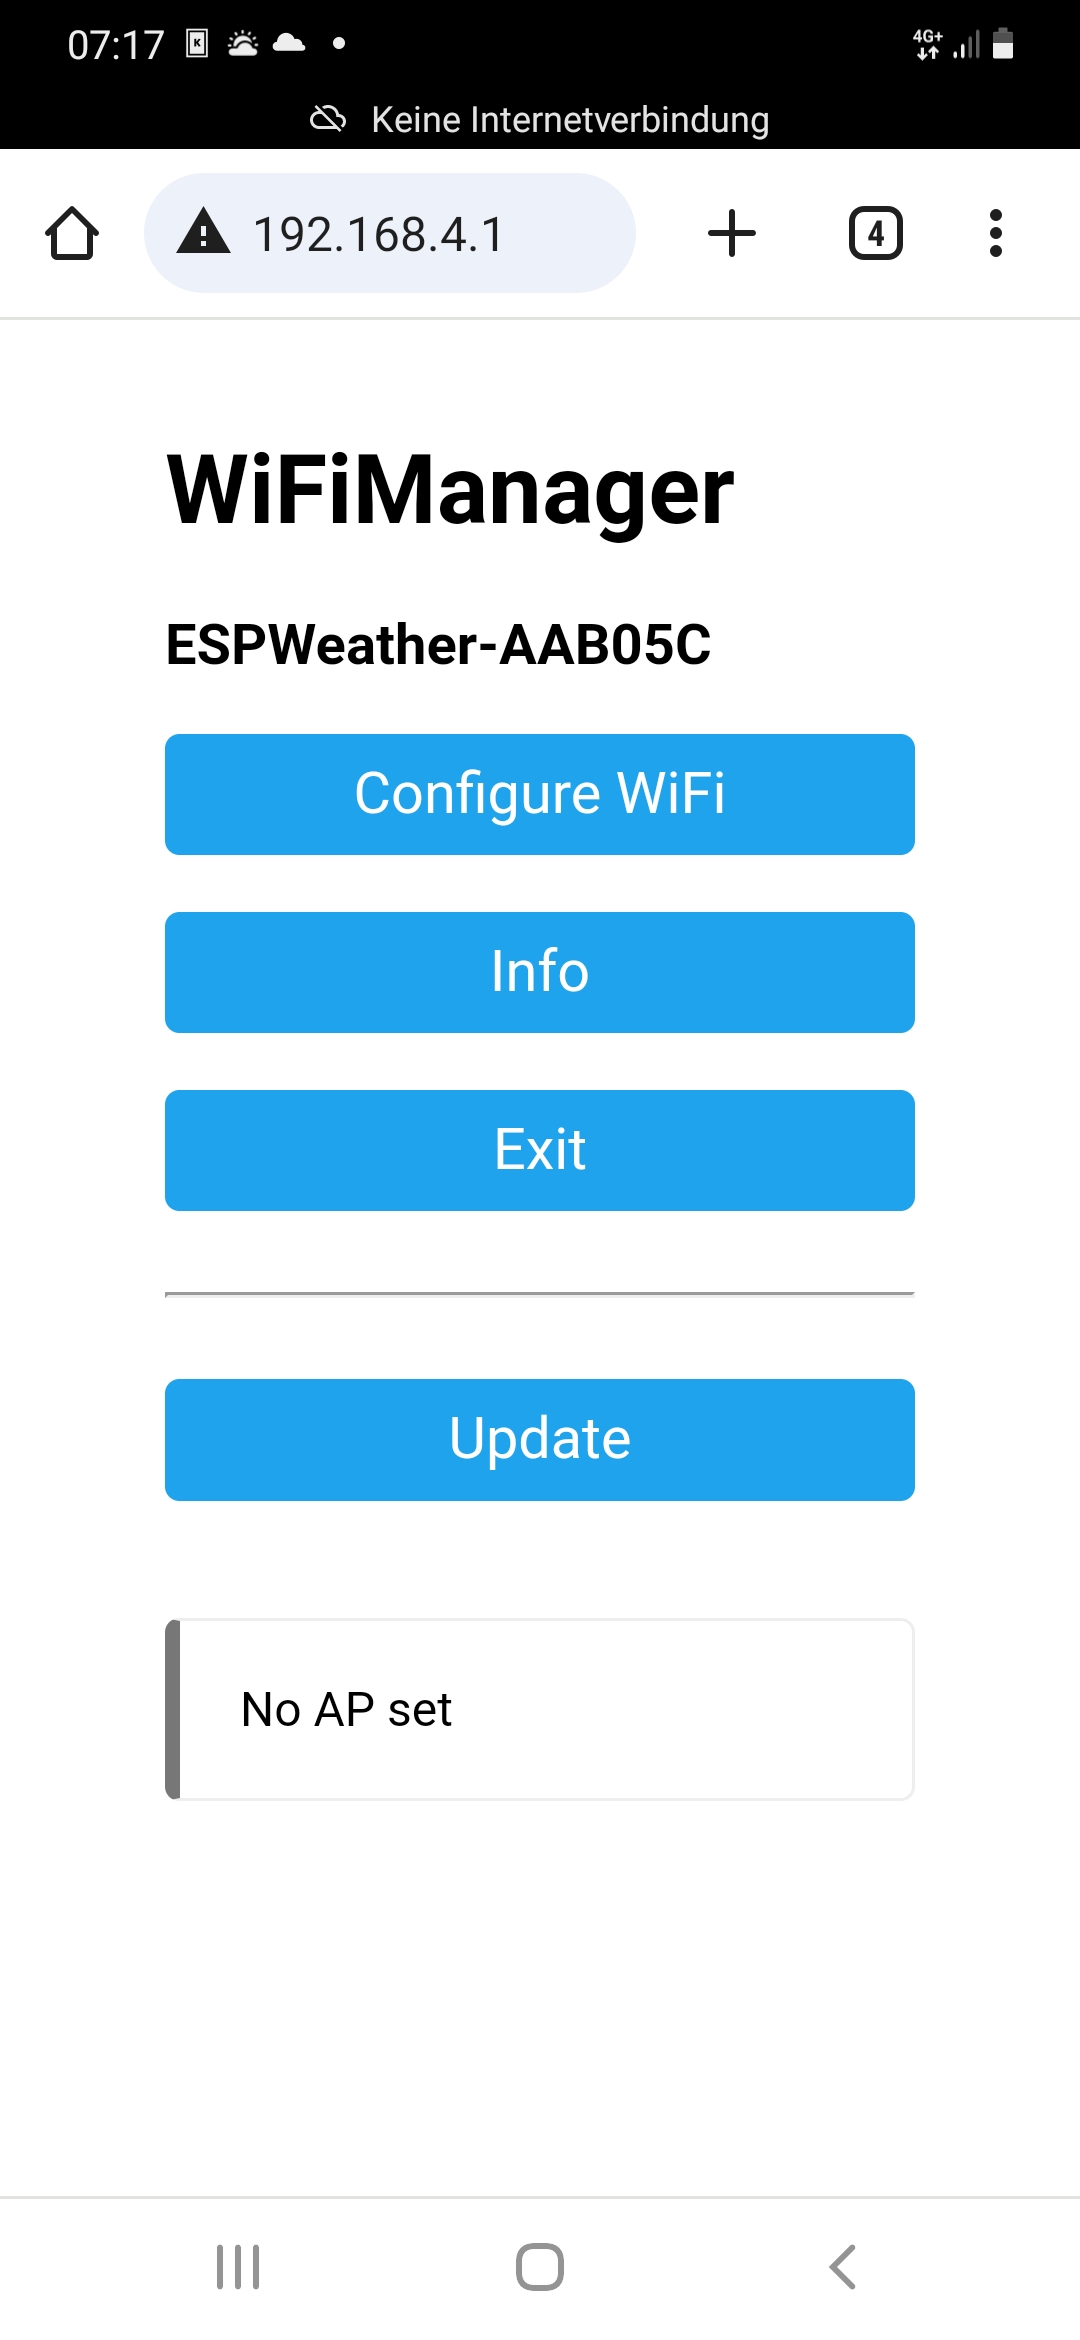
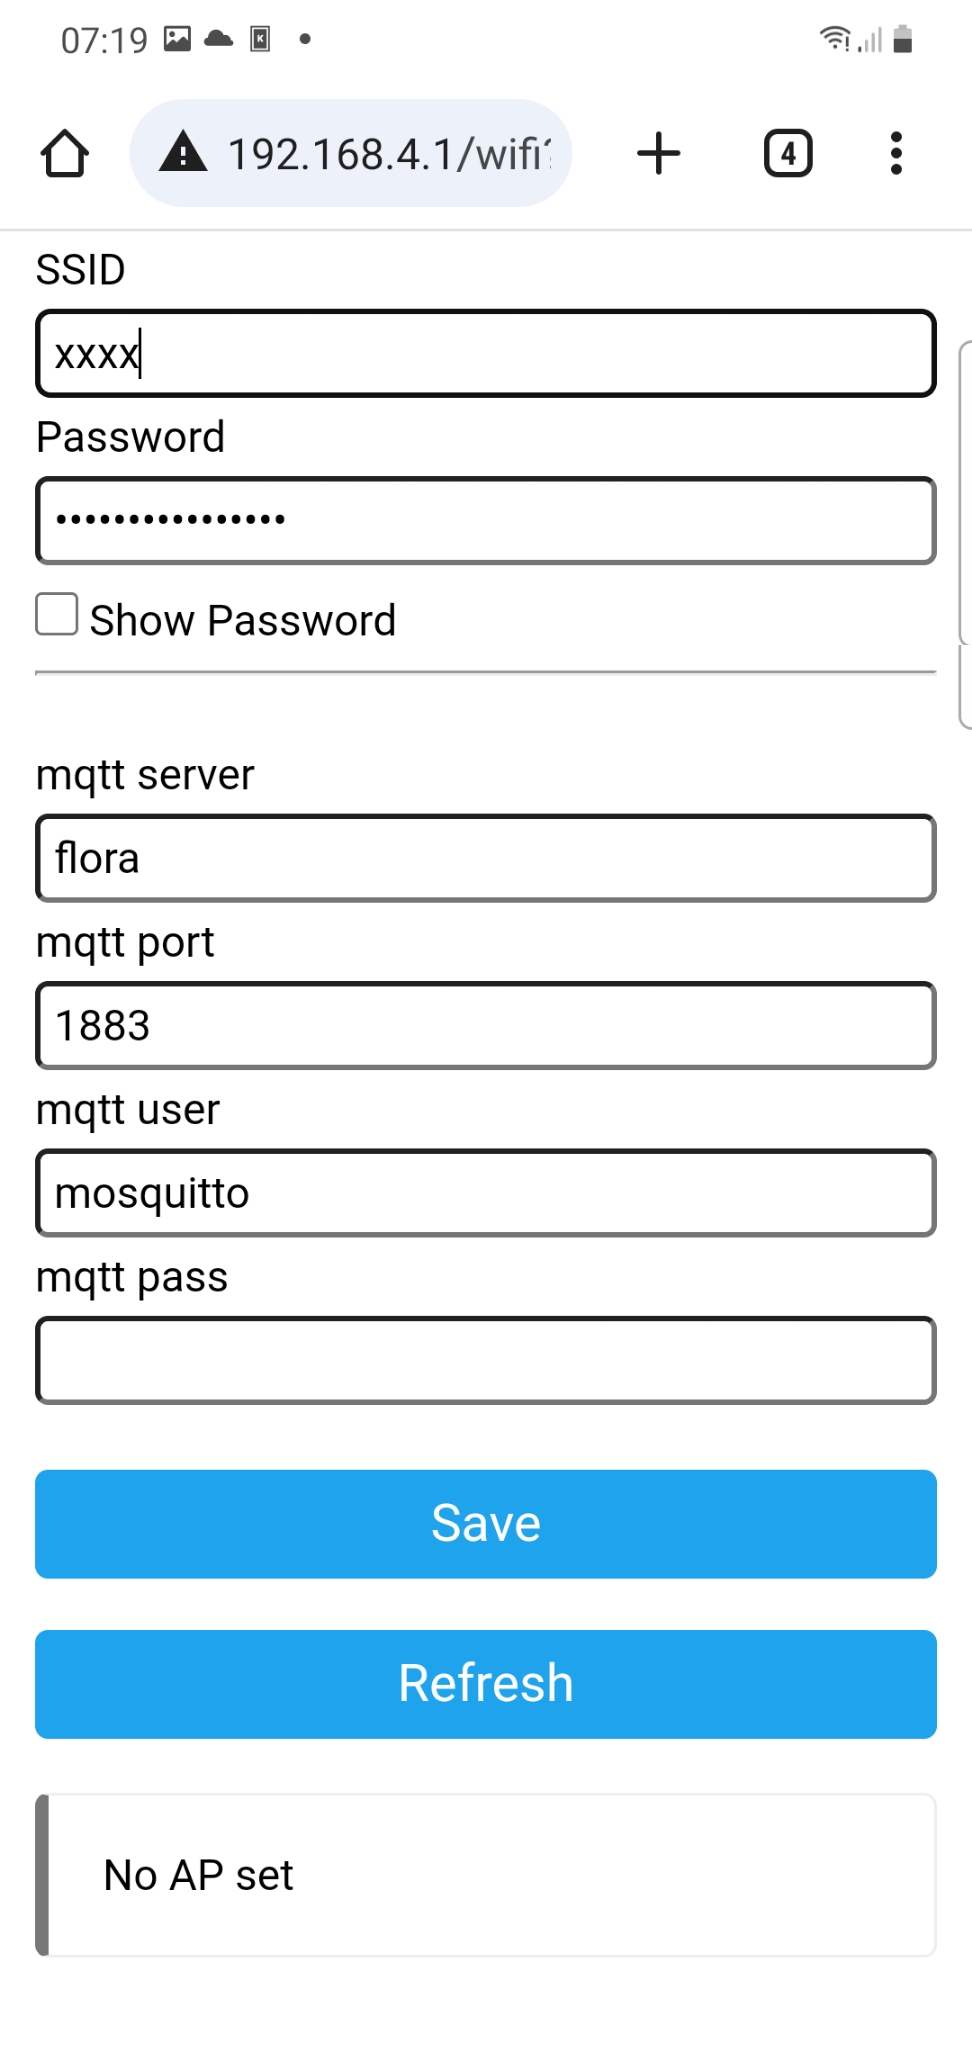
Same core functionality as [BresserWeatherSensorMQTT](https://github.com/matthias-bs/BresserWeatherSensorReceiver/blob/main/examples/BresserWeatherSensorMQTT/BresserWeatherSensorMQTT.ino), but instead of using static WiFi- and MQTT-connection data, [WiFiManager](https://github.com/tzapu/WiFiManager) is used instead.
> [!NOTE]
> When using the sketch on a device for the first time, you must format the flash file system (SPIFFS) first, otherwise the configuration cannot be saved.
**Configuration:**
* Access Point SSID: ESPWeather-
* Access Point Password: password
* Configuration URL: http://192.168.4.1/ (The browser must be connected to the access point above!)
Please refer to the [WiFiManager](https://github.com/tzapu/WiFiManager) documentation for details!
After a successful setup, you can perform two consecutive resets (within 10 seconds) to enable WiFiManager for changing the configuration. This is achieved by using [ESP_DoubleResetDetector](https://github.com/khoih-prog/ESP_DoubleResetDetector).
### [BresserWeatherSensorDomoticz](https://github.com/matthias-bs/BresserWeatherSensorReceiver/examples/BresserWeatherSensorDomoticz)
Based on [BresserWeatherSensorMQTT](https://github.com/matthias-bs/BresserWeatherSensorReceiver/examples/BresserWeatherSensorMQTT). Provides sensor data as MQTT messages via WiFi to Domoticz (https://domoticz.com/) (MQTT plugin for Domoticz required). The MQTT topics are designed for using with Domoticz virtual sensors (see https://www.domoticz.com/wiki/Managing_Devices#Temperature and https://www.domoticz.com/wiki/Managing_Devices#Weather).
### [BresserWeatherSensorM5Core2](https://github.com/matthias-bs/BresserWeatherSensorReceiver/examples/BresserWeatherSensorM5Core2)
Example for BresserWeatherSensorReceiver on [M5Stack Core2](https://docs.m5stack.com/en/core/core2) with [M5Stack Module LoRa868](https://docs.m5stack.com/en/module/lora868) (and optionally [M5Go Bottom2](http://docs.m5stack.com/en/base/m5go_bottom2)). Using getData() for sensor data reception.
Weather sensor data is presented on the display and logged as CSV files to SD card (if present at startup). The integrated blue LED is used to indicate SD card activity (short flash)
Logging requires proper timestamps. Time and date are provided by the integrated RTC chip with backup battery. The RTC must be set initially via WiFi and SNTP or manually (see [M5Unified/examples/Basic/Rtc/Rtc.ino](https://github.com/m5stack/M5Unified/blob/master/examples/Basic/Rtc/Rtc.ino)).

### [BresserWeatherSensorCanvasGauges](examples/BresserWeatherSensorCanvasGauges/)

This sketch provides a web server to display sensor readings in gauges. Two different types of
gauges are used: linear and radial. The gauges are implemented using the JavaScript library
[canvas-gauges](https://github.com/Mikhus/canvas-gauges).
The web server serves a simple HTML page with CSS and embedded JavaScript stored in the ESP
LittleFS file system to fetch the sensor readings. The readings are updated automatically on
the web page using Server-Sent Events (SSE).
See [ESP32 Web Server: Display Sensor Readings in Gauges](https://randomnerdtutorials.com/esp32-web-server-gauges/) by Rui Santos on Random Nerd Tutorials for details.
#### Notes
* Set your WiFi credentials in [secrets.h](examples/BresserWeatherSensorCanvasGauges/secrets.h)
* Upload the contents of [examples/BresserWeatherSensorCanvasGauges/data/](examples/BresserWeatherSensorCanvasGauges/data/) to the board's Flash memory using [earlephilhower/arduino-littlefs-upload](https://github.com/earlephilhower/arduino-littlefs-upload)
* Enable WiFi Access Point mode by uncommenting WIFI_AP_MODE if desired\
https://github.com/matthias-bs/BresserWeatherSensorReceiver/blob/60028b578836d372931b117c1e8ed4a78aaaa70d/examples/BresserWeatherSensorCanvasGauges/BresserWeatherSensorCanvasGauges.ino#L91
* Open http://weatherdashboard.local (or the IP address shown in the serial monitor) in your web browser to access the web page
* Press the on-board button during power-up to reset rain gauge data
* Rain values are limited to prevent overflow of the linear gauges
### [BresserWeatherSensorSDCard](examples/BresserWeatherSensorSDCard/)
This sketch logs the received sensor data as CSV files to an SD card. The SD card must be formatted as FAT32 file system.
To provide a timestamps for each data set, there are two options:
* ESP32 built-in RTC
The RTC is set to compile-time automatically after flashing the sketch, but will be lost power off (or power failure) or reset.
The internal RTC is also not very accurate.
* M5Stack Core2 integrated RTC
The integrated RTC chip with backup battery retains operation independently of the node's power supply. It must be set initially via WiFi and SNTP or manually (see [M5Unified/examples/Basic/Rtc/Rtc.ino](https://github.com/m5stack/M5Unified/blob/master/examples/Basic/Rtc/Rtc.ino)).
* External RTC module with battery backup
Connect an external RTC module (supported by [RTClib](https://github.com/adafruit/RTClib)) via I²C interface. Use [RTCSet](https://github.com/matthias-bs/BresserWeatherSensorLW/tree/main/extras/RTCSet) for initially setting the RTC.
The on-board LED is used to indicate SD card activity (short flash) and failure (permanent on - see debug output in IDE).
> [!TIP]
> See [SD library](https://github.com/espressif/arduino-esp32/tree/master/libraries/SD) for more information.
> [!NOTE]
> Currently only the LILYGO boards with on-board SD card slot listed in [Predefined Board Configurations](#predefined-board-configurations) and the M5Stack Core2 are supported by this example.
### [BresserWeatherSensorFreqTest](examples/BresserWeatherSensorFreqTest/)
This example helps you find the optimal carrier frequency offset for your CC1101 (or other) transceiver module. Different modules can have slight frequency deviations from the nominal 868.3 MHz, and finding the optimal offset can improve reception reliability.
## MQTT Integrations
### Home Assistant
#### MQTT Discovery
Home Assistant [MQTT Discovery](https://www.home-assistant.io/integrations/mqtt/#mqtt-discovery) is available.
MQTT topic schemes:
* `homeassistant/sensor/_/config` – weather sensor receiver configuration status
* `homeassistant/button/_/config` – weather sensor receiver command
* `homeassistant/sensor/_/config` – sensor data
* ``: Sensor ID as hex number
* ``: JSON element as in `data` message, e.g. `temp_c`.
> [!NOTE]
> The sensors transmit the battery status as binary value (`battery_ok`), but Home Assistant expects a percentage. Therefore the battery status is converted to 0\% or 100\%.
Customization of MQTT discovery messages can be done in `haAutoDiscovery()` in the sketches' `mqtt_comm.cpp` if desired.
[weather_sensor_receiver_config.yml](weather_sensor_receiver_config.yml) allows to configure sensor include/exclude lists.
#### Manual Configuration
Manual configuration of Home Assistant can be done using a file template provided by [Shadowpost](https://github.com/Shadowpost):
[Bresser_HA_MQTT_custom_config.yaml](https://github.com/matthias-bs/BresserWeatherSensorReceiver/blob/main/Bresser_HA_MQTT_custom_config.yaml)
### Datacake
See [Datacake MQTT Integration Documentation](https://docs.datacake.de/integrations/mqtt).
[datacake_uplink_decoder.js](scripts/datacake_uplink_decoder.js) is an example [payload decoder](https://docs.datacake.de/integrations/mqtt#write-payload-decoder). Change `device_id` and the MQTT topic variables as required.
## Debug Output Configuration
See [Debug Output Configuration in Arduino IDE](DEBUG_OUTPUT.md)
## HW Examples
> [!NOTE]
> The SX1276/RFM95W also supports FSK modulation and thus can be used to receive the weather sensor data.
### ESP8266 D1 Mini with CC1101

[Pinout ESP8266 WeMos D1-Mini with cc1101](https://github.com/matthias-bs/BresserWeatherSensorReceiver/blob/main/ESP8266_WeMos_D1-Mini_pinout_cc1101_v2.pdf)
#### CC1101
[Texas Instruments CC1101 Product Page](https://www.ti.com/product/CC1101)
> [!NOTE]
> CC1101 Module Connector Pitch is 2.0mm!!!**
Unlike most modules/breakout boards, most (if not all) CC1101 modules sold on common e-commerce platforms have a pitch (distance between pins) of 2.0mm. To connect it to breadboards or jumper wires with 2.54mm/100mil pitch (standard), the following options exist:
* solder wires directly to the module
* use a 2.0mm pin header and make/buy jumper wires with 2.54mm at one end and 2.0mm at the other (e.g. [Adafruit Female-Female 2.54 to 2.0mm Jumper Wires](https://www.adafruit.com/product/1919))
* use a [2.0mm to 2.54 adapter PCB](https://www.amazon.de/Lazmin-1-27MM-2-54MM-Adapter-Platten-Brett-drahtlose-default/dp/B07V873N52)
> [!NOTE]
> Make sure to use the 868MHz version!
### Adafruit Feather ESP32S2 with Adafruit LoRa Radio FeatherWing
> [!NOTE]
> Make sure to use the 868MHz version!
* [ADA3231](https://www.adafruit.com/product/3231) - Adafruit LoRa Radio FeatherWing - RFM95W 900 MHz - RadioFruit
* [ADA3232](https://www.adafruit.com/product/3232) - Adafruit LoRa Radio FeatherWing - RFM95W 433 MHz - RadioFruit
* [ADA5303](https://www.adafruit.com/product/5303) - Adafruit ESP32-S2 Feather with BME280 Sensor - STEMMA QT - 4MB Flash + 2 MB PSRAM
* [ADA5400](https://www.adafruit.com/product/5400) - Adafruit ESP32 Feather V2 - 8MB Flash + 2 MB PSRAM - STEMMA QT
Solder-Bridges on the Module/Wing:
* E to IRQ
* D to CS
* C to RST
* A to DI01
### Adafruit Feather ESP32 or ThingPulse ePulse Feather with Adafruit LoRa Radio FeatherWing

> [!NOTE]
> Make sure to use the 868MHz version!
* [ADA3231](https://www.adafruit.com/product/3231) - Adafruit LoRa Radio FeatherWing - RFM95W 900 MHz - RadioFruit
* [ADA3232](https://www.adafruit.com/product/3232) - Adafruit LoRa Radio FeatherWing - RFM95W 433 MHz - RadioFruit
* [ADA3405](https://www.adafruit.com/product/3405) - Adafruit HUZZAH32 – ESP32 Feather Board
* [B0BSC1PVL4](https://thingpulse.com/product/epulse-feather-low-power-esp32-development-board/) - ThingPulse ePulse Feather
Solder-Bridges on the Module/Wing:
* A to RST
* B to DIO1
* D to IRQ
* E to CS
### Adafruit RFM95W LoRa Radio Transceiver Breakout
> [!NOTE]
> Make sure to use the 868MHz version!
* [ADA3072](https://www.adafruit.com/product/3072) - 868/915 MHz version
* [ADA3073](https://www.adafruit.com/product/3073) - 433 MHz version
* RF connector
* Antenna
See [Adafruit RFM69HCW and RFM9X LoRa Packet Radio Breakouts - Pinouts](https://learn.adafruit.com/adafruit-rfm69hcw-and-rfm96-rfm95-rfm98-lora-packet-padio-breakouts/pinouts).
### DFRobot FireBeetle ESP32 with FireBeetle Cover LoRa Radio 868MHz

> [!NOTE]
> Stacking headers were included with TEL0125.
> [!NOTE]
> Make sure to use the 868MHz version!**
* [DFR0478](https://www.dfrobot.com/product-1590.html) - FireBeetle ESP32 IoT Microcontroller
* [TEL0125](https://www.dfrobot.com/product-1831.html) - LoRa Radio 868MHz - FireBeetle Covers
Solder-Bridges on the Cover:
* D2 to RESET
* D3 to DIO0
* D4 to CS
* D5 to DIO1
## Antennas and RF Connectors
The required antenna depends on the signal path between weather sensor and receiver.
Some options are:
* wire antenna
* spring antenna (helical wire coil)
* rubber antenna
See [Adafruit Tutorial - Antenna Options](https://learn.adafruit.com/adafruit-feather-32u4-radio-with-lora-radio-module/antenna-options) for wire antenna lengths and uFL connector soldering.
The [Data Alliance](https://www.data-alliance.net/mhf-series-mhf1-mhf2-mhf3-mhf4/) website helped to sort out my RF connector confusion:
> Applications of MHF Connectors & Cables
>
> The MHF series of RF micro-connectors (mating heights listed below are the maximum):
> * MHF1 (also known as MHF) has a Mating Height of 2.5mm
> * MHF2 has a Mating Height of 2.1mm
> * MHF3 has a Mating Height of 1.6mm
> * MHF4 has a Mating Height of 1.2mm
>
> MHF3 connector is compatible with a W.FL connector while MHF2 connector is equivalent of U.FL connector. The MHF4 cable connector is the smallest while MHF1 connector is the largest which is comparable to a U.FL connector.
Personally I prefer the SMA connector over the uFL connector - but be aware of the (usual) male/female connector types and the normal/reverse polarity types. See [SMA vs RP-SMA what is the difference?](https://forum.digikey.com/t/sma-vs-rp-sma-what-is-the-difference/550) by Digikey.
## Software Build Tutorial
See [BUILD](BUILD.md)
## Source Documentation
https://matthias-bs.github.io/BresserWeatherSensorReceiver/
## Legal
> This project is in no way affiliated with, authorized, maintained, sponsored or endorsed by Bresser GmbH or any of its affiliates or subsidiaries.