https://github.com/mattwelke/gcp-cloud-composer-example
https://github.com/mattwelke/gcp-cloud-composer-example
Last synced: about 2 months ago
JSON representation
- Host: GitHub
- URL: https://github.com/mattwelke/gcp-cloud-composer-example
- Owner: mattwelke
- Created: 2022-05-19T17:47:52.000Z (almost 3 years ago)
- Default Branch: main
- Last Pushed: 2022-06-13T22:57:33.000Z (almost 3 years ago)
- Last Synced: 2025-03-09T11:51:19.255Z (about 2 months ago)
- Language: Python
- Size: 640 KB
- Stars: 0
- Watchers: 2
- Forks: 0
- Open Issues: 2
-
Metadata Files:
- Readme: README.md
Awesome Lists containing this project
README
# gcp-cloud-composer-example
A tutorial on how to:
- Create a Cloud Composer 1 instance
- Do local development in VS Code on a DAG
- Deploy the DAG to the environment
- See the deployed DAG in the Airflow Web UI.
Composer version: composer-1.18.8-airflow-1.10.15
Airflow version: 1.10.15
Prereqs:
- VS Code
- pyenv (https://github.com/pyenv/pyenv)
- Python installed via pyenv (version determined during tutorial)
## Creating Composer environment
Create a new GCP project so that it's easy to delete all resources created automatically when finished.
To create the environment, enable the Composer API in the project and then run `./create_environment.sh`.
Wait for the environment to be created.
## Local development with VS Code
When you set up an IDE like VS Code for local dev with Python, you'll get code completion for built in Python packages (like `datetime`) but you won't get code completion for 3rd party packages (like `airflow`) unless you install those packages onto your dev machine too:

Code completion:

No code completion:

The solution to this problem is to create a `requirements.txt` file in the project with the Airflow version running in your Composer environment. Then, developers cloning the project to their workstation can use `pip` to install the exact Airflow version (and optionally, exact versions of other pip packages running in the Composer environment) to their workstation's virtual environment.
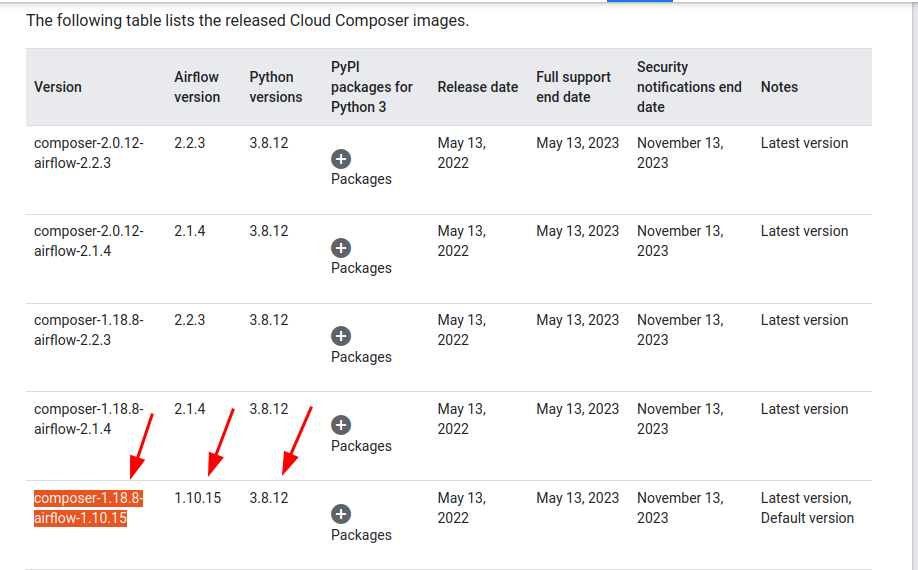
To find the Airflow version, you can check https://cloud.google.com/composer/docs/concepts/versioning/composer-versions. For example, because we know we're using the image composer-1.18.8-airflow-1.10.15 in `create_environment.sh`, we show our Airflow version is 1.10.15. It's also a good idea to note the exact Python version being used in the environment too, so that the virtual environment used locally can match the Composer environment exactly. For example, we see that the environment is using Python 3.8.12:

We can then record our Airflow version and Python version into the project:
```
echo 'apache-airflow==1.10.15' > requirements.txt
```
```
# creates .python-version file, which VS Code will pick up
pyenv local 3.8.12
```
And now we can create the virtual environment and install the Airflow package into it:
```
python -m venv .venv
```
(reload window in VS Code so it picks up the virtual environment)
Select the virtual environment using the "Select Interpreter" prompt:

Install the packages into the virtual environment:
```
pip install -r requirements.txt
```
Now, we can get code completion for the Python packages running in the Composer environment too. Our local development environment more closely matches the production environment into which we'll deploy our DAG:

## Deploying to Composer environment in GCP
After waiting for the environment to be created, deploy the quickstart DAG with `./deploy_quickstart.sh`. This script uses `gcloud` to upload the DAG file to the environment (which involves copying it into the DAG bucket for the environment).
To see our deployed DAG, we need to go to the web UI. Find it by viewing the config for your Composer environment, "Airflow web UI":

You won't see the new DAG right away, but after a few minutes, Airflow will have synced with the DAG bucket, and it will appear and begin running according to its schedule:

## Teardown
Delete the GCP project to delete all the resources created.