https://github.com/maudzung/complex-yolov4-pytorch
The PyTorch Implementation based on YOLOv4 of the paper: "Complex-YOLO: Real-time 3D Object Detection on Point Clouds"
https://github.com/maudzung/complex-yolov4-pytorch
3d-object-detection complex-yolo data-parallel-computing giou lidar lidar-point-cloud mish mosaic multiprocessing object-detection real-time rotated-boxes rotated-boxes-iou yolov4
Last synced: over 1 year ago
JSON representation
The PyTorch Implementation based on YOLOv4 of the paper: "Complex-YOLO: Real-time 3D Object Detection on Point Clouds"
- Host: GitHub
- URL: https://github.com/maudzung/complex-yolov4-pytorch
- Owner: maudzung
- License: gpl-3.0
- Created: 2020-07-03T23:39:23.000Z (about 6 years ago)
- Default Branch: master
- Last Pushed: 2024-08-30T23:53:42.000Z (almost 2 years ago)
- Last Synced: 2025-04-08T02:42:44.104Z (over 1 year ago)
- Topics: 3d-object-detection, complex-yolo, data-parallel-computing, giou, lidar, lidar-point-cloud, mish, mosaic, multiprocessing, object-detection, real-time, rotated-boxes, rotated-boxes-iou, yolov4
- Language: Python
- Homepage: https://arxiv.org/pdf/1803.06199.pdf
- Size: 6.5 MB
- Stars: 1,276
- Watchers: 26
- Forks: 258
- Open Issues: 57
-
Metadata Files:
- Readme: README.md
- License: LICENSE
Awesome Lists containing this project
README
# Complex YOLOv4
[![python-image]][python-url]
[![pytorch-image]][pytorch-url]
The PyTorch Implementation based on YOLOv4 of the paper: [Complex-YOLO: Real-time 3D Object Detection on Point Clouds](https://arxiv.org/pdf/1803.06199.pdf)
---
## Features
- [x] Realtime 3D object detection based on YOLOv4
- [x] Support [distributed data parallel training](https://github.com/pytorch/examples/tree/master/distributed/ddp)
- [x] Tensorboard
- [x] Mosaic/Cutout augmentation for training
- [x] Use [GIoU](https://arxiv.org/pdf/1902.09630v2.pdf) loss of rotated boxes for optimization.
- **Update 2020.08.26**: [Super Fast and Accurate 3D Object Detection based on 3D LiDAR Point Clouds](https://github.com/maudzung/Super-Fast-Accurate-3D-Object-Detection)
- Faster training, faster inference
- An Anchor-free approach
- No need for Non-Max-Suppression
- Demonstration (on a GTX 1080Ti)
[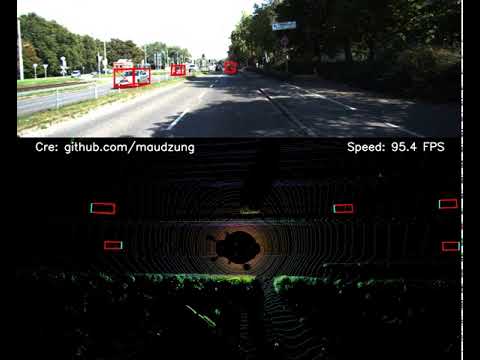](http://www.youtube.com/watch?v=FI8mJIXkgX4)
**[Youtube link](https://youtu.be/FI8mJIXkgX4)**
## 2. Getting Started
### 2.1. Requirement
```shell script
pip install -U -r requirements.txt
```
For [`mayavi`](https://docs.enthought.com/mayavi/mayavi/installation.html) and [`shapely`](https://shapely.readthedocs.io/en/latest/project.html#installing-shapely)
libraries, please refer to the installation instructions from their official websites.
### 2.2. Data Preparation
Download the 3D KITTI detection dataset from [here](http://www.cvlibs.net/datasets/kitti/eval_object.php?obj_benchmark=3d).
The downloaded data includes:
- Velodyne point clouds _**(29 GB)**_: input data to the Complex-YOLO model
- Training labels of object data set _**(5 MB)**_: input label to the Complex-YOLO model
- Camera calibration matrices of object data set _**(16 MB)**_: for visualization of predictions
- Left color images of object data set _**(12 GB)**_: for visualization of predictions
Please make sure that you construct the source code & dataset directories structure as below.
For 3D point cloud preprocessing, please refer to the previous works:
- [VoxelNet-Pytorch](https://github.com/skyhehe123/VoxelNet-pytorch)
- [Complex-YOLOv2](https://github.com/AI-liu/Complex-YOLO)
- [Complex-YOLOv3](https://github.com/ghimiredhikura/Complex-YOLOv3)
### 2.3. Complex-YOLO architecture

This work has been based on the paper [YOLOv4: Optimal Speed and Accuracy of Object Detection](https://arxiv.org/abs/2004.10934).
Please refer to several implementations of YOLOv4 using PyTorch DL framework:
- [Tianxiaomo/pytorch-YOLOv4](https://github.com/Tianxiaomo/pytorch-YOLOv4)
- [Ultralytics/yolov3_and_v4](https://github.com/ultralytics/yolov3)
- [WongKinYiu/PyTorch_YOLOv4](https://github.com/WongKinYiu/PyTorch_YOLOv4)
- [VCasecnikovs/Yet-Another-YOLOv4-Pytorch](https://github.com/VCasecnikovs/Yet-Another-YOLOv4-Pytorch)
### 2.4. How to run
#### 2.4.1. Visualize the dataset (both BEV images from LiDAR and camera images)
```shell script
cd src/data_process
```
- To visualize BEV maps and camera images (with 3D boxes), let's execute _**(the `output-width` param can be changed to
show the images in a bigger/smaller window)**_:
```shell script
python kitti_dataloader.py --output-width 608
```
- To visualize mosaics that are composed from 4 BEV maps (Using during training only), let's execute:
```shell script
python kitti_dataloader.py --show-train-data --mosaic --output-width 608
```
By default, there is _**no padding**_ for the output mosaics, the feature could be activated by executing:
```shell script
python kitti_dataloader.py --show-train-data --mosaic --random-padding --output-width 608
```
- To visualize cutout augmentation, let's execute:
```shell script
python kitti_dataloader.py --show-train-data --cutout_prob 1. --cutout_nholes 1 --cutout_fill_value 1. --cutout_ratio 0.3 --output-width 608
```
#### 2.4.2. Inference
Download the trained model from [**_here_**](https://drive.google.com/drive/folders/1RHD9PBvk-9SjbKwoi_Q1kl9-UGFo2Pth?usp=sharing),
then put it to `${ROOT}/checkpoints/` and execute:
```shell script
python test.py --gpu_idx 0 --pretrained_path ../checkpoints/complex_yolov4/complex_yolov4_mse_loss.pth --cfgfile ./config/cfg/complex_yolov4.cfg --show_image
```
#### 2.4.3. Evaluation
```shell script
python evaluate.py --gpu_idx 0 --pretrained_path --cfgfile --img_size --conf-thresh --nms-thresh --iou-thresh
```
(The `conf-thresh`, `nms-thresh`, and `iou-thresh` params can be adjusted. By default, these params have been set to _**0.5**_)
#### 2.4.4. Training
##### 2.4.4.1. Single machine, single gpu
```shell script
python train.py --gpu_idx 0 --batch_size --num_workers ...
```
##### 2.4.4.2. Multi-processing Distributed Data Parallel Training
We should always use the `nccl` backend for multi-processing distributed training since it currently provides the best
distributed training performance.
- **Single machine (node), multiple GPUs**
```shell script
python train.py --dist-url 'tcp://127.0.0.1:29500' --dist-backend 'nccl' --multiprocessing-distributed --world-size 1 --rank 0
```
- **Two machines (two nodes), multiple GPUs**
_**First machine**_
```shell script
python train.py --dist-url 'tcp://IP_OF_NODE1:FREEPORT' --dist-backend 'nccl' --multiprocessing-distributed --world-size 2 --rank 0
```
_**Second machine**_
```shell script
python train.py --dist-url 'tcp://IP_OF_NODE2:FREEPORT' --dist-backend 'nccl' --multiprocessing-distributed --world-size 2 --rank 1
```
To reproduce the results, you can run the bash shell script
```bash
./train.sh
```
#### Tensorboard
- To track the training progress, go to the `logs/` folder and
```shell script
cd logs//tensorboard/
tensorboard --logdir=./
```
- Then go to [http://localhost:6006/](http://localhost:6006/):
### 2.5. List of usage for Bag of Freebies (BoF) & Bag of Specials (BoS) in this implementation
| |Backbone | Detector |
|---|---|---|
|**BoF** |[x] Dropblock
[x] Random rescale, rotation (global)
[x] Mosaic/Cutout augmentation|[x] Cross mini-Batch Normalization
[x] Dropblock
[x] Random training shapes
|
|**BoS** |[x] Mish activation
[x] Cross-stage partial connections (CSP)
[x] Multi-input weighted residual connections (MiWRC) |[x] Mish activation
[x] SPP-block
[x] SAM-block
[x] PAN path-aggregation block
[x] GIoU loss
[ ] CIoU loss |
## Contact
If you think this work is useful, please give me a star!
If you find any errors or have any suggestions, please contact me (**Email:** `nguyenmaudung93.kstn@gmail.com`).
Thank you!
## Citation
```bash
@article{Complex-YOLO,
author = {Martin Simon, Stefan Milz, Karl Amende, Horst-Michael Gross},
title = {Complex-YOLO: Real-time 3D Object Detection on Point Clouds},
year = {2018},
journal = {arXiv},
}
@article{YOLOv4,
author = {Alexey Bochkovskiy, Chien-Yao Wang, Hong-Yuan Mark Liao},
title = {YOLOv4: Optimal Speed and Accuracy of Object Detection},
year = {2020},
journal = {arXiv},
}
```
## Folder structure
```
${ROOT}
└── checkpoints/
├── complex_yolov3/
└── complex_yolov4/
└── dataset/
└── kitti/
├──ImageSets/
│ ├── train.txt
│ └── val.txt
├── training/
│ ├── image_2/ <-- for visualization
│ ├── calib/
│ ├── label_2/
│ └── velodyne/
└── testing/
│ ├── image_2/ <-- for visualization
│ ├── calib/
│ └── velodyne/
└── classes_names.txt
└── src/
├── config/
├── cfg/
│ ├── complex_yolov3.cfg
│ ├── complex_yolov3_tiny.cfg
│ ├── complex_yolov4.cfg
│ ├── complex_yolov4_tiny.cfg
│ ├── train_config.py
│ └── kitti_config.py
├── data_process/
│ ├── kitti_bev_utils.py
│ ├── kitti_dataloader.py
│ ├── kitti_dataset.py
│ ├── kitti_data_utils.py
│ ├── train_val_split.py
│ └── transformation.py
├── models/
│ ├── darknet2pytorch.py
│ ├── darknet_utils.py
│ ├── model_utils.py
│ ├── yolo_layer.py
└── utils/
│ ├── evaluation_utils.py
│ ├── iou_utils.py
│ ├── logger.py
│ ├── misc.py
│ ├── torch_utils.py
│ ├── train_utils.py
│ └── visualization_utils.py
├── evaluate.py
├── test.py
├── test.sh
├── train.py
└── train.sh
├── README.md
└── requirements.txt
```
## Usage
```
usage: train.py [-h] [--seed SEED] [--saved_fn FN] [--working-dir PATH]
[-a ARCH] [--cfgfile PATH] [--pretrained_path PATH]
[--img_size IMG_SIZE] [--hflip_prob HFLIP_PROB]
[--cutout_prob CUTOUT_PROB] [--cutout_nholes CUTOUT_NHOLES]
[--cutout_ratio CUTOUT_RATIO]
[--cutout_fill_value CUTOUT_FILL_VALUE]
[--multiscale_training] [--mosaic] [--random-padding]
[--no-val] [--num_samples NUM_SAMPLES]
[--num_workers NUM_WORKERS] [--batch_size BATCH_SIZE]
[--print_freq N] [--tensorboard_freq N] [--checkpoint_freq N]
[--start_epoch N] [--num_epochs N] [--lr_type LR_TYPE]
[--lr LR] [--minimum_lr MIN_LR] [--momentum M] [-wd WD]
[--optimizer_type OPTIMIZER] [--burn_in N]
[--steps [STEPS [STEPS ...]]] [--world-size N] [--rank N]
[--dist-url DIST_URL] [--dist-backend DIST_BACKEND]
[--gpu_idx GPU_IDX] [--no_cuda]
[--multiprocessing-distributed] [--evaluate]
[--resume_path PATH] [--conf-thresh CONF_THRESH]
[--nms-thresh NMS_THRESH] [--iou-thresh IOU_THRESH]
The Implementation of Complex YOLOv4
optional arguments:
-h, --help show this help message and exit
--seed SEED re-produce the results with seed random
--saved_fn FN The name using for saving logs, models,...
--working-dir PATH The ROOT working directory
-a ARCH, --arch ARCH The name of the model architecture
--cfgfile PATH The path for cfgfile (only for darknet)
--pretrained_path PATH
the path of the pretrained checkpoint
--img_size IMG_SIZE the size of input image
--hflip_prob HFLIP_PROB
The probability of horizontal flip
--cutout_prob CUTOUT_PROB
The probability of cutout augmentation
--cutout_nholes CUTOUT_NHOLES
The number of cutout area
--cutout_ratio CUTOUT_RATIO
The max ratio of the cutout area
--cutout_fill_value CUTOUT_FILL_VALUE
The fill value in the cut out area, default 0. (black)
--multiscale_training
If true, use scaling data for training
--mosaic If true, compose training samples as mosaics
--random-padding If true, random padding if using mosaic augmentation
--no-val If true, dont evaluate the model on the val set
--num_samples NUM_SAMPLES
Take a subset of the dataset to run and debug
--num_workers NUM_WORKERS
Number of threads for loading data
--batch_size BATCH_SIZE
mini-batch size (default: 4), this is the totalbatch
size of all GPUs on the current node when usingData
Parallel or Distributed Data Parallel
--print_freq N print frequency (default: 50)
--tensorboard_freq N frequency of saving tensorboard (default: 20)
--checkpoint_freq N frequency of saving checkpoints (default: 2)
--start_epoch N the starting epoch
--num_epochs N number of total epochs to run
--lr_type LR_TYPE the type of learning rate scheduler (cosin or
multi_step)
--lr LR initial learning rate
--minimum_lr MIN_LR minimum learning rate during training
--momentum M momentum
-wd WD, --weight_decay WD
weight decay (default: 1e-6)
--optimizer_type OPTIMIZER
the type of optimizer, it can be sgd or adam
--burn_in N number of burn in step
--steps [STEPS [STEPS ...]]
number of burn in step
--world-size N number of nodes for distributed training
--rank N node rank for distributed training
--dist-url DIST_URL url used to set up distributed training
--dist-backend DIST_BACKEND
distributed backend
--gpu_idx GPU_IDX GPU index to use.
--no_cuda If true, cuda is not used.
--multiprocessing-distributed
Use multi-processing distributed training to launch N
processes per node, which has N GPUs. This is the
fastest way to use PyTorch for either single node or
multi node data parallel training
--evaluate only evaluate the model, not training
--resume_path PATH the path of the resumed checkpoint
--conf-thresh CONF_THRESH
for evaluation - the threshold for class conf
--nms-thresh NMS_THRESH
for evaluation - the threshold for nms
--iou-thresh IOU_THRESH
for evaluation - the threshold for IoU
```
[python-image]: https://img.shields.io/badge/Python-3.6-ff69b4.svg
[python-url]: https://www.python.org/
[pytorch-image]: https://img.shields.io/badge/PyTorch-1.5-2BAF2B.svg
[pytorch-url]: https://pytorch.org/