https://github.com/maudzung/sfa3d
Super Fast and Accurate 3D Object Detection based on 3D LiDAR Point Clouds (The PyTorch implementation)
https://github.com/maudzung/sfa3d
3d-object-detection bevmap center fast-detection kitti-dataset lidar-point-cloud real-time ros rtm3d
Last synced: about 1 year ago
JSON representation
Super Fast and Accurate 3D Object Detection based on 3D LiDAR Point Clouds (The PyTorch implementation)
- Host: GitHub
- URL: https://github.com/maudzung/sfa3d
- Owner: maudzung
- License: mit
- Created: 2020-08-24T14:16:33.000Z (almost 6 years ago)
- Default Branch: master
- Last Pushed: 2023-09-17T01:57:42.000Z (over 2 years ago)
- Last Synced: 2024-04-13T18:37:34.542Z (about 2 years ago)
- Topics: 3d-object-detection, bevmap, center, fast-detection, kitti-dataset, lidar-point-cloud, real-time, ros, rtm3d
- Language: Python
- Homepage: https://github.com/maudzung/Super-Fast-Accurate-3D-Object-Detection
- Size: 44.4 MB
- Stars: 951
- Watchers: 32
- Forks: 269
- Open Issues: 22
-
Metadata Files:
- Readme: README.md
- License: LICENSE
Awesome Lists containing this project
README
# Super Fast and Accurate 3D Object Detection based on 3D LiDAR Point Clouds (SFA3D)
[![python-image]][python-url]
[![pytorch-image]][pytorch-url]
---
## Features
- [x] Super fast and accurate 3D object detection based on LiDAR
- [x] Fast training, fast inference
- [x] An Anchor-free approach
- [x] No Non-Max-Suppression
- [x] Support [distributed data parallel training](https://github.com/pytorch/examples/tree/master/distributed/ddp)
- [x] Release pre-trained models
## Highlights
- [x] The technical details are described **[here](./Technical_details.md)**
- [x] The great introduction and explanation from _`Computer Vision and Perception for Self-Driving Cars Course`_ **[Youtube link](https://youtu.be/cPOtULagNnI?t=4858)**
- [x] SFA3D is used for the second course in the _`Udacity Self-Driving Car Engineer Nanodegree Program: Sensor Fusion and Tracking`_ **[GitHub link](https://github.com/udacity/nd013-c2-fusion-starter/tree/b1455b8ff433cb7f537d62e526209738293e7d8b)**
**Update 2020.09.06**: Add `ROS` source code. The great work has been done by [@AhmedARadwan](https://github.com/AhmedARadwan).
The implementation is [here](https://github.com/maudzung/SFA3D/tree/ea0222c1b35489dc35d8452c989c4b014e20e0da)
## Demonstration (on a single GTX 1080Ti)
[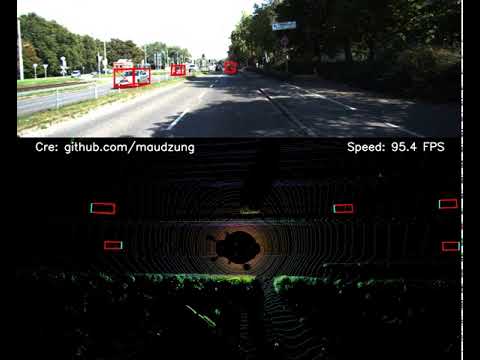](http://www.youtube.com/watch?v=FI8mJIXkgX4)
**[Youtube link](https://youtu.be/FI8mJIXkgX4)**
## 2. Getting Started
### 2.1. Requirement
The instructions for setting up a virtual environment is [here](https://github.com/maudzung/virtual_environment_python3).
```shell script
git clone https://github.com/maudzung/SFA3D.git SFA3D
cd SFA3D/
pip install -r requirements.txt
```
### 2.2. Data Preparation
Download the 3D KITTI detection dataset from [here](http://www.cvlibs.net/datasets/kitti/eval_object.php?obj_benchmark=3d).
The downloaded data includes:
- Velodyne point clouds _**(29 GB)**_
- Training labels of object data set _**(5 MB)**_
- Camera calibration matrices of object data set _**(16 MB)**_
- **Left color images** of object data set _**(12 GB)**_ (For visualization purpose only)
Please make sure that you construct the source code & dataset directories structure as below.
### 2.3. How to run
#### 2.3.1. Visualize the dataset
To visualize 3D point clouds with 3D boxes, let's execute:
```shell script
cd sfa/data_process/
python kitti_dataset.py
```
#### 2.3.2. Inference
The pre-trained model was pushed to this repo.
```
python test.py --gpu_idx 0 --peak_thresh 0.2
```
#### 2.3.3. Making demonstration
```
python demo_2_sides.py --gpu_idx 0 --peak_thresh 0.2
```
The data for the demonstration will be automatically downloaded by executing the above command.
#### 2.3.4. Training
##### 2.3.4.1. Single machine, single gpu
```shell script
python train.py --gpu_idx 0
```
##### 2.3.4.2. Distributed Data Parallel Training
- **Single machine (node), multiple GPUs**
```
python train.py --multiprocessing-distributed --world-size 1 --rank 0 --batch_size 64 --num_workers 8
```
- **Two machines (two nodes), multiple GPUs**
- _**First machine**_
```
python train.py --dist-url 'tcp://IP_OF_NODE1:FREEPORT' --multiprocessing-distributed --world-size 2 --rank 0 --batch_size 64 --num_workers 8
```
- _**Second machine**_
```
python train.py --dist-url 'tcp://IP_OF_NODE2:FREEPORT' --multiprocessing-distributed --world-size 2 --rank 1 --batch_size 64 --num_workers 8
```
#### Tensorboard
- To track the training progress, go to the `logs/` folder and
```shell script
cd logs//tensorboard/
tensorboard --logdir=./
```
- Then go to [http://localhost:6006/](http://localhost:6006/)
## Contact
If you think this work is useful, please give me a star!
If you find any errors or have any suggestions, please contact me (**Email:** `nguyenmaudung93.kstn@gmail.com`).
Thank you!
## Citation
```bash
@misc{Super-Fast-Accurate-3D-Object-Detection-PyTorch,
author = {Nguyen Mau Dung},
title = {{Super-Fast-Accurate-3D-Object-Detection-PyTorch}},
howpublished = {\url{https://github.com/maudzung/Super-Fast-Accurate-3D-Object-Detection}},
year = {2020}
}
```
## References
[1] CenterNet: [Objects as Points paper](https://arxiv.org/abs/1904.07850), [PyTorch Implementation](https://github.com/xingyizhou/CenterNet)
[2] RTM3D: [PyTorch Implementation](https://github.com/maudzung/RTM3D)
[3] Libra_R-CNN: [PyTorch Implementation](https://github.com/OceanPang/Libra_R-CNN)
_The YOLO-based models with the same BEV maps input:_
[4] Complex-YOLO: [v4](https://github.com/maudzung/Complex-YOLOv4-Pytorch), [v3](https://github.com/ghimiredhikura/Complex-YOLOv3), [v2](https://github.com/AI-liu/Complex-YOLO)
*3D LiDAR Point pre-processing:*
[5] VoxelNet: [PyTorch Implementation](https://github.com/skyhehe123/VoxelNet-pytorch)
## Folder structure
```
${ROOT}
└── checkpoints/
├── fpn_resnet_18/
├── fpn_resnet_18_epoch_300.pth
└── dataset/
└── kitti/
├──ImageSets/
│ ├── test.txt
│ ├── train.txt
│ └── val.txt
├── training/
│ ├── image_2/ (left color camera)
│ ├── calib/
│ ├── label_2/
│ └── velodyne/
└── testing/
│ ├── image_2/ (left color camera)
│ ├── calib/
│ └── velodyne/
└── classes_names.txt
└── sfa/
├── config/
│ ├── train_config.py
│ └── kitti_config.py
├── data_process/
│ ├── kitti_dataloader.py
│ ├── kitti_dataset.py
│ └── kitti_data_utils.py
├── models/
│ ├── fpn_resnet.py
│ ├── resnet.py
│ └── model_utils.py
└── utils/
│ ├── demo_utils.py
│ ├── evaluation_utils.py
│ ├── logger.py
│ ├── misc.py
│ ├── torch_utils.py
│ ├── train_utils.py
│ └── visualization_utils.py
├── demo_2_sides.py
├── demo_front.py
├── test.py
└── train.py
├── README.md
└── requirements.txt
```
[python-image]: https://img.shields.io/badge/Python-3.6-ff69b4.svg
[python-url]: https://www.python.org/
[pytorch-image]: https://img.shields.io/badge/PyTorch-1.5-2BAF2B.svg
[pytorch-url]: https://pytorch.org/