https://github.com/mdbloice/labeller
Quickly set up an image labelling web application for manually tagging images for machine learning tasks.
https://github.com/mdbloice/labeller
data-centric data-centric-ai machine-learning-library
Last synced: 12 months ago
JSON representation
Quickly set up an image labelling web application for manually tagging images for machine learning tasks.
- Host: GitHub
- URL: https://github.com/mdbloice/labeller
- Owner: mdbloice
- License: mit
- Created: 2021-09-16T08:16:01.000Z (almost 5 years ago)
- Default Branch: main
- Last Pushed: 2023-10-05T10:51:48.000Z (over 2 years ago)
- Last Synced: 2025-05-29T06:17:38.425Z (about 1 year ago)
- Topics: data-centric, data-centric-ai, machine-learning-library
- Language: Python
- Homepage:
- Size: 91.8 KB
- Stars: 9
- Watchers: 1
- Forks: 2
- Open Issues: 0
-
Metadata Files:
- Readme: README.md
- License: LICENSE
Awesome Lists containing this project
README

[](https://github.com/mdbloice/Labeller/actions/workflows/main.yml)
Quickly set up an image labelling web application for the tagging of images by humans for supervised machine learning tasks.
## Introduction
*Labeller* allows you to quickly set up an image tagging web application for labelling of images.
### Usage
1. Install _Labeller_ using `pip install labeller` from the command line
2. Navigate to the directory where you wish to create your web application. This directory should contain a subdirectory named `static/images` that contains the images you wish to label
3. Run `python -m labeller class_1 class_2 ... class_n` where `class_1 class_2 ... class_n` is a list of your class names separated by spaces
4. Run `python -m flask run` to start the web application
Example:
```bash
$ python -m labeller One Two Three Four Five
$ python -m flask run
```
This will create an application similar to the following:
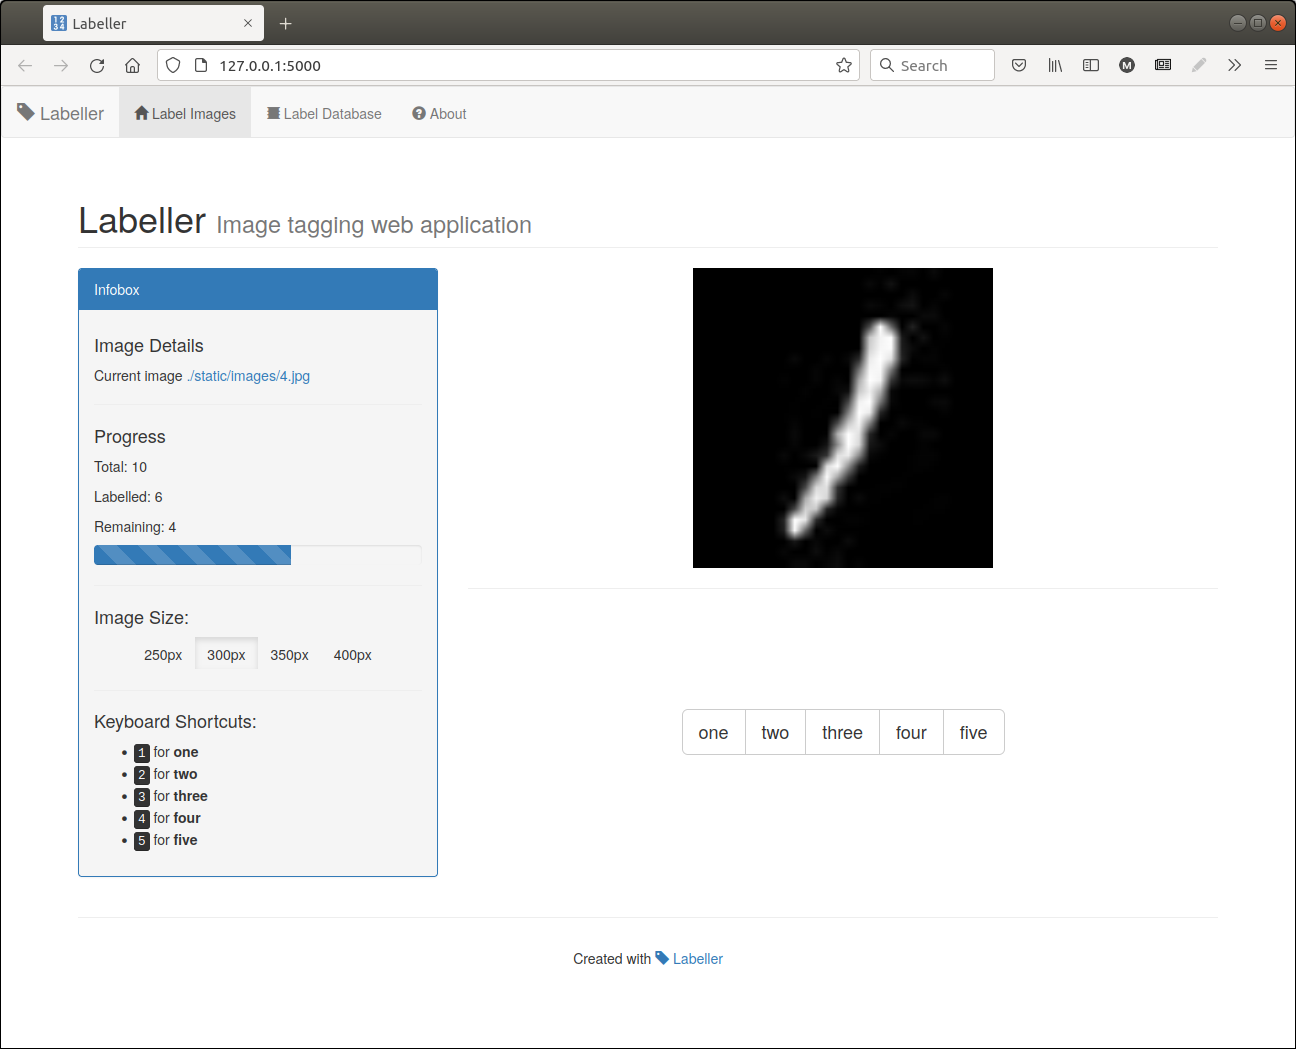
See the [Options](#options) section for configuration options.
Run `python -m labeller -h` for quick help.
### How Labeller Works
When you create a new labelling application, _Labeller_ will generate a web application based on the number of classes you have defined during initialisation. Images stored in `static/images` will be displayed randomly to the user, and they can be labelled with one of the classes provided during the app initialisation.
The built application will have the following structure:
```
project_folder
├── app.py
├── db
│ └── labels.db
├── static
│ ├── favicon.ico
│ ├── images
│ │ ├── im_1.jpg
│ │ ├── im_2.jpg
│ │ ├── ...
│ │ └── im_n.jpg
│ └── styles
│ └── dashboard.css
└── templates
├── about.html
├── footer.html
├── index.html
├── labels.html
└── navbar.html
```
The `labels.db` file is an SQLite database containing the labels for the images that have been labelled so far. To export them to CSV format, run the following:
```
$ sqlite3 -header -csv labels.db "select * from labels;" > labels.csv
```
## FAQ
- I want to clear the database and start labelling again
- Delete the `labels.db` SQLite database in the `db` directory. Generate your application again using `python -m labeller [class_names]` and Labeller will regenerate a new, empty database if no database exists.
- How can I export the data from the database as a CSV file?
- Try something like: `sqlite3 -header -csv labels.db "select * from labels;" > labels.csv`
Ensure you place your images in a the directory path `static/images`, so that a path to an image would be `./static/images/im_1.png` for example. In other words your directory structure should look as follows before you build your application:
```
project_folder
└── static
└── images
├── im_1.jpg
├── im_2.jpg
├── im_3.jpg
├── ...
└── im_n.jpg
```
## Options
Currently, the only user definable parameters is the list of class names. This will change as the application develops.
### Flask Options
_Labeller_ uses Flask as its web development framework. You can pass arguments to Flask as normal when invoking `python -m flask run`, or through environment variables. For example development mode can be enabled by setting an environment variable, e.g: `export FLASK_ENV=development` in Linux (in Windows use `set FLASK_ENV=development` or `$env:FLASK_ENV = "development"` in Powershell).
Some common options that can be passed with `python -m flask run` are:
- To serve the application over the network pass `--host=0.0.0.0`, so `python -m flask run --host=0.0.0.0`
- To use a different port other than the default of 5000, e.g. port 5001, pass `--port 5001`, so `python -m flask run --port 5001`
## Requirements
- Python >=3.5
The following Python packages are required, and will be downloaded automatically by `pip` during installation:
- `flask`
- `flask-bootstrap`
as well and their requirements.
## Known Issues
- HTML formatting of generated output needs work
- Images that are particularly large may have issues rendering and this will be fixed in the next update
## Future Work
- Text snippet labelling
- Consensus labelling (combining labelling efforts across users)
- Multi class labelling (labelling an image with more than one label)
- Free-text tagging/labelling
- Allow an option to resize all images in the `images` directory to a certain size when creating the web app
- API access for running instances to get image tags
- Provide option to not use CDNs for JQuery and Bootstrap
- Docker image?
## Licence and Acknowledgements
Labeller is made available under the terms of the MIT licence.
Logo created at [LogoMakr.com](https://logomakr.com)