https://github.com/mimshwright/pixi-easing-graph
pixi-easing-graph
https://github.com/mimshwright/pixi-easing-graph
Last synced: 6 months ago
JSON representation
pixi-easing-graph
- Host: GitHub
- URL: https://github.com/mimshwright/pixi-easing-graph
- Owner: mimshwright
- License: mit
- Created: 2022-11-29T10:11:27.000Z (over 3 years ago)
- Default Branch: main
- Last Pushed: 2023-01-28T23:11:59.000Z (over 3 years ago)
- Last Synced: 2024-08-10T08:15:40.911Z (almost 2 years ago)
- Language: TypeScript
- Homepage: https://mimshwright.github.io/pixi-easing-graph/
- Size: 2.01 MB
- Stars: 2
- Watchers: 3
- Forks: 0
- Open Issues: 3
-
Metadata Files:
- Readme: README.md
- Changelog: CHANGELOG.md
- License: LICENSE.md
Awesome Lists containing this project
README
# pixi-easing-graph
A utility component for viewing easing functions in Pixi.js and react-pixi. The graph includes an animated example and can be highly-customized to fit your needs. Function are expected to take a single a number between 0 and 1 and return a number between 0 and 1.
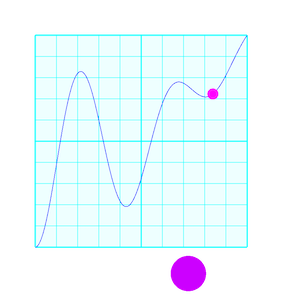
## [Demo](mimshwright.github.io/pixi-easing-graph/)
Check out the [Demo](mimshwright.github.io/pixi-easing-graph/) which shows off many of the features and is build with [react-pixi](https://github.com/inlet/react-pixi).
## Usage
```js
import {EasingGraph} from "pixi-easing-graph";
const graph = new EasingGraph(func [, options]);
```
`func` must be an easing function in the format `(x:number) => number` where the range of numbers expected for both input and output are between `0.0` and `1.0`. (see note below about "Drawing Multiple functions")
`options` is an object with the following properties and default values:
- `width` - width of the graph - default `250`
- `height` - height of the graph - default `250`
- `style` - graph style: "dot", "line", or "fill" - default `"dot"`,
- `clamp` - if true, clamps values between the range of 0 and 1 - default `false`
- `steps` - number of steps of the function to draw. If the value is NaN, this will equal `width` - default `NaN`
- `dotSize` - radius of dots when style is "dot" (also used for trails) - default `2`
- `lineWidth` - thickness of line when style is "line" - default `1`
- `background` - background color - default `0xffffff`
- `foreground` - foreground (graph) color - default `0x000000`
- `backgroundAlpha` - alpha for the background color - default `1.0`,
- `fillAlpha` - alpha for the foreground color in "fill" mode - default `0.5`,
- `gridCount` - How many lines in the grid on each axis. If 0, no grid is drawn - default `10`
- `gridSubdivisions` - when true, the middle and edges of the grid are emphasized - default `true`
- `gridColor` - Color of the grid - default `0xcccccc`
- `showMarker` - when true, the animation includes a marker dot that follows the graph - default `true`
- `markerColor` - color of the marker - default `0xff0000`
- `markerSize` - size of the marker - default `10`
- `markerTrail` - when true, the marker leave a trail of dots. If style is `dot` it won't be drawn. - default `false`
- `showMarker` - when true, the animation includes an example animation - default `false`
- `examplePosition` - position of the animated example: "bottom", "right" or "both - default `"bottom"`,
- `exampleColor` - color of the example animation - default `0x333333`
- `exampleSize` - size of the example - default `50`
- `exampleTrail` - when true, the examples leave a trail of dots - default `false`
- `showValues` - when true, shows the input and output values in a small text field - default `false`, fill defaults to `foreground`
- `textStyle` - If `showValues` is `true`, this is the style used to style the text. You can also include `x` and `y` to position the text. Values will be merged with the default. - default `{ fontSize: 10, x: 5, y: 5, fill: foreground]}`
- `duration` - Duration of the animation in milliseconds. - default is `2000`
- `autoPlay` - When true, the animation automatically plays any time `draw()` is called. - default `false`
- `loop` - When true, after you `play()` the animation will loop continuously until you call `stop()` - default `false`
### Animation
To play an animation of the easing function, use the `play()` method.
```js
import { EasingGraph } from "pixi-easing-graph";
const graph = new EasingGraph(quad);
stage.addChild(graph);
graph.play();
```
You can stop animations with `stop()`.
You can adjust the animations by using the `marker-` & `example-` properties in `options`. _More animation options coming soon._
### Drawing Multiple Functions
It's possible to graph more than one function, for exmaple, if you want to compare two easing funcitons. To do this, replace the `func` param in the constructor with an array of functions.
```javascript
const f = (x) => x;
const g = (x) => x * x;
const h = (x) => x * x * x;
const graph = new EasingGraph([f, g, h]);
```

The first function will be treated as the _primary_ funciton. Only the primary will be animated, show examples, and show text values. All others will only be drawn on the graph. (The ability to draw examples for all functions could be added in the future if needed.)
The functions will be drawn in reverse order so the primary funciton is drawn on top.
By default, the different functions will all use the same styling. To add custom styling to each one, you can create an object for each function...
```javascript
const graph = new EasingGraph([{f:f, foreground: 0x0000FF}, {f:g, foreground:0xFF0000, {f:h, foreground: 0x00FF00}]);
```
Any that don't define `foreground` will use the default value from the options object.
So to summarize, the types that can be passed into the first argument of the constructor are:
```typescript
EasingFunction | (EasingFunction | {f:EasingFunction, foreground?:number })[]
```
## react-pixi
There is a [react-pixi](https://github.com/inlet/react-pixi) component included with the code.
```js
import { EasingGraphComponent as EasingGraph } from "pixi-easing-graph";
```
All the options can be passed to this component as props as well as `f`, `x`, `y`.
As a hack, to trigger the animation, you can also set the `play` property to a different value to trigger the animation.
```js
setPlay(play === 0 ? 1 : 0)}>
```
## Development
### Scripts
- `dev` : start a server to see the demo
- `lint` : lint the code. You can also do `fix` to auto-fix.
- `test` : test with jest. Also `test:coverage` and `test:watch`
- `build` : bundle the code
- `commit` & `release` : see below
- `deploy`: Build the demo code and publish to gh-pages
### Commits & Releases
Code is automatically linted before being committed. I recommend installing the plugins for eslint and prettier in your code editor. You can attempt to fix linting issues with `yarn fix`.
When ready to commit, please commit using `yarn commit` to use commitizen for standard format commits.
When ready to release use `yarn release` with the `-r patch|minor|major` flag (default without the flag is `patch`).
You'll then need to publish your changes separately.
You can deploy an updated demo to github pages using `yarn deploy`