https://github.com/mo-esmp/dynamicrolebasedauthorizationnetcore
Dynamic Role-Based Access Control for ASP.NET Core MVC and Web API
https://github.com/mo-esmp/dynamicrolebasedauthorizationnetcore
asp-net-core asp-net-core-identity asp-net-identity discovering-controllers dynamic-auth dynamic-rbac hardcode-roles identity rbac rbac-authorization rbac-roles role-based-access-control
Last synced: about 1 year ago
JSON representation
Dynamic Role-Based Access Control for ASP.NET Core MVC and Web API
- Host: GitHub
- URL: https://github.com/mo-esmp/dynamicrolebasedauthorizationnetcore
- Owner: mo-esmp
- License: gpl-3.0
- Created: 2018-05-31T12:49:56.000Z (about 8 years ago)
- Default Branch: dev
- Last Pushed: 2024-11-04T21:56:47.000Z (over 1 year ago)
- Last Synced: 2025-05-10T11:46:45.479Z (about 1 year ago)
- Topics: asp-net-core, asp-net-core-identity, asp-net-identity, discovering-controllers, dynamic-auth, dynamic-rbac, hardcode-roles, identity, rbac, rbac-authorization, rbac-roles, role-based-access-control
- Language: C#
- Homepage:
- Size: 2.65 MB
- Stars: 493
- Watchers: 18
- Forks: 101
- Open Issues: 8
-
Metadata Files:
- Readme: README.md
- License: LICENSE
Awesome Lists containing this project
README
# Dynamic Role-Based Authorization in ASP.NET Core MVC 3.1, 5.0, 6.0 and 7.0 [](https://www.nuget.org/packages/DynamicAuthorization.Mvc.Core)
You already know how role-based authorization works in ASP.NET Core.
```c#
[Authorize(Roles = "Administrator")]
public class AdministrationController : Controller
{
}
```
But what if you don't want hardcode roles on the `Authorize` attribute or create roles later and specify in which controller and action it has access without touching source code?
**DynamicAuthorization** helps you authorize users without hardcoding role(s) on the `Authorize` attribute with minimum effort. DynamicAuthorization is built at the top of ASP.NET Core Identity and uses identity mechanism for managing roles and authorizing users.
Install the _DynamicAuthorization.Mvc.Core_ [NuGet package](https://www.nuget.org/packages/DynamicAuthorization.Mvc.Core)
```powershell
Install-Package DynamicAuthorization.Mvc.Core
```
or
```shell
dotnet add package DynamicAuthorization.Mvc.Core
```
Then, add `AddDynamicAuthorization()` to `IServiceCollection` in `Startup.ConfigureServices` method:
```csharp
public void ConfigureServices(IServiceCollection services)
{
...
services
.AddIdentity(options => options.SignIn.RequireConfirmedAccount = false)
.AddEntityFrameworkStores()
.AddDefaultTokenProviders();
services
.AddDynamicAuthorization(options => options.DefaultAdminUser = "UserName")
```
You can set the default admin username via `DefaultAdminUser` config to access everywhere without creating a default admin role and its access.
Then install JSON or SQLSever store to save role access.
To install _DynamicAuthorization.Mvc.JsonStore_ [NuGet package](https://www.nuget.org/packages/DynamicAuthorization.Mvc.JsonStore)
```powershell
Install-Package DynamicAuthorization.Mvc.JsonStore
```
or
```shell
dotnet add package DynamicAuthorization.Mvc.JsonStore
```
```csharp
public void ConfigureServices(IServiceCollection services)
{
services
.AddDynamicAuthorization(options => options.DefaultAdminUser = "UserName")
.AddJsonStore(options => options.FilePath = "FilePath");
```
Role access will be saved in a JSON file and you can specify the file path `FilePath` config.
Or install SQLServer store _DynamicAuthorization.Mvc.MsSqlServerStore_ [NuGet package](https://www.nuget.org/packages/DynamicAuthorization.Mvc.MsSqlServerStore)
```powershell
Install-Package DynamicAuthorization.Mvc.MsSqlServerStore
```
or
```shell
dotnet add package DynamicAuthorization.Mvc.MsSqlServerStore
```
```csharp
public void ConfigureServices(IServiceCollection services)
{
services
.AddDynamicAuthorization(options => options.DefaultAdminUser = "UserName")
.AddSqlServerStore(options => options.ConnectionString = "ConnectionString");
```
You can decorate controllers and actions with `DisplayName` attribute to show the user a more meaningful name instead of controller and action name.
```c#
[DisplayName("Access Management")]
public class AccessController : Controller
{
// GET: Access
[DisplayName("Access List")]
public async Task Index()
}
```
You can also the default UI for managing roles and assigning roles to users if you don't want to implement them by yourself.
Install the _DynamicAuthorization.Mvc.Ui_ [NuGet package](https://www.nuget.org/packages/DynamicAuthorization.Mvc.Ui)
```powershell
Install-Package DynamicAuthorization.Mvc.Ui
```
Then `AddUi` to DynamicAuthorization registration:
```
services
.AddDynamicAuthorization(options => options.DefaultAdminUser = "UserName")
.AddJsonStore(options => options.FilePath = "FilePath")
.AddUi();
```
Use `http:///role` url to manage roles and assign access to a role.
Use `http:///userrole` url to assign roles to users.
You can also use a custom `TagHelper` to check whether the user has access to view content or not. create a custom tag helper that inherits from `SecureContentTagHelper`
```c#
[HtmlTargetElement("secure-content")]
public class MySecureContentTagHelper : SecureContentTagHelper
{
public MySecureContentTagHelper(
ApplicationDbContext dbContext,
DynamicAuthorizationOptions authorizationOptions,
IRoleAccessStore roleAccessStore
)
: base(dbContext, authorizationOptions, roleAccessStore)
{
}
}
```
In each view wrap a content or an anchor tag inside `secure-content` tag:
```html
```
Don't forget to add your tag halper namespace to `_ViewImports.cshtml`:
```cshtml
@using SampleMvcWebApp
@addTagHelper *, Microsoft.AspNetCore.Mvc.TagHelpers
@addTagHelper *, SampleMvcWebApp
```
If you extended `IdentityUser` or you changed user and role key, you should pass user and role type too. for example:
```c#
public class ApplicationDbContext : IdentityDbContext { ... }
public class MySecureContentTagHelper : SecureContentTagHelper { ... }
```
or
```c#
public class ApplicationDbContext : IdentityDbContext { ... }
public class MySecureContentTagHelper : SecureContentTagHelper { ... }
```
#
If you don't want to use the default UI, follow the below steps to discover controllers and actions and give access to the role and then assign role(s) to the user.
The next step is discovering controllers and actions. `IMvcControllerDiscovery` return all controllers and actions that decorated with `[Authorize]` attribute. `IMvcControllerDiscovery.GetControllers()` method returns list of `MvcControllerInfo`:
```c#
public class MvcControllerInfo
{
public string Id => $"{AreaName}:{Name}";
public string Name { get; set; }
public string DisplayName { get; set; }
public string AreaName { get; set; }
public IEnumerable Actions { get; set; }
}
public class MvcActionInfo
{
public string Id => $"{ControllerId}:{Name}";
public string Name { get; set; }
public string DisplayName { get; set; }
public string ControllerId { get; set; }
}
```
The next step is creating a role to assign access to it. Use `RoleManager<>` to create role and `IRoleAccessStore` to store role access.
```c#
var role = new IdentityRole { Name = "RoleName" };
var result = await _roleManager.CreateAsync(role);
var controllers = _mvcControllerDiscovery.GetControllers();
var roleAccess = new RoleAccess
{
Controllers = controllers.First(),
RoleId = role.Id
};
await _roleAccessStore.AddRoleAccessAsync(roleAccess);
```
The final step is assigning a created role to a user:
```c#
var user = await _userManager.FindByIdAsync("someId");
await _userManager.AddToRolesAsync(user, new [] { "RoleName" });
```
And now the user only can access those controllers and actions that his roles can access.
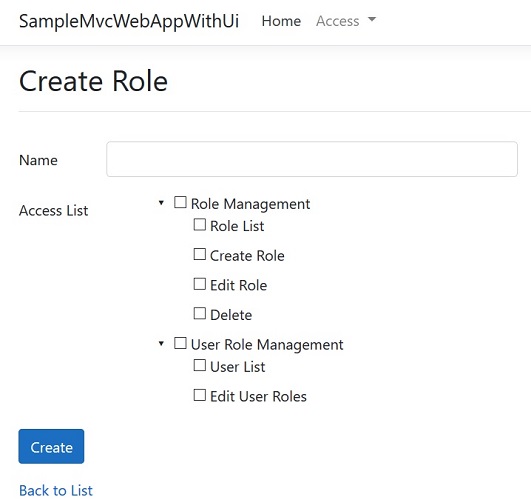
Here is an example to create a role and assign access to the role.
```c#
public class RoleViewModel
{
[Required]
[StringLength(256, ErrorMessage = "The {0} must be at least {2} characters long.")]
public string Name { get; set; }
public IEnumerable SelectedControllers { get; set; }
}
[DisplayName("Role Management")]
public class RoleController : Controller
{
private readonly IMvcControllerDiscovery _mvcControllerDiscovery;
private readonly IRoleAccessStore _roleAccessStore;
private readonly RoleManager _roleManager;
public RoleController(
IMvcControllerDiscovery mvcControllerDiscovery,
IRoleAccessStore roleAccessStore,
RoleManager roleManager
)
{
_mvcControllerDiscovery = mvcControllerDiscovery;
_roleManager = roleManager;
_roleAccessStore = roleAccessStore;
}
// GET: Role/Create
[DisplayName("Create Role")]
public ActionResult Create()
{
var controllers = _mvcControllerDiscovery.GetControllers();
ViewData["Controllers"] = controllers;
return View();
}
// POST: Role/Create
[HttpPost, ValidateAntiForgeryToken]
public async Task Create(RoleViewModel viewModel)
{
if (!ModelState.IsValid)
{
ViewData["Controllers"] = _mvcControllerDiscovery.GetControllers();
return View(viewModel);
}
var role = new IdentityRole { Name = viewModel.Name };
var result = await _roleManager.CreateAsync(role);
if (!result.Succeeded)
{
foreach (var error in result.Errors)
ModelState.AddModelError("", error.Description);
ViewData["Controllers"] = _mvcControllerDiscovery.GetControllers();
return View(viewModel);
}
if (viewModel.SelectedControllers != null && viewModel.SelectedControllers.Any())
{
foreach (var controller in viewModel.SelectedControllers)
foreach (var action in controller.Actions)
action.ControllerId = controller.Id;
var roleAccess = new RoleAccess
{
Controllers = viewModel.SelectedControllers.ToList(),
RoleId = role.Id
};
await _roleAccessStore.AddRoleAccessAsync(roleAccess);
}
return RedirectToAction(nameof(Index));
}
}
```
Checkout samples to view full implementation.
#
To implement DynamicAuthorization step by step by yourself checkout [manual branch](https://github.com/mo-esmp/DynamicRoleBasedAuthorizationNETCore/tree/manual).