https://github.com/moisestech/stylegan2-training-notes
StyleGAN2 Training Notes
https://github.com/moisestech/stylegan2-training-notes
Last synced: 8 months ago
JSON representation
StyleGAN2 Training Notes
- Host: GitHub
- URL: https://github.com/moisestech/stylegan2-training-notes
- Owner: moisestech
- Created: 2020-06-04T23:13:36.000Z (about 6 years ago)
- Default Branch: master
- Last Pushed: 2020-06-07T14:47:03.000Z (about 6 years ago)
- Last Synced: 2025-04-09T19:51:41.738Z (about 1 year ago)
- Size: 1.76 MB
- Stars: 5
- Watchers: 2
- Forks: 0
- Open Issues: 0
-
Metadata Files:
- Readme: README.md
Awesome Lists containing this project
README
# Training a Non-Square StyleGAN2 model on GCP
**#stylegan2** **#non-square** **#gcp**
Notes :pencil: based on [Training StyleGAN2 Part 2 Video](www.youtube.com/watch?v=Ij1dqSVR89M) :movie_camera: taught in the [StyleGAN2 DeepDive course]([https://bustbright.square.site/s/shop](https://bustbright.square.site/s/shop)) :books:by [@Derrick Schultz]([https://twitter.com/dvsch](https://twitter.com/dvsch)) and [@Lia Coleman]([https://twitter.com/Lialialiacole](https://twitter.com/Lialialiacole)). The asterisk * on each numbered section will link to the video timecode of the tutorial.
## 1. Start-up Server :gear: [*](https://youtu.be/Ij1dqSVR89M?t=19)
1. Login into [GCP](console.cloud.google.com)
2. Click launch on your Compute account. (image?)
**Notes:**
- Have your dataset ready and uploaded in :file_folder:Google Drive.
- Vertical :art: Images: 767px by 1200px
- Square :art: Images: 1024px by 1024px
- Refer to the Github :octocat: repo [skyfkynil/stylegan2](https://github.com/skyflynil/stylegan2) for detailed directions.
- For further information refer to the paper Official TensorFlow Implementation with practical improvements :page_facing_up:[http://arxiv.org/abs/1912.04958](http://arxiv.org/abs/1912.04958)
## 2. SSH Login Open in Browser Window :computer: [*](https://youtu.be/Ij1dqSVR89M?t=84)
- Click Login through SSH Connect, opening a browser window.
- Out of the box doesn’t have static IP (It can be set-up)
## 3. Activate StyleGAN2 library :snake: [*](https://youtu.be/Ij1dqSVR89M?t=121)
1. In Terminal activate your anaconda environment.
```
conda activate stylegan
```
## 4. Set-up Dataset Folder :file_folder: [*](https://youtu.be/Ij1dqSVR89M?t=176)
1. Move into the skyflynil folder and go into the folder *datasets*
2. Place all TFRecords in the datasets folder.
3. Create raw_datasets folder
```
mkdir raw_datasets
```
- (Why? To differentiate raw images from tfrecord folders)
4. Go inside your new folder
```
cd into raw_datasets
```
## 5. Upload Dataset images in GCP :arrow_up: [*](https://youtu.be/Ij1dqSVR89M?t=218)
1. Use [GDown](https://pypi.org/project/gdown/)
2. Pass the ID to a file
3. On GDrive, toggle Share linking on and copy the ID
```
gdown --id id-ofyour-gdrive-zip-file
```
- GServer to GServer is really fast
## 6. Unzip :closed_lock_with_key: [*](https://youtu.be/Ij1dqSVR89M?t=311)
1. Unzip your gdown file
```
unzip dataset-name.zip
```
2. Clean up your raw_dataset folder by removing the zip file
```
rm dataset-name.zip
```
3. Go back to the main styleGAN2 folder
```
..//
```
## 7. Create our TFRecords files :crystal_ball: [*](https://youtu.be/Ij1dqSVR89M?t=363)
1. Create TFRecords from your image files, rather than training from raw-images (optimization)
```
!python dataset_tool.py create_from_images_raw --res_log2=8 ./dataset/dataset_name ./raw_datasets/dataset-name/
```
- you should see raw-dataset TFRecords file
- (base) stylegan-ver: 1
**Notes**
- **Detailed instruction for training your [stylegan2 skyflynil notes](https://github.com/skyflynil/stylegan2)**
- Instead of image size of 2^n * 2^n, now you can process your image size as of (min_h x 2^n) X (min_w * 2^n) naturally. For example, 640x384, min_h = 5, min_w =3, n=7. Please make sure all your raw images are preprocessed to the exact same size. To reduce the training set size, JPEG format is preferred.
- For image size 1280x768 (hxw), you may choose (min_h, min_w, res_log2) as (10, 6, 7) or (5, 3, 8) , the latter setup is preferred due to deeper and smaller network, change res_log2 argument for dataset creation and training accordingly.
- For information on installing your anaconda environment check out the video [StyleGAN2 installation on GCP]([https://www.youtube.com/watch?v=59hpiFMjhpY](https://www.youtube.com/watch?v=59hpiFMjhpY)) :movie_camera:
- Documentation link to [listing out your anaconda environments]([https://docs.conda.io/projects/conda/en/latest/user-guide/tasks/manage-environments.html#viewing-a-list-of-your-environments](https://docs.conda.io/projects/conda/en/latest/user-guide/tasks/manage-environments.html#viewing-a-list-of-your-environments)) on Terminal
## 8. Upload & Transfer Learn from a new model :orange_book: [*](https://youtu.be/Ij1dqSVR89M?t=603)
- If your dataset are :art: images with dimensions 1200px by 768px, or 768px by 1200px (non-square) you must transfer learn from a model trained on those dimensions.
- The model that is default set in transfer learning is 1024px by 1024ox.
- You can't transfer learn if the size of your model and the size of your dataset don't match.
1. Setup Results Folder :file_folder: to Ignore ("rename") :no_entry_sign: Square Model [*](https://youtu.be/Ij1dqSVR89M?t=660)
```
mv results/00000-pretrained/network-snapshot-1000.pkl results/00000-pretrained/network-snapshot-1000.pkl-ignore
```
2. Get the sharable link to your non-square model pre-trained .pkl file on Google Drive and Gdown the file into the results folder.
```
gdown --id id-ofyour-pkl-file
```
## 9. Train Model :gear: [*](https://youtu.be/Ij1dqSVR89M?t=888)
```
!python run_training.py --num-gpus=1 --data-dir=./dataset --config=config-f --dataset=your_dataset_name --mirror-augment=true --metric=none --total-kimg=20000 --min-h=5 --min-w=3 --res-log2=8 --result-dir="/content/drive/My Drive/stylegan2/results"
```
**Notes**
- *data-dir* should always point to the parent of your parent directory of your TFRecords folder.
- *config* use config-e (512px) or config-f (1024px), it depends on the size of the image your are outputting to.
- *dataset* input the name of your dataset folder :file_folder:
- *total kimages* 20000
- *res-log2* means it is a power of 2
- so the model will multiply log2-8 by min-width=5 and min-height=2
- which gives us our 1280px by 768px training dimensions.
- width: 2^6*2 = 768
- height=2^8*5 1200
- This repo recommends that if you are doing 128 it recommends you use 7
- Because that 8th channel although it makes the network a little bit deeper it makes it smaller overall
- :warning: You can’t do a 16:9 or 720p aspect ratios.
## 10. Check on Your Training :eyes: [*](https://youtu.be/Ij1dqSVR89M?t=1130)
**Notes:**
1. We are ready to start training, it will display that is is training from your last :cactus: .pkl file

- Its might be a bit slower the first time on the same machine because it is caching some files.
- *Data shape* = [3, 1280, 768] :triangular_ruler:
- *Dynamic range* = [0, 255] :traffic_light:
- Range 0-255 256 the size that we can work with loading networks
2. Custom Cuda commands compile
- (2- 5 minute wait) :clock4:
- Outputting the architecture
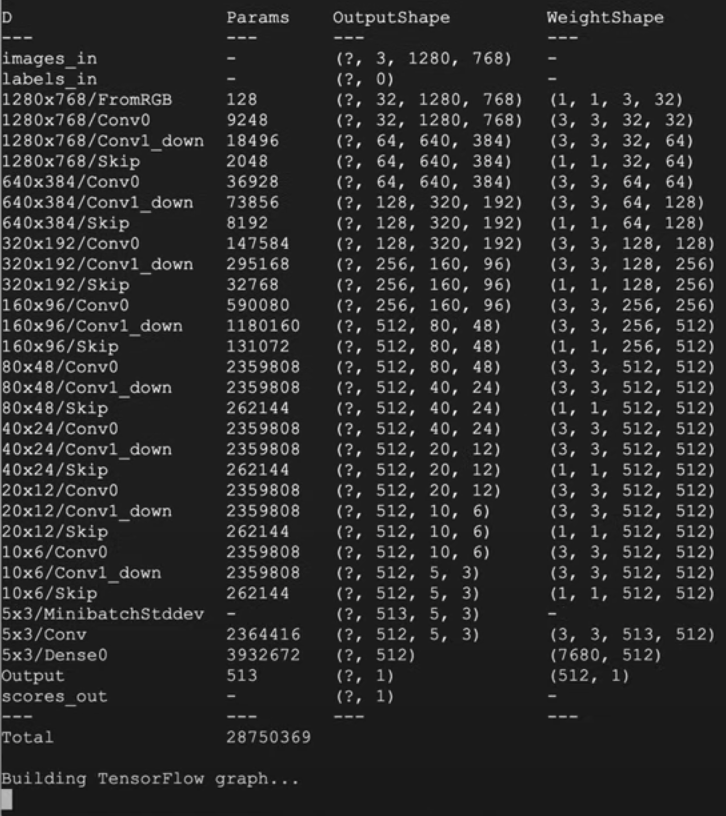

3. To confirm :white_check_mark:, terminal should output process above :point_up_2:
* Building *Tensorflow graph*
* Training for *20 kimages*
* You will produce an initial :cactus: .pkl file from its current status.
* Outputting pickling up from the same image
* Size of the *mini-batches*
* Size of *gpumem* is how much memory the training is using. (underestimates)
* *Warning:* :warning: might throw error if the datasets TFRecords file is not the right shape.
## 11. Create Training Subprocess :link: [*](https://youtu.be/Ij1dqSVR89M?t=1475)
- GCP terminal when closed, also terminates the training process.
1. [Nohup](https://en.wikipedia.org/wiki/Nohup) re-running the script using *Nohup* is a background process in the GPU that will allow us to close the browser window and continue the training process.

- Other solutions: Install gnu, gmux
2. Now we will check *nohup.out* to asses wether this is working as a background process.
```
Nvdia-smi
```

- Cuda version 4.0
- How much GPU are you using
- Process ID python 15.7gb
- This is your command running on the GPU
```
Kill -9 PID number
```
## 13. 1 Day of Training Later.. :sunrise:
- 24 hours of training later :clock4:
1. In [GCP](console.cloud.google.com) head back to your server into the skyflynil folder :file_folder:
2. Since *nohup* has made the training run as a subprocess you will have to type the Nvdia-smi command to check that it is running properly
```
Nvdia-smi
```
3. Terminate the sub-process
```
ls results
```
4. Head inside the results folder which will have the results labeled with your dataset name.
```
cd/results/0003-stylegan2-your_dataset_name
```
- Training 80k images can start reflecting dataset ok enough.
- Training up to 500k images gets to a really good point
- Truncation values will vary in displayed results.
## 14. Download file :arrow_heading_down: nohup.out :bookmark_tabs: [*](https://youtu.be/Ij1dqSVR89M?t=1963)
1. Download the nohup .out file
```
ls pwd
```

2. Open in Text Editor and scroll to the bottom

**Notes:**
- A *tick* is a certain number of *kimages*, depending on what you set your *mini-batch* too
- How long does it take to train a tick faster with how quickly it takes
Hope these notes help to breakdown the StyleGAN2 video tutorial for reference in the future. :rocket: