https://github.com/monah-rasta/serverrewards
Oxide plugin for Rust. Earn reward points in various ways and spend them on many different options in the GUI reward store
https://github.com/monah-rasta/serverrewards
oxide plugin rust
Last synced: about 2 months ago
JSON representation
Oxide plugin for Rust. Earn reward points in various ways and spend them on many different options in the GUI reward store
- Host: GitHub
- URL: https://github.com/monah-rasta/serverrewards
- Owner: MONaH-Rasta
- License: mit
- Created: 2025-03-06T21:04:31.000Z (about 1 year ago)
- Default Branch: main
- Last Pushed: 2025-03-06T21:14:08.000Z (about 1 year ago)
- Last Synced: 2025-03-06T22:23:11.235Z (about 1 year ago)
- Topics: oxide, plugin, rust
- Language: C#
- Homepage: https://umod.org/plugins/server-rewards
- Size: 35.2 KB
- Stars: 0
- Watchers: 1
- Forks: 0
- Open Issues: 0
-
Metadata Files:
- Readme: README.md
- License: LICENSE
Awesome Lists containing this project
README
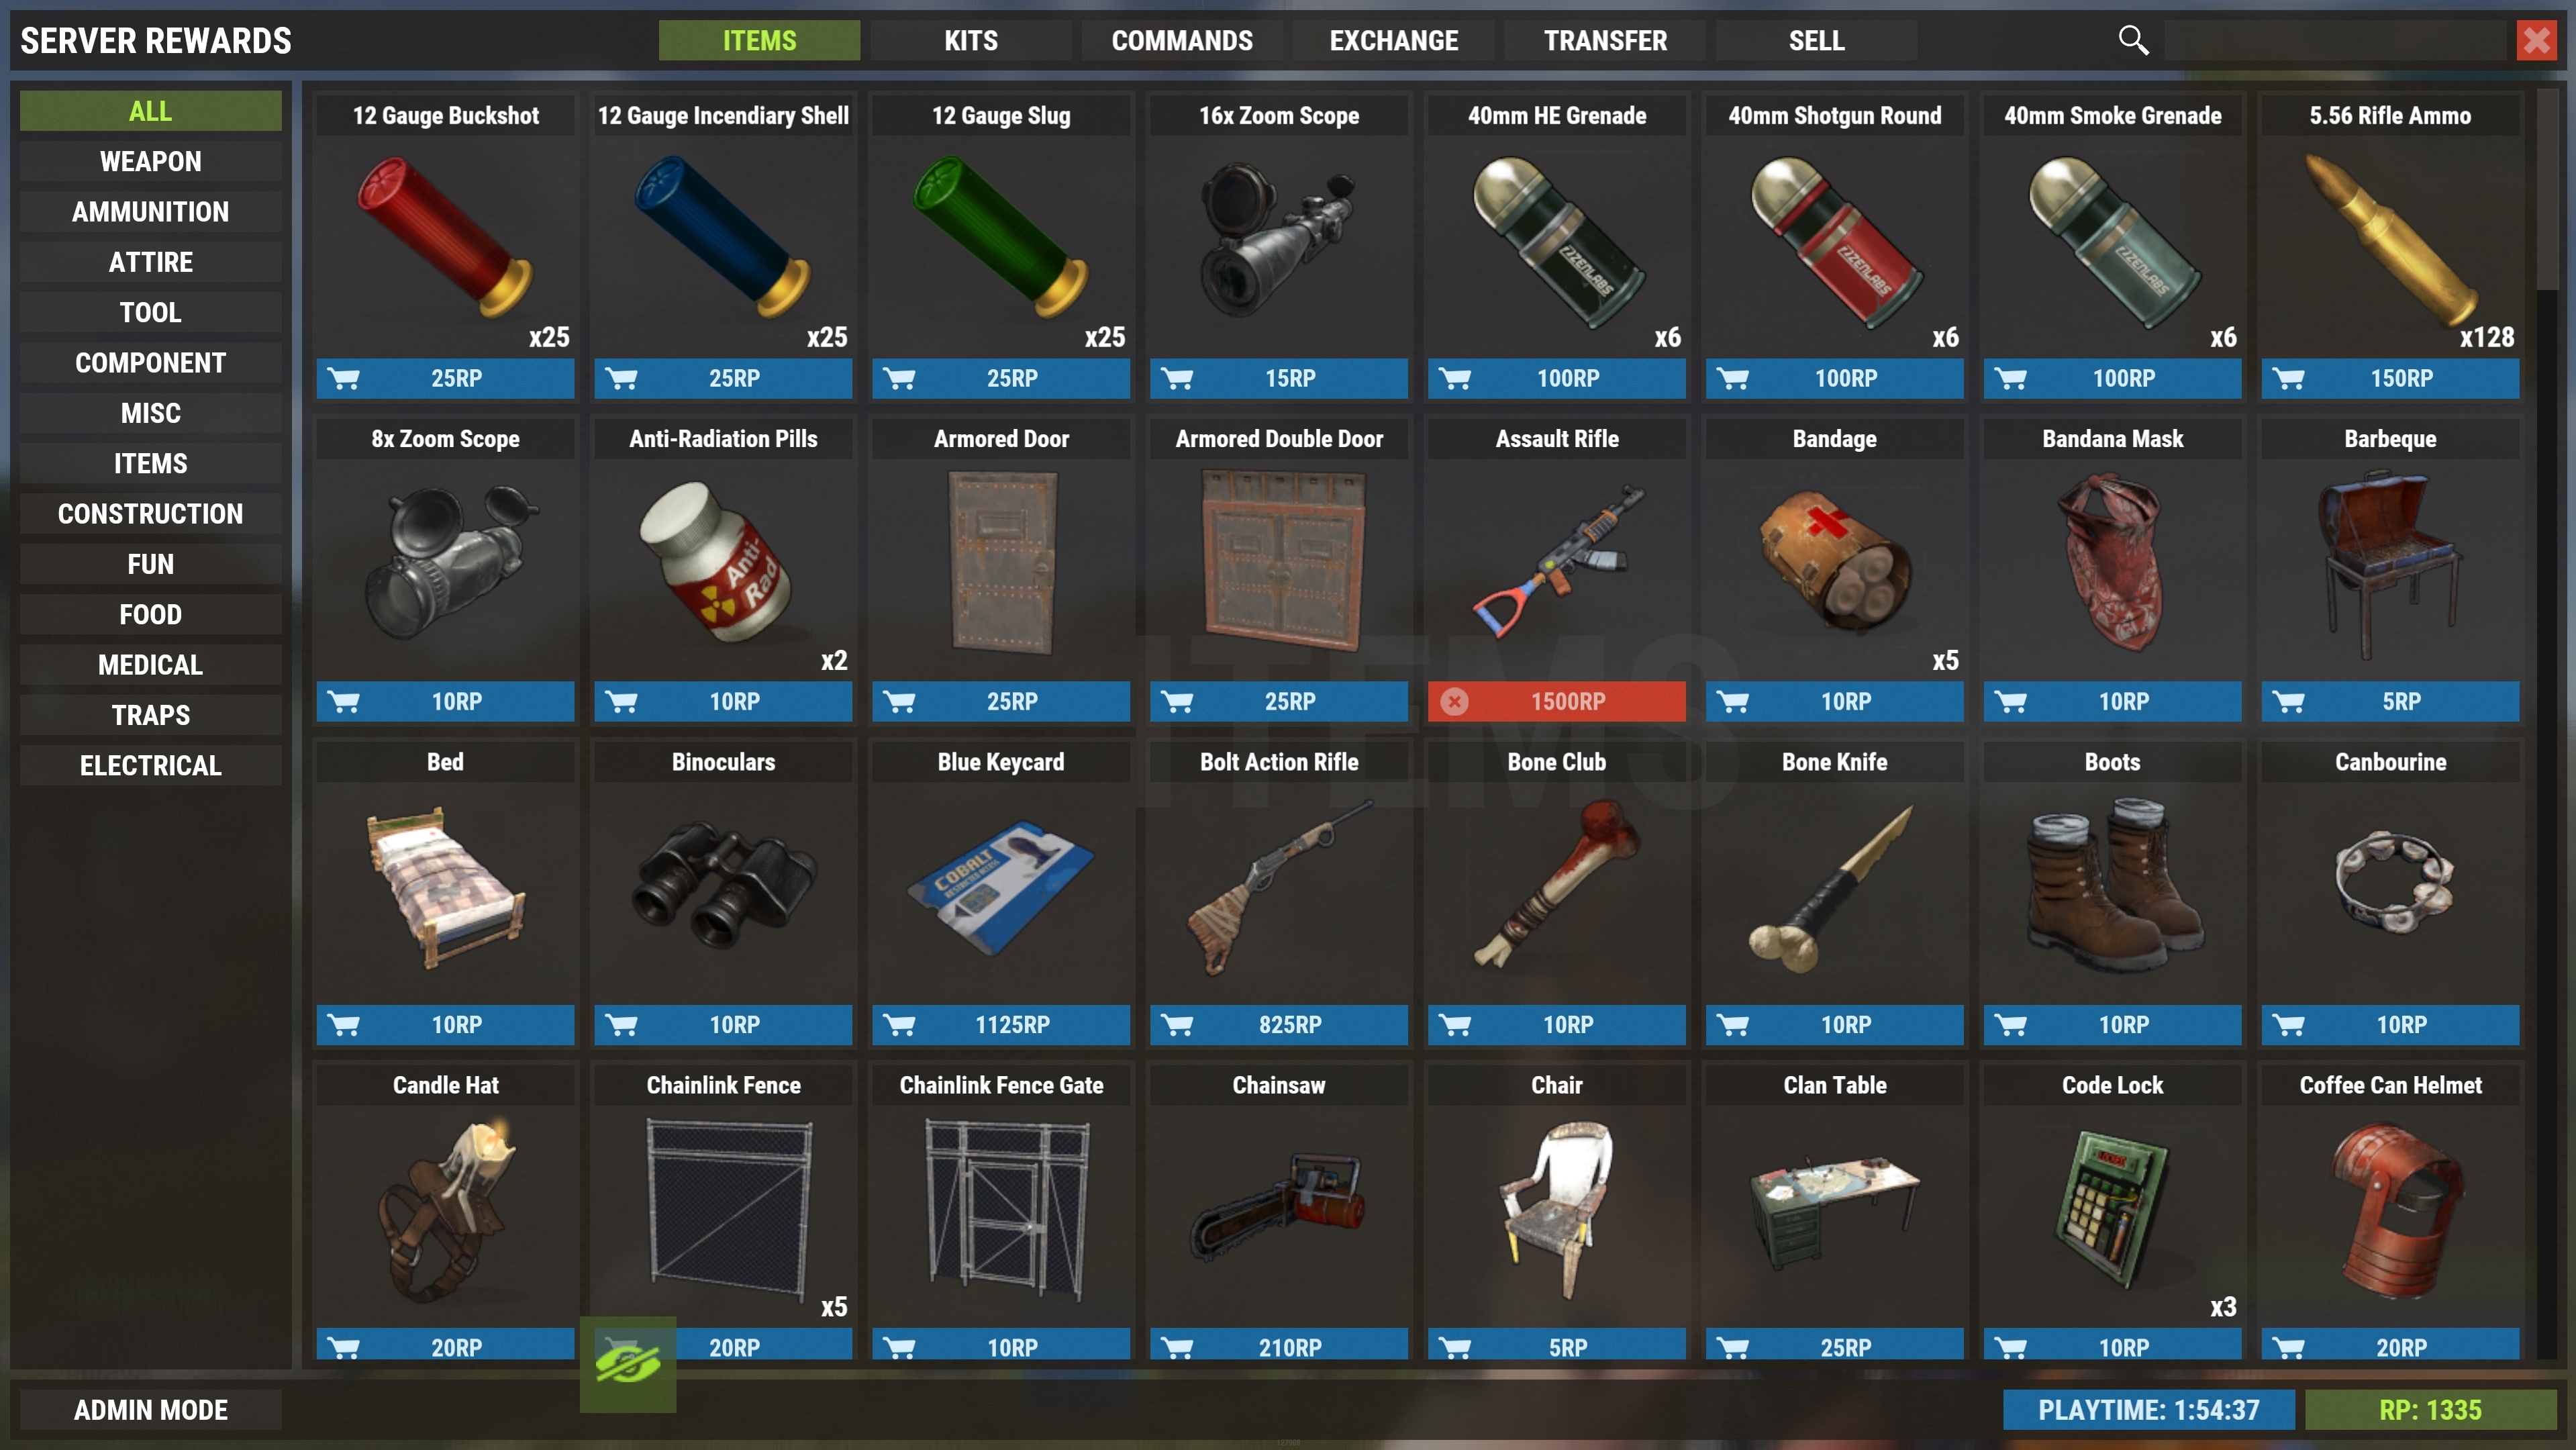
## Features
* UI store with a customizable color scheme
* The plugin functions as both a store and a bank, keeping track of its own currency `RP`
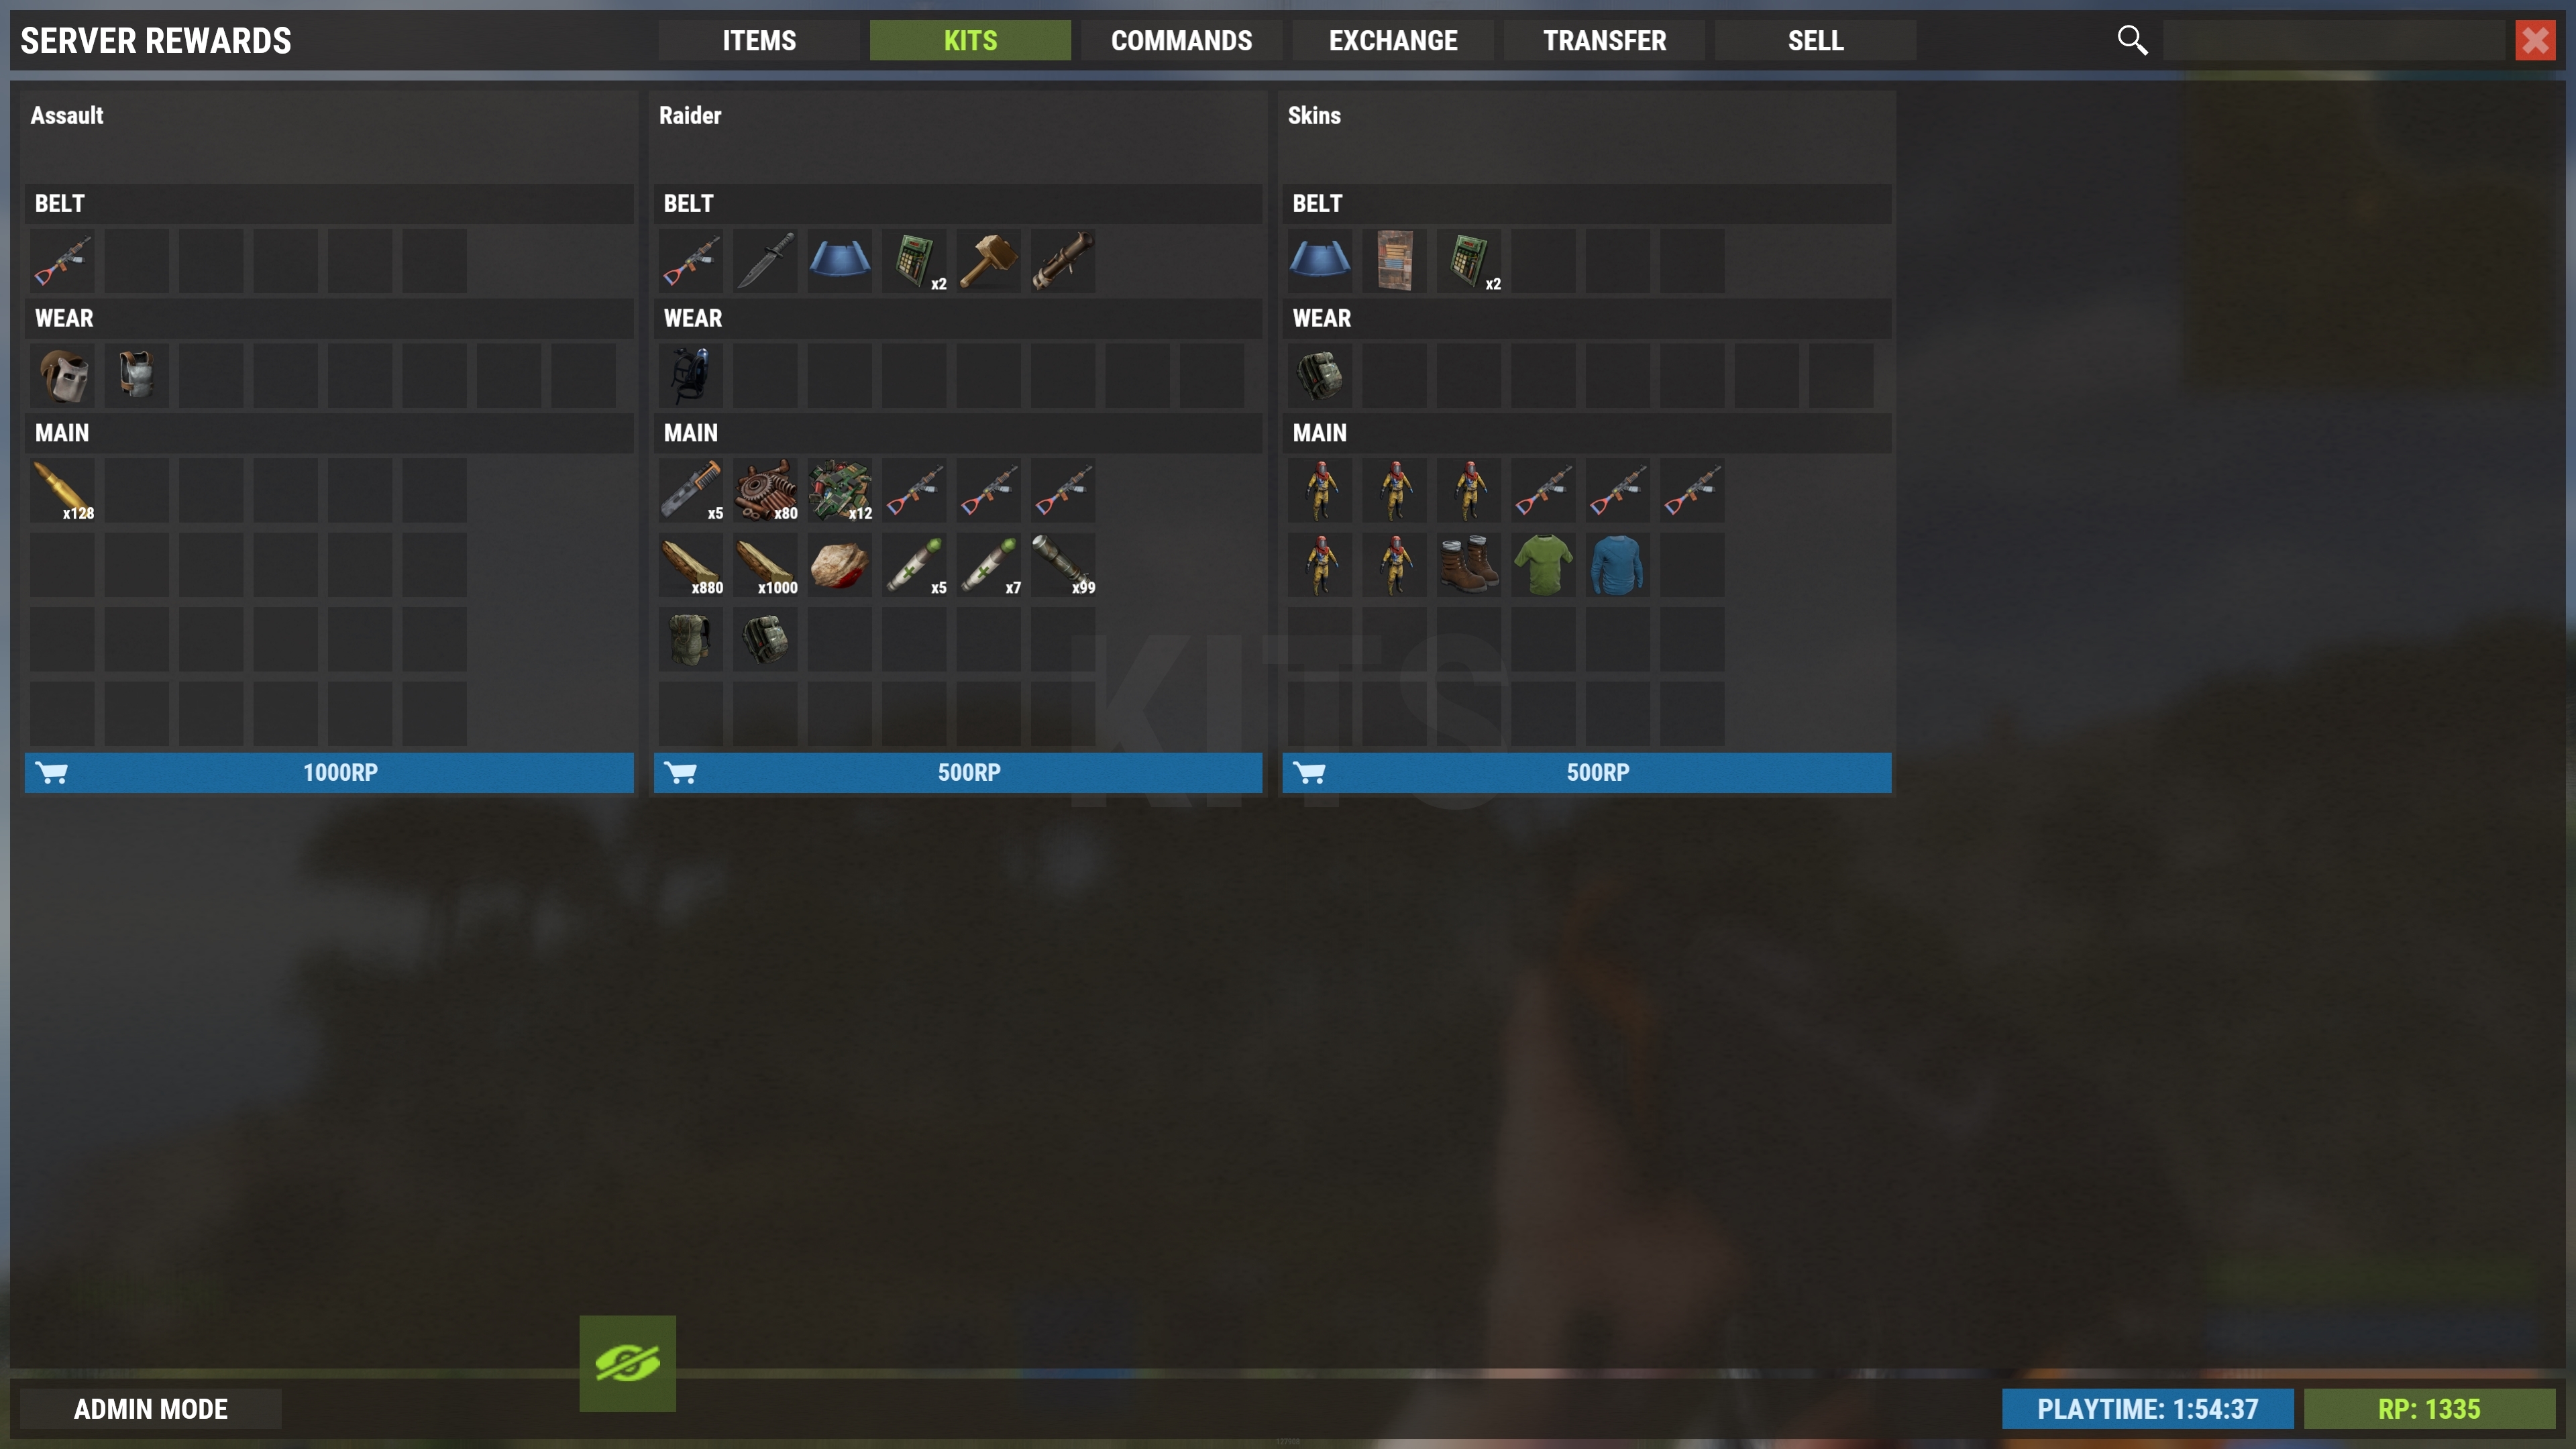
* Allow users to purchase items, kits and command sets
* Assign permissions to products so only VIPs can access them
* Allow users to sell items back to the store
* Allow users to exchange RP for Economics and vice versa
* Allow users to transfer RP to other players
* Optional logging of all transactions and player balances
* Setup NPC stores using HumanNPC with either their own items for sale, or as a way to interact with the main store
## Permissions
* `serverrewards.admin` - Required for players without auth level 2 (owners) to edit anything store related.
## Chat Commands
* `/s` - Opens the store. This command can be changed in the config file
## Admin RP Management Commands
*This command can be changed in the config file*
#### Chat
* `/rp add ` - Add the specified amount of RP to a player
* `/rp take ` - Deduct the specified amount of RP from a player
* `/rp clear ` - Reset the specified players RP to 0
* `/rp check ` - Show the amount of RP a player has
#### Console
* `rp add ` - Add the specified amount of RP to a player
* `rp take ` - Deduct the specified amount of RP from a player
* `rp clear ` - Reset the specified players RP to 0
* `rp check ` - Show the amount of RP a player has
## Adding, Editing and Removing Products
All the store management is done via the user interface.
A 'ADMIN MODE' button will appear in the bottom left of the menu for users with auth level 2, or the `serverrewards.admin` permission.
When admin mode is enabled, the purchase buttons for each product will be replaced with a `EDIT` and `DELETE` button, and a `ADD PRODUCT` button will appear in the footer for each product category.
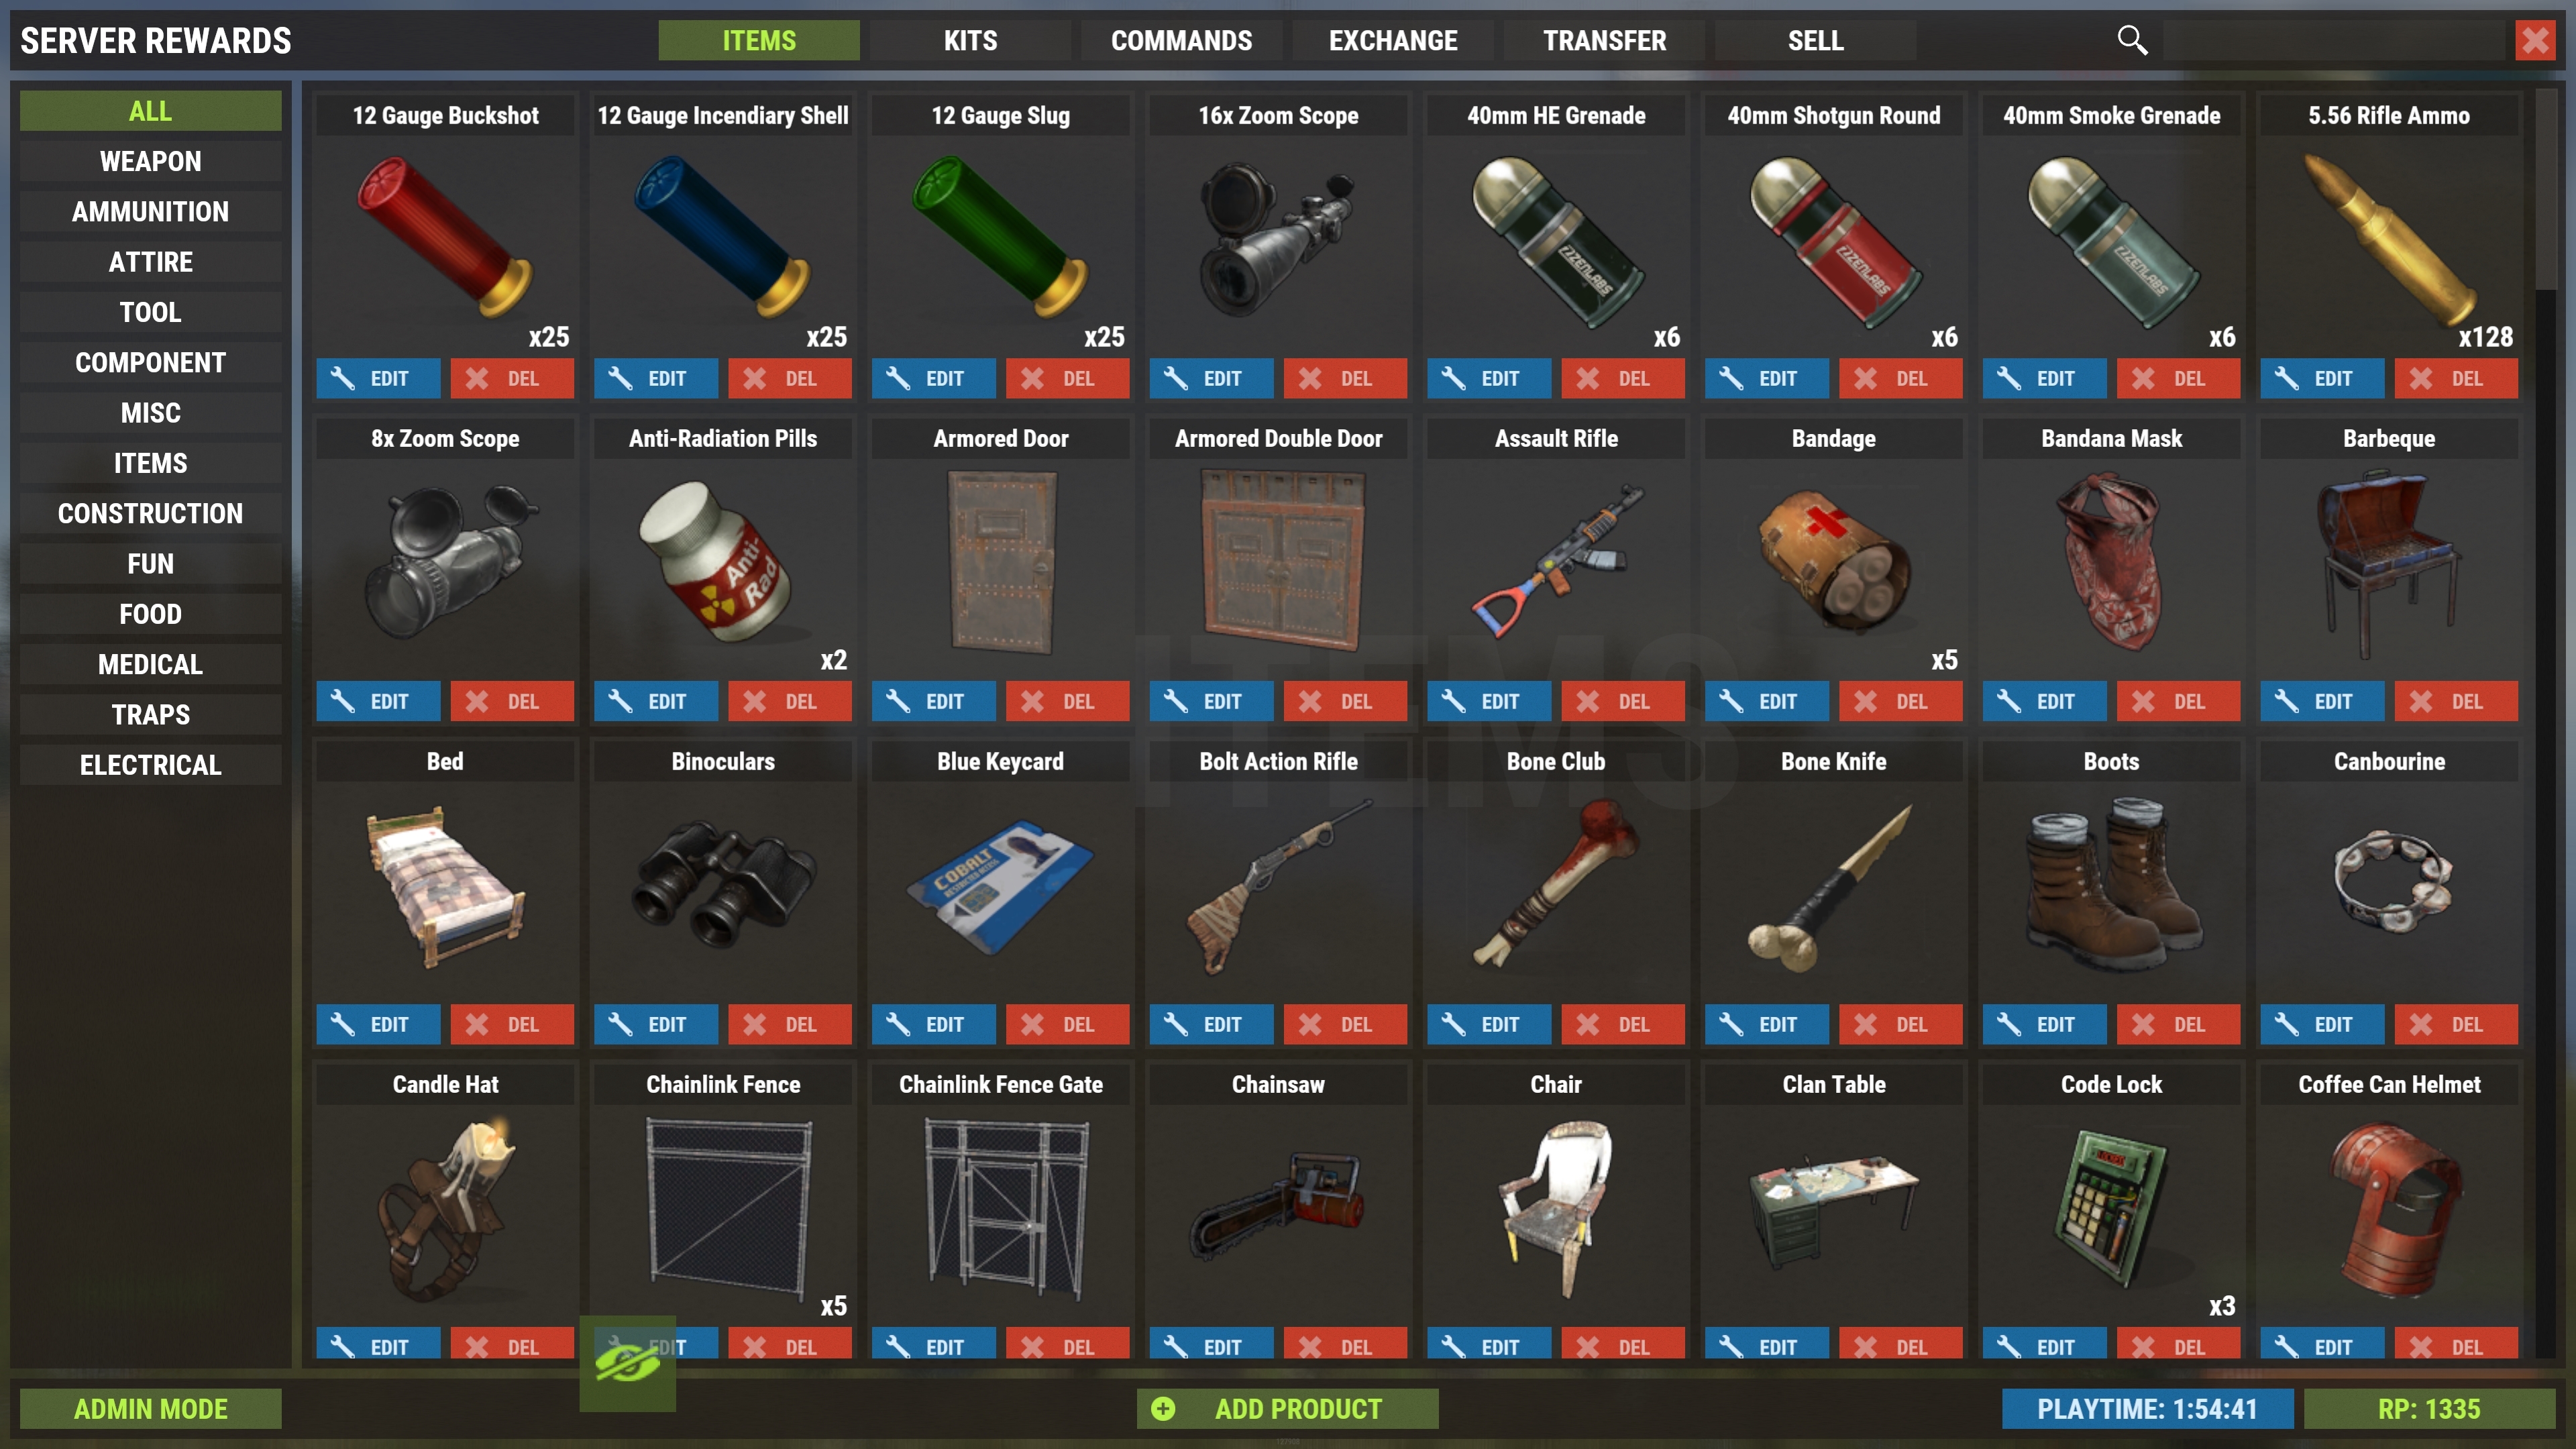
The Add Product and Edit buttons will open the same menu to either create or edit the product.
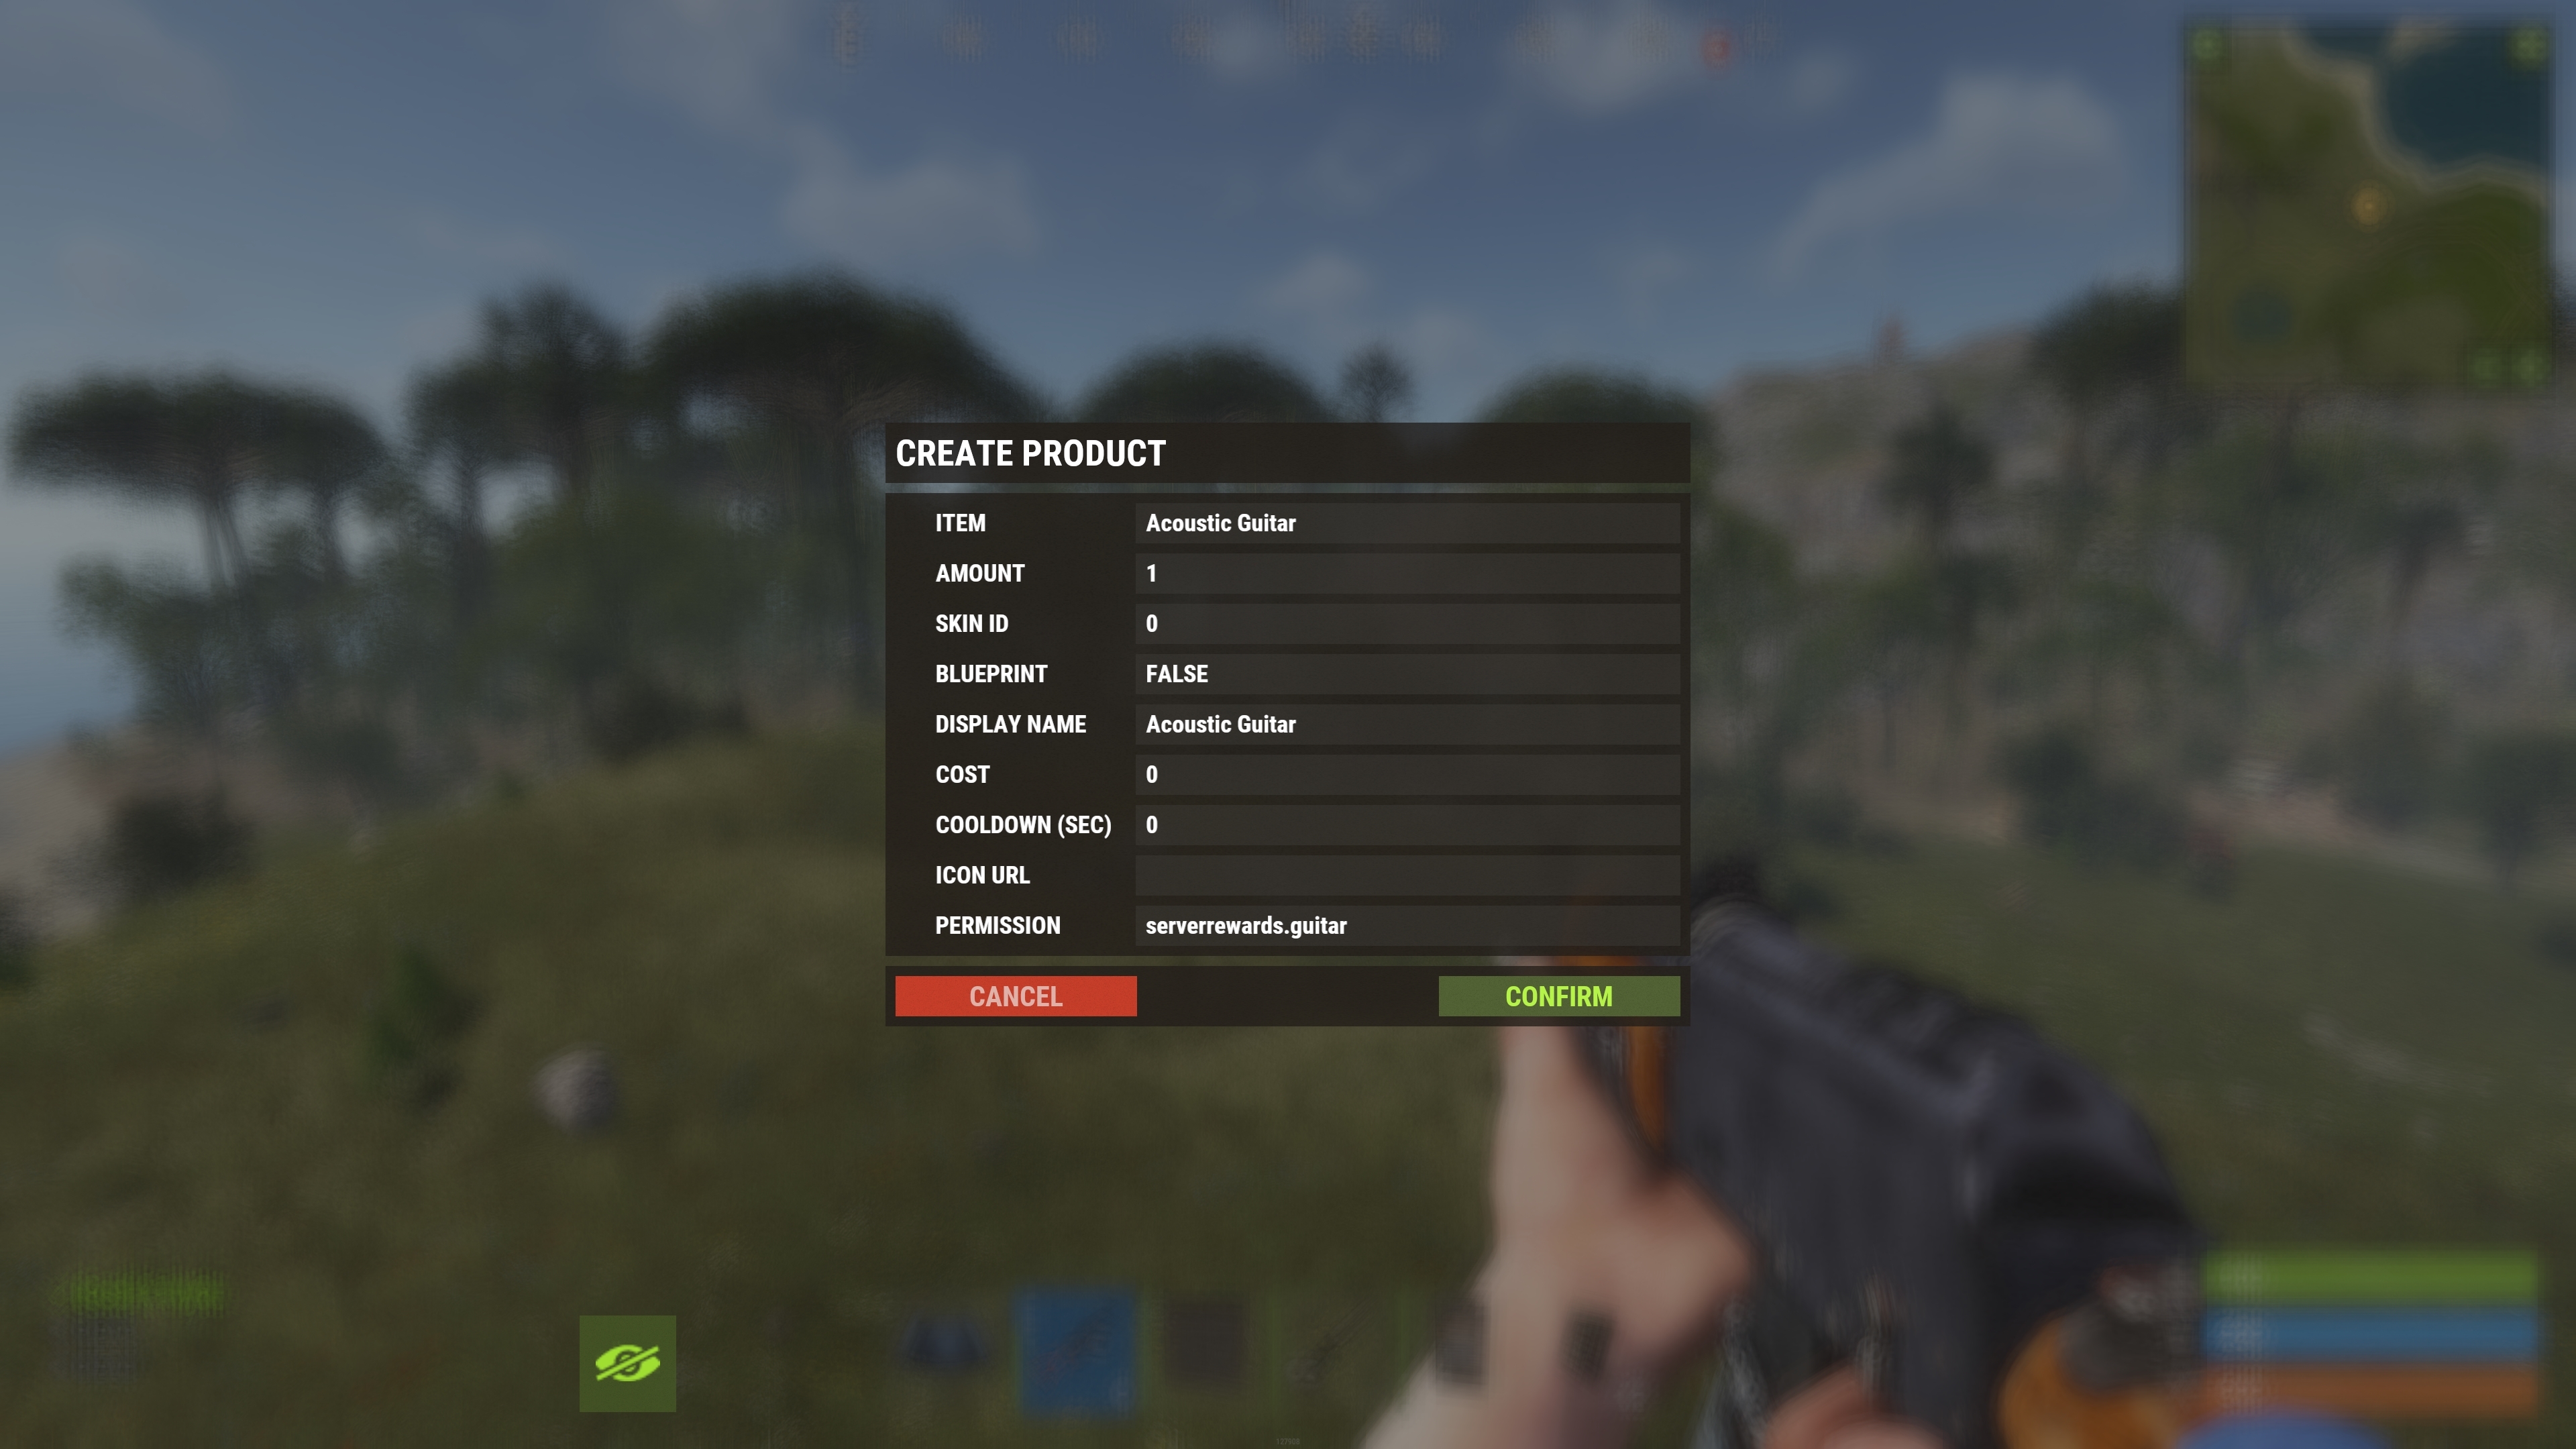
Once done click `CONFIRM` to save your changes.
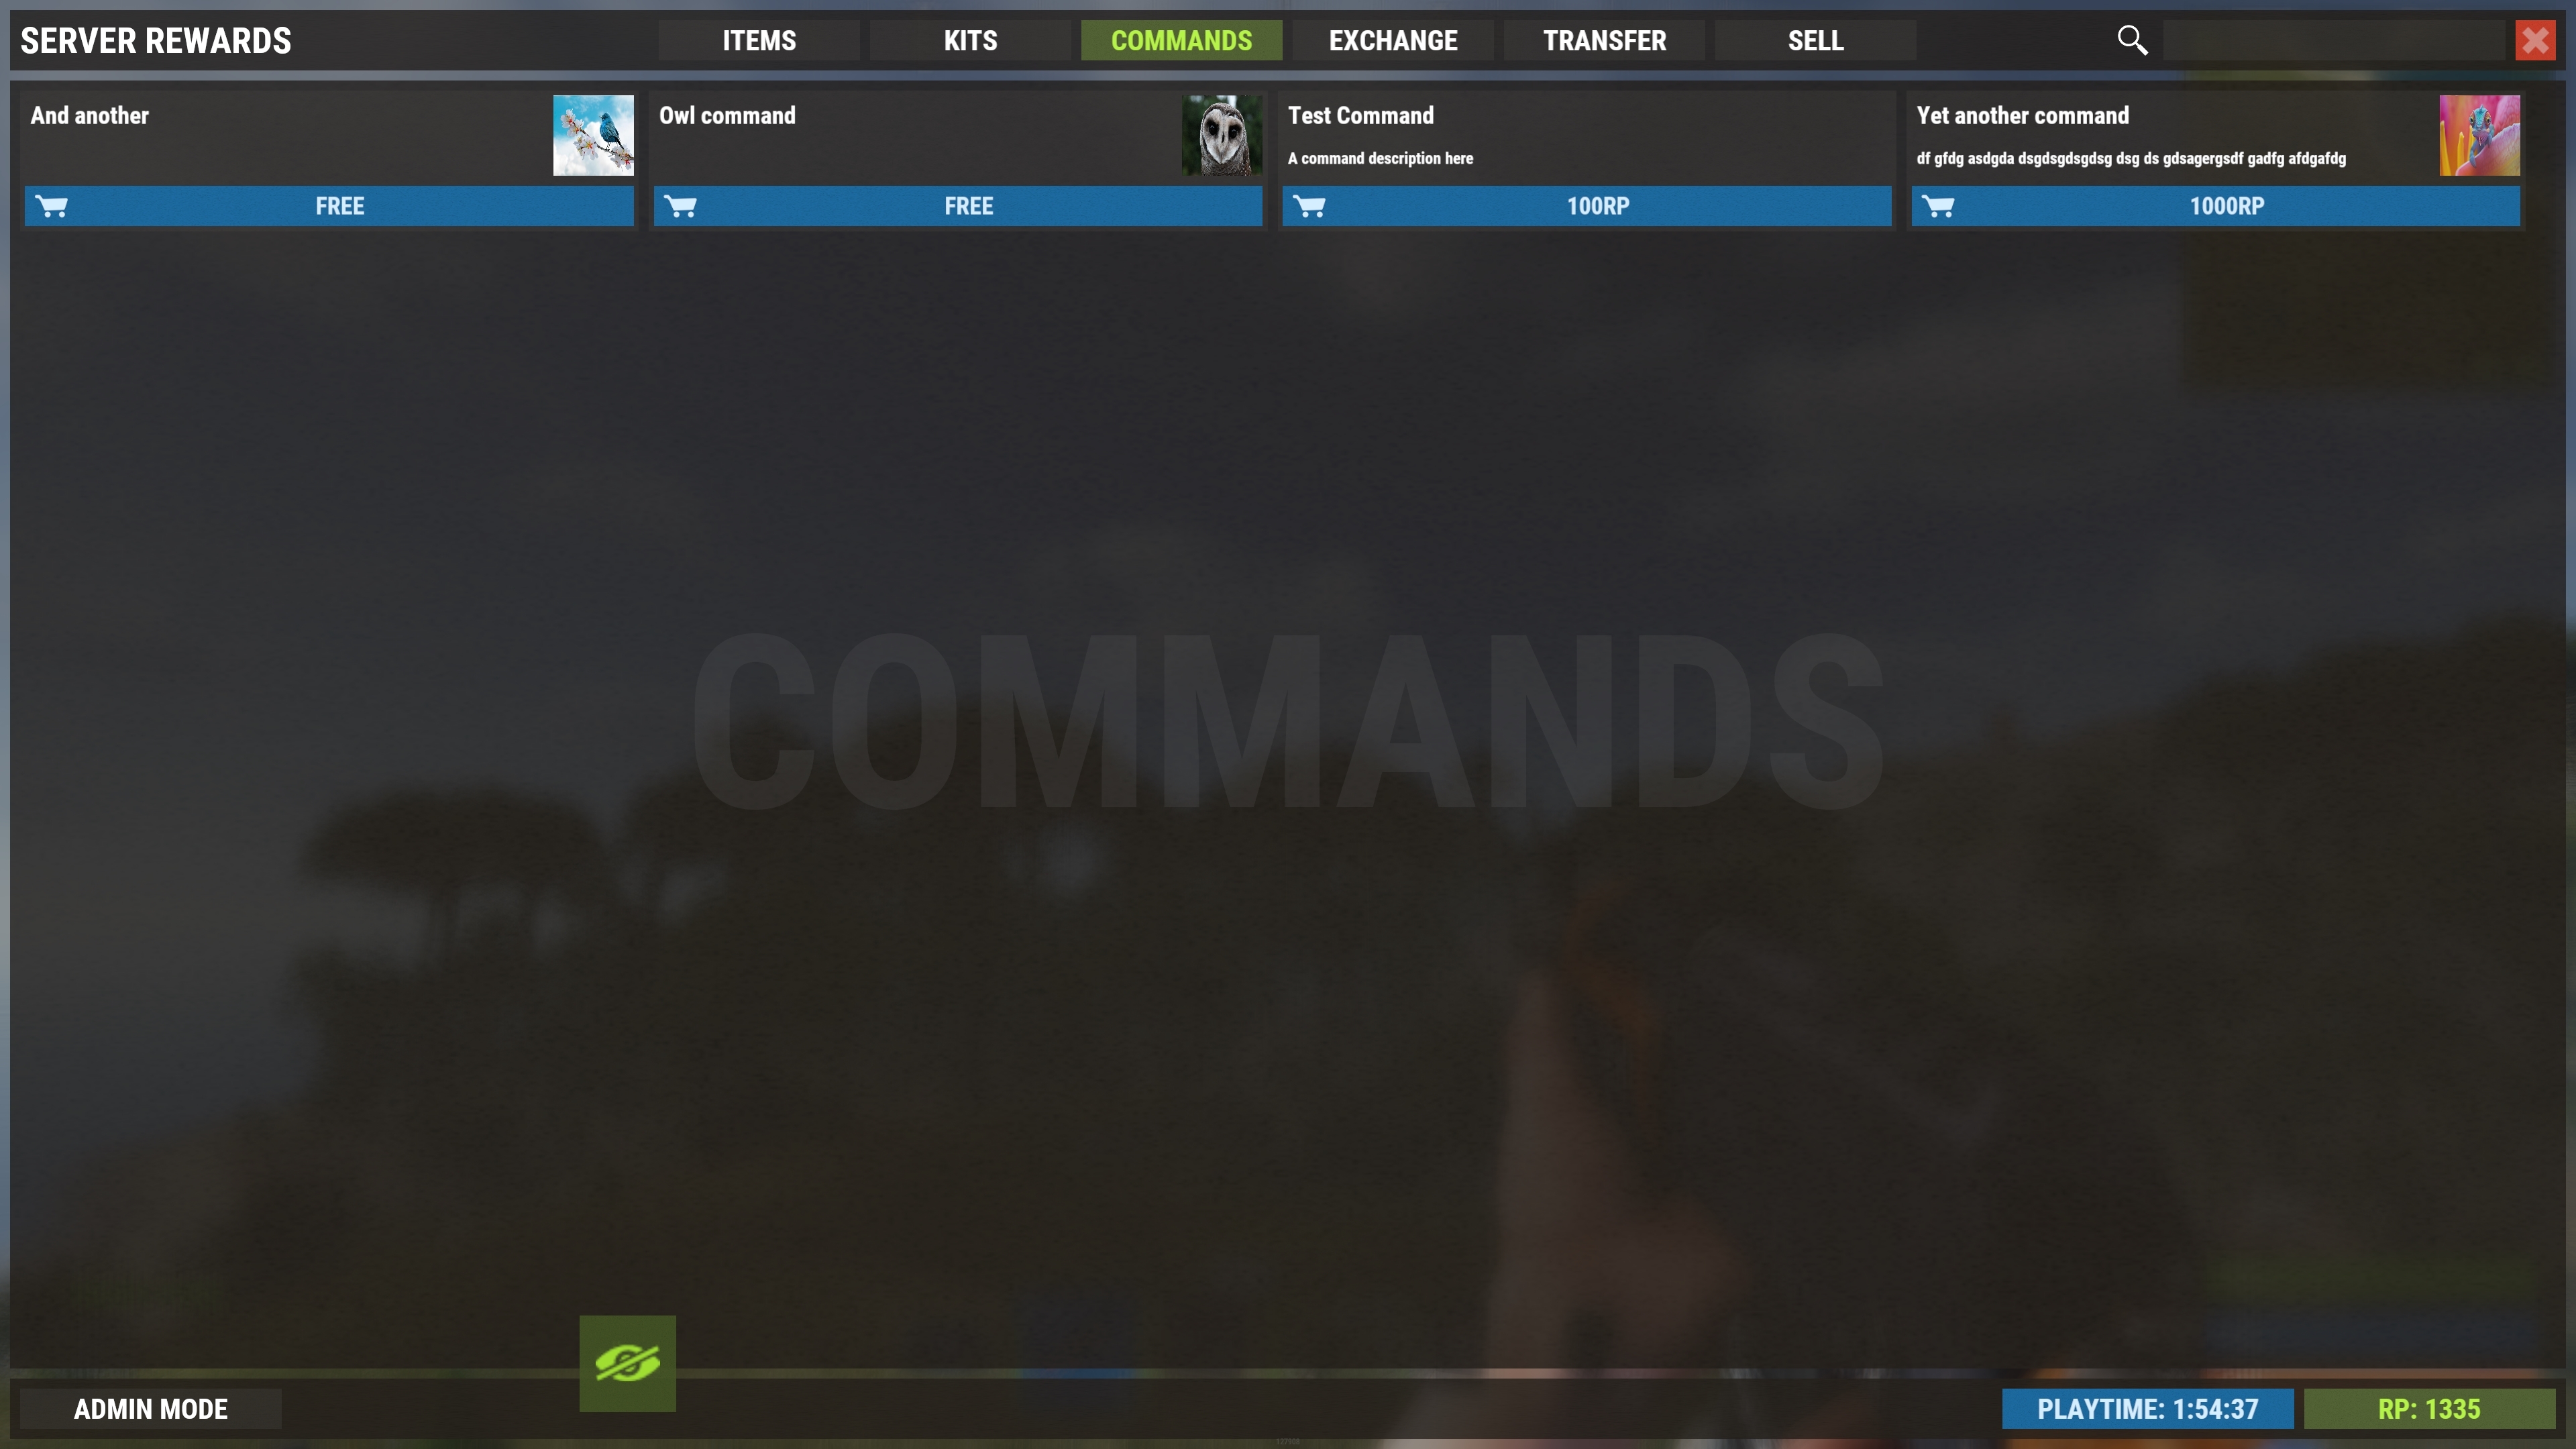
## Command Products
Command product allow the player to run pre-defined server commands upon purchase.
You can place specific variables int these commands which will be replaced prior to the command being run.
For example, the command `inventory.giveto $player.id wood 100` will replace `$player.id` with the purchasing users ID
The current variables you can use in a command are:
```
$player.name - The purchasing players display name
$player.id - The purchasing players user ID
$player.x, $player.y, $player.z - The purchasing players world position
```
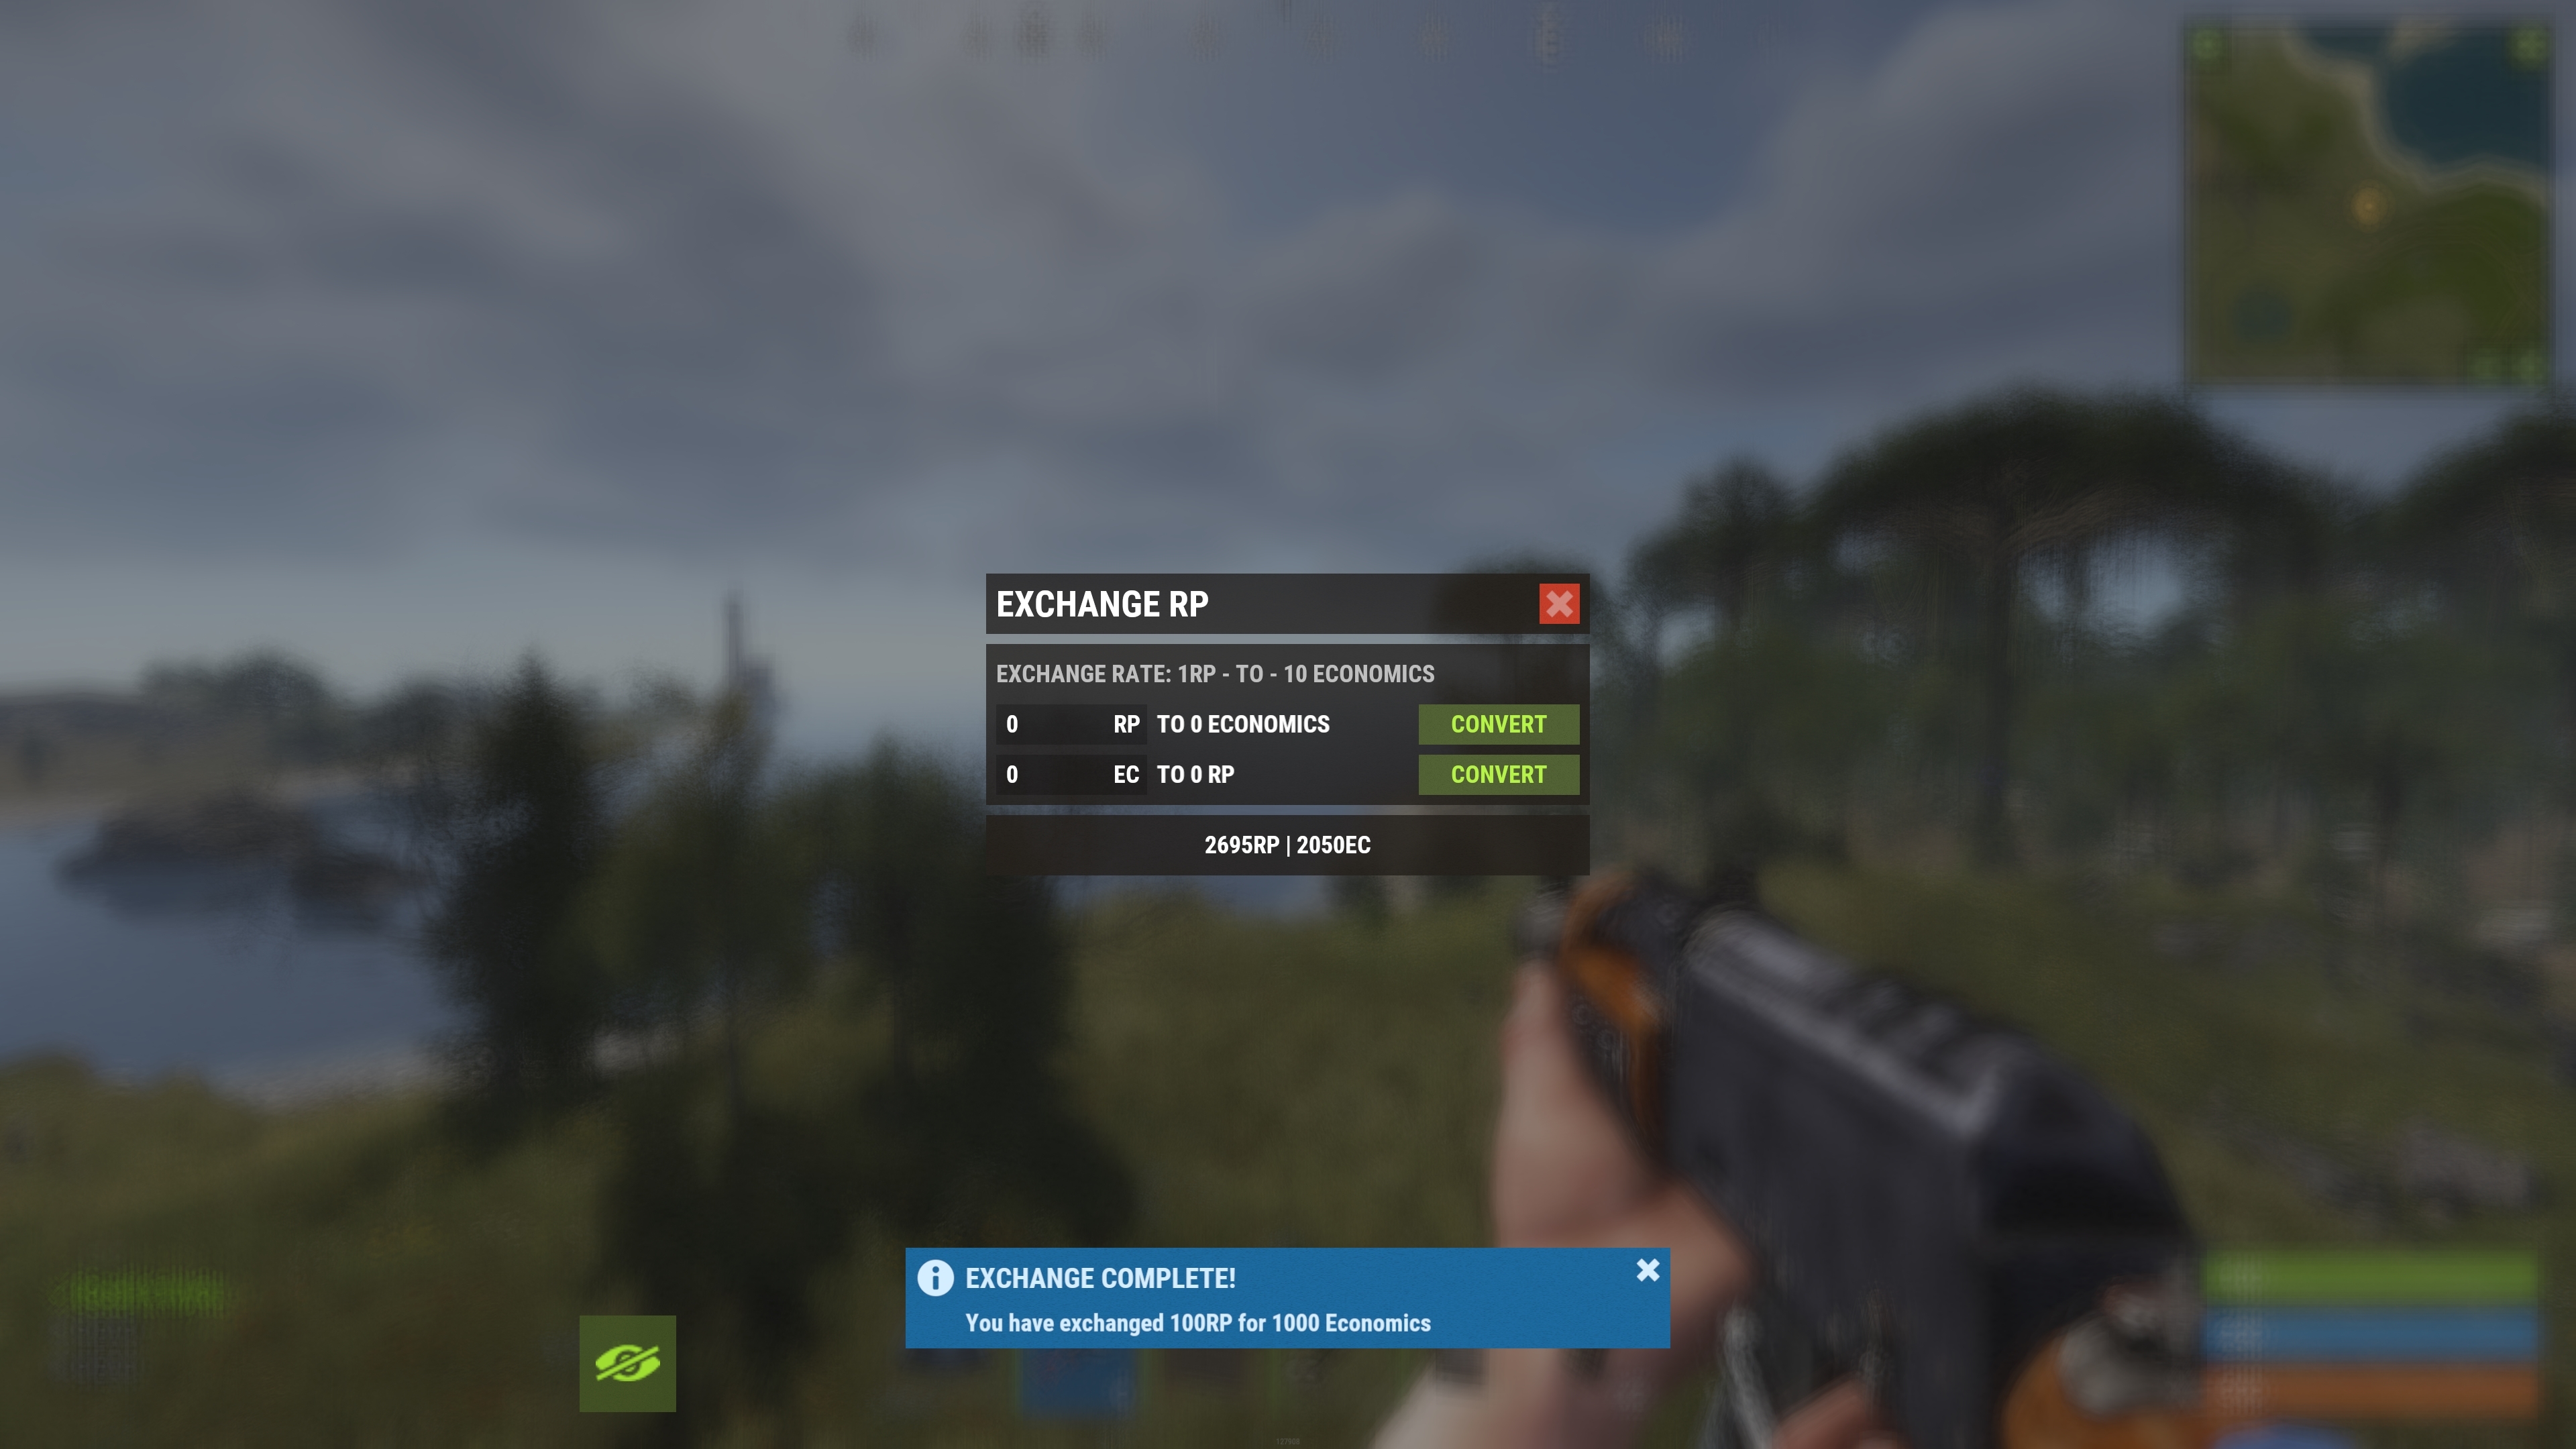
## Exchange
You can opt to allow users to exchange currency between Economics and ServerRewards. The user will be presented with 2 options, to exchange RP for Economics or vice-versa. They simply enter the amount they want to exchange and press `CONVERT`
You can set your own exchange rate in the configuration (default 1-to-1)
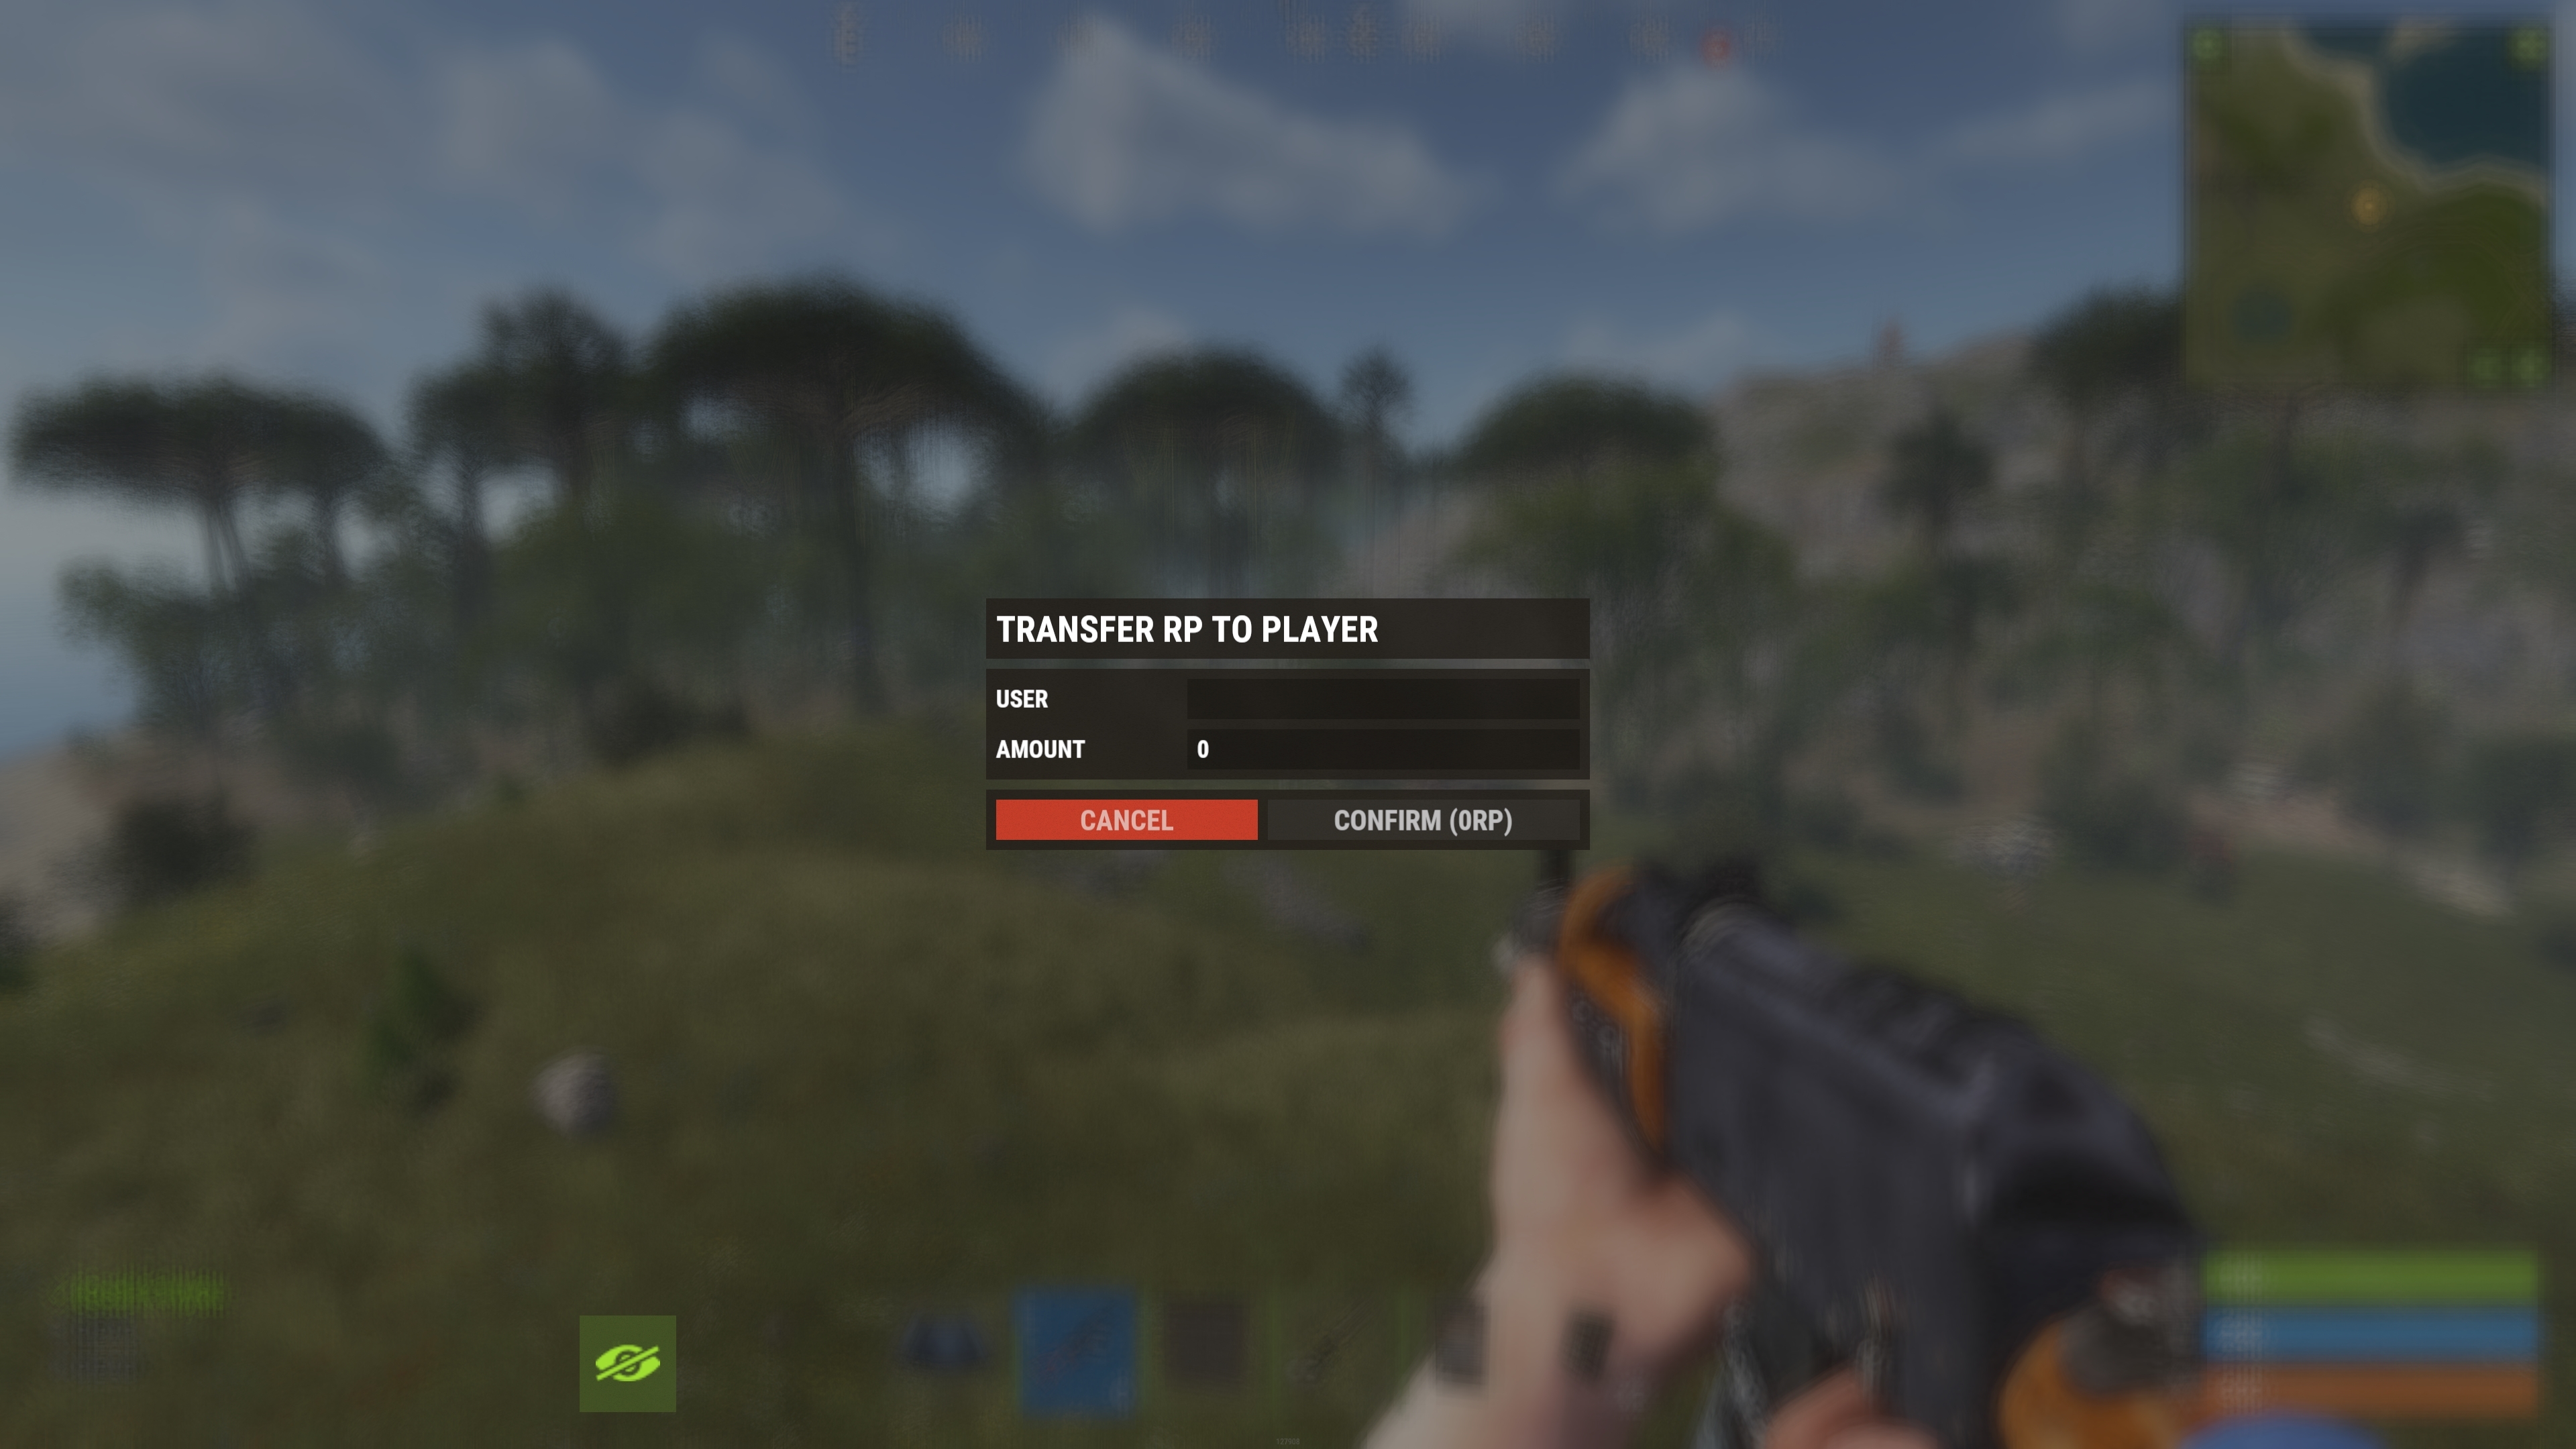
## Transfer
You can opt to allow users to transfer RP to other players in the config file. The user will be prompted to select a active player on the server and input an amount of RP to transfer
## Sellable Items
You can opt to allow users to sell items back to the store. The plugin will keep a list of all the items in the game, and by default they are all set to disabled.
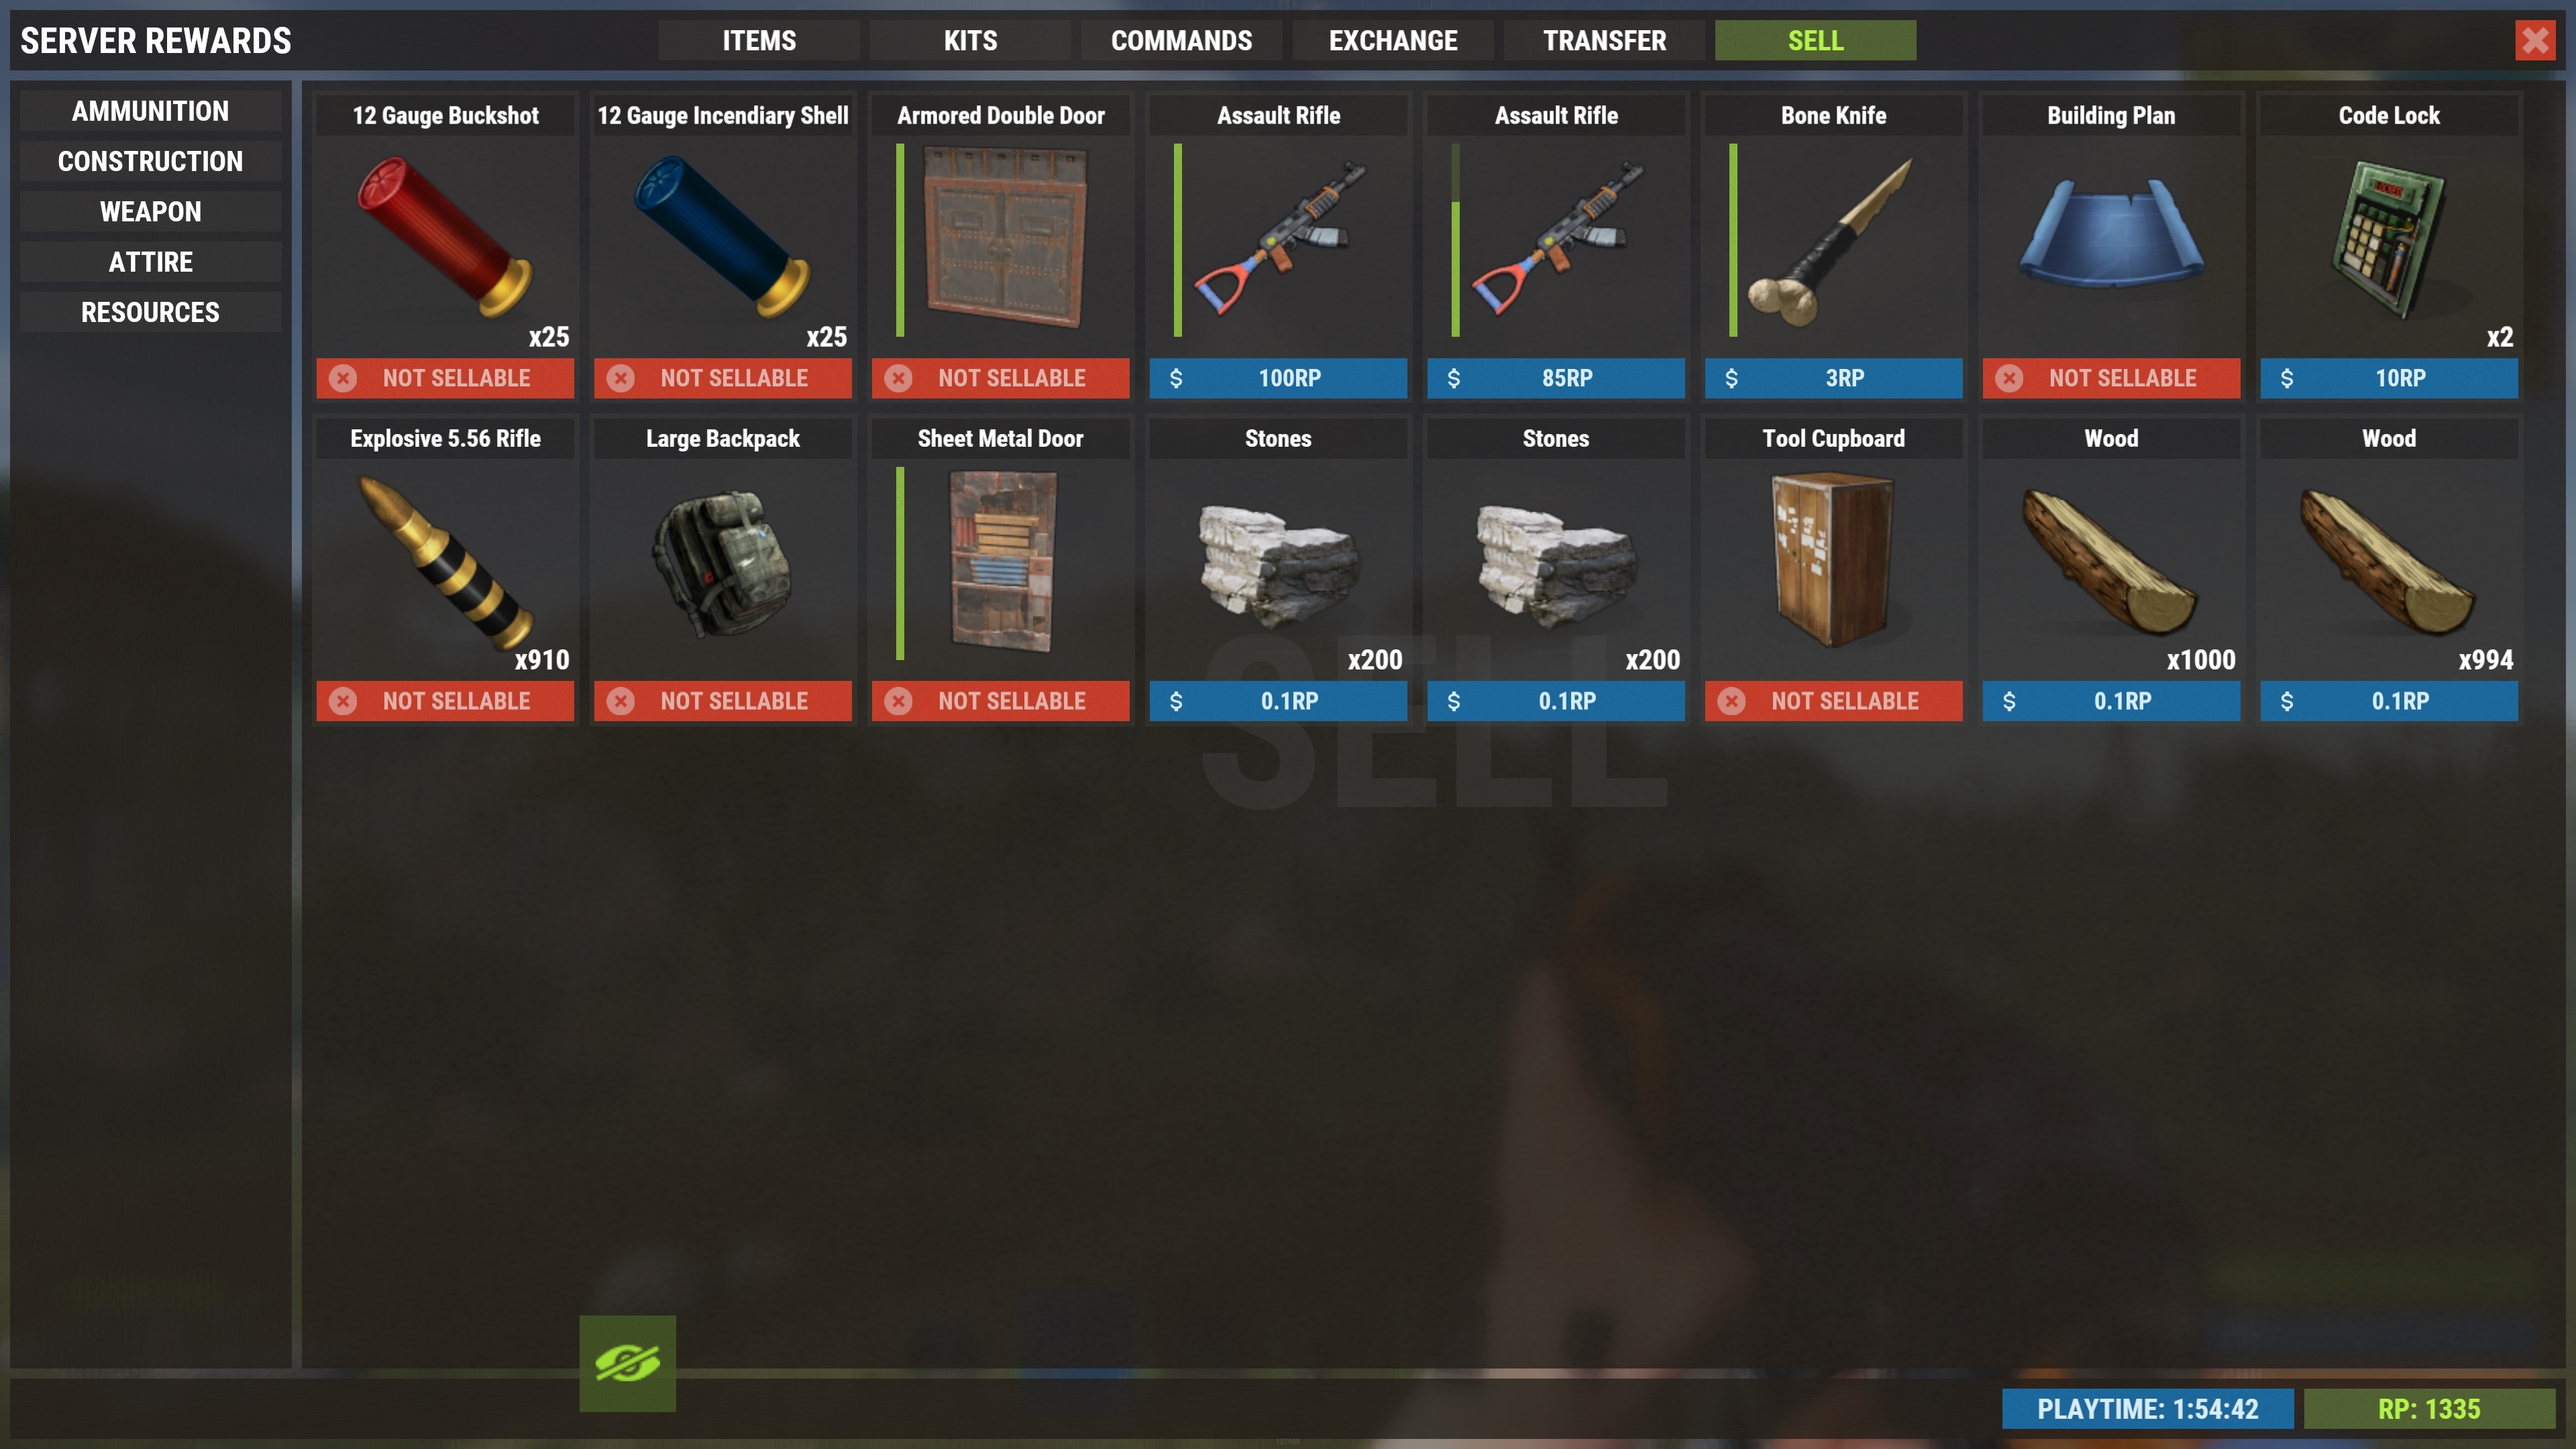
To enable a item to be sold back to the store you need to set a sale price. You can do this either via the console command provided above, or by manually editing the data file located at `/oxide/data/ServerRewards/sell_prices.json`
The sell data contains each item in the game, with a sale price, a skin multiplier and a list for specifying skin price overrides.
By default a skinned item will sell for the (Price * Price multiplier for skin variants), this can be overridden using the `sr.sellable setprice` command and providing the skin ID of the skin you want a specific price for.
The store will not accept broken items and the final price of a item being sold back to the store will be adjusted to suit its current condition (if applicable)
#### Console Commands
* `sr.sellable setprice ` - Sets the sell price for a item. If you supply a skin ID it the override price for that skin only
* `sr.sellable setskinmult ` - Sets the price multiplier for skin variants. This does not apply to skin override prices
* `sr.sellable show ` - Show the price, skin multiplier and skin override prices for a item
## NPC Stores
NPC stores use NPCs from the [HumanNPC](https://umod.org/plugins/human-npc) plugin.
NPC stores can either be a portal into the main store, or they can define their own products and categories.
By default, upon creating a NPC store, it will just open the main store page. You can add and remove NPC stores using the commands provided below.
You can set a custom store name for NPCs which is shown in the top left of the UI. This is only applicable when custom store is enabled.
To change which categories a NPC store gives access to, you can use the `/srcnpc togglenav` command followed by one of the category arguments `items|kits|commands|exchange|transfer|sell` which will toggle that category on or off.
To run custom products in the store you will need to enable custom store mode by typing `/srnpc customstore`.
If the NPC is a custom store, you can add/edit/remove products the same way you do in the main store via the UI.
If your NPC store only has `TRANSFER` or `EXCHANGE` categories, it will only open the store into those menus, and close the store when leaving those menus
#### Chat Commands
* `/srnpc add` - Turn the NPC you are looking at into a store NPC
* `/srnpc remove` - Remove the store from the NPC you are looking at
* `/srnpc setname ` - Sets a store name for the NPC you are looking at. This name is shown on the store page if custom store is enabled
* `/srcnpc nav ` - Toggles whether the specified navigation type is show in the NPC store
* `/srnpc customstore` - Toggles whether this NPC runs a custom store or just opens the global store
## Updating to V2.x.x - Read before updating!
Before updating, make a backup of your configuration file and data files located in `/oxide/data/ServerRewards/`
Version 2.x.x uses a completely different configuration file, so you will need to reapply your changes manually.
The plugin will detect when the update has occured and attempt to automatically convert your previous data files to the new format. Your old data files will be moved to `/oxide/data/ServerRewards/v1/`
If for any reason this does not work, or you need to do the conversion manually, you can use the console command `sr.convert`
**Regarding NPC Stores**
The previous version of ServerRewards linked products in a custom NPC store back to a product from the main store. Version 2.x.x does **not** do this, custom NPC stores now keep their own list of products.
## Configuration
```json
{
"Categories": {
"Show items tab": true,
"Show kits tab": true,
"Show commands tab": true,
"Show exchange tab": true,
"Show transfer tab": true,
"Show seller tab": true
},
"Options": {
"Open Store Command": "s",
"Admin RP Command": "rp",
"Only show/give players skins that they are allowed to use (requires PlayerDLCAPI)": true,
"Log all transactions": true,
"Use NPC dealers only": false,
"Economics exchange rate (1 RP is worth this much Economics)": 1.0
},
"UI Options": {
"Display user playtime": true,
"Toast color (Normal)": {
"Hex": "1F6BA0",
"Alpha": 1.0
},
"Toast text color (Normal)": {
"Hex": "D5EEFF",
"Alpha": 1.0
},
"Toast color (Error)": {
"Hex": "CD412B",
"Alpha": 0.96
},
"Toast text color (Error)": {
"Hex": "F7EBE1",
"Alpha": 0.5
},
"Background color": {
"Hex": "151515",
"Alpha": 0.75
},
"Panel color (Primary)": {
"Hex": "27241D",
"Alpha": 0.9
},
"Panel color (Secondary)": {
"Hex": "504D48",
"Alpha": 0.2
},
"Scrollbar color (Background)": {
"Hex": "171717",
"Alpha": 1.0
},
"Scrollbar color (Handle)": {
"Hex": "6F6B64",
"Alpha": 0.25
},
"Scrollbar color (Highlight)": {
"Hex": "6F6B64",
"Alpha": 0.4
},
"Scrollbar color (Pressed)": {
"Hex": "383838",
"Alpha": 1.0
},
"Button color": {
"Hex": "504D48",
"Alpha": 0.2
},
"Button text color": {
"Hex": "FFFFFF",
"Alpha": 1.0
},
"Button color (Confirm)": {
"Hex": "526334",
"Alpha": 1.0
},
"Button text color (Confirm)": {
"Hex": "B6F34A",
"Alpha": 1.0
},
"Button color (Purchase)": {
"Hex": "1F6BA0",
"Alpha": 1.0
},
"Button text color (Purchase)": {
"Hex": "D5EEFF",
"Alpha": 1.0
},
"Button color (Reject)": {
"Hex": "CD412B",
"Alpha": 0.95
},
"Button text color (Reject)": {
"Hex": "F7EBE1",
"Alpha": 0.5
},
"Button color (Disabled)": {
"Hex": "504D48",
"Alpha": 0.2
},
"Button text color (Disabled)": {
"Hex": "FFFFFF",
"Alpha": 0.5
}
},
"Version": {
"Major": 2,
"Minor": 0,
"Patch": 0
}
}
```
## API
```csharp
// Add RP to the target player
bool AddPoints(BasePlayer player, int amount)
bool AddPoints(IPlayer player, int amount)
bool AddPoints(string userID, int amount)
bool AddPoints(EncryptedValue userID, int amount)
bool AddPoints(ulong userID, int amount)
```
```csharp
// Take points from the target player
bool TakePoints(BasePlayer player, int amount)
bool TakePoints(IPlayer player, int amount)
bool TakePoints(string userID, int amount)
bool TakePoints(EncryptedValue userID, int amount)
bool TakePoints(ulong userID, int amount)
```
```csharp
// Get the target players current points
int CheckPoints(BasePlayer player)
int CheckPoints(IPlayer player, int amount)
int CheckPoints(string userID)
int CheckPoints(EncryptedValue userID)
int CheckPoints(ulong userID)
```
## Hooks
```csharp
// Called when a players points have changed
void OnPointsUpdated(ulong userID, int balance)
```