https://github.com/monzim/mini-etl
This is a mini-ETL project like Fiber (YC) but smaller version. It's allows users to extract data from a source, transform it, and load it into a destination. The project is built using next.js (Frontend) and NestJS (Backend).
https://github.com/monzim/mini-etl
digitalocean docker drizzle-orm github-actions microservice nestjs nextjs pg postgres prisma-orm rabbitmq shadcn-ui typescript vercel
Last synced: 2 months ago
JSON representation
This is a mini-ETL project like Fiber (YC) but smaller version. It's allows users to extract data from a source, transform it, and load it into a destination. The project is built using next.js (Frontend) and NestJS (Backend).
- Host: GitHub
- URL: https://github.com/monzim/mini-etl
- Owner: monzim
- License: mit
- Created: 2024-07-01T05:34:40.000Z (almost 2 years ago)
- Default Branch: main
- Last Pushed: 2024-07-07T07:13:36.000Z (almost 2 years ago)
- Last Synced: 2024-07-08T05:57:52.971Z (almost 2 years ago)
- Topics: digitalocean, docker, drizzle-orm, github-actions, microservice, nestjs, nextjs, pg, postgres, prisma-orm, rabbitmq, shadcn-ui, typescript, vercel
- Language: TypeScript
- Homepage: https://mini-etl.vercel.app
- Size: 325 KB
- Stars: 1
- Watchers: 1
- Forks: 0
- Open Issues: 0
-
Metadata Files:
- Readme: README.md
- License: LICENSE
Awesome Lists containing this project
README
# [Mini-ETL (Extract, transform, load)](https://mini-etl.vercel.app)
**This project is inspired by [Fiber.Dev](https://fiber.dev)**
Live: [mini-etl.vercel.app](https://mini-etl.vercel.app)
GitHub: [mini-etl](https://github.com/monzim/mini-etl)
## Introduction
This is a mini-ETL project like Fiber (YC) but smaller version. It's allows users to extract data from a source, transform it, and load it into a destination. The project is built using next.js (Frontend) and NestJS (Backend).
- CURRENTLY IT SUPPORT ONLY GITHUB
This is just a demonstration project and it can be extended to support other data sources like Gitlab, Bitbucket, etc.
## Features
- Load the data into a destination (Support PostgreSQL and S3)
- GitHub OAuth Authentication: Users can log in using their GitHub accounts.
- Extract data from Github (Public Repositories, ISSUES, Pull Requests)
- Transform the data
- Data Source Management: Users can add and manage data sources such as S3 buckets and PostgreSQL databases.
- Automatic and Manual Data Synchronization: Data is synced automatically at regular intervals, with an option for manual synchronization.
- Data Viewing: Users can view their synchronized data in a user-friendly interface.
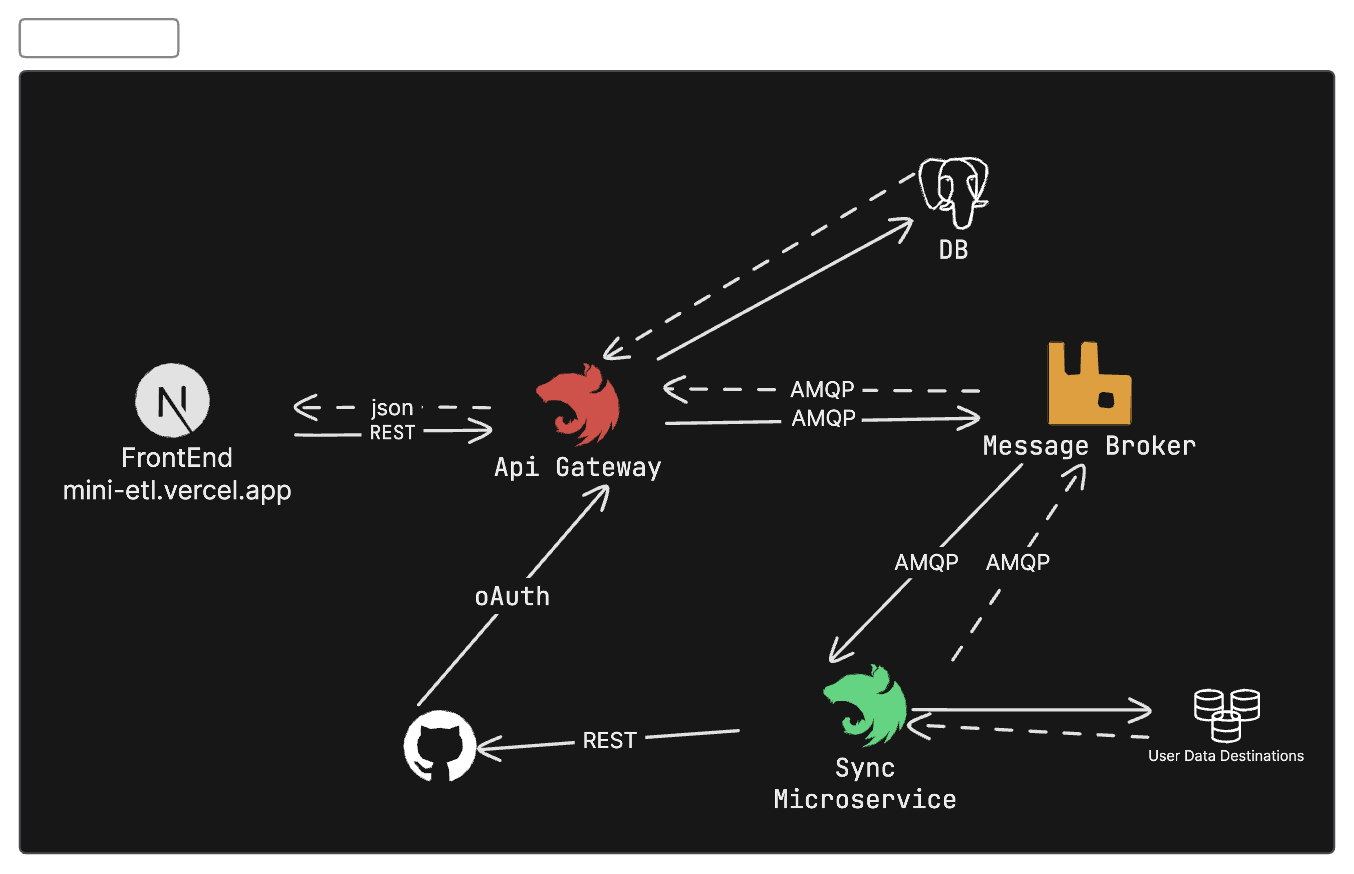
# Backend (NestJS)
- [ApiGateway](api_gateway) Built with NestJS, it handles all incoming REST API calls and routes them to the appropriate microservices.
- [SyncService (Microservice)](sync_service) A dedicated microservice for handling data synchronization tasks.
## Stack
- NestJS (Node.js Framework)
- PostgreSQL (Database)
- PG, Prisma and Drizzle (ORM)
- Docker (Containerization)
- RabbitMQ (Message Broker)
- DigitalOcean (Deployment)
# How to Run the Project?
To run this project, you need to have node installed on your machine. You can download it from [here](https://nodejs.org/en/). This project have Two parts:
1. Frontend (Next.js) - `cd frontend`
2. Backend (NestJS)
- ApiGateway - `cd api_gateway`
- SyncService - `cd sync_service`
### Backend (NestJS - SyncService)
First we need to run the sync service. To run the sync service, you need to have RabbitMQ and postgres connection Strings. You can create a `.env` file in the `sync_service` directory as like the .env.example file.
```bash
RABBITMQ_QUEUE=""
RABBITMQ_URL=""
DATABASE_URL=""
DATABASE_URL_DRIZZLE="" // no need this
```
After creating the `.env` file, you can run the following commands:
```bash
# generate the prisma client
pnpm install
npx prisma generate && npx prisma db push
pnpm start:dev
```
### Backend (NestJS - ApiGateway)
First we need to run the api gateway. To run the api gateway, you need to have RabbitMQ and postgres connection Strings. You can create a `.env` file in the `api_gateway` directory as like the .env.example file.
```bash
DATABASE_URL=
GITHUB_CALLBACK_URL=http://localhost:3000/auth/callback/github
GITHUB_CLIENT_ID=
GITHUB_CLIENT_SECRET=
JWT_SECRET=
RABBITMQ_QUEUE=
RABBITMQ_URL=
AUTH_FRONTEND_REDIRECT_URL=""
FRONTEND_URL=""
```
After creating the `.env` file, you can run the following commands:
```bash
pnpm install
npx prisma generate && npx prisma db push
pnpm start:dev
```
### Frontend (Next.js)
To run the frontend, you need to have the following environment variables. You can create a `.env.local` file in the `frontend` directory as like the .env.example file.
```bash
NEXT_PUBLIC_API_URL=http://localhost:3000/api
```
After creating the `.env.local` file, you can run the following commands:
```bash
pnpm install
pnpm dev
```
## Mini ETL Workflow
Here's how Mini-ETL works.
1. **User Authentication**:
- Users log in using GitHub OAuth.
- Upon successful login, a JWT token is generated and stored in user cookies.
2. **Adding Data Sources**:
- Users can add data sources by providing specific credentials.
- Supported destinations include S3 buckets (with optional Cloudflare R2) and PostgreSQL databases.
- The API gateway validates these credentials via the SyncMicroservice.
3. **Data Source Validation**:
- If the data source credentials are valid, the data source is marked as valid.
- Users can then connect their GitHub provider to this valid data source.
4. **Data Synchronization**:
- The SyncMicroservice automatically synchronizes data (public repositories, issues, and pull requests) from GitHub to the specified destination every ten minutes.
- Users can also manually trigger synchronization via a button in the app console.
5. **Viewing Data**:
- In the app console, users can see all connected providers and data sources.
- Synced data is displayed in a nicely formatted table.
- Users can manually trigger synchronization if needed.
