https://github.com/mooerslab/easypymol
Script to facilitate the making of horizontal scripts
https://github.com/mooerslab/easypymol
ambient-occulsion biomolecular-structures black-and-white-cartoons coordinate-covalent-bonds horizontal-scripts metal-coordination molecular-artwork molecular-graphics molecular-structures molecular-visuallization pml protein-structure pymol pymol-macro-language rna-structure roundview scripting startup-aliases structural-bioinformatics tutorial-videos
Last synced: about 1 year ago
JSON representation
Script to facilitate the making of horizontal scripts
- Host: GitHub
- URL: https://github.com/mooerslab/easypymol
- Owner: MooersLab
- License: gpl-3.0
- Created: 2015-10-17T23:05:52.000Z (over 10 years ago)
- Default Branch: master
- Last Pushed: 2024-05-25T03:45:17.000Z (about 2 years ago)
- Last Synced: 2025-03-31T16:24:14.867Z (about 1 year ago)
- Topics: ambient-occulsion, biomolecular-structures, black-and-white-cartoons, coordinate-covalent-bonds, horizontal-scripts, metal-coordination, molecular-artwork, molecular-graphics, molecular-structures, molecular-visuallization, pml, protein-structure, pymol, pymol-macro-language, rna-structure, roundview, scripting, startup-aliases, structural-bioinformatics, tutorial-videos
- Language: Python
- Size: 646 KB
- Stars: 16
- Watchers: 4
- Forks: 18
- Open Issues: 0
-
Metadata Files:
- Readme: README.md
- License: LICENSE
Awesome Lists containing this project
README

[](https://opensource.org/licenses/MIT)
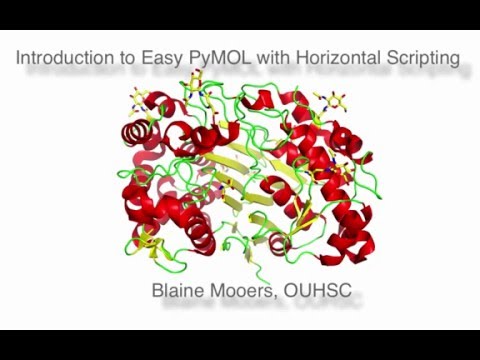
# PyMOL made easier with horizontal scripting
*Script to facilitate the making of horizontal scripts*
[](https://zenodo.org/badge/latestdoi/20847/MooersLab/EasyPyMOL)
Welcome to the `EasyPyMOL` repository, which implements horizontal scripting with PyMOL described in the manuscript:
"[Simplifying and enhancing the use of PyMOL with horizontal scripts](http://onlinelibrary.wiley.com/doi/10.1002/pro.2996/abstract;jsessionid=3BFE5B68AD44844F55AAE6E273D88375.f02t03)" published in the September 2016 issue of Protein Science.
See this 4-minute introductory video.
Scroll down to find tutorial videos about downloading the scripts from GitHub and installing them on Windows, Linux, mac PyMOLX11 and Mac PyMOL:
### Click on the image immediately below to start the video (4:17 min).
[](https://www.youtube.com/watch?v=XRsAaKq4afs)
Video Highlights for Protein Science methods paper: Simplifying and enhancing the use of PyMOL with horizontal scripts.
### Click on the image immediately below to start the video (5:43 min).
[](http://www.youtube.com/watch?v=96lSGbrcnyw)
#### Ambient occlusion image of phage T4 lysozyme made with the alias "AO"
The 17 commands that are on 17 lines in a traditional vertical script were placed on one line as a horizontal script.

#### Ribbon diagram of the above molecule made with the alias "T4L"
Another image is made with a horizontal script.

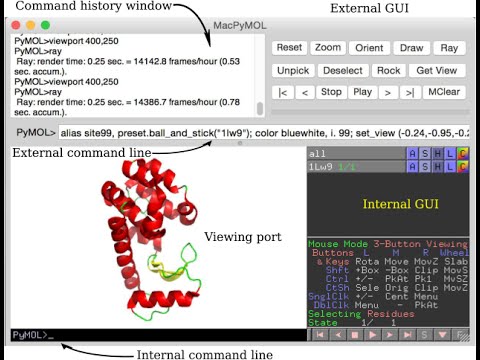
### Problem:
the viewport settings returned on seven lines with line continuation symbols from the command [`get_view()`](http://pymolwiki.org/index.php/Get_View) in [PyMOL](https://www.pymol.org/) are too hard to copy and paste onto the command line because the line breaks have to be removed. These settings are often changed many times while editing a new scene.
```python
PyMOL>get_view
### cut below here and paste into script ###
set_view(\
-0.832868993, 0.398498207, 0.383896619,\
-0.260102808, -0.894237876, 0.363985002,\
0.488390923, 0.203309149, 0.848513067,\
0.000000000, 0.000000000, -61.396984100,\
-46.246913910, -4.663769245, 42.401920319,\
56.260883331, 66.533096313, -20.000000000 )
### cut above here and paste into script ###
```
### Solution:
The function `roundview()` in the script [`roundview.py`](.\roundview.py), which is available from this website.
```
PyMOL>roundview
set_view(-0.83,0.4,0.38,-0.26,-0.89,0.36,0.49,0.2,0.85,0.0,0.0,-61.4,-46.25,-4.66,42.4,56.26,66.53,-20.0);
```
Paste the above reformatted [`set_view()`](http://pymolwiki.org/index.php/Set_View) command onto the PyMOL [command line](http://pymolwiki.org/index.php/Command_Line_Options) in the external gui or into a [script](http://www.pymolwiki.org/index.php/Running_Scripts) in a plain text editor.
### What is the `roundview()` function?
The Python script roundview.py includes the function `roundview()` that reformats the viewing port settings from seven rows to one row. The more compact format from `roundview()` is easy to copy and paste onto the command line. Other commands that are separated by semicolons can be added to the command line along with the settings. This defines a horizontal script. The script can include comments that are isolated by semicolons. The horizontal script can be edited and tested repeatedly within PyMOL for many cycles without using an external text editor. This saves time during the development of a new molecular scene. The cursor can be moved around quickly on the command line with the readline commands:
* **cntrl-a** moves the cursor to the beginning of the line
* **cntrl-e** moves the cursor to the end of the line
* **shift-cntrl-a** selects everything to from the cursor to the beginning of the line
* **shift-cntrl-e** selects everything to from the cursor to the end of the line
* **command-f** move forward by one word
* **commend-b** move backward by one word
### Requirements
Requires a molecular object loaded into an interactive session of PyMOL. Does not require any modules other than two in PyMOL. Should work on all versions of PyMOL.
Tested on:
* Ubuntu 14.04 64 bit with PyMOL 1.7.2.2.
* Windows 8 32 bit running PyMOL 1.7.6.2 and PyMOL 1.7.6.6.
* Mac OSX 10.10.5 64 bit running PyMOL 1.5.0.5, 1.7.6.6 (via MacPorts), 1.8.0.5, and 1.8.2.0.
We tried to make the code backward compatible with PyMOL 1.5. However, we do not guarantee that this code works with earlier versions of PyMOL or that it will not fail in future versions. Several changes in PyMOL version 1.6 reduced the backward compatibility. We also do not guarantee that the code will work if you install it in a location other than that described below.
### Instructions
#### Quick start instructions for beginning users of Github
Click on the image immediately below to watch 1-minute video or read on.
[](https://www.youtube.com/watch?v=XRsAaKq4afs)
Copy the script from [this link](https://github.com/MooersLab/EasyPyMOL/blob/master/roundview.py) after clicking on "RAW" in the upper right corner and paste it into a plain text file (NOT a doc, docx, or rtf file). Name the script [`roundview.py`](./roundview.py). Save the file to your home directory (e.g., /Users/username or /home/username or C:\Users\username). Start PyMOL. Check that PyMOL's current directory is the home directory by entering `pwd` on the command line in PyMOL. Check for the presence of roundview.py by entering `ls *.py` on the command line in PyMOL.
Note that the scripts were developed on a Mac, and most have UTF-8 encoding instead of ASCII encoding, as expected on Windows. A second set of script files was opened in Sublime Text and saved with Western encoding for Windows, with the filename modified with Windows appended.
The line below in the scripts for Mac and Linux instructs the Python interpreter to read the file with utf-8 encoding.
#-*- coding: utf-8 -*-
```shell
ls *.py
```
Paste the following horizontal script on the command line just below the command history window in the top or external gui:
```shell
fetch 1lw9, async=0; run roundview.py; roundview 0,1
```
You should see the following in the command history window of the top gui:
```shell
set_view (1.0,0.0,0.0,0.0,1.0,0.0,0.0,0.0,1.0,0.0,0.0,-155.2,35.1,11.5,9.7,122.3,188.0,-20.0);
```
Type the following to see the default format from get_view.
```shell
get_view
```
Which output looks easier to copy from the command history window and paste onto the command line in PyMOL?
#### More advanced ways to install roundview.py
Get the script. Either download the folder from [this link](https://github.com/MooersLab/EasyPyMOL/archive/master.zip) or type the following command in a terminal window in your home directory or the directory where you store your PyMOL Python scripts
```shell
git clone https://github.com/MooersLab/EasyPyMOL.git
```
You need the program [Git](https://git-scm.com/) installed on your computer. Git is available via MacPorts or otherwise [see these instructions for installing git](https://git-scm.com/book/en/v2/Getting-Started-Installing-Git).
There are at least four different ways of loading the script into PyMOL:
1. move [`roundview.py`](./roundview.py) to the working directory. Then in PyMOL, type
```py
run roundview.py
```
Please note that the `run` command just loads the script into PyMOL. It does not execute it. Now the "roundview()" command is available by typing `roundview` and the on-line documentation is available by typing "help roundview".
2. load [`roundview.py`](./roundview.py) with the plugin manager (see plugin pulldown) in PyMOL
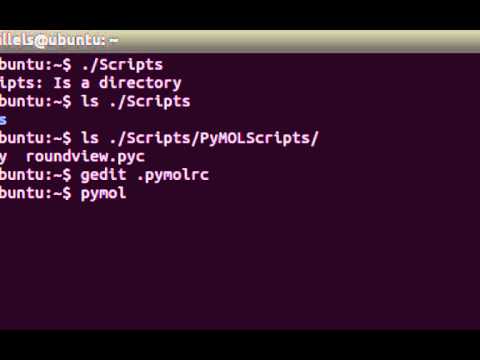
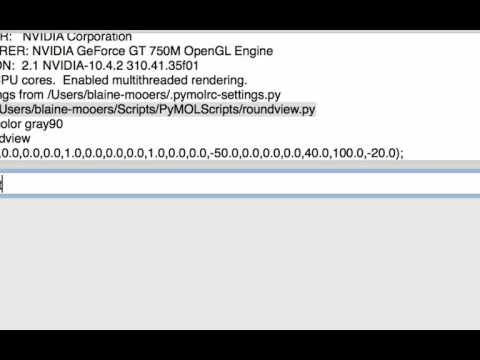
3. copy [`roundview.py`](./roundview.py) to a safe folder that will not be deleted when you delete PyMOL. I use `~/Scripts/PyMOLScripts/`. Then load `roundview()` into PyMOL using method 1 or 2.
4. create or edit the hidden text file `.pymolrc` (named `pymolrc.pml` and not hidden on Windows) in the home directory so that it includes the following lines so that `roundview.py` is always loaded upon startup. This option also works without the first two lines.
```py
import sys
sys.path.append('/Path/To/roundview')
run /Path/To/roundview.py
```
For example:
```py
import sys
sys.path.append('/Users/blaine-mooers/Scripts/PyMOLScripts/')
run /Users/blaine-mooers/Scripts/Scripts_PyMOL/roundview.py
```
Restart PyMOL. You should see something like the following in the command history window if your path to the script is correct.
```py
PyMOL>import sys
PyMOL>sys.path.append('/Users/blaine-mooers/Scripts/PyMOLScripts/')
PyMOL>run /Users/blaine-mooers/Scripts/Scripts_PyMOL/roundview.py
```
Type `roundview` on either command line. You should get back the following in the command history window if no molecule is loaded:
```py
set_view (1.0,0.0,0.0,0.0,1.0,0.0,0.0,0.0,1.0,0.0,0.0,-50.0,0.0,0.0,0.0,40.0,100.0,-20.0);
```
## roundview.py installation video for PyMOL on Windows (4:20 minutes):
### Click on the image immediately below to start video.
[](https://www.youtube.com/watch?v=C0NWphiTEYE)
Note that the scripts were developed on a Mac and most have utf-8 encoding instead of ascii encoding as expected on Windows. A second set of script files were opened in Sublime Text and saved with Western encoding for Windows and with the filename modified with Windows appended.
The line below in the scripts for Mac and Linux instructs the Python interpreter to read the file with utf-8 encoding.
#-*- coding: utf-8 -*-
## roundview.py installation video for PyMOL on Linux and PyMOLX11Hybrid on Mac (3:24 minutes):
### Click on the image immediately below to start video.
[](https://www.youtube.com/watch?v=XQWQzq48DeA)
## Link to roundview.py installation video for MacPyMOL (5:50 minutes):
### Click on the image immediately below to start video.
[](https://www.youtube.com/watch?v=XTwwWgwj4z0)
#### How to run
---------------
After loading a pdb file and setting up the molecular scene, type on a command line in PyMOL:
```
PyMOL>roundview
```
##### How to get help
Type the following on a command line in PyMOL
```
PyMOL> help roundview
```
Something like the following should be printed to the command history window:
Usage: `roundview [view, decimal places, outname]`
* The values in the [ ] are optional.
* The default view is "0".
* The default number of `decimal places` is 2.
* The `outname` is the name of a plain text file to which the output of `roundveiw()` is written.
Quick test with wildtype bacteriophage T4 lysozyme, 3fa0
--------------------------------------------------------------------------------
Start PyMOL. Copy and paste the entire line below onto the command line in the external gui (the on above the GL viewing port). This is an example of a horizontal script. By hitting the up arrow key, you can recall this command for editing on the command line. This code block is more agile to edit than opening, editing, saving, and loading an external script file.
```
fetch 3fa0,async=0;orient;turn z,-90;turn y,-5;turn x,10; hide everything; bg_color white; show cartoon;color red, ss H;color yellow, ss S;color green, ss L+'';roundview
```
To apply the canonical view similar to that in [Gassner et al. 2003](http://www.ncbi.nlm.nih.gov/pubmed/12646375), copy and paste the following onto the command line:
```
set_view (-0.18,-0.69,-0.7,0.98,-0.17,-0.09,-0.06,-0.7,0.71,0.0,0.0,-154.87,34.77,11.27,9.52,121.27,188.47,-20.0); ray 1500,1600; png canonical.png
```
You should get back an image that looks like the following:
To test some other argument values, copy and paste the following command into PyMOL.
```
PyMOL>roundview 0,1,firstscene.txt
```
Do a `ls *.txt` to list the files in the working directory. The file "firstscene.txt" should be listed. The default filename is "roundedview.txt". This file is appended with each execution of the roundview command. You may find it easier to copy the set_view line from this text file than from the command history window in PyMOL.
## Scripts that use aliases to horizontal scripts. Some aliases contain compact scene settings from `roundview()`.
### Exam2function.py
Defines aliases `q1-q8` for questions 1-8 from exam 2 of the OUHSC Macromolecular Systems [course](https://apps.ouhsc.edu/studentinfo/Courses.aspx?College=GRAD). Each alias is mapped to a number of commands.
1. Create `~/Scripts/PyMOLScripts` and store the script in this subfolder.
1. Enter on the command line in PyMOL the following command:
```
run ~/Scripts/PyMOLScripts/exam2function.py
```
1. Type `q1` to execute the alias associated with exam question 1.
1. Type `help q1` to print the documentation to the PyMOL command history window.
The bottom of the documentation includes the corresponding horizontal script.
All or parts of the horizontal script can be copied from the command history
window for reuse of the code in another horizontal script or a traditional
vertical script.
Tested on PyMOL versions 1.5.0.5, 1.7.7.2 (from macports), and 1.8.0.5.
### StartupAliases.py
1. Copy to ~/Scripts/PyMOLScripts/.
1. Add this command on one line in your .pymolrc file (pymolrc.pml on Windows):
```shell
run ~/Scripts/PyMOLScripts/StartUpAliases.py
```
Now these aliases will be available whenever you startup PyMOL.
1. Type the `alias ` to execute it.
1. Type `help alias name` to see the documentation, which includes a vertical list of the commands mapped to the alias to ease the copying of isolated commands from the command history window during code reuse. The corresponding horizontal script without line breaks is also printed. It can be selected in the command history window and pasted onto the command line.
Format of list below:
Alias name, description: PDB code, where applicable.
#### Molecules in standard orientations:
* **T4L**, WT T4 lysozyme (1.09 ang) as a ribbon diagram: 3fa0.
* **U8**, 16-mer dsRNA with 8 contiguous Us. U-helix RaNA (1.37 ang): 3nd3.
* **WC8**, 16-mer RNA with all Watson-Crick base pairs (1.67 ang): 3nd4.
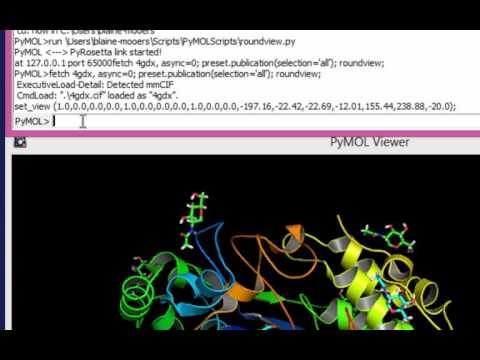
* **N9**, neuraminidase as cartoon, biological unit (1.55 ang): 4dgr.
* **GGT**, gamma glutamyl transpeptidase as cartoon (1.67 ang): 4gdx.
* **GU**, 10-mer RNA with eight GU base pairs (1.32 ang): 4pco.
#### Complex figures to serve as templates:
* **BST**, Base-stacking figure, (1.32 ang): 4pco.
* **LG**, Electron density map of nine sugar glycan,(1.55 ang):, 4dgr.
* **NA**, Sodium cation in major groove of 16-mer RNA: 3nd4.
#### Complex representations applied to any visible molecular object:
* **AO**, Make ambient occlusion image. Requires global view of protein.
* **BU**, Display biological unit.
* **CB**, Define color blind compatible coloring scheme.
* **BW**, Make black and white ribbon cartoon on white background.
* **CSS**, Color ribbon and cartoons by secondary structure: red, green and yellow.
* **CBSS**, Color ribbon and cartoons with colorblind friendly colors.
* **CR**, Commands to make colored filled-ring cartoon of nucleic acids..
* **FR**, Commands to make filled-ring cartoon of nucleic acids.
#### Demo 1:
Type `T4L` on the command line. Now type "AO". You should get an image like the following:
Type `help AO` on the command line to see the documentation for the `AO` alias. It is mapped to 17 commands.
PyMOL>help AO
DESCRIPTION
Commands to make ambient occlusion image like those in Qutemole.
USAGE
Type 'AO' to execute. Type 'help AO' to see this documentation
printed to the command history window. Select from the command
history individual lines of code to build a new script. Select the
horizontal script at the bottom if retaining most of the commands
in your new script. Copy and paste onto the command line below.
Works only with the command line immediately under the command
history window in the top (external) gui.
The commands with linebreaks:
set_color oxygen, [1.0,0.4,0.4];
set_color nitrogen, [0.5,0.5,1.0];
remove solvent;
as spheres;
util.cbaw;
bg white;
set light_count,10;
set spec_count,1;
set shininess, 10;
set specular,0.25;
set ambient,0;
set direct,0;
set reflect,1.5;
set ray_shadow_decay_factor, 0.1;
set ray_shadow_decay_range, 2;
unset depth_cue;
ray
The commands without linebreaks:
set_color oxygen, [1.0,0.4,0.4];set_color nitrogen, [0.5,0.5,1.0];remove solvent;as spheres;util.cbaw;bg white;set light_count,10;set spec_count,1;set shininess, 10;set specular,0.25;set ambient,0;set direct,0;set reflect,1.5;set ray_shadow_decay_factor, 0.1;set ray_shadow_decay_range, 2;unset depth_cue;ray
#### Demo 2:
Type `T4L` on the command line. Now type `BW`. You should get a black and white image like the following. These black and white figures are useful when color figures are not needed:

#### Demo 3:
Type `U8` on the command line. Convert the cartoon to a black-and-white image with `BW`.

#### Demo 4:
Type 'help NA' to see a very long script mapped to two a letter command.
DESCRIPTION
Hydrated sodium cation bound in major groove of a
16-mer RNA of Watson-Crick base pairs.
The sodium is bound to the N7 nitrogen atom of
Adenine 3 at 1.55 Angstrom resolution, PDB code 3nd4.
57 commands were used to make this figure.
More than one label in a horizontal script is not
allowed. This one label has to be at the end of the line.
Labels can be imported from a Labels.pml file.
Store the label commands one per row in this file.
Import the file with the @Labels.pml command.
Include the path to the file if the labels file is not
in the current working directory of PyMOL.
USAGE
Type `NA` to activate. Type `help NA` to see this documentation
printed to the command history window. Select from the command
history individual lines of code to build a new script. Select the
horizontal script at the bottom if retaining most of the commands
in your new script. Copy and paste onto the command line below.
Works only with the command line immediately under the command
history window at the top of the gui.
delete all;
viewport 900,600;
fetch 3nd4, type=pdb, async=0;
run ~/Scripts/PyMOLScripts/quat.py;
quat 3nd4;
show sticks;
set stick_radius=0.125;
hide everything, name H*;
bg_color white;
create coorCov, (3nd4_1 and (resi 19 or resi 119 or resi 219 or resi 319 or resi 419 or resi 519 or (resi 3 and name N7)));
bond (coorCov//A/NA`19/NA),(coorCov//A/A`3/N7);
bond (coorCov//A/NA`19/NA),(coorCov//A/HOH`119/O);
bond (coorCov//A/NA`19/NA),(coorCov//A/HOH`219/O);
bond (coorCov//A/NA`19/NA),(coorCov//A/HOH`319/O);
bond (coorCov//A/NA`19/NA),(coorCov//A/HOH`419/O);
bond (coorCov//A/NA`19/NA),(coorCov//A/HOH`519/O);
distance (3nd4_1 and chain A,and resi 19 and name NA), (3nd4_1 and chain A and resi 519);
distance (3nd4_1 and chain A and resi 19 and name NA), (3nd4_1 and chain A and resi 419);
distance (3nd4_1 and chain A and resi 19 and name NA), (3nd4_1 and chain A and resi 119);
distance (3nd4_1 and chain A and resi 19 and name NA), (3nd4_1 and chain A and resi 319);
distance (3nd4_1 and chain A and resi 19 and name NA), (3nd4_1 and chain A and resi 219);
show nb_spheres;
set nb_spheres_size, .35;
distance hbond1,/3nd4_1/1/A/HOH`119/O, /3nd4_1/1/A/A`3/OP2;
distance hbond2,/3nd4_1/1/A/HOH`319/O, /3nd4_1/1/A/A`3/OP2;
distance hbond3,/3nd4_1/1/A/HOH`91/O,/3nd4_1/1/A/HOH`119/O;
distance hbond4,/3nd4_1/1/A/G`4/N7,/3nd4_1/1/A/HOH`91/O;
distance hbond5,/3nd4_1/1/A/G`4/O6, /3nd4_1/1/A/HOH`419/O;
distance hbond6,/3nd4_1/1/A/HOH`91/O,/3nd4_1/1/A/G`4/OP2;
distance hbond7,/3nd4_1/1/A/HOH`319/O,/3nd4_1/1/A/G`2/OP2;
distance hbond9,/3nd4_1/1/A/HOH`419/O,/3nd4_2/2/A/HOH`74/O;
distance hbond10,/3nd4_2/2/A/C`15/O2,/3nd4_1/1/A/G`2/N2;
distance hbond11, /3nd4_2/2/A/C`15/N3,/3nd4_1/1/A/G`2/N1;
distance hbond12,/3nd4_2/2/A/C`15/N4,/3nd4_1/1/A/G`2/O6;
distance hbond13, /3nd4_2/2/A/U`14/N3,/3nd4_1/1/A/A`3/N1;
distance hbond14,3nd4_2/2/A/U`14/O4,/3nd4_1/1/A/A`3/N6;
distance hbond15, /3nd4_2/2/A/C`13/N4,/3nd4_1/1/A/G`4/O6;
distance hbond16,/3nd4_2/2/A/C`13/N3, /3nd4_1/1/A/G`4/N1;
distance hbond17, /3nd4_1/1/A/G`4/N2,/3nd4_2/2/A/C`13/O2;
distance hbond18,/3nd4_1/1/A/G`2/N2,/3nd4_2/2/A/C`15/O2;
distance hbond19,/3nd4_1/1/A/HOH`91/O,/3nd4_1/1/A/G`4/OP2;
set depth_cue=0;
set ray_trace_fog=0;
set dash_color, black;
set label_font_id, 5;
set label_size, 36;
set label_position, (0.5, 1.0, 2.0);
set label_color, black;set dash_gap, 0.2;
set dash_width, 2.0;set dash_length, 0.2;
set label_color, black;set dash_gap, 0.2;
set dash_width, 2.0;set dash_length, 0.2;
select carbon, element C;
color yellow, carbon;
disable carbon;
set_view (-0.9,0.34,-0.26,0.33,0.18,-0.93,-0.27,-0.92,-0.28,-0.07,-0.23,-27.83,8.63,19.85,13.2,16.0,31.63,-20.0)
Commands without linebreaks for easy selecting, copying, and pasting onto the command line for code reuse:
delete all;viewport 900,600;fetch 3nd4, type=pdb,async=0;run ~/Scripts/PyMOLScripts/quat.py;quat 3nd4; show sticks;set stick_radius=0.125;hide everything, name H*;bg_color white;create coorCov, (3nd4_1 and (resi 19 or resi 119 or resi 219 or resi 319 or resi 419 or resi 519 or (resi 3 and name N7)));bond (coorCov//A/NA`19/NA),(coorCov//A/A`3/N7); bond (coorCov//A/NA`19/NA),(coorCov//A/HOH`119/O); bond (coorCov//A/NA`19/NA),(coorCov//A/HOH`219/O); bond (coorCov//A/NA`19/NA),(coorCov//A/HOH`319/O); bond (coorCov//A/NA`19/NA),(coorCov//A/HOH`419/O); bond (coorCov//A/NA`19/NA),(coorCov//A/HOH`519/O);distance (3nd4_1 and chain Aand resi 19 and name NA), (3nd4_1 and chain A and resi 519);distance (3nd4_1 and chain A and resi 19 and name NA), (3nd4_1 and chain A and resi 419);distance (3nd4_1 and chain A and resi 19 and name NA), (3nd4_1 and chain A and resi 119);distance (3nd4_1 and chain A and resi 19 and name NA),(3nd4_1 and chain A and resi 319);distance (3nd4_1 and chain A and resi 19 and name NA), (3nd4_1 and chain A and resi 219);show nb_spheres; set nb_spheres_size, .35;distance hbond1,/3nd4_1/1/A/HOH`119/O, /3nd4_1/1/A/A`3/OP2;distance hbond2,/3nd4_1/1/A/HOH`319/O, /3nd4_1/1/A/A`3/OP2;distance hbond3,/3nd4_1/1/A/HOH`91/O, /3nd4_1/1/A/HOH`119/O;distance hbond4,/3nd4_1/1/A/G`4/N7,/3nd4_1/1/A/HOH`91/O;distance hbond5,/3nd4_1/1/A/G`4/O6, /3nd4_1/1/A/HOH`419/O;distance hbond6,/3nd4_1/1/A/HOH`91/O, /3nd4_1/1/A/G`4/OP2;distance hbond7,/3nd4_1/1/A/HOH`319/O, /3nd4_1/1/A/G`2/OP2;distance hbond9,/3nd4_1/1/A/HOH`419/O,/3nd4_2/2/A/HOH`74/O;distance hbond10,/3nd4_2/2/A/C`15/O2,/3nd4_1/1/A/G`2/N2;distance hbond11, /3nd4_2/2/A/C`15/N3,/3nd4_1/1/A/G`2/N1;distance hbond12,/3nd4_2/2/A/C`15/N4,/3nd4_1/1/A/G`2/O6;distance hbond13, /3nd4_2/2/A/U`14/N3,/3nd4_1/1/A/A`3/N1;distance hbond14,3nd4_2/2/A/U`14/O4,/3nd4_1/1/A/A`3/N6;distance hbond15, /3nd4_2/2/A/C`13/N4,/3nd4_1/1/A/G`4/O6;distance hbond16,/3nd4_2/2/A/C`13/N3, /3nd4_1/1/A/G`4/N1;distance hbond17, /3nd4_1/1/A/G`4/N2,/3nd4_2/2/A/C`13/O2;distance hbond18,/3nd4_1/1/A/G`2/N2,/3nd4_2/2/A/C`15/O2;distance hbond19,/3nd4_1/1/A/HOH`91/O,/3nd4_1/1/A/G`4/OP2;set depth_cue=0;set ray_trace_fog=0;set dash_color, black;set label_font_id, 5;set label_size, 36;set label_position, (0.5, 1.0, 2.0);set label_color, black;set dash_gap, 0.2;set dash_width, 2.0;set dash_length, 0.2;set label_color, black;set dash_gap, 0.2;set dash_width, 2.0;set dash_length, 0.2;select carbon, element C; color yellow, carbon;disable carbon;set_view (-0.9,0.34,-0.26,0.33,0.18,-0.93,-0.27,-0.92,-0.28,-0.07,-0.23,-27.83,8.63,19.85,13.2,16.0,31.63,-20.0);
Type `NA` to get the resulting image of a sodium cation bound with inner sphere coordination to the N7 nitrogen of an adenine and to five waters. The sodium is in the major groove of a double-stranded RNA molecule (PDB-ID 3nd4). The dashed lines represent hydrogen bonds. The numbers are distances in angstroms.

Reference, License, Copyright, and Date of last update
--------------------------------------------------------------------------------
* Mooers, B. H. (2016). Simplifying and enhancing the use of PyMOL with horizontal scripts. *Protein Science*, 25(10), 1873-1882.
* GNU General Public License ([GPL-3](http://www.gnu.org/licenses/gpl-3.0.en.html))
* (C) [Blaine Mooers](https://basicsciences.ouhsc.edu/bmb/Faculty/bio_details/mooers-blaine-hm-phd), Ph.D., [University of Oklahoma Health Sciences Center](http://www.ouhsc.edu/), 2015-2017
* This work was supported by NIH grants RO1 AI088011 (PI: Mooers) from the National Institute of Allergy and Infectious Diseases and ROP20 GM103640 (PI: Ann West), an Institutional Development Award (IDeA) from the National Institute of General Medical Sciences of the National Institutes of Health.
* Updated 25 September 2022
Bibtex entry
------------
```bibtex
@article{mooers2016simplifying,
title={Simplifying and enhancing the use of PyMOL with horizontal scripts},
author={Mooers, Blaine HM},
journal={Protein Science},
volume={25},
number={10},
pages={1873--1882},
year={2016},
publisher={Wiley Online Library}
}
```
Related Repos
-------------
- [pymolshortcuts](https://github.com/MooersLab/pymolshortcuts)
- [pymolsnips](https://github.com/MooersLab/pymolsnips)
- [orgpymolpysnips](https://github.com/MooersLab/orgpymolpysnips)
- [rstudiopymolpysnips](https://github.com/MooersLab/rstudiopymolpysnips)
- [taggedpymolpysnips](https://github.com/MooersLab/taggedpymolpysnips)
- [jupyterlabpymolpysnips](https://github.com/MooersLab/jupyterlabpymolpysnips)
- [colabOpenSourcePyMOLpySnips](https://github.com/MooersLab/colabOpenSourcePyMOLpySnips)
- [colabPyMOLpySnips](https://github.com/MooersLab/colabPyMOLpySnips)
- [PyMOLwallhangings](https://github.com/MooersLab/PyMOLwallhangings)
## Update history
|Version | Changes | Date |
|:-----------:|:------------------------------------------------------------------------------------------------------------------------------------------:|:--------------------:|
| Version 0.2 | Added badges, funding, and update table. | 2024 May 24 |