https://github.com/morphl-ai/morphl-orchestrator
Backbone for the MorphL-Community-Edition platform.
https://github.com/morphl-ai/morphl-orchestrator
cassandra-database hdfs keras-tensorflow kubernetes machine-learning morphl-platform pipeline pyspark ubuntu1604
Last synced: about 1 year ago
JSON representation
Backbone for the MorphL-Community-Edition platform.
- Host: GitHub
- URL: https://github.com/morphl-ai/morphl-orchestrator
- Owner: Morphl-AI
- License: apache-2.0
- Created: 2018-07-16T21:27:23.000Z (almost 8 years ago)
- Default Branch: master
- Last Pushed: 2019-11-26T18:03:45.000Z (over 6 years ago)
- Last Synced: 2024-03-14T17:44:20.849Z (over 2 years ago)
- Topics: cassandra-database, hdfs, keras-tensorflow, kubernetes, machine-learning, morphl-platform, pipeline, pyspark, ubuntu1604
- Language: Shell
- Homepage: https://morphl.io/
- Size: 371 KB
- Stars: 5
- Watchers: 8
- Forks: 4
- Open Issues: 9
-
Metadata Files:
- Readme: README.md
- License: LICENSE
Awesome Lists containing this project
README
# MorphL Platform Orchestrator
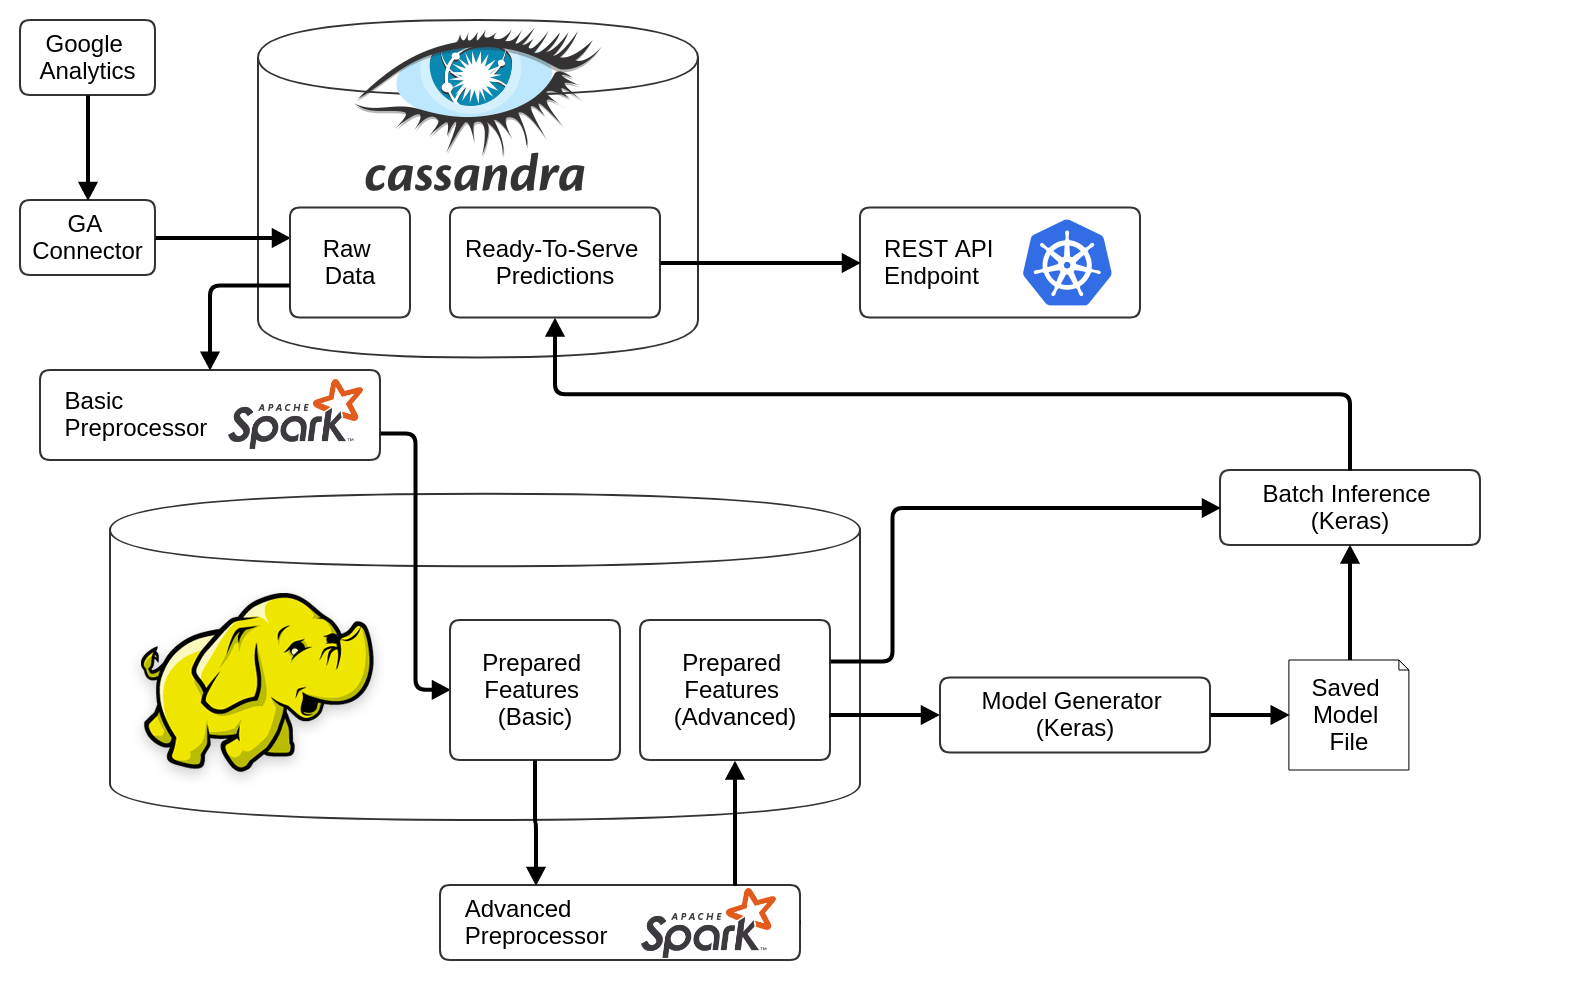
The MorphL Orchestrator is the backbone of the MorphL platform. It sets up the infrastructure and software that are necessary for running the MorphL platform. It consists of 3 pipelines:
- **Ingestion Pipeline** - It runs a series of connectors responsible for gathering data from various APIs (Google Analytics, Mixpanel, Google Cloud Storage, etc.) and save it into Cassandra tables.
- **Training Pipeline** - Consists of pre-processors (responsible for cleaning, formatting, deduplicating, normalizing and transforming data) and model training.
- **Prediction Pipeline** - It generates predictions based on the model that was trained. It is triggered at the final step of the ingestion pipeline through a preflight check.
The pipelines are set up using [Apache Airflow](https://github.com/apache/incubator-airflow). Below you can see a diagram of the platform's architecture:
### Prerequisites
#### 1) Virtual Instance
The orchestrator can be installed on a virtual instance on a cloud platform of your choice (Google Cloud Platform, Amazon Web Services, etc.).
We recommend using a clean Ubuntu 16.04 machine, minimum 2 vCPUs, 16GB of RAM, 50GB storage.
#### 2) API subdomain
Model predictions will be exposed through a secure API, for easy integration within a web or mobile app. The API needs an associated domain or subdomain name.
##### A record
In your DNS zone, add an A record with your subdomain and external IP address of the orchestrator instance:
`A api.yourdomain.com ???.???.???.???`
where `???.???.???.???` is the IP address of the Ubuntu machine. You should be able to get this IP address from your cloud management interface or by running from your machine:
`dig +short myip.opendns.com @resolver1.opendns.com`
- **Make sure you're using a static IP address that doesn't change when the instance is rebooted.**
- **Also, allow both HTTP and HTTPS traffic to your VM**.
##### Settings file
Add your subdomain name in a text file on your machine:
```
cat > /opt/settings/apidomain.txt << EOF
api.yourdomain.com
EOF
```
SSL certificates for the API subdomain will be automatically generated and renewed using [Let's Encrypt](https://letsencrypt.org/).
## Quick Start Guide
### Step 1) Installing the platform
This step is required for setting up the environment and downloading the required software on your instance.
Bootstrap the installation by running the following commands as root:
```
WHERE_THE_ORCHESTRATOR_IS='https://github.com/Morphl-AI/MorphL-Orchestrator'
WHERE_AUTH_IS='https://github.com/Morphl-AI/MorphL-Auth-API.git'
WHERE_GA_CHP_IS='https://github.com/Morphl-AI/MorphL-Model-Publishers-Churning-Users'
WHERE_GA_CHP_BQ_IS='https://github.com/Morphl-AI/MorphL-Model-Publishers-Churning-Users-BigQuery'
WHERE_USI_CSV_IS='https://github.com/Morphl-AI/MorphL-Model-User-Search-Intent'
apt update -qq && apt -y install git ca-certificates
git clone ${WHERE_THE_ORCHESTRATOR_IS} /opt/orchestrator
git clone ${WHERE_AUTH_IS} /opt/auth
git clone ${WHERE_GA_CHP_IS} /opt/ga_chp
git clone ${WHERE_GA_CHP_BQ_IS} /opt/ga_chp_bq
git clone ${WHERE_USI_CSV_IS} /opt/usi_csv
bash /opt/orchestrator/bootstrap/runasroot/rootbootstrap.sh
```
The installation process is fully automated and will take a while to complete (25-35 minutes). The `rootbootstrap.sh` script will install Docker, Docker Registry, Kubernetes, PostgreSQL and various utilities libraries. A second script (`airflowbootstrap.sh`) will be run and will install Anaconda, Airflow, JDK, Cassandra, Spark and Hadoop.
Once the installation is done, check the bottom of the output to see the if the status `The installation has completed successfully.` has been reported.
At this point a few more setup steps are necessary.
### Step 2) Provide connectors credentials
The next step is creating a series of files that store credentials for connecting to various data sources APIs.
From the root prompt, log into `airflow`:
```
su - airflow
```
**Add credentials depending on our data source API**:
- Churning users based on Google Analytics data (_GA_CHP_ model) - see docs [here](https://github.com/Morphl-AI/MorphL-Model-Publishers-Churning-Users#orchestrator-setup).
- Churning users based on Google Analytics 360 with BigQuery integration (_GA_CHP_BQ_ model) - see docs [here](https://github.com/Morphl-AI/MorphL-Model-Publishers-Churning-Users-BigQuery/tree/master/bq_extractor#orchestrator-setup).
Log out of `airflow` and back in again, and verify that your key file and view ID have been configured correctly:
```
cat /opt/secrets/keyfile.json
env | grep KEY_FILE_LOCATION
```
If the output of `env | grep KEY_FILE_LOCATION` is empty, like this:
```
KEY_FILE_LOCATION=
```
it means you have forgotten to log out of `airflow` and back in again.
Unless specified otherwise, all commands referred to below should be run as user `airflow`.
### Step 3) Loading historical data
To train the models, you'll need to bring in historical data. If you don't have historical data, you can let the ingestion pipeline gather it. However, in most cases, you'll have data that was already gathered and can be immediately downloaded.
Run the command:
```
# Load historical data for churning users with Google Analytics
load_ga_chp_historical_data.sh
# OR load historical data for churning users with Big Query
load_ga_chp_bq_historical_data.sh
```
You will be presented with a prompt that lets you select the time interval for loading the data:
```
How much historical data should be loaded?
1) 2018-08-04 - present time (5 days worth of data)
2) 2018-07-30 - present time (10 days worth of data)
3) 2018-07-10 - present time (30 days worth of data)
4) 2018-06-10 - present time (60 days worth of data)
5) 2018-04-11 - present time (120 days worth of data)
6) 2018-02-10 - present time (180 days worth of data)
7) 2017-11-12 - present time (270 days worth of data)
8) 2017-08-09 - present time (365 days worth of data)
Select one of the numerical options 1 thru 8:
```
Once you select an option, you should see an output like this:
```
Emptying the relevant Cassandra tables ...
Initiating the data load ...
The data load has been initiated.
```
Open [http://???.???.???.???:8181/admin/](http://???.???.???.???:8181/admin/) in a browser.
`???.???.???.???` is the Internet-facing IP address of the Ubuntu machine.
You should be able to get this IP address from your cloud management interface or by running:
```
dig +short myip.opendns.com @resolver1.opendns.com
```
To visualize the pipelines' status, logs, etc. you can log into Airflow's web UI.
Use username `airflow` and the password found with:
```
env | grep AIRFLOW_WEB_UI_PASSWORD
```
Keep refreshing the UI page until all the data for the number of days you specified previously, has been loaded into Cassandra.
### Step 4) Scheduling the remaining parts of the pipeline
Once all the raw data has been loaded, there is one more thing to do for the ML pipeline to be fully operational:
```
# Trigger pipeline for churning users with Google Analytics
airflow trigger_dag ga_chp_training_pipeline
# OR trigger pipeline for churning users with Big Query
airflow trigger_dag ga_chp_bq_training_pipeline
```
The command above will trigger the training pipeline, and upon running it you should see output similar to this:
```
[...] {__init__.py:45} INFO - Using executor LocalExecutor
[...] {models.py:189} INFO - Filling up the DagBag from /home/airflow/airflow/dags
[...] {cli.py:203} INFO - Created
```
Since we have already loaded historical data (step 3), we can start running the pre-processors and train the models. If you do not manually trigger the training pipeline as described above, it will automatically start at its scheduled date (it runs on a weekly basis).
The step above only needs to be performed once, immediately following the installation.
From this point forward, **the platform is on auto-pilot** and will on a regular basis collect new data and generate fresh ML models fully automatically.
### Using Predictions
Once a model has been trained, the prediction pipeline also needs to be triggered. You can wait until it is automatically triggered by the preflight check at the end of the ingestion pipeline (which runs daily) or you can trigger it yourself with the following command:
```
# Trigger pipeline for churning users with Google Analytics
airflow trigger_dag ga_chp_prediction_pipeline
# OR trigger pipeline for churning users with Big Query
airflow trigger_dag ga_chp_bq_prediction_pipeline
```
After the pipeline is triggered, the API can be accessed using the following command:
```
# Authorize API
curl -s http://${AUTH_KUBERNETES_CLUSTER_IP_ADDRESS}
# Churning users API
curl -s http://${GA_CHP_KUBERNETES_CLUSTER_IP_ADDRESS}/churning
# Churning users with BigQuery API
curl -s http://${GA_CHP_BQ_KUBERNETES_CLUSTER_IP_ADDRESS}/churning-bq
# User search intent with CSVs
curl -s http://${USI_CSV_KUBERNETES_CLUSTER_IP_ADDRESS}/search-intent
```
See [GA_CHP Wiki](https://github.com/Morphl-AI/MorphL-Model-Publishers-Churning-Users/wiki/Public-API-Endpoints) or [GA_CHP_BQ wiki](https://github.com/Morphl-AI/MorphL-Model-Publishers-Churning-Users-BigQuery/wiki/Public-API-Endpoints) for examples on how to access predictions.
### Troubleshooting
Should you need the connection details for Cassandra, the user name is `morphl` and you can find the password with:
```
env | grep MORPHL_CASSANDRA_PASSWORD
```
### (Optional) PySpark development
Since running PySpark on your local machine can be challenging, we recommend using the MorphL Orchestrator.
To start developing PySpark applications, you need to run the Jupyter Notebook with a very specific configuration.
To do that, you have at your disposal a script that sets up that environment:
```
run_pyspark_notebook.sh
```
Look for these messages in the output:
```
[I 14:01:20.091 NotebookApp] The Jupyter Notebook is running at:
[I 14:01:20.091 NotebookApp] http://???.???.???.???:8282/?token=2501b8f79e8f128a01e83a457311514e021f0e33c70690cb
```
It is recommended that every PySpark notebook should have this snippet at the top:
```
from os import getenv
MASTER_URL = 'local[*]'
APPLICATION_NAME = 'preprocessor'
MORPHL_SERVER_IP_ADDRESS = getenv('MORPHL_SERVER_IP_ADDRESS')
MORPHL_CASSANDRA_USERNAME = getenv('MORPHL_CASSANDRA_USERNAME')
MORPHL_CASSANDRA_PASSWORD = getenv('MORPHL_CASSANDRA_PASSWORD')
MORPHL_CASSANDRA_KEYSPACE = getenv('MORPHL_CASSANDRA_KEYSPACE')
spark.stop()
spark_session = (
SparkSession.builder
.appName(APPLICATION_NAME)
.master(MASTER_URL)
.config('spark.cassandra.connection.host', MORPHL_SERVER_IP_ADDRESS)
.config('spark.cassandra.auth.username', MORPHL_CASSANDRA_USERNAME)
.config('spark.cassandra.auth.password', MORPHL_CASSANDRA_PASSWORD)
.config('spark.sql.shuffle.partitions', 16)
.getOrCreate())
log4j = spark_session.sparkContext._jvm.org.apache.log4j
log4j.LogManager.getRootLogger().setLevel(log4j.Level.ERROR)
```