https://github.com/mozzius/recurrink
https://github.com/mozzius/recurrink
Last synced: 4 months ago
JSON representation
- Host: GitHub
- URL: https://github.com/mozzius/recurrink
- Owner: mozzius
- Created: 2022-10-19T11:14:23.000Z (almost 4 years ago)
- Default Branch: main
- Last Pushed: 2022-10-24T10:39:38.000Z (over 3 years ago)
- Last Synced: 2026-02-17T22:47:24.421Z (5 months ago)
- Language: TypeScript
- Homepage: recurrink.vercel.app
- Size: 237 KB
- Stars: 0
- Watchers: 1
- Forks: 0
- Open Issues: 0
-
Metadata Files:
- Readme: README.md
- Funding: .github/FUNDING.yml
Awesome Lists containing this project
README
# create-t3-turbo

## About
Ever wondered how to migrate your T3 application into a monorepo? Stop right here! This is the perfect starter repo to get you running with the perfect stack!
It uses [Turborepo](https://turborepo.org/) and contains:
```
.github
└─ workflows
└─ CI with pnpm cache setup
.vscode
└─ Recommended extensions and settings for VSCode users
apps
├─ expo
| ├─ Expo SDK 46
| ├─ React Native using React 18
| ├─ Tailwind using Nativewind
| └─ Typesafe API calls using tRPC
└─ next.js
├─ React 18
├─ TailwindCSS
└─ E2E Typesafe API Server & Client
packages
├─ api
| └─ tRPC v10 router definition
└─ db
└─ typesafe db-calls using Prisma
```
## Quick Start
To get it running, follow the steps below:
### Setup dependencies
```diff
# Install dependencies
pnpm i
# In packages/db/prisma update schema.prisma provider to use sqlite
# or use your own database provider
- provider = "postgresql"
+ provider = "sqlite"
# Create a `.env` for prisma and make sure it's synced
echo DATABASE_URL=file:./db.sqlite >> packages/db/.env
pnpm db-push
```
### Configure Expo `dev`-script
> **Note:** If you want to use a physical phone with Expo Go, just run `pnpm dev` and scan the QR-code.
#### Use iOS Simulator
1. Make sure you have XCode and XCommand Line Tools installed [as shown on expo docs](https://docs.expo.dev/workflow/ios-simulator/).
2. Change the `dev` script at `apps/expo/package.json` to open the iOS simulator.
```diff
+ "dev": "expo start --ios",
```
3. Run `pnpm dev` at the project root folder.
#### For Android
1. Install Android Studio tools [as shown on expo docs](https://docs.expo.dev/workflow/android-studio-emulator/).
2. Change the `dev` script at `apps/expo/package.json` to open the Android emulator.
```diff
+ "dev": "expo start --android",
```
3. Run `pnpm dev` at the project root folder.
## Deployment
### Next.js
#### Prerequisites
_We do not recommend deploying a SQLite database on serverless environments since the data wouldn't be persisted. I provisioned a quick Postgresql database on [Railway](https://railway.app), but you can of course use any other database provider. Make sure the prisma schema is updated to use the correct database._
#### Deploy to Vercel
Let's deploy the Next.js application to [Vercel](https://vercel.com/). If you have ever deployed a Turborepo app there, the steps are quite straightforward. You can also read the [official Turborepo guide](https://vercel.com/docs/concepts/monorepos/turborepo) on deploying to Vercel.
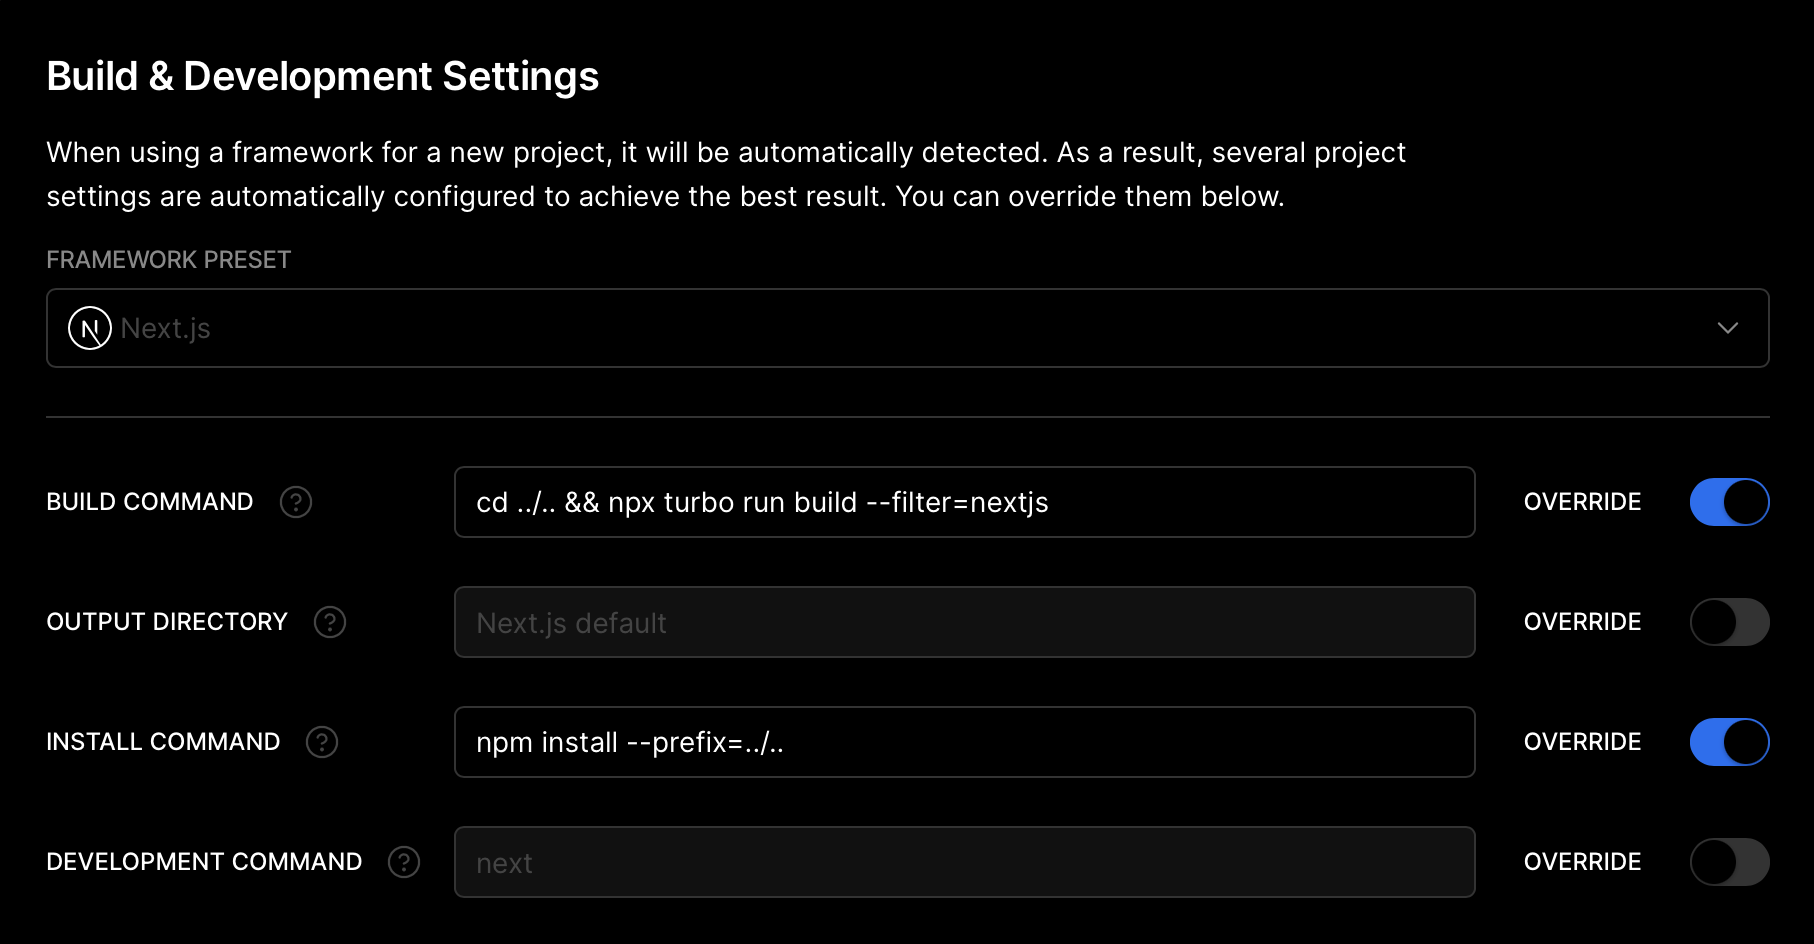
1. Create a new project on Vercel, select the `apps/nextjs` folder as the root directory and apply the following build settings:
2. Add your `DATABASE_URL` environment variable.
3. Done! Your app should successfully deploy. Assign your domain and use that instead of `localhost` for the `url` in the Expo app so that your Expo app can communicate with your backend when you are not in development.
### Expo
Deploying your Expo application works slightly differently compared to Next.js on the web. Instead of "deploying" your app online, you need to submit production builds of your app to the app stores, like [Apple App Store](https://www.apple.com/app-store/) and [Google Play](https://play.google.com/store/apps). You can read the full [Distributing your app](https://docs.expo.dev/distribution/introduction/), including best practices, in the Expo docs.
1. Let's start by setting up [EAS Build](https://docs.expo.dev/build/introduction/), which is short for Expo Application Services. The build service helps you create builds of your app, without requiring a full native development setup. The commands below are a summary of [Creating your first build](https://docs.expo.dev/build/setup/).
```bash
// Install the EAS CLI
$ pnpm add -g eas-cli
// Log in with your Expo account
$ eas login
// Configure your Expo app
$ cd apps/expo
$ eas build:configure
```
2. After the initial setup, you can create your first build. You can build for Android and iOS platforms and use different [**eas.json** build profiles](https://docs.expo.dev/build-reference/eas-json/) to create production builds or development, or test builds. Let's make a production build for iOS.
```
$ eas build --platform ios --profile production
```
> If you don't specify the `--profile` flag, EAS uses the `production` profile by default.
3. Now that you have your first production build, you can submit this to the stores. [EAS Submit](https://docs.expo.dev/submit/introduction/) can help you send the build to the stores.
```
$ eas submit --platform ios --latest
```
> You can also combine build and submit in a single command, using `eas build ... --auto-submit`.
4. Before you can get your app in the hands of your users, you'll have to provide additional information to the app stores. This includes screenshots, app information, privacy policies, etc. _While still in preview_, [EAS Metadata](https://docs.expo.dev/eas/metadata/) can help you with most of this information.
5. Once everything is approved, your users can finally enjoy your app. Let's say you spotted a small typo; you'll have to create a new build, submit it to the stores, and wait for approval before you can resolve this issue. In these cases, you can use EAS Update to quickly send a small bugfix to your users without going through this long process. Let's start by setting up EAS Update.
The steps below summarize the [Getting started with EAS Update](https://docs.expo.dev/eas-update/getting-started/#configure-your-project) guide.
```bash
// Add the `expo-updates` library to your Expo app
$ cd apps/expo
$ pnpm expo install expo-updates
// Configure EAS Update
$ eas update:configure
```
6. Before we can send out updates to your app, you have to create a new build and submit it to the app stores. For every change that includes native APIs, you have to rebuild the app and submit the update to the app stores. See steps 2 and 3.
7. Now that everything is ready for updates, let's create a new update for `production` builds. With the `--auto` flag, EAS Update uses your current git branch name and commit message for this update. See [How EAS Update works](https://docs.expo.dev/eas-update/how-eas-update-works/#publishing-an-update) for more information.
```bash
$ cd apps/expo
$ eas update --auto
```
> Your OTA (Over The Air) updates must always follow the app store's rules. You can't change your app's primary functionality without getting app store approval. But this is a fast way to update your app for minor changes and bug fixes.
8. Done! Now that you have created your production build, submitted it to the stores, and installed EAS Update, you are ready for anything!
## References
The stack originates from [create-t3-app](https://github.com/t3-oss/create-t3-app).
A [blog post](https://jumr.dev/blog/t3-turbo) where I wrote how to migrate a T3 app into this.