https://github.com/mrworf/rainfall
Raspberry Pi controlled irrigation system for cheap
https://github.com/mrworf/rainfall
irrigation irrigation-controller raspberrypi sprinkler sprinkler-controller
Last synced: 5 months ago
JSON representation
Raspberry Pi controlled irrigation system for cheap
- Host: GitHub
- URL: https://github.com/mrworf/rainfall
- Owner: mrworf
- License: gpl-3.0
- Created: 2020-05-14T21:54:37.000Z (about 6 years ago)
- Default Branch: master
- Last Pushed: 2021-12-02T00:18:02.000Z (over 4 years ago)
- Last Synced: 2024-01-28T02:02:19.624Z (over 2 years ago)
- Topics: irrigation, irrigation-controller, raspberrypi, sprinkler, sprinkler-controller
- Language: Python
- Homepage:
- Size: 698 KB
- Stars: 3
- Watchers: 3
- Forks: 0
- Open Issues: 7
-
Metadata Files:
- Readme: README.md
- Funding: .github/FUNDING.yml
- License: LICENSE
Awesome Lists containing this project
README
# rainfall
A python based sprinkler system which uses any raspberry pi connected to a relay board of your choice to control the sprinkler valves.
## disclaimer
I take no responsibility for any loss or problems that may come from using this software or following the
instructions.
While I test and use this myself, there are many moving parts which could go wrong.
Please take care in wiring and using this.
# background
I was using 2 x EzFlower. EzFlower is an insteon based 8 channel relay. The logic for the sprinklers still
has to be implemented by you. A fun exercise to be sure (at best it uses an if/this/else/that flow).
But keyword in that above paragraph is "was". This week, one of my boxes died. After a lot of grumbling and
cussing about having to cough up another $120 to keep it running, I decided to review my options.
Using a standard rainbird like when we got the house seemed a no-go since they usually have too few zones or lack
sophistication when it comes to scheduling. Going all out for a modern wifi enabled solution with enough zones
(I need at least 11) would cost nearly $200.
Instead decided to go my own way. I had a Raspberry Pi 2B lying around, and I found that for $10 you could get a nice 8 channel
relay board. And given the amount of GPIOs on RPi, you can get between 16 or 24 zones without any extra work (each board requires
8 GPIOs).
# hardware
This means you can build a 24 channel network enabled sprinkler system for about $60.
All you need is:
- Raspberry Pi (Zero Wireless ~$20)
- Memory card (noname ~$10)
- 3 x ELEGOO 8 Channel DC 5V (~$10)
And there you go. This assumes you have a suitable 5v USB powersupply already (which most of you probably do)
# what does it do

Bootstrap style UX for add/edit/remove of sprinkler stations with a simple programming interface.
All stations have the following options:
- Duration (minutes)
- Cycles (minimum 1 or it won't run)
- Days (which days, every, every other)
- Shift (to allow sprinklers to run on different days if they have the same schedule)
Next, you can select when on the day it should run the program, with one distinction.
As usual you can decide at which time it should start, but you can also choose to have it
run so it will finish by a certain time.
This means if you want to be sure all sprinklers are done by 4am, now you can. The system
may start the program at 1.35am to reach that goal (based on your schedules).
# installation
## Install Raspbian Buster Lite
- Go to [raspberrypi.org](https://www.raspberrypi.org/) and download their [latest image](https://downloads.raspberrypi.org/raspbian_lite_latest)
- Write the image onto your SD card using [Etcher](https://www.balena.io/etcher/)
## Setup your environment
- Boot the RPi using the image you just wrote to the SD Card
- Setup your network as needed (so you can run headless)
- Change the `pi` default password (`raspberry`) to something harder
- Update your OS
```
sudo apt update
sudo apt upgrade -y
```
- Install the needed software
```
sudo apt install git python3-gpiozero python3-flask python3-flask-httpauth
```
- You may want to install the SSH server as well to allow remote administration
```
sudo apt install openssh-server
```
- Open `/boot/config.txt` file with an editor as root
```
sudo nano -w /boot/config.txt
```
- Find `dtparam=audio=on` and add a hash in-front of it, like so: `#dtparam=audio=on`
- To enable usage of all the GPIOs, go to the end of the file and add the following
```
gpio=2-26=op,dh
```
- Save and exit (hint, CTRL-X then `y` and ENTER)
## Install the software
- Start by cloning the software from github.com. Make sure you're in the home directory first
```
cd
git clone https://github.com/mrworf/rainfall.git
```
Any question about making the connection is normal since this is the first time. Simply agree and the download will commence.
- Run the installer
```
cd rainfall
sudo ./install.sh
```
- Done! Time to power off and connect the hardware
```
sudo poweroff
```
# connecting hardware
## Wiring a ELEGOO 8 channel board to the RPi
The board has a number of pins, we'll connect 10 of them.

- GND will be connected to any of the ground pins on the raspberry pi
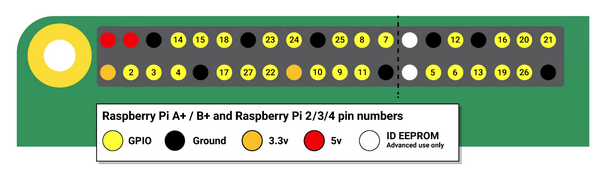
- IN1 through IN8 can be connected to any of the GPIO pins labelled 2 through 26.
- VCC will be connected to one of the two 5V outputs on the Raspberry Pi.
Make a note of which GPIOs going to which pin on the ELEGOO board since we'll need
that when adding the sprinklers to the UX.
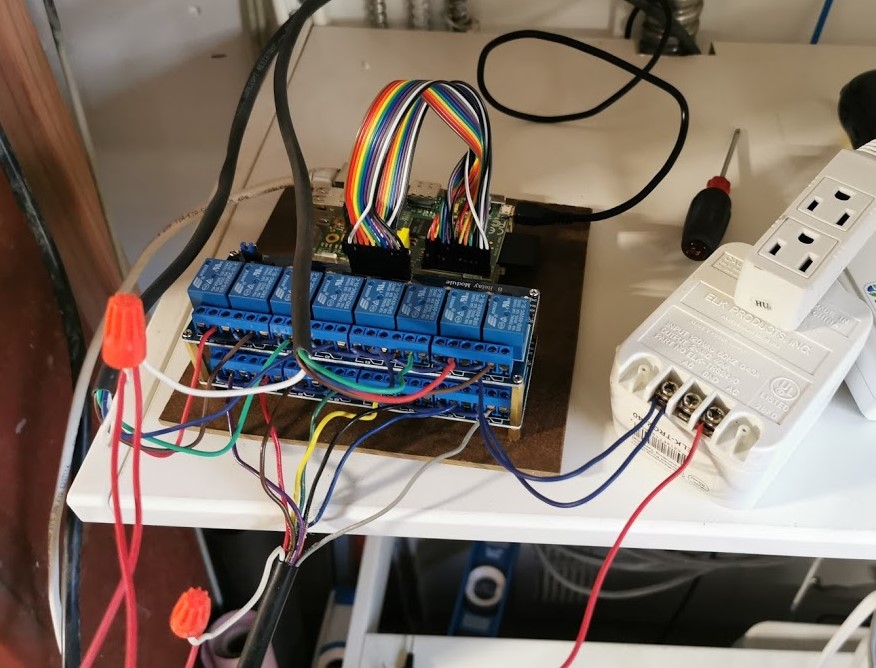
## Wiring the sprinklers to the ELEGOO board
Each relay on the board has 3 connections (this is simplified)
- ON (left)
- OUTPUT (middle)
- OFF (right)

What it means is that the OUTPUT (middle) is connected to OFF (right) when the GPIO is low.
When GPIO is high, OUTPUT is connected to ON (left).
What we want to do is to use the ON and OUTPUT connections. This makes sure that the
relays won't power the sprinkler valves if the raspberry pi is off.
Sprinkler valves use 24 VAC (AC current) and that means that all we need to do is send
the current to the right sprinkler.
All sprinklers will have a common lead, this should be wired directly to the AC power supply.
The individual leads from the sprinklers should be connected to the individual relay's OUTPUT terminal.
Lastly, the ON terminal on each relay should all be powered by the other terminal on the AC power supply.
In the end, it may look something like this:
## Powering up
_*PLEASE DOUBLECHECK ALL CONNECTIONS, YOU DON'T WANT 24 VAC REACHING THE RPI*_
Connecting the AC power should _not_ have any effect. If your sprinklers go off, you've probably wired it
to the OFF state instead which means power is sent to the OUTPUT when no signal is sent from the raspberry pi.
Once all looks good, power off the AC again and power up the Raspberry Pi.
If you hear alot of relay clacking after doing this, it means you missed the step with configuring the GPIOs
as mentioned above. Luckily you didn't have the AC connected so nothing happened. Please revisit the install steps
above.
Otherwise, if the relay boards are quiet and no leds on (which indicate an ON state), feel free to connect
the AC again. You are now ready to configure the software.
## I have more than 8 zones
Simply wire a second ELEGOO board as described above. By default, all Raspberry Pis have two 5V outputs
on the board making this an easy task (as long as you note down the GPIOs being used).
## I have more than 16 zones
Cool. First of all, you need a Raspberry Pi Zero, 3 or 4 to do this. The older RPis simply don't have all the GPIOs exposed.
Secondly, there won't be any more 5V outputs to easily tap into, so you'll have to find it somewhere else, or simply splice into
one of the existing 5V leads.
There should be enough GND and GPIOs that you will essentially have 2 GPIOs left over once done.
## Is there any more photos?
Yes, please visit my [photo album](https://photos.app.goo.gl/zsZV9URi4drs93DB8)
# using it
The service runs on port 7770 by default, so once your raspberry is running, point your web browser to the
address of the device like so:
http://my.device.address:7770/
## Adding your first sprinkler
- Press "Add sprinkler" button
This will open a dialog to define a sprinkler

Here you need to enter a name and a pin.
- name
Can be whatever you want
- pin
Refers to the GPIO pin on the Raspberry Pi

Continue to add the sprinklers you wired up. Don't worry, it will stop you from double using the GPIOs
## Setting a schedule
- Press "Other settings"
This will open a dialog where you can choose how the start time is calculated as well as the time it uses.
