https://github.com/mumble-srl/mpush-swift
MPush iOS SDK
https://github.com/mumble-srl/mpush-swift
cocoapods mpush notifications xcode
Last synced: 5 months ago
JSON representation
MPush iOS SDK
- Host: GitHub
- URL: https://github.com/mumble-srl/mpush-swift
- Owner: Mumble-SRL
- License: mit
- Created: 2019-01-10T08:00:38.000Z (over 7 years ago)
- Default Branch: master
- Last Pushed: 2024-10-29T15:46:24.000Z (over 1 year ago)
- Last Synced: 2025-03-30T13:36:37.324Z (about 1 year ago)
- Topics: cocoapods, mpush, notifications, xcode
- Language: Swift
- Homepage:
- Size: 2.68 MB
- Stars: 1
- Watchers: 2
- Forks: 0
- Open Issues: 0
-
Metadata Files:
- Readme: Readme.md
- License: LICENSE
Awesome Lists containing this project
README

# MPush iOS SDK
[](https://github.com/Mumble-SRL/MPush-Swift/tree/master/docs)
[](https://swift.org/package-manager/)
[](https://cocoapods.org)
[](https://github.com/Carthage/Carthage)
[](LICENSE)
MPush is a client libary, written in Swift, that can be used to interact with the [MPush](https://mpush.app) API. The minimum deplaoyment target for the library is iOS 11.0.
MPush uses a classic Pub/Sub pattern, you will register your devce to topics, then from the MPush apis you will be able to send notifications to those topics and all device registered will receive a notification.
A topic can represent whatever you want in your system (e.g. the entire app, a user a subset of user with a common charachteristic) so you will be able to choose the granularity of the notifications.
# Minimum Requirements
- [Swift 4.0+](https://github.com/pusher/push-notifications-swift/commit/d6dfa2186195135d8d7d1e3d3efdd7f8661ea404)
- [Xcode](https://itunes.apple.com/us/app/xcode/id497799835) - The easiest way to get Xcode is from the [App Store](https://itunes.apple.com/us/app/xcode/id497799835?mt=12), but you can also download it from [developer.apple.com](https://developer.apple.com/) if you have an AppleID registered with an Apple Developer account.
# Installation
## Swift Package Manager
With Xcode 11 you can start using [Swift Package Manager](https://swift.org/package-manager/) to add **MPushSwift** to your project. Follow those simple steps:
* In Xcode go to File > Swift Packages > Add Package Dependency.
* Enter `https://github.com/Mumble-SRL/MPushSwift.git` in the "Choose Package Repository" dialog and press Next.
* Specify the version using rule "Up to Next Major" with "0.2.13" as its earliest version and press Next.
* Xcode will try to resolving the version, after this, you can choose the `MPushSwift` library and add it to your app target.
## CocoaPods
CocoaPods is a dependency manager for iOS, which automates and simplifies the process of using 3rd-party libraries in your projects. You can install CocoaPods with the following command:
```ruby
$ gem install cocoapods
```
To integrate the MPush into your Xcode project using CocoaPods, specify it in your Podfile:
```ruby
platform :ios, '10.0'
target 'TargetName' do
use_frameworks!
pod 'MPushSwift'
end
```
Then, run the following command:
```
$ pod install
```
CocoaPods is the preferred methot to install the library.
## Carthage
[Carthage](https://github.com/Carthage/Carthage) is a decentralized dependency manager that builds your dependencies and provides you with binary frameworks. To integrate MPushSwift into your Xcode project using Carthage, specify it in your Cartfile:
```
github "Mumble-SRL/MPushSwift"
```
## Manual installation
To install the library manually drag and drop the folder `MPush` to your project structure in XCode.
Note that `MPush` has `MBNetworking (1.0)` as dependency, so you have to install also this library.
# Usage
The first thig you have to do is implement Push Notifications using the [UserNotifications](https://developer.apple.com/documentation/usernotifications) framework.
> You will be guided through all the steps needed to have a functional project wth the push notifications, if you have already done it you can skip to the [Integrate MPush](#integrate-mpush) section of this README.
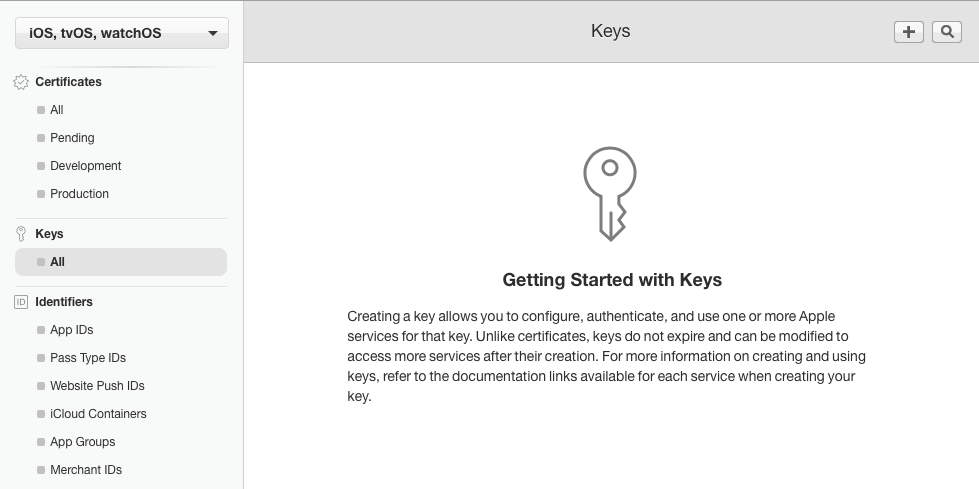
# Create a key
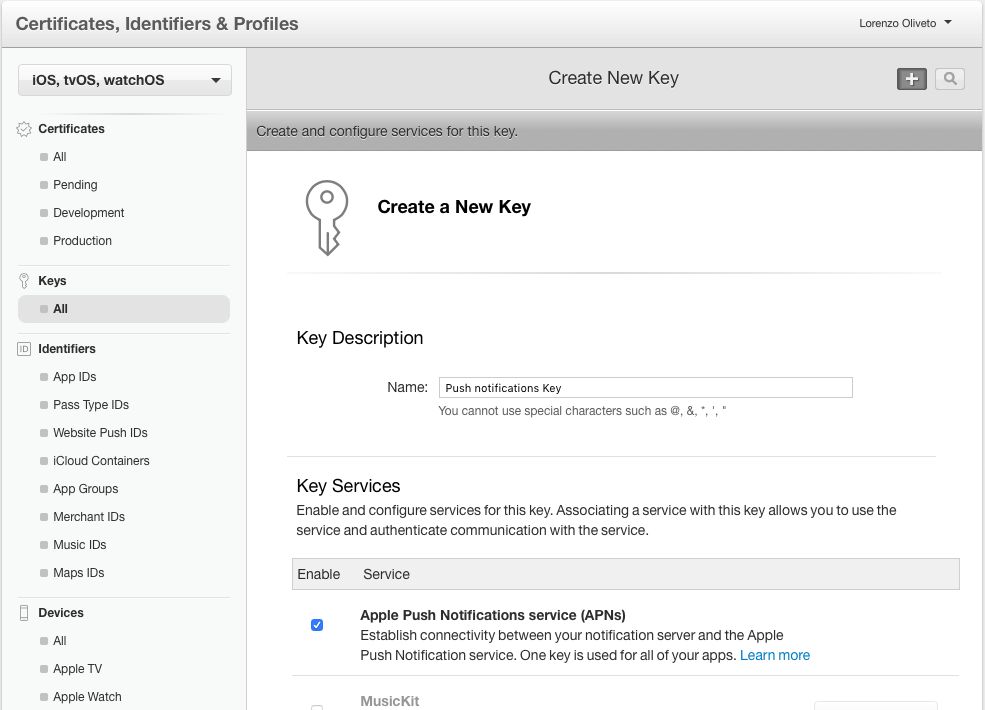
Go to [developer.apple.com](https://www.developer.apple.com) with an admin account and under Keys -> All click the plus button in the top right corner.
Specify a name for your key and enable Apple Push Notifications service (APNs).
Then download the .p8 key file created and upload it in our [dashboard](https://mpush.app).
> Note that the key created is valid for all the apps of your profile and can't be re-downloaded, keep it in a safe place because you will likely have to resue it.
# Add notifications to your app
Now go to your app settings under Identifier -> AppId and enable the notifications services following the steps. After that you need to update the Provisioning Profile for your app or create a new one because push notifications donesn't work for applications signed with a wildcard Provisioning Profile.
Now it's finally time to move to XCode. Open your project and enable push notifications in the capabilities tab.

In `AppDelegate.swift` add
```swift
import UserNotifications
func application(_ application: UIApplication, didFinishLaunchingWithOptions launchOptions: [UIApplication.LaunchOptionsKey: Any]?) -> Bool {
...
let userNotificationCenter = UNUserNotificationCenter.current()
userNotificationCenter.delegate = self
self.registerForPushNotifications()
...
}
// MARK: - Notifications
func registerForPushNotifications() {
UNUserNotificationCenter.current().requestAuthorization(options: [.alert, .sound, .badge]) { (granted, _) in
guard granted else { return }
self.getNotificationSettings()
}
}
func getNotificationSettings() {
UNUserNotificationCenter.current().getNotificationSettings { (settings) in
guard settings.authorizationStatus == .authorized else { return }
DispatchQueue.main.async {
UIApplication.shared.registerForRemoteNotifications()
}
}
}
extension AppDelegate: UNUserNotificationCenterDelegate {
func userNotificationCenter(_ center: UNUserNotificationCenter,
willPresent notification: UNNotification,
withCompletionHandler
completionHandler: @escaping (UNNotificationPresentationOptions) -> Void) {
completionHandler(UNNotificationPresentationOptions.alert)
}
func userNotificationCenter(_ center: UNUserNotificationCenter,
didReceive response: UNNotificationResponse,
withCompletionHandler
completionHandler: @escaping () -> Void) {
completionHandler()
}
}
```
# Integrate MPush
To integrate MPush to your implementation you need to add this in your AppDelegate
```swift
import MPushSwift
func application(_ application: UIApplication, didFinishLaunchingWithOptions launchOptions: [UIApplication.LaunchOptionsKey: Any]?) -> Bool {
...
MPush.token = "YOUR_PUSH_TOKEN"
...
}
...
func application(_ application: UIApplication, didRegisterForRemoteNotificationsWithDeviceToken deviceToken: Data) {
MPush.registerDevice(deviceToken: deviceToken, success: {
MPush.register(toTopic: MPTopic("YOUR_TOPIC"))
// OR if you have more than one topic
// MPush.register(toTopics: [MPTopic("TOPIC1"), MPTopic("TOPIC2")])
})
}
```
You're set 🎉, the device will receive notifications for the topic is registered to.
### MPTopic additional parameters
When creating topic you can specify additional parameters:
* `title`: a title fot that topic that will be displayed in the dashboard, if not specified it has the same value as the topic id
* `single`: If the topic identifies a single user or a group of users, defaults to `false`
# Rich Notifications
To implement rich notifications you will have to create a new Notificaiton Service Target that will be responsible for downloading the media of the notification and attach it to the notification object.
In Xcode go to File -> New -> Target and choose Notification Service Extension
> Keep in mind that notifications don't have much time to download the media attached, if the dowload doen't finish in a short period of time the notification will be delivered without the media.
To handle MPush attachments add this your `NotificationService` should look like this:
```swift
override func didReceive(_ request: UNNotificationRequest, withContentHandler contentHandler: @escaping (UNNotificationContent) -> Void) {
self.contentHandler = contentHandler
bestAttemptContent = (request.content.mutableCopy() as? UNMutableNotificationContent)
if let bestAttemptContent = bestAttemptContent {
if let mediaUrl = request.content.userInfo["media_url"] as? String, let fileUrl = URL(string: mediaUrl) {
downloadMedia(fileUrl: fileUrl, request: request, bestAttemptContent: bestAttemptContent) {
contentHandler(bestAttemptContent)
}
} else {
contentHandler(bestAttemptContent)
}
}
}
func downloadMedia(fileUrl: URL, request: UNNotificationRequest, bestAttemptContent: UNMutableNotificationContent, completion: @escaping () -> Void) {
let task = URLSession.shared.downloadTask(with: fileUrl) { (location, _, _) in
if let location = location {
let tmpDirectory = NSTemporaryDirectory()
let tmpFile = "file://".appending(tmpDirectory).appending(fileUrl.lastPathComponent)
let tmpUrl = URL(string: tmpFile)!
do {
try FileManager.default.moveItem(at: location, to: tmpUrl)
var options: [String: String]? = nil
if let type = request.content.userInfo["media_type"] as? String {
options = [String: String]()
options?[UNNotificationAttachmentOptionsTypeHintKey] = type
}
if let attachment = try? UNNotificationAttachment(identifier: "media." + fileUrl.pathExtension, url: tmpUrl, options: options) {
bestAttemptContent.attachments = [attachment]
}
completion()
} catch {
completion()
}
}
}
task.resume()
}
override func serviceExtensionTimeWillExpire() {
// Called just before the extension will be terminated by the system.
// Use this as an opportunity to deliver your "best attempt" at modified content, otherwise the original push payload will be used.
if let contentHandler = contentHandler, let bestAttemptContent = bestAttemptContent {
contentHandler(bestAttemptContent)
}
}
```
With this code we download the attachemnt, if exists, and move it to a temporary directory. Then we add it to our notification with
```swift
if let attachment = try? UNNotificationAttachment(identifier: "media." + fileUrl.pathExtension, url: tmpUrl, options: options) {
bestAttemptContent.attachments = [attachment]
}
```
# License
MPush is released under the MIT license. See [LICENSE](LICENSE) for details.