https://github.com/mygamedevtools/script-template
A simple tool to create and manage your script templates.
https://github.com/mygamedevtools/script-template
editor editor-plugin package script scripts template templates tool unity unity-editor unity-package unity3d unity3d-plugin unityeditor upm upm-package
Last synced: 9 months ago
JSON representation
A simple tool to create and manage your script templates.
- Host: GitHub
- URL: https://github.com/mygamedevtools/script-template
- Owner: mygamedevtools
- License: mit
- Created: 2022-09-14T00:14:59.000Z (almost 4 years ago)
- Default Branch: main
- Last Pushed: 2024-01-04T19:04:34.000Z (over 2 years ago)
- Last Synced: 2025-01-31T03:54:45.290Z (over 1 year ago)
- Topics: editor, editor-plugin, package, script, scripts, template, templates, tool, unity, unity-editor, unity-package, unity3d, unity3d-plugin, unityeditor, upm, upm-package
- Language: C#
- Homepage:
- Size: 414 KB
- Stars: 11
- Watchers: 2
- Forks: 1
- Open Issues: 0
-
Metadata Files:
- Readme: README.md
- Changelog: CHANGELOG.md
- License: LICENSE
Awesome Lists containing this project
README
Script Template


A simple tool to add and manage more script templates.
What's this about?
---
This tool adds custom Script Templates to Unity that will serve as alternatives for the default \"C#Script\" that I personally always modify before writing my scripts. In essence, it allows customization of the script templates with dynamic data such as signature and namespace settings. Additionally, it adds templates for other types of scripts rather than just Mono Behaviours. You can customize the templates after they have been copied as well.
Installation
---
### OpenUPM
This package is available on the [OpenUPM](https://openupm.com/packages/com.mygamedevtools.script-template) registry. Add the package via the [openupm-cli](https://github.com/openupm/openupm-cli):
```
openupm add com.mygamedevtools.script-template
```
### [Installing from Git](https://docs.unity3d.com/Manual/upm-ui-giturl.html) _(requires [Git](https://git-scm.com/) installed and added to the PATH)_
1. Open `Edit/Project Settings/Package Manager`.
2. Click +.
3. Select `Add package from git URL...`.
4. Paste `com.mygamedevtools.script-template` into the name.
5. Click `Add`.
Usage
---
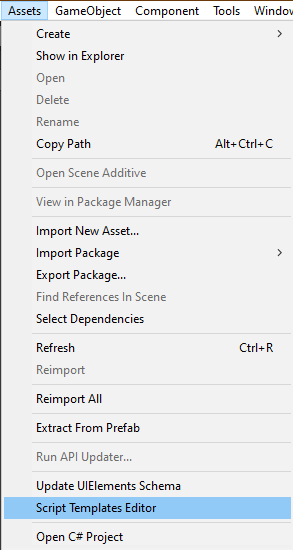
From `Assets/Script Templates Editor` you can open the **Script Templates Editor** Window.

Here you can preview in realtime what your script will look like, customize the values, and copy the templates.
### Settings
You can decide to enable both the Signature and the Namespace modules, each with its own set of custom settings.
#### Signature
The Signature module adds a simple signature header on your script following the template:
```cs
/**
* #SCRIPTNAME#.cs
* Created by: #AUTHOR#
* Created on: #CREATIONDATE#
*/
```
The `#SCRIPTNAME#` is no stranger to custom script templates, as it is replaced by the default Unity asset processor.
However, both the `#AUTHOR#` and `#CREATIONDATE#` will be replaced by the values you set on the `Author`, `Email(optional)`, and `Use Local Date` fields under the Namespace module group.
#### Namespace
The Namespace module adds a namespace to your file, indenting the template content under it.
For that to work, you need to have a template such as:
```
#NAMESPACE#public class #SCRIPTNAME# : MonoBehaviour
{
# #public void Start()
# #{
# ## #
# #}
}
```
Then, if enabled, the namespace will be replaced according to the values you set.
If you enable `Use Assembly Definition`, make sure the script is in the correct location to be linked to an assembly definition, or the `Default Namespace` will be applied.
Otherwise, if you decide to just use the `Default Namespace`, then it will be applied to all scripts.
#### Indentation
The indentation whitespaces must be marked with the `# #` keyword, one for each indent level, so they can be converted to tabs or spaces and by how much. So, using the previous example:
```
#NAMESPACE#public class #SCRIPTNAME# : MonoBehaviour
{
# #public void Start()
# #{
# ## #
# #}
}
```
By selecting **4 spaces** as the indentation settings, the final created script would be:
```cs
namespace MyNamespace
{
public class MyClass : MonoBehaviour
{
public void Start()
{
}
}
}
```
Finally, you should `Save` your changes once you're satisfied with your settings, to make sure they will be used whenever creating a new script.
You also have the option to `Clear` those settings at any time, if you wish.
This data is saved to the [Editor Prefs](https://docs.unity3d.com/ScriptReference/EditorPrefs.html) cache.
### Templates
This section shows a list of all included Script Templates and you can select them to locate the file.
You also have two buttons: `Copy to Project` and `Copy to Editor`.
The first one will copy all script templates to the current project `Assets/ScriptTemplates` path, limiting the script template usage to that project.
The other will copy all script templates to your Editor folder, and you will be able to use the templates
in all projects.
However, if you don't have this package in a project, it will not replace the custom keywords on the file and might lead to compilation issues.
Also, if you update the Unity Editor version, you will lose the script templates and be required to copy them again. This is not necessary if you copy them to your project.
Both actions of copying to the project and to the editor will require an editor restart to take effect.
#### Included Templates:
* Game Objects
* [Mono Behaviour](https://docs.unity3d.com/ScriptReference/MonoBehaviour.html)
* [Scriptable Object](https://docs.unity3d.com/ScriptReference/ScriptableObject.html)
* [State Machine Behaviour](https://docs.unity3d.com/ScriptReference/StateMachineBehaviour.html)
* [Property Attribute](https://docs.unity3d.com/ScriptReference/PropertyAttribute.html)
* Editor
* [Editor Window](https://docs.unity3d.com/ScriptReference/EditorWindow.html)
* [Custom Editor Inspector](https://docs.unity3d.com/ScriptReference/Editor.html)
* [Property Drawer](https://docs.unity3d.com/ScriptReference/PropertyDrawer.html)
* UI Toolkit
* [Custom Element](https://docs.unity3d.com/Manual/UIE-expose-custom-control-to-uxml.html)
* Entities
* [System](https://docs.unity3d.com/Packages/com.unity.entities@1.0/manual/systems-isystem.html)
* [Component](https://docs.unity3d.com/Packages/com.unity.entities@1.0/manual/components-unmanaged.html)
* [Authoring](https://docs.unity3d.com/Packages/com.unity.entities@1.0/manual/baking-baker-overview.html) (Baker Workflow)
* [Managed Component](https://docs.unity3d.com/Packages/com.unity.entities@1.0/manual/components-managed.html)
* [Managed System](https://docs.unity3d.com/Packages/com.unity.entities@1.0/manual/systems-systembase.html)
* Plain C#
* Class
* Struct
* Enum
* Interface
How it works
---
The custom Script Templates have custom keywords that will be replaced by the data you entered on the Editor Window and the present date.
The keyword recognition and replacing is done by the [ScriptKeywordReplacer](Assets/CustomScriptTemplate/Editor/ScriptKeywordReplacer.cs) class.
Customization
---
You can customize your Script Templates to suit your needs, for example, adding default methods or even new keywords to process.
Just make sure you add them to the correct folder and add the custom keywords following the same rules as the built-in templates.
Keep in mind that if you ever want a feature that it does not have, I may want to include it in this package.
But, why?
---
For me, it's more practical to create scripts from premade templates for different usage contexts than starting with the default "CSharp Script" Unity provides. With this package, you can have multiple templates to easily bootstrap your coding.
---
Don't hesitate to create [issues](https://github.com/mygamedevtools/script-template/issues) for suggestions and bugs. Have fun!