https://github.com/navarroaxel/react-native-scrollview-carousel-example
The simplest carousel example in React Native using ScrollView horizontal
https://github.com/navarroaxel/react-native-scrollview-carousel-example
Last synced: 29 days ago
JSON representation
The simplest carousel example in React Native using ScrollView horizontal
- Host: GitHub
- URL: https://github.com/navarroaxel/react-native-scrollview-carousel-example
- Owner: navarroaxel
- License: mit
- Created: 2020-09-26T13:57:08.000Z (over 5 years ago)
- Default Branch: master
- Last Pushed: 2023-03-05T13:07:48.000Z (about 3 years ago)
- Last Synced: 2025-03-11T04:25:54.885Z (about 1 year ago)
- Language: JavaScript
- Size: 904 KB
- Stars: 0
- Watchers: 2
- Forks: 2
- Open Issues: 9
-
Metadata Files:
- Readme: README.md
- License: LICENSE
Awesome Lists containing this project
README
# react-native-scrollview-carousel-example
The simplest carousel example in React Native using the built-in ScrollView in
horizontal mode.

## Setting up the development environment
Install the Expo CLI command line utility:
```bash
npm install -g expo-cli
```
Clone the repository and install the dependencies:
```bash
git clone https://github.com/navarroaxel/react-native-scrollview-carousel-example.git
cd react-native-scrollview-carousel-example
npm install
```
## Trying the example app
Start the local dev server for the app:
```bash
npm start
```
Then, follow the expo instructions to open the app in your phone or emulator.
## How does ScrollView work?
The ScrollView renders all its react child components vertically, but we can
arrange them horizontally in a row using:
```jsx
```
In this example, we show how to overlap the `Image` component on the header
to get a cool effect. The touch is so fluid and fast that the user has a sense
of a highly performance application.
### Performance issues
The `ScrollView` renders all its react child components. If you need to render
a carousel with more than 10 items, you can get better performance by using the
`FlatList` built-in component.
## The layout
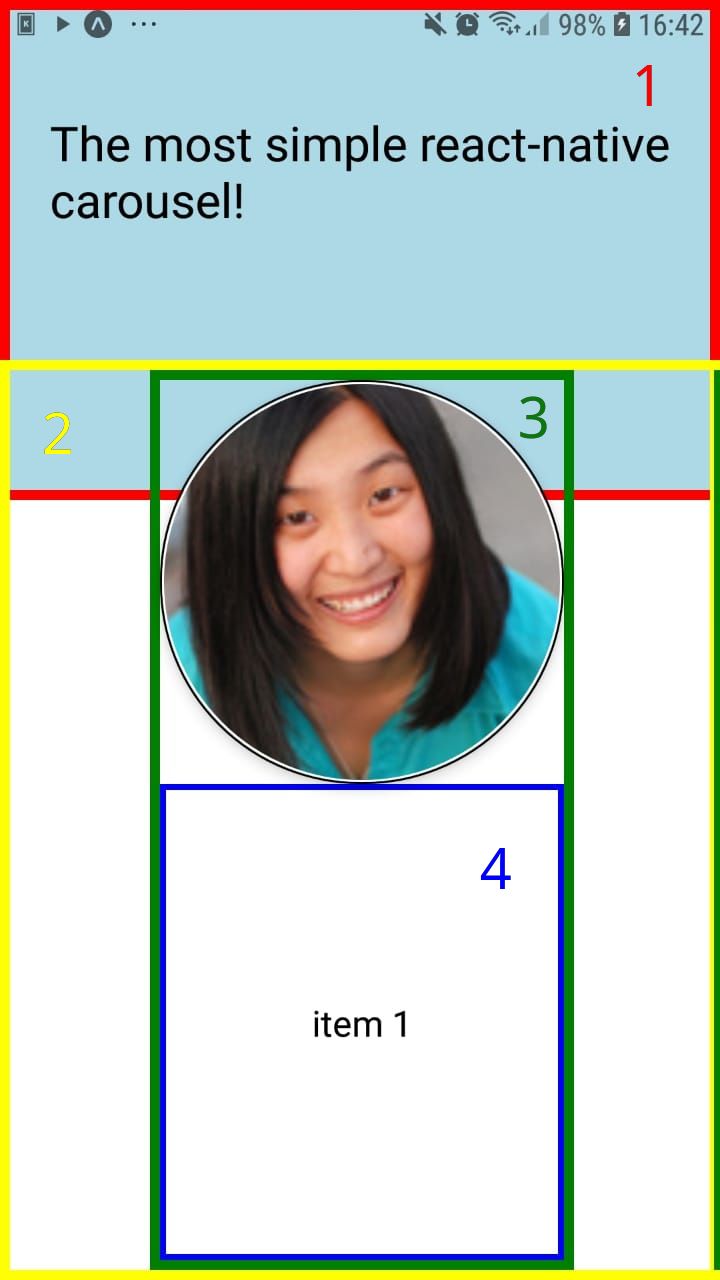
### Header
We will call the `View` number 1 "Header", this should have a fixed height
because the `ScrollView` extends himself with a `flex: 1` style.
:bulb: You can use a proportional height based on the device screen using the
`useWindowDimensions` hook.
```jsx
const {height} = useWindowDimensions();
```
### ScrollView
The `ScrollView` is the number 2, I used a `marginTop: -70` to overlap the
carousel on the header for a cool effect. :sunglasses:
### Carousel Itme
The `View` number 3 is the "Carousel Item". I used a carousel of images because
is the most use case for carousels in real life.
:bulb: A tool to create the image's shadow:
Don't worry about this loop:
```javascript
Array.apply(null, Array(6)).map((_, index) => ( /* ... */ ));
```
This is just the functional form to:
```javascript
for (i = 0; i < 6; i++) {
items.push( /* ... */ );
}
```
Every item has a `marginLeft: 70` to start in the middle of the screen. But
for the last item we should use `marginRight` to end with the same margin:
```javascript
lastItem: {
marginLeft: 70,
marginRight: 70,
},
```
### The item content
The `View` number 4 is a placeholder for the text associated with the image.
This style is required to keep everything centered in the `View` number 3 - the
carousel item.
```javascript
itemContent: {
flex: 1,
alignItems: 'center',
justifyContent: 'center',
},
itemText: {
textAlign: 'center',
},
```