https://github.com/nkappler/ctxmenu
Tiny and customizable context menu generator
https://github.com/nkappler/ctxmenu
context-menu contextmenu customizable easy-to-use javascript javascript-library no-dependencies pressandhold right-click standalone submenu tiny
Last synced: 6 months ago
JSON representation
Tiny and customizable context menu generator
- Host: GitHub
- URL: https://github.com/nkappler/ctxmenu
- Owner: nkappler
- License: mit
- Created: 2019-01-09T14:31:52.000Z (over 7 years ago)
- Default Branch: master
- Last Pushed: 2025-02-12T15:23:46.000Z (over 1 year ago)
- Last Synced: 2025-04-16T22:04:52.315Z (over 1 year ago)
- Topics: context-menu, contextmenu, customizable, easy-to-use, javascript, javascript-library, no-dependencies, pressandhold, right-click, standalone, submenu, tiny
- Language: TypeScript
- Homepage: https://nkappler.de/ctxmenu/
- Size: 908 KB
- Stars: 49
- Watchers: 2
- Forks: 6
- Open Issues: 5
-
Metadata Files:
- Readme: README.md
- License: LICENSE
Awesome Lists containing this project
README
# ctxmenu.js [](https://www.npmjs.com/package/ctxmenu) [](https://raw.githubusercontent.com/nkappler/ctxmenu/master/index.d.ts)
## Tiny* and customizable context menu generator.
* <3kB minified and gzipped
[DEMO](https://nkappler.github.io/ctxmenu)
#### Table of contents
[Features](#features)\
[Installation](#installation)\
[Menu Definition](#menu-definition)\
[Item Types](#item-types) \
[API](#api) \
[Custom Events](#custom-events) \
[Customize](#customize) \
[Contributing](#contributing)
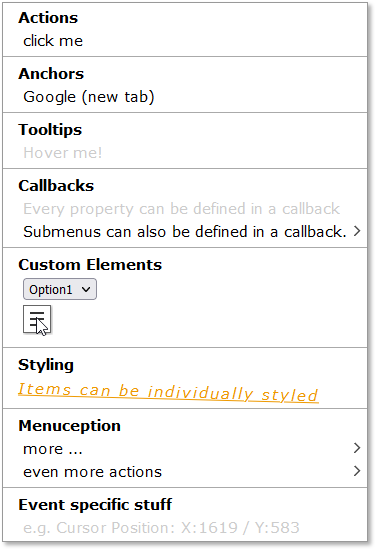
## Screenshot
## Features
- Create custom context menus for every browser.
- Style the context menu with css.
- No dependencies.
- Callback to customize based on event properties _(Cursor position, etc.)_
- Different menu items: headings, anchors, action items, dividers and submenus
- Interactive menu items can be disabled
## Installation
### with npm:
Install ctxmenu
```shell
your_project> npm install -s ctxmenu
```
Import ctxmenu:
```typescript
import { ctxmenu } from "ctxmenu";
```
### without npm
ctxmenu.js is also available as a standalone version.
to use it, just download and link ctxmenu.js or ctxmenu.min.js in your websites header.
```html
```
## Menu Definition
Menu definitions are used to describe the content of a context menu. A menu definition is an array of objects, where each object defines a single item in the menu.
Example:

```javascript
var menuDefinition = [
{ text: "Heading" },
{
text: "Action Item",
action: () => alert("Hello World!")
},
{ isDivider: true },
{
text: "Anchor Item",
href: "",
disabled: true
}
]
```
## Item Types
[Heading](#heading-item) \
[Anchor](#anchor-item) \
[Action Item](#action-item) \
[Submenu](#submenu-item)\
[Divider](#divider-item)
### Heading Item
This is a heading item which displays a `text` and optionally shows a `tooltip` when hovering over it. If you need finer control over the content of the menu item, you can supply your own HTML string by using the `html` property instead of `text`. Alternatively you can also supply an HTMLElement JavaScript Object. For all properties you can supply the value directly or a factory function which will be called just before the menu is opened (i.e. on right click). You can also supply a URL or Data URL to an image used as `icon` for the menu item. Recommended resolution is 18×18px. \
For more information about the `EventRegistry`, see [Custom Events](#custom-events). With the `attributes` record you can define arbitrary attributes for the list item, like you can with the `Element.setAttribute` browser API, for example, `id`, `class` or data attributes.
> [!NOTE]
> Keep in mind that with the `attributes` record you can overwrite other config options like `style` or `tooltip` for example
```typescript
{
text?: string | () => string,
tooltip?: string | () => string,
html?: string | () => string,
element?: HTMLElement | () => HTMLElement,
icon?: string | () => string,
style?: string | () => string,
events?: EventRegistry | () => EventRegistry,
attributes?: Record | () => Record
}
```
⚠ NOTE: _All other menu items (except the divider item) derive from this and can have at least these properties_
### Anchor Item
This is an interactive item which implements an anchor tag (``) and will redirect to a given URL (`href`).
```typescript
{
/*...Standard Props */
/** URL */
href: string | () => string,
/** https://www.w3schools.com/tags/att_a_target.asp */
target?: string | () => string,
/** defaults to false */
disabled?: boolean | () => boolean
}
```
### Action Item
This is an interactive item which will execute a given callback function when clicked.
The callback receives the event as parameter, so you can access the Action Item List Element via `e.currentTarget`.
```typescript
{
/*...Standard Props */
/** callback fired when the item is clicked */
action: (event: MouseEvent) => void,
/** defaults to false */
disabled?: boolean | () => boolean
}
```
### Submenu Item
This is an interactive item which holds another [menu definition](#menu-definition). You can create infinitely deep nested submenus.
With `subMenuAttributes` you define HTML attributes for the submenu container (the UL element), with `attributes` you can define those for the list item itself.
```typescript
{
/*...Standard Props */
/** Submenu Definition, */
subMenu: Array | () => Array, // A menu definition
/** Attribute record for the submenu container */
subMenuAttributes: Record | () => Record
/** defaults to false */
disabled?: boolean | () => boolean // default false
}
```
### Divider Item
This is a divider item which draws a horizontal line.
```typescript
{ isDivider: true }
```
## API
This library exports a singleton object `ctxmenu`.
In the standalone version the singleton is a global variable (`window.ctxmenu`).
It has the following six APIs:
[attach](#ctxmenuattach)\
[update](#ctxmenuupdate)\
[delete](#ctxmenudelete)\
[show](#ctxmenushow)\
[hide](#ctxmenuhide)\
[setNonce](#ctxmenusetnonce)
### Interfaces
[CTXConfig](#ctxconfig)
### `ctxmenu.attach`
```typescript
ctxmenu.attach(target: string, ctxmenu: Array, config?: CTXConfig)
```
The `attach` method is used to bind a context menu to any DOM Node and takes the following arguments:
- `target` - A selector string to define the target node (eg `'body'`, or `'#someID'`)
- `ctxmenu` - An Array of objects defining the menu layout. See [Menu Definition](#menu-definition).
- `config?` - A config object, See [CTXConfig](#ctxconfig).
### `ctxmenu.update`
```typescript
ctxmenu.update(target: string, ctxmenu?: Array, config?: CTXConfig)
```
The update method is used to update an existing context menu. You can pass `undefined` for each optional parameter in order to not change it. If you pass a partial [CTXConfig](#ctxconfig) object, only the specified members will be overwritten.
`update` takes two or three arguments:
- `target` - the selector string to define the target element
- `ctxmenu` - the updated menu definition. _(may be undefined when only updating the config)_
- `config?` - A config object, See [CTXConfig](#ctxconfig).
> [!NOTE]
> If you try to update a menu which does not exist, it will silently be [attached](#ctxmenuattach) instead.
### `ctxmenu.delete`
```typescript
ctxmenu.delete(target: string)
```
The delete method is used to delete a context menu and only takes the `target` selector string.
### `ctxmenu.show`
```typescript
ctxmenu.show(ctxmenu: Array, e: MouseEvent | HTMLElement)
```
The `show` method can be used to show a context menu without using the [`attach`](#ctxmenuattach) method to set up a contextmenu for specific elements first. You need to pass the original event or a target element, which will be used to calculate the menu's position.
This may be useful when integrating with other libraries or frameworks that already provide a contextmenu handler or when trying to show a context menu on a different user interaction (for example showing a context menu when left-clicking a button).
⚠️**Positioning of the menu:** If the second parameter you pass is of type `MouseEvent`, the menu will appear at the cursors position, if it is of type `HTMLElement` it will appear next to the element. See [#36](https://github.com/nkappler/ctxmenu/issues/36)
⚠️ **Event propagation:** When passing a target element, you will need to stop the propagation of the event to prevent the context menu from being immediately closed again:
```typescript
clickHandler(e: MouseEvent) {
e.stopPropagation();
ctxmenu.show([ ... /* menu definition */ ], e.target);
}
```
### `ctxmenu.hide`
```typescript
ctxmenu.hide()
```
Hide any open context menu.
### `ctxmenu.setNonce`
```typescript
ctxmenu.setNonce(nonce: string)
```
Set a CSP (Content Security Policy) nonce to be used for ctxmenus style element. This is useful when you have a strict CSP that requires nonces for inline styles.
> [!IMPORTANT]
> `setNonce` must be called **before the first menu is shown**, otherwise you have to expect rendering issues due to missing styles. If required by your CSP, make sure to call this method early in your application initialization, ideally before any `attach` calls.
Example:
```typescript
// Set a nonce for all menus (must be called before showing any menu)
ctxmenu.setNonce('your-csp-nonce-here');
// Attach menus as usual
ctxmenu.attach('#myElement', menuDefinition);
```
## CTXConfig
With this interface you can define __lifecycle events__ and __attributes__ for a context menu via the [attach](#ctxmenuattach) and [update](#ctxmenuupdate) methods.
```typescript
onBeforeShow?: (menu: CTXMenu, event?: MouseEvent) => CTXMenu;
onShow?: (dom: HTMLUListElement) => void;
onBeforeHide?: (dom: Element) => void;
onHide?: (dom: Element) => void;
attributes?: Record;
```
The `onBeforeShow` method can be used to change the menu definition just before it is shown. This can be useful to customize the menu based on the event properties (for example, the cursor position). The function must return a valid menu definition.
The `onShow` method can be used to execute code after the menu is attached to the DOM. This can be useful to execute code that depends on the menu being visible (for example, to focus an input field). Gets passed a reference to the DOM Element representing the context menu.
The `onBeforeHide` method can be used to execute code just before the menu is detached from DOM. This can be useful to execute code that depends on the menu being visible (for example, to save the state of the menu). Will be called for any submenu that is closed as well. Gets passed a reference to the DOM element which will be removed.
The `onHide` method can be used to execute code after the menu is hidden. This can be useful to execute code that depends on the menu being hidden (for example, to reset the state of the menu). Will be called for any submenu that is closed as well. Gets passed a reference to the DOM element which has been removed.
The `attributes` record can be used to define arbitrary attributes for the menu container (the UL element), like you can with the `Element.setAttribute` browser API, for example, `id`, `class` or data attributes.
## Custom Events
Every Menu Item has an optional `events` property:
```typescript
{
events?: EventRegistry | () => EventRegistry
}
```
The `EventRegistry` is a map of event handlers. For each event you can either specify the event listener directly, or an object containing the `listener` and an optional `options` ([EventListenerOptions](https://developer.mozilla.org/en-US/docs/Web/API/EventTarget/addEventListener#syntax)) object:
```typescript
{
text: "Hover me!",
events: {
mouseenter: (e) => e.target.style.animation = "blinker 1s linear infinite",
mouseleave: {
listener: (e) => e.target.style.animation = "",
options: {
passive: true
}
}
}
}
```
## Customize
ctxmenu.js uses the following css classes which you might want to overwrite:
```css
.ctxmenu /* the main menu div */
.ctxmenu li /* any menu item */
.ctxmenu li.disabled /* any disabled menu item */
.ctxmenu li.divider /* any horizontal divider */
.ctxmenu li.interactive /* any interactive item (anchor, action item, submenu)*/
.ctxmenu li.submenu /* any menu item that has a submenu */
```
## Contributing
### Step 1: Setup
After cloning the repo, run `npm install`. This will install all dev-dependencies and also should transpile the library to javascript, as the tests use the transpiled files to be as close to a real-world setup as possible.
Until you do this step, you might see errors in the test files.
After this step, these directories should be generated in the repository:
`dist`, `standalone` and `node_modules`.
If you don't see the `standalone` or `dist` directory, run the build command manually:
### Step 2: Build and Test Commands
- `npm run build` transpiles all source files into javascript once.
- `npm run test` launches the build in watch mode and starts the test proxy at [localhost:8888](http://localhost:8888)
- `npm run dev` transpiles all source files in watch mode, open the demo page (`docs/index.html`) in your browser to test your changes manually.
### Step 3: Test your changes
Please test your changes before opening a PR. To test your changes locally, run `npm run dev`. This will transpile the typescript source files. You can now open the `docs/index.html` file in your browser to test your changes manually.
### Step 4: Open a Pull Request
Your PR should describe your use case and your changes in detail and must include automated tests. You can add your tests cases in the `test/*.test.ts` files.
If you feel that your modification should be part of the demo page, add an example to `test/demo.ts`.
This file will be transpiled by any of the build commands into `/docs/demo.js`, don't modify the JavaScript file directly, or the changes will be overwritten.